
In this article, we’ll talk about React form builders, check out their core features, look at some important aspects to consider when picking a form builder, and explore some popular options.
These popular options include:
Forms play a critical role in engaging users, collecting essential information, enabling important features in various applications, and allowing users to input information.
However, building and controlling various kinds of forms from scratch can take time and a whole lot of effort. And that’s where form builders come in.
Form builders are made to simplify form creation in React applications, making the user experience simple and friendly.
Understanding React Form Builders
React form builders make it easy to create and manage forms in React apps. Among the features they offer are:
- inputs, drop-downs, and more are built into pre-built forms
- management of form states
- the validation process
- submission of form data
Form builders offer various benefits, such as:
- making the development process faster because there’s less code writing and state management
- offering sleek interactions, clear validation, and user-friendly design
- handling everyday tasks such as validation
- offering accessibility features to make forms more usable
Form builders offer various features to developers, such as:
- selecting a builder and following its integration guide
- integrating the form based on the builder’s interface (either drag-and-drop or code-based)
- creating elements and defining validation rules, labels, and data types
- describe how the form reacts to user interactions
The various features form builders might offer include:
- drag-and-drop, which is accessible for non-technical users
- code customization
- a combination of code editing and drag-and-drop functionality
SurveyJS
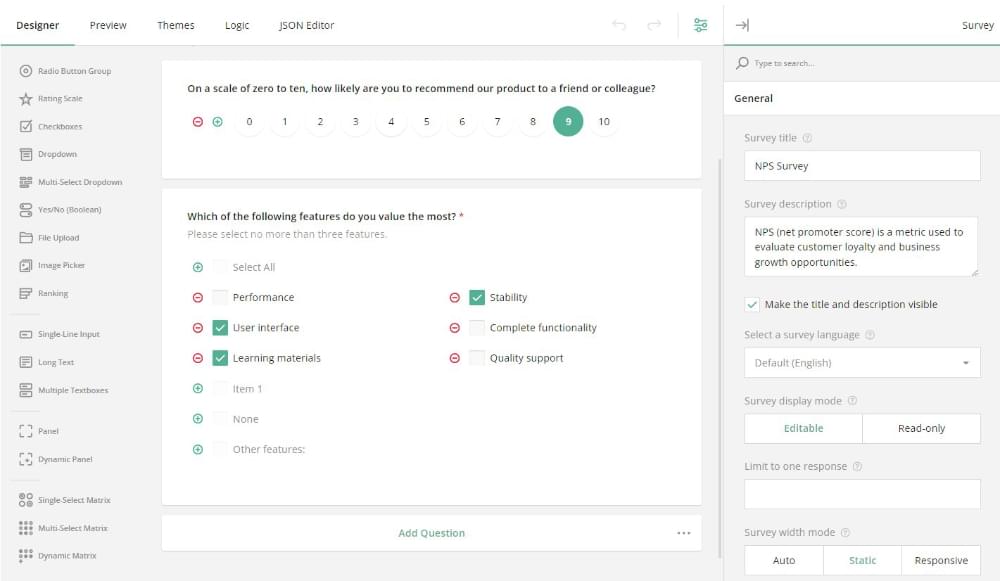
SurveyJS Form Builder is an open-source UI component in React that perfectly blends with any backend system and gives the opportunity to create and style many dynamic HTML forms in a React application.
You can easily experience all the features of this form builder via this quick demo without any required integration.
SurveyJS features
- a dedicated GUI for conditional rules
- form branching and an integrated CSS theme editor for custom form styling and branding
- TypeScript support
- integration with any backend framework (examples for PHP, Node.js, and ASP.NET included)
- generating JSON form definitions (schemas) in real time
- a no-code, drag-and-drop interface that makes form creation accessible to anyone
In the sections below, we’ll cover the step-by-step methods to get started with the SurveyJS form builder component in a React application.
SurveyJS installation
Install the survey-creator-react npm package. The first thing is to install the survey-creator-react (rendering code) npm package using the command below:
npm install survey-creator-react --saveThe command above makes sure the survey-creator-core package is installed automatically as a dependency.
SurveyJS styles configuration
The next step is to import the Survey Creator and SurveyJS Form Library stylesheets as indicated below:
import "survey-core/defaultV2.min.css";
import "survey-creator-core/survey-creator-core.min.css";
Survey creator configuration
The next step is to configure the Survey Creator component. The code below is used to configure the Survey Creator component by specifying its properties in a configuration object:
const creatorOptions = {
showLogicTab: true,
isAutoSave: true
};
The object above enables the following properties:
showLogicTabdisplays the Logic tab in the tab panelisAutoSaveautomatically saves the survey JSON schema on every change
Now, we need to pass the configuration object to the SurveyCreator constructor, as shown in the code below, to instantiate Survey Creator and then assign the produced instance to a constant that will be used later to render the component:
import { SurveyCreator } from "survey-creator-react";

// ...

export function SurveyCreatorWidget() {
const creator = new SurveyCreator(creatorOptions);
}
Rendering Survey Creator
To render Survey Creator, all that’s needed is to import the SurveyCreatorComponent, include it in the template, and pass the instance we created in the previous step to the component’s creator attribute:
import { SurveyCreatorComponent, SurveyCreator } from "survey-creator-react";

// ...

export function SurveyCreatorWidget() {
  const creator = new SurveyCreator(creatorOptions);

  return (
    <SurveyCreatorComponent creator={creator} />
  )
}
Saving and loading survey model schemas
By default, Survey Creator makes survey model schemas as JSON objects, which makes it easy to persist the objects on the server, save updates and restore earlier saved schemas.
All that’s needed to save a JSON object is to implement the saveSurveyFunc function, which accepts two arguments:
saveNo. This is an incremental number of the current change.callback. This is a callback function. When called, thesaveNomust be passed as the first argument while the second argument is set totrueorfalsebased on whether the server applied or rejected the change.
The code below shows how to use the saveSurveyFunc function to save a survey model schema in a local storage or a web service:
export function SurveyCreatorWidget() {
// ...
creator.saveSurveyFunc = (saveNo, callback) => {
  // If you use localStorage:
  window.localStorage.setItem("survey-json", creator.text);
  callback(saveNo, true);

  // If you use a web service:
  saveSurveyJson(
      "https://your-web-service.com/",
      creator.JSON,
      saveNo,
      callback
  );
};
// ...
}

// If you use a web service:
function saveSurveyJson(url, json, saveNo, callback) {
// ...

}
More details on how to load a survey model schema JSON into Survey Creator and how to check a survey JSON schema before saving it when running a Node.js server can be found here.
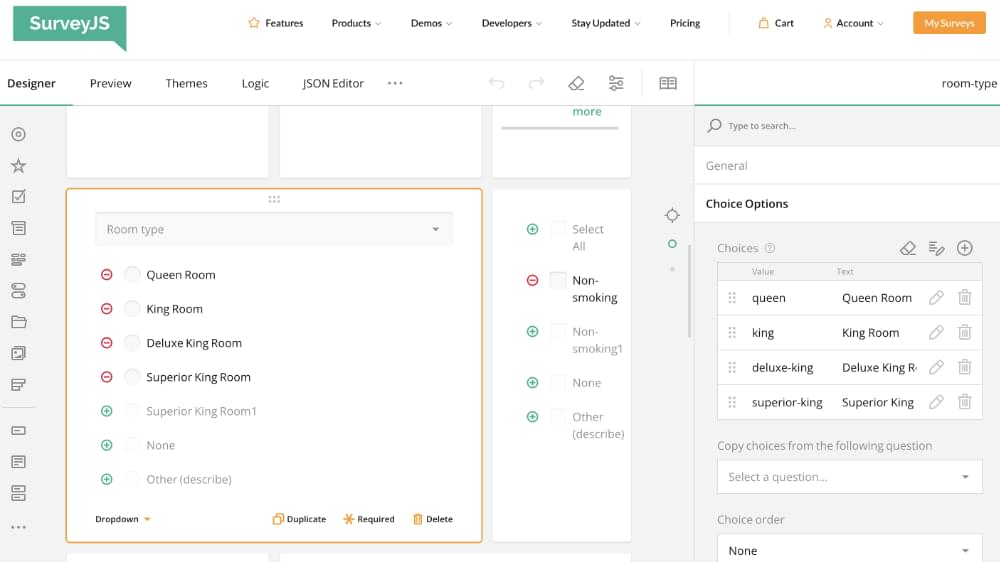
Managing image uploads in SurveyJS
Adding a logo or background to a survey is a common requirement. We can either add them in the survey header or within Image and Image Picker questions when creating a survey, and SurveyJS has made this easy to do. All that’s needed is to embed them in the survey and theme JSON schemas as Base64 URLs.
However, this method increases the schema size. One good way to get around this is to upload images to a server and save only image links in the JSON schemas.
The code below shows how to use the onUploadFile event. The options.files parameter saves the images sent to the server:
export function SurveyCreatorWidget() {
  // ...
  creator.onUploadFile.add((_, options) => {
    const formData = new FormData();
    options.files.forEach(file => {
      formData.append(file.name, file);
    });
    fetch("https://example.com/uploadFiles", {
      method: "post",
      body: formData
    }).then(response => response.json())
      .then(result => {
        options.callback(
          "success",
          // A link to the uploaded file
          "https://example.com/files?name=" + result[options.files[0].name]
        );
      })
      .catch(error => {
        options.callback('error');
      });
  });
  // ...
}
The onUploadFile event is used to implement image upload. Its options.files parameter stores the images we should send to our server. When the server returns an image link, the options.callback(status, imageLink) method is called with a success as the status parameter passed and a link to the uploaded image as the imageLink parameter.
Now, to view the application, we need to run npm run start in the command line and open http://localhost:3000/ in the browser.
Other useful SurveyJS links
You may also find these SurveyJS resources useful:
- Installing the survey-react-ui npm package
- Configure styles
- Creating a model
- Rendering the form
- Handling form completion
The survey-creator source code is publicly accessible here on GitHub.
FormBuilder
FormBuilder is a drag-and-drop React form builder library for creating web forms with a simple but powerful web interface.
Here’s a quick demo to experience all the features of the FormBuilder without any required integration.
The following npm packages make up FormBuilder:
FormBuilder features
- a web interface with drag and drop functionality
- adaptive layout
- form validation
- built-in web components based on React Suite library
- easy integration of custom components
- export form to JSON and import form from JSON
- powerful internationalization
- custom actions
- computable properties
- templates (forms within a form)
Creating a simple form demo with FormBuilder
To create a simple demo form, we’ll follow the instructions in the Getting Started section of the FormBuilder docs.
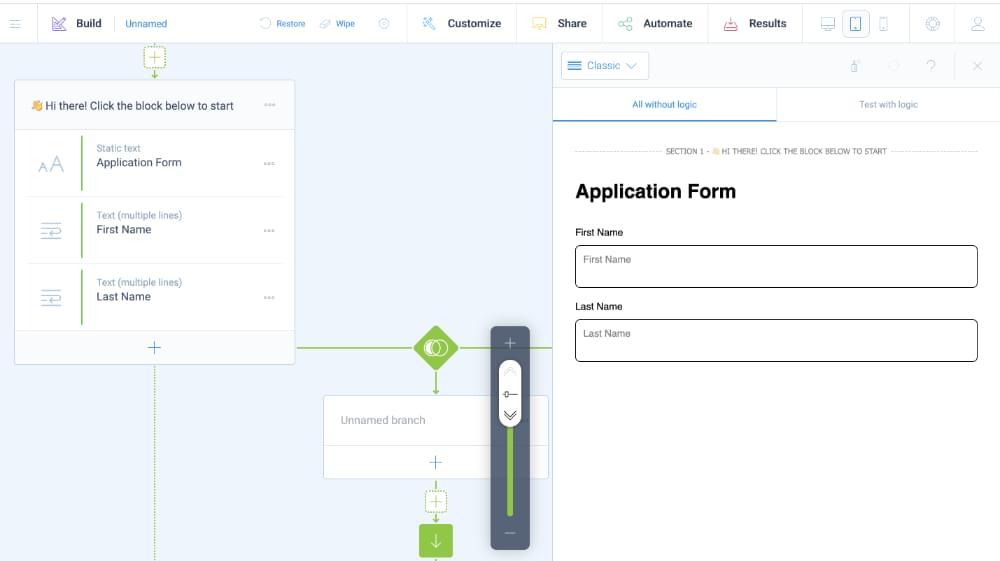
Following the guide and opening the demo page in the browser, we’ll see the form builder editor page similar to the image below.
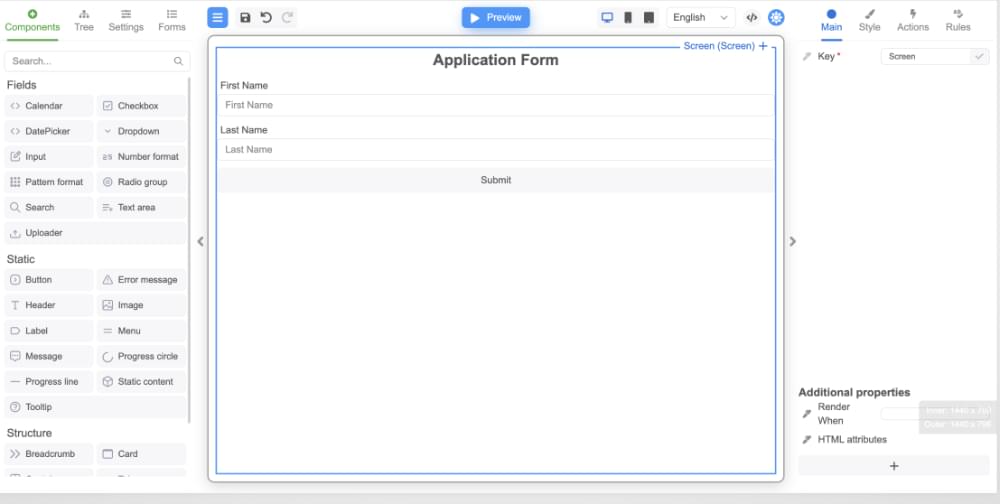
We build the forms here, as seen in the instructions guide. For the sake of this demo, we’ve created a mini-application form, added an onClick event handler for the form, and added validation on the input field. We’ve also added a tooltip for the button and changed the format of the error message display.
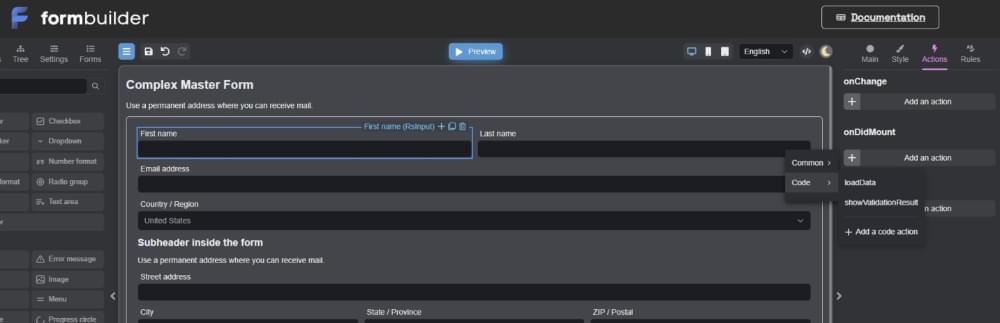
Unlike SurveyJS — which allows even non-techies to set up all form configurations, including their behavior, without a line of code — FormBuilder requires manually adding code for actions, as shown in the image below.
Adding the FormViewer component
Now, we can add the FormViewer component, responsible for displaying the form in FormBuilder.
The FormBuilder uses the FormViewer component to display the form in the center panel.
But we need to install the package first by using this command:
npm install @react-form-builder/core @react-form-builder/components-rsuiteNow, we can use the FormViewer component with elements from the React Suite library to render the Application form by pasting the code below in the App.js file:
import React from 'react'
import {view} from '@react-form-builder/components-rsuite'
import {FormViewer} from '@react-form-builder/core'

const form = `{
  "form": {
    "key": "Screen",
    "type": "Screen",
    "props": {},
    "children": [
      {
        "key": "RsInput 1",
        "type": "RsInput",
        "props": {}
      }
    ]
  }
}`

function App() {
  return <FormViewer view={view} getForm={_ => form}/>
}

export default App
View a fuller example
import { FormViewer, IFormViewer } from '@react-form-builder/core'
import { useEffect, useRef } from 'react'
import { view } from '@react-form-builder/components-rsuite'


// Example form, in JSON format
const FormJSON = `
{
  "version": "1",
  "actions": {
    "logValue": {
      "body": "console.log('FirstName', e.data.name, 'LastName', e.data.lastname)",
      "params": {}
    }
  },
  "tooltipType": "RsTooltip",
  "errorType": "RsErrorMessage",
  "form": {
    "key": "Screen",
    "type": "Screen",
    "props": {},
    "children": [
      {
        "key": "RsHeader 1",
        "type": "RsHeader",
        "props": {
          "content": {
            "value": "Application Form"
          }
        },
        "css": {
          "any": {
            "object": {
              "textAlign": "center"
            }
          }
        }
      },
      {
        "key": "name",
        "type": "RsInput",
        "props": {
          "label": {
            "value": "First Name"
          },
          "placeholder": {
            "value": "First Name"
          }
        },
        "schema": {
          "validations": [
            {
              "key": "required"
            },
            {
              "key": "min",
              "args": {
                "limit": 3
              }
            }
          ]
        },
        "events": {
          "onChange": [
            {
              "name": "validate",
              "type": "common"
            },
            {
              "name": "logValue",
              "type": "code"
            }
          ]
        }
      },
      {
        "key": "lastname",
        "type": "RsInput",
        "props": {
          "label": {
            "value": "Last Name"
          },
          "placeholder": {
            "value": "Last Name"
          }
        },
        "events": {
          "onChange": [
            {
              "name": "validate",
              "type": "common"
            },
            {
              "name": "logValue",
              "type": "code"
            }
          ]
        },
        "schema": {
          "validations": [
            {
              "key": "required"
            },
            {
              "key": "min",
              "args": {
                "limit": 3
              }
            }
          ]
        }
      },
      {
        "key": "RsButton 1",
        "type": "RsButton",
        "props": {
          "children": {
            "value": "Submit"
          }
        },
        "events": {
          "onClick": [
            {
              "name": "validate",
              "type": "common"
            },
            {
              "name": "logValue",
              "type": "code"
            }
          ]
        }
      }
    ]
  },
  "localization": {},
  "languages": [
    {
      "code": "en",
      "dialect": "US",
      "name": "English",
      "description": "American English",
      "bidi": "ltr"
    }
  ],
  "defaultLanguage": "en-US"
}
`
const formName = 'Example'

async function getFormFn(name?: string) {
  if (name === formName) return FormJSON
  throw new Error(`Form '${name}' is not found.`)
}

function App() {
  const ref = useRef<IFormViewer>(null)

  useEffect(() => {
    if (ref.current) {
      // if you want to work with the internal FormViewer component in an imperative style
      console.log('Viewer', ref.current)
    }
  }, [])

  return (
    <FormViewer
      view={view}
      getForm={getFormFn}
      formName={formName}
      initialData={({})}

      viewerRef={ref}

    />
  )
}

export default App
Next is to confirm the form by visiting localhost:3000 in the browser to view the application form.
Below is an example of what we should see on the screen.

Tripetto
Tripetto is a form tool that offers a complete and unique solution for creating and running forms and surveys.
Tripetto comes as a SaaS application, exactly like Typeform and SurveyMonkey.
Tripetto’s running operation consists of three core pillars:
- a visual form builder to create forms (form designer)
- runners to run those forms (and collect responses)
- blocks (question types) for use in the forms
One good thing about Tripetto is that the running pillars above are available as entirely client-side components.
They run in the context of the user’s browser and don’t rely on a specific backend, which means they can serve in any client-side environment that supports JavaScript.
Also, it gives total freedom in handling the data that Tripetto generates or consumes.
The backend can also be whatever we want.
Tripetto features
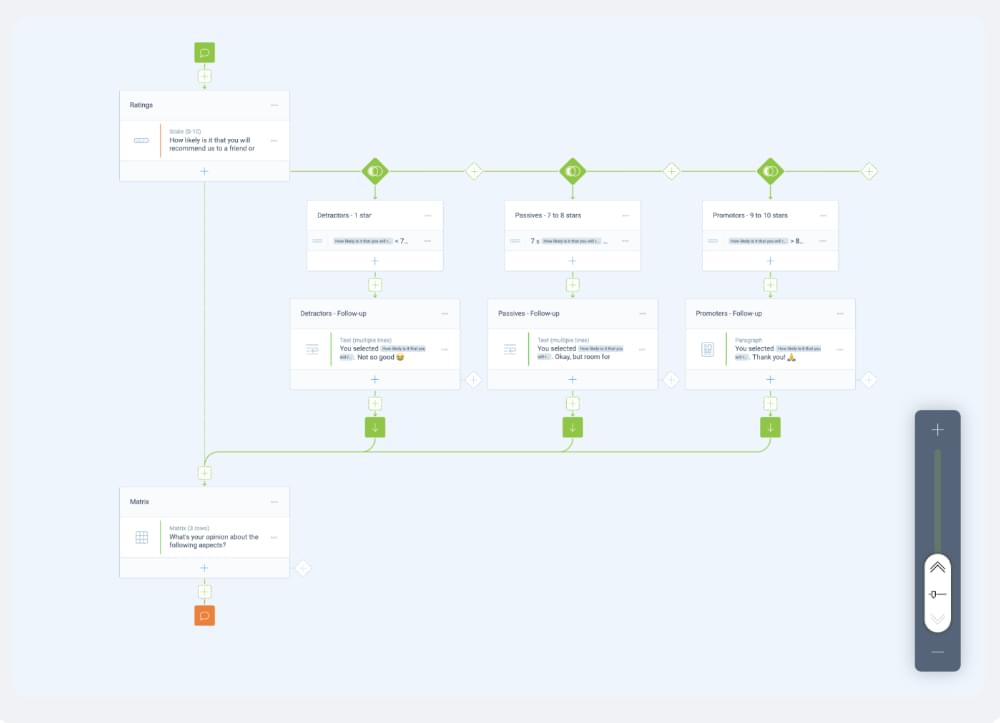
- a unique visual form builder that allows form sketching and surveys like flowcharts
- fully custom integration with various web apps without external dependencies
- a standby runner to display forms in a modern autoscroll UI, a more classic form UI, or a fancy chat UI
- available components for Angular and React
- bundled with the standard question types (blocks)
- extendable with custom blocks
- JSON form definition
How Tripetto works
There are various options for using Tripetto’s visual form builder to create forms. We can integrate it into any project, but it’s optional. The best choice for any project depends on some of the required needs.
Among the options available are:
But we’ll use the Tripetto Studio web app to create a form and explain how to use the Tripetto runner to run it.
The Tripetto Studio web app allows anyone who needs a form or survey. Whether they need a form for a website or want to create a survey that can be shared using a direct link, it’s all possible with the Studio.
Creating a simple demo form with Tripetto
To create a simple form, all we need to do is go to tripetto.app and start building our form.
Here, we’ve made an application form without creating an account following the documentation guide.
But if we want to save (and publish) our form and store it, we need to create an account by clicking on the user icon in the top right corner of the application.
Now that we’ve built our form, we’ll run it and extend the form to include more question types. Here’s more information about doing that in the documentation.
Form.io
Form.io enables the development of form-based progressive web applications. It allows developers to create forms speedily using a painless drag-and-drop form builder interface. Creating these forms generates a JSON schema to render the forms within the progressive application dynamically and automatically create the API to receive the data when the form is submitted.
Form.io provides everything needed to build business process workflow applications with little effort and complex, form-driven applications within a few times without compromising security or sanity.
Form.io features
The following are some of the critical features of Form.io:
- OAuth providers
- dynamic forms
- easy feature enhancement
- user management and auth
- forms and data management
- role-based access control
- automatic API creation
- a drag-and-drop interface
- advanced conditional logic
The Form.io website contains more details about its features.
Getting started with Form.io
To get started with Form.io, here are the basic steps you can take:
- create a project
- create a team
- create a form
- add an action
- configure access settings
- embed the form
- view submissions in the developer portal
Following the described steps above, we’ll end up with something like the form pictured below.
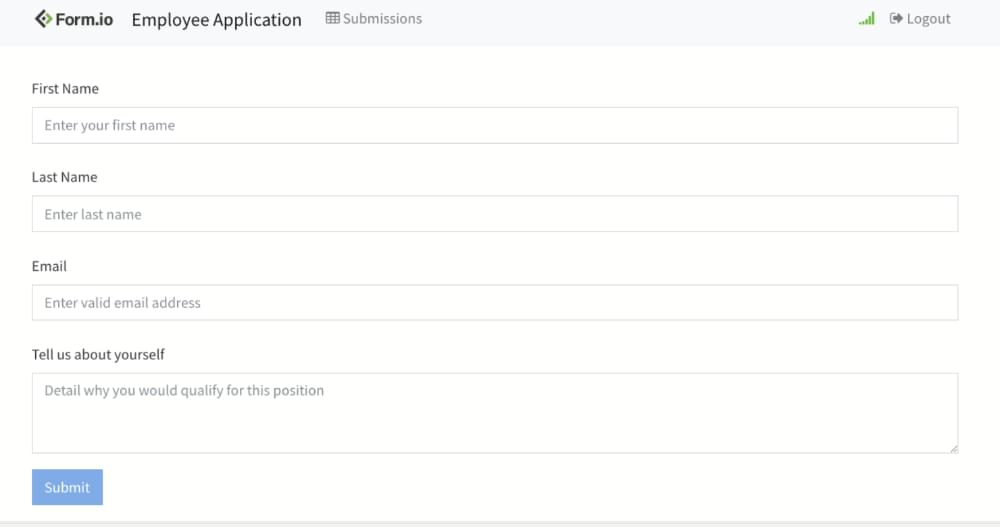
We can do many other things with the FormView application, such as white labeling, changing the logo, navigating to a thankyou page, and so on. For more information about the FormView application, please check out the FormView user guide.
A Comparison Between SurveyJS and FormBuilder
| Features | SurveyJS | FormBuilder |
|---|---|---|
| Drag and drop form builder | Yes | Yes, but requires manual coding for actions |
| JSON forms | Yes | Yes |
| Customizable layout | Yes | Yes |
| Ease of Use | Yes (great documentation) | Yes |
| Language translation | Yes | Yes |
| Conditional logic | Yes | Yes |
| Pricing | Free with essential features | Free with limited features |
Please refer to the documentation for additional features available in SurveyJS and FormBuilder.
Choosing the Right Form Builder
When choosing a form builder tool for an organization or project, we obviously need to ensure that the tool we choose has all the appropriate features to meet our requirements.
Here are some standard features to look for when selecting the right form builder software for a business or project:
- user-friendliness
- the ability to customize forms easily
- conditional logic and a range of question types
- easy integration with third-party systems
- automation of work processes
- free trial and basic demo options
- an offline features tool
- reporting and analytics
Conclusion
Forms are helpful in almost every business and industry to collect customer information and feedback. A powerful form builder tool helps us create professional looking forms for this purpose. In this article, we’ve introduced four powerful React form builder tools and given a brief overview of how they work. With any luck, at least one of them might be what you need.
Other options you might like to check out include Amplify Studio’s Form Builder and the BEEKAI form builder.
To learn more about working with forms in React, check out Working with Forms in React.
 Femi Akinyemi
Femi is a skilled frontend developer proficient in React, JavaScript, HTML, and CSS. He is a technical writer known for publishing React and web development tutorials. Currently working as a software developer in Nigeria, he actively contributes to open-source projects and is passionate about software development.