In this tutorial we’re going to look at how to implement push notifications in an Android App using the Google Cloud Messaging Platform. We will be using the Ionic framework and Cordova to create the app. The server component will be implemented using Node. You can checkout all the code for the project that we will be building from Github.
Create a Google Console Project
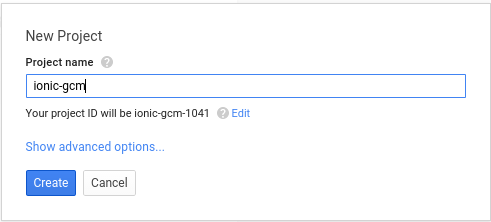
The first step, is to create a new project on the Google Developer Console. You will need an account if you don’t have one.
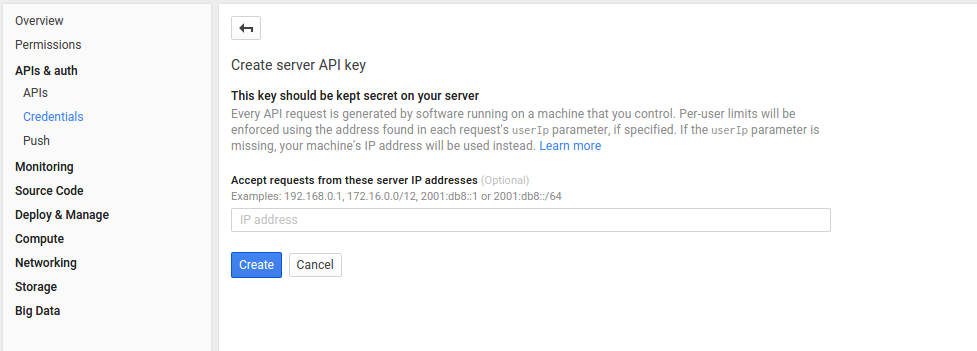
Once the project is created, click on the APIs & auth menu found on the left side of the screen and then credentials. This allows you to create a new API key that you can use for the server. Click on Add credentials and select API key.

Next you will be asked what kind of key you want to create. Select server key since the key will be primarily used in the server. Don’t add an IP address yet and skip the step by not adding anything and click the create button. Note the resulting API key.
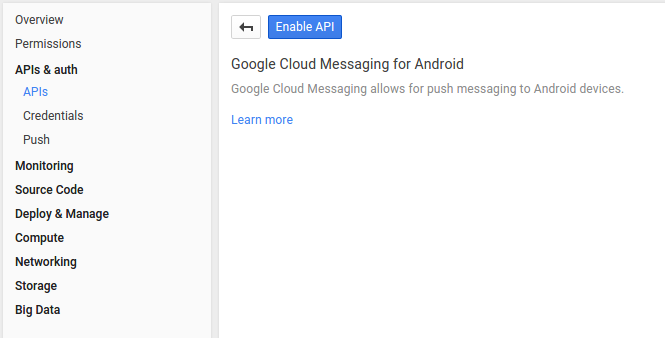
Still under the APIs & auth menu, click on the APIs link and search for Cloud Messaging for Android. This is the API needed, click and enable it.
Setting Up
Create a new ionic app that uses the blank template.
ionic start ionic-gcm blankMove into the project directory and install Phonegap Builds’ Push Plugin. This is used by the app to register the device and to receive push notifications sent by the server.
cordova plugin add https://github.com/phonegap-build/PushPlugin.gitAt the time of writing, sound doesn’t work when a notification is received. The default is to vibrate, even if you’ve set the phone to use sounds. If you want to play a sound, you have to change the GCMIntentService.java file. You can find it on the following path plugins/com.phonegap.plugins.PushPlugin/src/android/com/plugin/gcm
Open the file and add the following on lines 12 and 13.
import android.content.res.Resources;
import android.net.Uri;
And from lines 125 to 131.
String soundName = extras.getString("sound");
if (soundName != null) {
    Resources r = getResources();
    int resourceId = r.getIdentifier(soundName, "raw", context.getPackageName());
    Uri soundUri = Uri.parse("android.resource://" + context.getPackageName() + "/" + resourceId);
    mBuilder.setSound(soundUri);
}
Remove line 105:
.setDefaults(defaults)You can look at this pull request for reference.
If you have already added the android platform, you might need to update the corresponding file at platforms/android/src/com/plugin/gcm/GCMIntentService.java with the same changes.
Aside from the Push Plugin, we need to install the cordova whitelist plugin.
cordova plugin add cordova-plugin-whitelistThis activates the settings included in the config.xml file which can be found in the root directory of the Ionic project. By default, it allows access to every server. If you’re planning to deploy this app later, you should to update the following line to match only those servers that your app is communicating with. This improves the security of the app.
<access origin="*"/>Building the Project
Now we can start to build the project.
Requests Service
Create a services folder under the www/js directory and create a RequestsService.js file. This will be the service that passes the device token to the server. The device token is needed to send push notifications to a specific device. Add the following to the file.
(function(){

    angular.module('starter')
    .service('RequestsService', ['$http', '$q', '$ionicLoading',  RequestsService]);

    function RequestsService($http, $q, $ionicLoading){

        var base_url = 'http://{YOUR SERVER}';

        function register(device_token){

            var deferred = $q.defer();
            $ionicLoading.show();

            $http.post(base_url + '/register', {'device_token': device_token})
                .success(function(response){

                    $ionicLoading.hide();
                    deferred.resolve(response);

                })
                .error(function(data){
                    deferred.reject();
                });


            return deferred.promise;

        };


        return {
            register: register
        };
    }
})();
Breaking the code down. First we wrap everything in an immediately invoked function expression. This allows encapsulation of the code that’s contained inside and avoids polluting the global scope.
(function(){

})();
Next we create a new angular service for the starter module. This module was created in the js/app.js file and was called starter, so it’s referred to here. The service depends on $http, $q, and $ionicLoading, these are services provided by Angular and Ionic.
angular.module('starter')
    .service('RequestsService', ['$http', '$q', '$ionicLoading',  RequestsService]);

function RequestsService($http, $q, $ionicLoading){
    ...
}
Inside the RequestsService function, declare the base_url used as the base URL for making requests to the server. It should be an internet accessible URL so that the app can make requests to it.
var base_url = 'http://{YOUR SERVER}';If you do not have a server where you can run the server component, you can use ngrok to expose any port in your localhost to the internet. Download the version for your platform from the project downloads page, extract and run it. I’ll show you how to run ngrok later once we get to the server part.
Returning to the code. We create a register function that will make a POST request to the server to register the device using the device token from the push plugin.
function register(device_token){

    var deferred = $q.defer(); //run the function asynchronously
    $ionicLoading.show(); //show the ionic loader animation

    //make a POST request to the /register path and submit the device_token as data.
    $http.post(base_url + '/register', {'device_token': device_token})
        .success(function(response){

            $ionicLoading.hide(); //hide the ionic loader
            deferred.resolve(response);

        })
        .error(function(data){
            deferred.reject();
        });


    return deferred.promise; //return the result once the POST request returns a response

};
Finally we use the revealing module pattern to expose the register method as a public method of RequestsService.
return {
    register: register
};
Add the javascript to index.html right after the link to the app.js file.
<script src="js/services/RequestsService.js"></script>Open the plugin/com.phonegap.plugins.PushPlugin/www directory and copy the PushNotification.js file to the www/js folder. Add a link to it in the index.html file right after the link to the css/style.css file.
<script type="text/javascript" charset="utf-8" src="js/PushNotification.js"></script>Registering the Device
In the app.js file, create a global variable for the Push Plugin. Add this code just after the closing brace for the $ionicPlatform.ready function.
pushNotification = window.plugins.pushNotification;To register the device, call the register function. This function accepts 3 arguments. First is the function executed once a notification is received, second is the function executed if an error occured and third are options. The options is an object where you specify configuration for the push notification that will be received. From the code below, you can see the badge (the icon in the notification), sound and alert (the text in the notification) options. The ecb is the event callback function that gets executed every time a notification is received. This is the same function used in the first argument. Lastly, the senderId is the ID of the project that you created earlier on the Google Console. You can find it by clicking on the Overview menu of your project.
To register the device, call the register function. This function accepts 3 arguments. First is the function that will be executed once a notification is received, second is the function that will be executed if an error occurred and third is the options. The options is an object where you specify different options for the push notification that will be received. From the code below, you can see that you can enable the badge (the icon in the notification), sound or alert (the text in the notification). The ecb is the event callback function that gets executed every time a notification is received. This is basically the same function used in the first argument. Lastly, the senderId is the project number of the project that you have created earlier on the Google Console. You can find it by clicking on the Overview menu of your project.
Add this code to app.js:
pushNotification.register(
  onNotification,
  errorHandler,
  {
    'badge': 'true',
    'sound': 'true',
    'alert': 'true',
    'ecb': 'onNotification',
    'senderID': 'YOUR GOOGLE CONSOLE PROJECT NUMBER',
  }
);
Receiving Notifications
The onNotification function should be attached to the window object so that the plugin can find it. The argument passed to this function is the actual notification. You can check which type of notification event occured by extracting the event property.
This can have 3 possible values: registered, message, and error. The registered event is fired when the device is registered. The message event when a push notification is received while the app is in the foreground. And the error when an error occured. When the registered event is fired, check if the length of regid is greater than 0.
If it is then assume that a correct device token has been returned. Call the register function in the RequestsService service and pass the device_token as an argument. Once it returns a response, inform the user that the device has been registered.
Add this code to app.js:
window.onNotification = function(e){

      switch(e.event){
        case 'registered':
          if(e.regid.length > 0){

            var device_token = e.regid;
            RequestsService.register(device_token).then(function(response){
              alert('registered!');
            });
          }
        break;

        case 'message':
          alert('msg received: ' + e.message);
          /*
            {
                "message": "Hello this is a push notification",
                "payload": {
                    "message": "Hello this is a push notification",
                    "sound": "notification",
                    "title": "New Message",
                    "from": "813xxxxxxx",
                    "collapse_key": "do_not_collapse",
                    "foreground": true,
                    "event": "message"
                }
            }
          */
        break;

        case 'error':
          alert('error occured');
        break;

      }
};
When an error occurs, notify the user using an alert message.
Add this code to app.js:
window.errorHandler = function(error){
  alert('an error occured');
}
Playing Sounds
If you want to play a sound when a notification is received, we need to add the mp3 file inside the platforms/android/res/raw folder. Mine is named notification.mp3. Take note of the file name and we will add it to the server side later when pushing a notification. You can download some notification sounds here.
Server Side
The server is responsible for accepting the device token submitted from the app as well as sending push notifications.
Create a server folder inside the root directory of the project then create an ionic-gcm.js file. This is the file that will contain the code for running a node server. This file has three dependencies: express, node-gcm and body-parser. Install those using npm.
npm install express node-gcm body-parserOpen the ionic-gcm.js file and require those dependencies.
var express = require('express');
var gcm = require('node-gcm');
Use express.
var app = express();Create a server that listens for requests on port 3000.
var server = app.listen(3000, function(){

 console.log('server is running');

});
Set the server to allow all request origins. This allows AJAX requests coming from any IP address.
app.use(function(req, res, next){
  res.header("Access-Control-Allow-Origin", "*");
  res.header("Access-Control-Allow-Headers", "Origin, X-Requested-With, Content-Type, Accept");
  next();
});
Create a global variable for storing the current device token. This will be updated when the /register route is accessed. And the current value will be used when the /push route is accessed.
var device_token;Create a new route for the /register path. This is the route for device registration. You can access the device_token that was passed through the body property in the req object.
Note that I haven’t added any code related to saving the device token into a database. I expect you to have your own so I put it there as a TODO. For now it uses the global device_token variable for storing the device token. Once you’ve saved the device_token, send the ok as a response.
app.post('/register', function(req, res){
    device_token = req.body.device_token;
    console.log('device token received');
    console.log(device_token);
    /*YOUR TODO: save the device_token into your database*/
    res.send('ok');
});
To send push notifications:
- Create a route for the
/pushpath. - In the callback function, create a new array that will store the device tokens and a variable that stores the number of times to retry sending the message.
- Create a new sender instance by calling the
Senderfunction. This accepts the API key from the Google console. - Create a new message by calling the
Messagefunction in thegcmobject. This object is provided by the node-gcm package. - Add the data to be passed in the push notification by calling the
addDatafunction of the message. This function accepts a key-value pair of the data to pass. The required keys aretitleandmessage. Thetitleis the title of the push notification and themessageis the content. In the example below, thesoundkey is also passed. This is the name of the sound file you want to play when the notification is received. - Optionally, you can set the
collapseKeyto group notifications. This lets you send notification #1 with acollapseKeyand then minutes later, notification #2 with the samecollapseKey. What will happen is that notification #2 will replace notifiction #1. That is if the user still hasn’t opened notification #1 when notification #2 arrives. delayWhileIdleis another optional property, if this is set totrue, the notification isn’t sent immediately if the device is idle. This means that the server waits for devices to become active before it sends the notification. Note that if thecollapseKeyis set, the server will only send the latest messages sent containing thatcollapseKey. Finally there’stimeToLivewhich allows you to set the number of seconds that the message will be kept on the server when the receiving device is offline. If you specify this property, you also need to specify thecollapseKey.- This is another step that I expect you to implement on your own. Fetching the
device_tokenfrom the database. In order to do that, you need to pass auser_idor other unique user identification. This would allow you to fetch thedevice_tokenby using that unique data as a key. In the example below, the value for the globaldevice_tokenvariable is used instead. So every time a new device is registered, that device will be the one that receives the notification. - Push the
device_tokenwhich you got from the database into thedevice_tokensarray. - Call the
sendfunction in themessageobject. This accepts themessage,device_tokens,retry_timesand the function to call once the message is sent. - Send the
okresponse.
app.get('/push', function(req, res){

    var device_tokens = []; //create array for storing device tokens
    var retry_times = 4; //the number of times to retry sending the message if it fails

    var sender = new gcm.Sender('THE API KEY OF YOUR GOOGLE CONSOLE PROJECT'); //create a new sender
    var message = new gcm.Message(); //create a new message

    message.addData('title', 'New Message');
    message.addData('message', 'Hello this is a push notification');
    message.addData('sound', 'notification');

    message.collapseKey = 'testing'; //grouping messages
    message.delayWhileIdle = true; //delay sending while receiving device is offline
    message.timeToLive = 3; //the number of seconds to keep the message on the server if the device is offline

    /*
    YOUR TODO: add code for fetching device_token from the database
    */

    device_tokens.push(device_token);

    sender.send(message, device_tokens, retry_times, function(result){
        console.log(result);
        console.log('push sent to: ' + device_token);
    });

    res.send('ok');
});
Run the server by calling it from the terminal:
node ionic-gcm.jsIf you want to use ngrok to expose this server to the internet, open a new terminal window where you installed ngrok and execute the following command:
ngrok http 3000This tells ngrok to expose port 3000 to the internet and assigns it a publicly accessible URL.
Deploying the App
Returning to the app. Navigate to the root directory of the app and update base_url in www/js/services/RequestsService.js to match the URL that ngrok provided.
var base_url = 'http://{YOUR SERVER}';Add the android platform:
cordova platform add androidDon’t forget to add the mp3 file to the platforms/android/res/raw directory for the sound to work.
Build the app by executing the following command:
cordova build androidOnce that’s complete, navigate to the platforms/android/build/outputs/apk/ directory and copy the android-debug.apk file to your Android device. Install it and open it. Once it’s opened, it should forward the device token to the server.
It should show something similar to the following in the terminal window where you executed node ionic-gcm.js:
device token received
sjdlf0ojw3ofjowejfowefnosfjlsjfosnf302r3n2on3fon3flsnflsfns0f9un
You can now test the push notification by opening the following local URL in a browser:
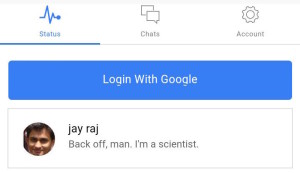
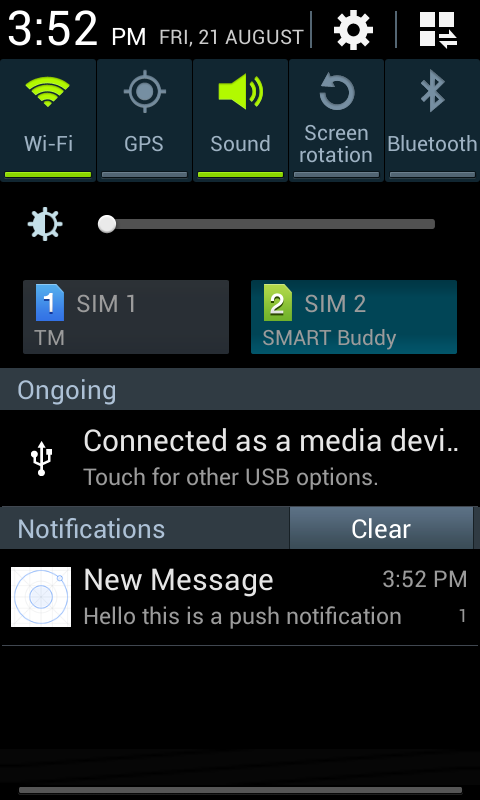
http://localhost:3000/pushYour device should receive a push notification at this point. Here’s a screenshot.
Conclusion
That’s it! In this tutorial, you’ve learned how to work with the Google Cloud Messaging Platform for Android in order to send push notifications to a Cordova app. If you have any questions, comments or problems then please let me know in the comments below.
Frequently Asked Questions (FAQs) on Push Notifications in Ionic Apps with Google Cloud Messaging
What is Google Cloud Messaging and how does it work with Ionic Apps?
Google Cloud Messaging (GCM) is a mobile notification service developed by Google that enables third-party application developers to send notifications from developer-run servers to both Android applications and iOS applications. It works with Ionic Apps by allowing these apps to receive various types of messages, including notification messages, data messages, and messages with both notification and data payloads.
How do I set up Google Cloud Messaging for my Ionic App?
Setting up GCM for your Ionic App involves several steps. First, you need to create a project in the Google Cloud Console. Then, you need to enable the GCM service for your project. After that, you need to obtain an API key which will be used to authenticate your app with the GCM service. Finally, you need to integrate the GCM service into your Ionic App using the Ionic Cloud package.
What are the benefits of using Google Cloud Messaging in Ionic Apps?
GCM provides several benefits for Ionic Apps. It allows for efficient, scalable, and reliable delivery of notifications to your app users. It also provides a simple, cost-effective way to keep your app users engaged and informed about important updates, promotions, and other relevant information.
Can I use Google Cloud Messaging with other mobile app development platforms?
Yes, GCM is not limited to Ionic Apps. It can be used with other mobile app development platforms that support push notifications, such as React Native, Flutter, and Xamarin.
How do I troubleshoot issues with Google Cloud Messaging in my Ionic App?
Troubleshooting GCM issues in your Ionic App can involve several steps. First, you need to ensure that your GCM setup is correct and that your API key is valid. Then, you need to check the error messages returned by the GCM service. These error messages can provide clues about what might be causing the issue. If you’re still having trouble, you can seek help from the GCM and Ionic communities or contact Google Cloud support.
How secure is Google Cloud Messaging?
GCM uses secure, encrypted connections for all communication between your app and the GCM service. This ensures that your notifications and data are protected from unauthorized access and tampering.
Can I send targeted notifications with Google Cloud Messaging?
Yes, GCM allows you to send targeted notifications to specific segments of your app users. You can define these segments based on various criteria, such as user demographics, behavior, location, and more.
How do I monitor the performance of my Google Cloud Messaging notifications?
Google Cloud Console provides detailed analytics and reporting features that allow you to monitor the performance of your GCM notifications. You can track metrics such as delivery rates, open rates, and conversion rates, and use this data to optimize your notification strategy.
What are the alternatives to Google Cloud Messaging for Ionic Apps?
There are several alternatives to GCM for Ionic Apps, including Firebase Cloud Messaging (FCM), OneSignal, and Amazon SNS. These services offer similar features to GCM, but may have different pricing, performance, and integration options.
How do I migrate from Google Cloud Messaging to Firebase Cloud Messaging?
Migrating from GCM to FCM involves several steps. First, you need to add the FCM SDK to your Ionic App. Then, you need to update your server code to send notifications via FCM instead of GCM. Finally, you need to update your app code to receive notifications via FCM. Google provides detailed migration guides to help you through this process.
 Wern Ancheta
Wern is a web developer from the Philippines. He loves building things for the web and sharing the things he has learned by writing in his blog. When he's not coding or learning something new, he enjoys watching anime and playing video games.