This is part two of two in the series describing how to create a jQuery plugin to detect and respond to swipe gestures. In the first part, we saw how to create a plugin that changes a carousel’s pictures to correspond to the position of the finger on screen. In this part, we will extend that to detect a swipe gesture. This improves the carousel by creating fixed intervals so that a swipe changes the carousel to show the next/previous picture in its entirety.
var Swiper = function (el, callbacks, options) {
  ...
  this.opts = options;
  this.swipeDone = false;

  //perform binding
  this.el.addEventListener('touchend', function (evt) {
    tis.stop(evt);
  });
  ....
};

Swiper.LEFT = - 1;
Swiper.RIGHT = 1;

...

$.fn.swiper = function (callbacks, options) {
  var opts = $.extend({}, $.fn.swiper.defaults, options);
  if (typeof callbacks.swiping !== 'function') {
    throw '"swiping" callback must be defined.';
  }
  if (typeof callbacks.swiped !== 'function') {
    throw '"swiped" callback must be defined.';
  }
  if (typeof callbacks.swipeCancel !== 'function') {
    throw '"swipeCancel" callback must be defined.';
  }

  this.each(function () {
    ...
    if (!swiper) {
      tis.data('swiper', (swiper = new Swiper(this, callbacks, opts)));
    }
  });
};

$.fn.swiper.defaults = {
    tolerance: 100
};Swiper is modified to accept a third parameter options that holds a single property tolerance. The parameter is assigned to an internal property opts. The touchend event is proxied to the stop() instance method of the Swiper class.
Additionally, two callback functions have been added (swiped and swipeCancel) to handle the swiping. The default value for tolerance is set as 100 (pixels). Notice there are also two class properties Swiper.LEFT and Swiper.RIGHT. They represent a left swipe and a right swipe respectively and will be used in subsequent listings.
The plugin definition is also modified to accept a second, optional, parameter that provides the choice to override the default threshold of 100 pixels.
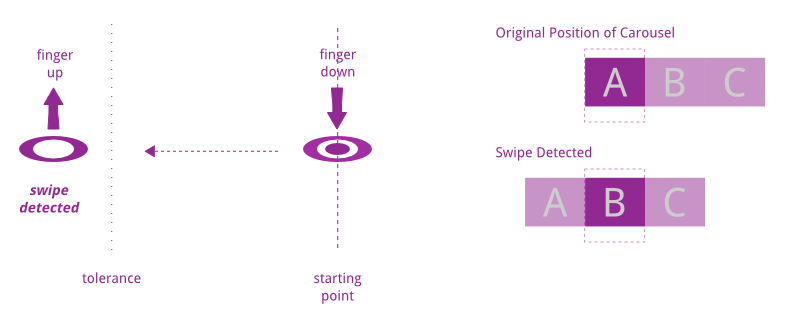
We need to extend the plugin to recognise when a swipe has occurred and modify the carousel correspondingly. There are several scenarios we need to consider. The first, and most straightforward, is when the user drags a finger across the screen and releases it. If the finger covers a distance that is more than or equal to the tolerance value, we consider that a swipe, and the carousel should advance to the next image when the finger is lifted off the screen. The figure below illustrates this scenario.
 On the other hand, if the finger covers a distance that is less than the
 tolerance value, the movement is not considered a swipe and the carousel should revert to its original position.
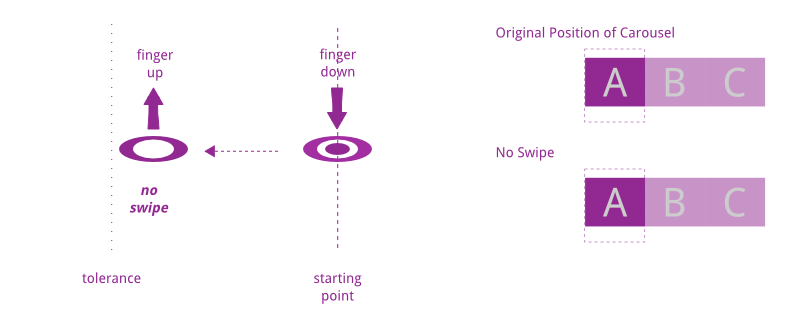 Remember that the plugin moves the carousel to mirror the movement of the finger for the duration of contact with the screen. The decision as to whether to advance or revert the carousel position is taken when the finger is lifted off the screen (binding for the
 touchend event).
Swiper.prototype.stop = function (evt) {
  if (!this.swipeDone) {
    this.cbs.swipeCancel();
  } else {
    this.cbs.swiped(this.getDirection());
  }
};swiped()), otherwise revert the carousel (swipeCancel()).
One thing to note is that we are returning the direction of the movement to the “advancing” callback as determined by the getDirection method. This is required as the callback needs to know which direction to advance the carousel to.
Swiper.prototype.getDirection = function () {
  var direction = this.diff();
  if (direction < 0) {
    return Swiper.LEFT;
  }
  if (direction > 0) {
    return Swiper.RIGHT;
  }
};diff() method defined in Part 1 of this series to get the displacement of the finger. If the difference is negative, it is a left swipe, otherwise it is a right swipe.
We now need to know how to determine whether a swipe is generated i.e. setting of the swipeDone flag. Before we delve into that though, let’s consider the next scenario.
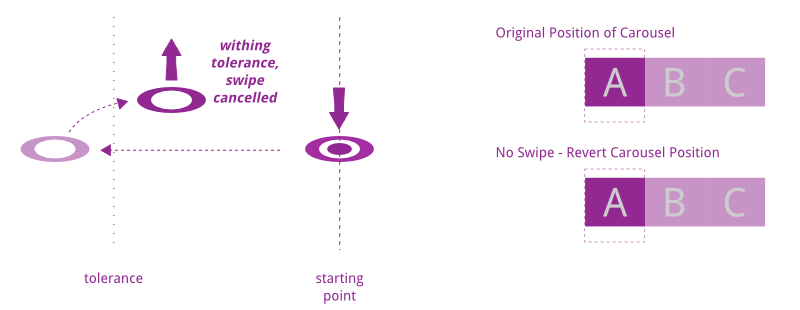
If the user brings a finger to the screen, drags it beyond the threshold value, and then brings it back to within the threshold value before removing the finger, we don’t want to advance the carousel as the user’s intention, by bringing the finger back, is that he/she does not want to advance the carousel.
 Similarly if the user brings the finger back beyond the tolerance value before removing the finger, his/her intention is to advance the carousel.
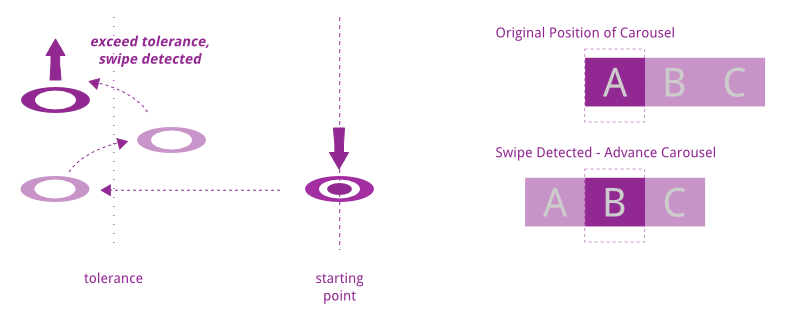 As you can imagine, the determination of when the gesture is detected is done while the finger is dragging on the screen, and not when the finger is lifted. We therefore have to make some changes to the
 move() instance method of the Swiper class.
Swiper.prototype.move = function (evt) {
  if (Math.abs(this.diff()) >= this.opts.tolerance) {
    this.swipeDone = true;
  } else {
    this.swipeDone = false;
  }
  if (evt.targetTouches && evt.targetTouches.length === 1) {
    if (evt.targetTouches[0].offsetX) {
      this.points[1] = evt.targetTouches[0].offsetX;
    } else if (evt.targetTouches[0].layerX) {
      this.points[1] = evt.targetTouches[0].layerX;
    } else {
      this.points[1] = evt.targetTouches[0].pageX;
    }
    this.cbs.swiping(this.diff());
  }
};move() method, we check if the distance moved by the finger has exceeded the tolerance value. The difference is encompassed in a Math.abs() function because a left movement will always generate a negative value which is less than any positive value. By taking its absolute value, we can check the distance for both left and right movements. If it is determined that the distance is larger than or equals to the tolerance value, we consider it a swipe.
A key point about making this work is the removal of the line this.points[0] = this.points[1]; from the move() method. This is absolutely critical because we want to take reference from the point where the finger came into contact with the screen (touchstart). If we retain this line of code, the reference point will keep changing with each movement of the finger and we will not be able to perform the calculation that we want. With the removal of this line of code though, the value that diff() returns will also be different from before. We then have to change the definition of the swiping() callback function.
One last change to make to the Swiper class is to its start() instance method. This change basically says that every time a finger is first placed on screen, the swipeDone flag to false, which is natural since a swipe cannot have been generated when the finger first touches the screen.
Swiper.prototype.start = function (evt) {
  if (evt.targetTouches && evt.targetTouches.length === 1) {
    this.swipeDone = false;
    ...
  }
};currPos value as a percentage, the values of MAX_LEFT and MAX_RIGHT need to be converted into percentages too.
We still want to retain the mirroring effect of the carousel on the finger. To do that, a new variable adhocPos is introduced in the swiping() callback. This value holds the position of the carousel as the finger drags on the screen. It uses the baseWidth variable which is set to 330 pixels (the width of each image in the carousel). This value must be changed if the width of an image in the carousel changes.
...
MAX_LEFT = -300,
MAX_RIGHT = 0,
baseWidth = 330;
cb = {
  swiping: function (displacement) {
    var adhocPos = currPos / 100 * baseWidth;
    adhocPos += displacement;
    pictures.css('left', adhocPos + 'px');
  },
  ...
}currPos value is treated as a percentage which is set in the swiped callback below:
swiped: function (direction) {
  currPos += (direction * 100);
  if (currPos < MAX_LEFT || currPos > MAX_RIGHT) {
    //i.e. exceeded limit
    currPos -= (direction * 100);
  }
  pictures.css('left', currPos + '%');
}direction parameter which, as we saw earlier, is either 1 or -1. This is then multiplied with 100 to convert into a percentage value before summing up with currPos. The if statement checks to make sure that the value remains within the boundaries so that the carousel does not scroll into empty space. This was previously done in the swiping() callback. By placing this check in the swiped() callback, we get the effect that when the user drags the carousel beyond the last image, we see white space but as soon as the finger is lifted, the carousel jumps back, thereby creating a sort of “bouncing” effect.
Lastly, there is the swipeCancel() callback which sets the carousel back to its original position before the dragging started.
swipeCancel: function () {
  pictures.css('left', currPos + '%');
}Frequently Asked Questions about jQuery Plugin for Touch Swiping
How can I detect a finger swipe using jQuery on both iPhone and Android?
Detecting a finger swipe using jQuery on both iPhone and Android involves using the touchstart, touchmove, and touchend events. These events are triggered when a user touches the screen, moves their finger while still touching the screen, and lifts their finger off the screen, respectively. By tracking these events, you can determine the direction and speed of the swipe. You can use the event’s pageX and pageY properties to get the coordinates of the touch event, and then calculate the distance and direction of the swipe.
What is the jQuery Mobile swipe event and how does it work?
The jQuery Mobile swipe event is a built-in event that’s triggered when a user swipes over an element in a horizontal left or right direction. It’s part of the jQuery Mobile library, which is a touch-optimized web framework. The swipe event is triggered after the user’s touch has moved a certain distance in a horizontal direction, and it includes data about the direction and distance of the swipe.
How can I detect the swipe direction using jQuery?
Detecting the swipe direction using jQuery involves tracking the touchstart and touchend events and comparing the X and Y coordinates of these events. If the X coordinate of the touchend event is greater than the X coordinate of the touchstart event, the swipe was to the right. If it’s less, the swipe was to the left. Similarly, if the Y coordinate of the touchend event is greater than the Y coordinate of the touchstart event, the swipe was downwards. If it’s less, the swipe was upwards.
How can I use jQuery to detect a swipe event?
To detect a swipe event using jQuery, you can use the swipeleft and swiperight events provided by the jQuery Mobile library. These events are triggered when a user swipes over an element in a left or right direction. You can bind these events to an element using the on method, and then define a function to run when the event is triggered.
How can I use the detect_swipe jQuery plugin?
The detect_swipe jQuery plugin allows you to detect swipe events and their direction on touch devices. To use it, you first need to include the jQuery library and the detect_swipe plugin in your HTML file. Then, you can use the swipe function provided by the plugin to bind a swipe event to an element. This function takes a callback function as an argument, which is called when a swipe event is detected. The callback function receives an event object, which includes data about the swipe event, such as its direction.
How can I customize the swipe event in jQuery Mobile?
jQuery Mobile allows you to customize the swipe event by changing the swipe event’s default settings. These settings include the swipe distance threshold (the minimum distance a touch has to move to be considered a swipe), the swipe duration threshold (the maximum time a touch can last to be considered a swipe), and the swipe horizontal distance threshold (the minimum horizontal distance a touch has to move to be considered a swipe). You can change these settings by modifying the $.event.special.swipe object.
How can I detect multi-touch swipes using jQuery?
Detecting multi-touch swipes using jQuery is more complex than detecting single-touch swipes, as it involves tracking multiple touch events simultaneously. However, you can use the touchstart, touchmove, and touchend events and the event’s touches property to track multiple touch points. The touches property is an array of touch objects, each representing a single touch point. By tracking these touch points, you can determine the direction and speed of each swipe.
How can I detect swipe events on non-touch devices using jQuery?
On non-touch devices, you can detect swipe events using the mousedown, mousemove, and mouseup events, which are the mouse equivalents of the touchstart, touchmove, and touchend events. By tracking these events and comparing the X and Y coordinates of the mousedown and mouseup events, you can determine the direction and speed of the swipe.
How can I prevent the default action of a swipe event in jQuery?
You can prevent the default action of a swipe event in jQuery by calling the event’s preventDefault method in the event handler function. This method prevents the browser from performing the default action associated with the event, such as scrolling the page when a swipe event is detected.
How can I detect a swipe event on a specific element using jQuery?
To detect a swipe event on a specific element using jQuery, you can bind the swipe event to that element using the on method. When the swipe event is triggered on that element, the event handler function you defined will be called. This function can include code to handle the swipe event, such as changing the element’s position or triggering another event.
 Chee How Chua
Chee How is a technology enthusiast and is especially interested in all Web related stuff. He currently works as a Web developer in a company he co-founded, and writes JavaScript, Java and PHP on a day-to-day basis.


