This article was sponsored by Beans. Thank you for supporting the sponsors who make SitePoint possible.
If you develop websites and themes using WordPress, then you understand how much work it takes. Working from scratch makes you feel like you’re trying to reinvent the wheel, so many developers use frameworks to speed up the process. Finding the right framework means a much easier development process.
This article will outline a new framework for developing WordPress sites, called Beans, and show how it’s useful for creating WordPress sites without hassle.
Introducing Beans
Beans is a starter theme/framework which allows you to pick and choose the features you’ll need to build your website, and trim away the parts you can do without. It’s lightweight and fast, while giving you a lot of flexibility.
Beans makes content responsive and images adaptive, creating multiple versions of images automatically and serving up the right image for the device it’s being viewed on. The content responds to the device as well, restructuring and reorganizing to best fit the device’s display.
Let’s take a closer look at a few aspects of the framework, before comparing it with its closest competitor, Genesis (which I’ve covered myself on SitePoint).
SEO
Beans is built to be SEO-friendly. Other themes and frameworks out there aren’t semantic, and they aren’t built with SEO in mind. Beans is built to be descriptive and semantic, making it optimized for search engines. You don’t have to worry about whether your content meets the requirements for search engine indexing, it’s built right into the framework. Beans is lightweight and optimized for mobile — two features that are vital for SEO success.
Child Themes
Beans uses and recommends using child themes to build custom sites. This means that when Beans is updated, your site doesn’t break. The Beans team also provides a basic child theme to help you to get started.
Site Design
With Beans you can control the structure of each page globally or individually. You can set the layout of the site in the customize section of the WordPress admin. You can also control the layout on a per-page basis. You have the choice of one left or right sidebar, two left or right sidebars, one sidebar on both sides, or no sidebar at all.
Organization
Beans makes it easy to keep your code looking clean and organized. If you find yourself writing too much code for a specific page, you can take all of it and place it into a page template for that page. This keeps you from having to sort through a jumbled mess of code in your functions.php file. You can place specific code on highly customized pages.
Even the CSS is easy to update and maintain. You can use Less, or you can use CSS. Everything is kept in the style.css file located in your child theme. This keeps you from having to dig through the main CSS file to find the line you’re looking for. You simply add the CSS to override how something looks or how it is structured.
Future-Proof
One of the reasons for Beans’ emphasis on creating child themes is so that when Beans updates their core theme, your site won’t become broken. You may have to update a line of code in your child theme, but it’s still better than ending up with a broken site.
Now let’s take a look at how Beans compares to Genesis, its closest competitor.
Beans Vs. Genesis
The first obvious question when considering Beans is, how does its approach compare with Genesis? I installed Beans and set up a site to compare how it runs against a Genesis-based site.
Appearance
Genesis themes all tend to have a similar look. This depends a lot on the developer, but a lot of Genesis sites look similar in appearance and structure. Beans offers the flexibility to create whatever you can imagine. With UIkit integration, you get access to all sorts of components to create a modern, custom website for yourself or clients. UIkit itself can be customized to look how you want, making it easy to work with and easy to create a custom look.
Page Weight
Beans also builds more lightweight sites than Genesis, as you only call into your site what you need. You don’t use scripts and components you don’t need, and you aren’t loading scripts for those items.
Flexibility
In Beans, you can remove and show elements on a per-page basis, which makes it quick and easy to customize. This is as simple as one line of code in your functions.php file.
You also have much more flexibility and control over a site’s HTML. You only load the markup you need. You can use UIkit HTML attributes to style and layout pages. The big difference with building Beans WordPress sites is that you have hooks before and after each bit of HTML markup. You can add content easily, enabling you to shift elements around as needed.
Speed
Beans is faster overall. There are a couple of reasons why. The first reason is that all assets are combined into one file. Also, on a per-page basis, you only load what you need. That means you aren’t loading markup on pages that isn’t necessary. All of this is controlled with Beans.
The other reason Beans is faster is because you can build fairly complicated sites without being dependent on implementing a lot of resource-devouring plugins to add functionality. When combined with the fact that Beans only loads what the page needs and nothing extra, it makes it a lean and lightning-fast solution for any WordPress developer.
UIkit Integration
UIkit is an open source front-end framework built into Beans, designed to help you build gorgeous sites without bloat. You load only what is needed on a per-page basis, meaning you aren’t loading scripts and components you aren’t using. This makes your site attractive and lightning fast.
I made this its own section, because it is a big one for me. The integration of UIkit enables you to create any type of layout you want. All you need is the right CSS class to apply to an element, such as a div, and it will control the structure of the page. It makes it easy to build with, because it is similar to frameworks that a lot of developers already know, such as Bootstrap. You can load components on the fly, but only when you need them.
UIkit integration allows you to add classes for things like alignment, without having to write special CSS for it each time. For example, on the About page, I wanted to center the title. Instead of writing a block of CSS for a special title class, I was able to add a utility class to get this done. I used:
<h1 class="uk-text-center">About</h1>Classes like these can be added on top of other Beans classes, making it easy to get the layout you want without having to write block after block of code.
Fields API
Another standout feature Beans has implemented is the Fields API. Right now, WordPress doesn’t have a fields API. If you’ve ever tried to build, organize or change the content in the backend, it can be a real chore to accomplish this. The Fields API offers a range of fields that can be used in the WordPress backend. If you’re building a completely custom WordPress site, you will likely want to add back-end options and fields for website specific information.
You can create options fields, post meta fields and customizer fields. These are all popular features that WordPress users look for when using a quality theme. The different field types you can implement are:
Text – Place a single word here.
Text Area – You would place a paragraph of text here.
Select – Select an available option.
Checkbox – A checkbox that would enable a feature.
Radio – A text or image based radio list.
Image – Enable a single image or a gallery of images.
Slider – A slider hat allows you to choose a specific value in a range.
Group – A group of fields.
To implement Fields, you will use the admin_init for all 4 field types. You can set the field id and label. You can display those values on the front end using beans_get_post_meta, or the other closely related hooks. This gives you the ability to display any information you want, however you like, within your theme.
The Customizer
More and more WordPress users are expecting to see the Customizer come into play when selecting options. The Customizer displays a live front end view of the site while you manipulate values in the back-end. The Customizer is really just a stacked set of theme options displayed while you view the live site. This keeps you from having to save the back-end and come back and revise your choices. The Fields API allows you to completely control the customizer from the front end.
Free and Open Source
Beans is 100% free and open source. There are other frameworks out there that are lacking in features, but you still end up paying for those. On top of the documentation, they provide helpful code snippets and code references to help you along the way.
Documentation
Beans is also well-documented, with examples for each component, showing you how to implement each feature. You begin with a good starting point, and from there, the sky is the limit to what you can build.
Now we’ve taken a look at how Beans compares to Genesis, let’s take a closer look at working with the framework.
Getting Started
Getting started with Beans couldn’t be easier. First, visit the Beans website and download and install the Beans framework. Then, you’ll want to go to the “Child Theme” section of their website and download the child theme. Go back to the WordPress dashboard and install the child theme after making sure the base framework is installed. You must download the base theme and install it before installing the child theme.
Before You Start Building
You’ll want to dig into the documentation to familiarize yourself with how the framework works. There are a couple of things you will want to review and refer to as you work.
UIkit API – This is the set of components integrated within the theme itself. You have a vast amount of customization options, which offers a lot of flexibility.
Understand How Child Themes and File Structures Work – You’ll need to have a basic working knowledge of how themes and child themes work, including what each file is and it’s purpose. This will help you to understand how to modify your theme. This SitePoint screencast outlines the basic process of creating a child theme.
Beans HTML API – This allows you to easily modify page layouts. You can modify the markup just how you need to create a truly custom structure for your theme.
Now to Really Get Started
Navigate to Admin > Appearance > Settings to set the options for the Beans framework. While you’re building your site, you’ll want to enable development mode if you are using Less. There are other options here, such as the ability to flush images and cached scripts, but we will leave those alone for now.
You can either use Less to overwrite UIKit variables or edit the CSS directly. Whichever method you choose, you’ll want to enable or disable the alternative method in the functions.php file of your child theme. All new functions will be added here.
In my example, I am going to use CSS, so I’ll remove the following block of code from the functions.php file:
/*
* Remove this action and callback function if you do not wish to use Less to style your site or overwrite UIkit variables.
* If you are using Less, make sure to enable development mode via the Admin->Appearance->Settings option. Less will then be processed on the fly.
*/
add_action( 'beans_uikit_enqueue_scripts', 'beans_child_enqueue_uikit_assets' );
function beans_child_enqueue_uikit_assets() {
beans_compiler_add_fragment( 'uikit', get_stylesheet_directory_uri() . '/style.less', 'less' );
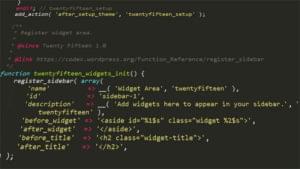
}How Designing Your Site Works
Beans makes things easy when it comes to page customization. You don’t have to add scripts to pages and bloat your site. You can add components to pages using a mix of functions and the UIkit structure system to build the layout.
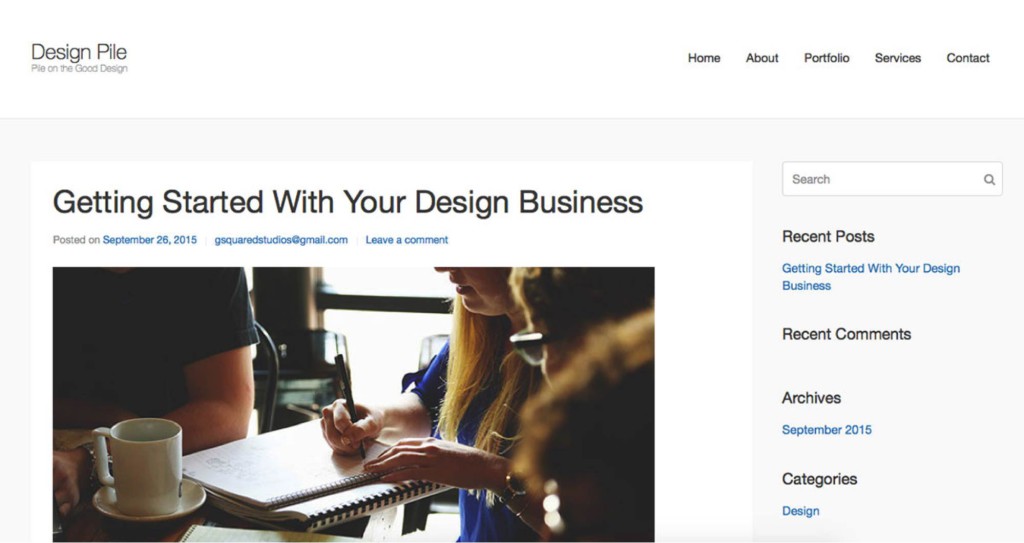
In the image above, you can see the typical site design you start out with. This is the default look you would expect with just about any starter theme. However, customizations are applied via the functions.php file, which allows you to do some pretty interesting things. If I add the following code, the layout changes, with the site going into grid mode.
// Enqueue the UIkit dynamic grid component.
add_action( 'beans_uikit_enqueue_scripts', 'beans_child_enqueue_grid_uikit_assets' );

function beans_child_enqueue_grid_uikit_assets() {

	// Stop here if we are on a singular view.
	if ( is_singular() )
		return;

    beans_uikit_enqueue_components( array( 'grid' ), 'add-ons' );

}


// Display posts in a responsive dynamic grid.
add_action( 'wp', 'beans_child_posts_grid' );

function beans_child_posts_grid() {

	// Stop here if we are on a singular view.
	if ( is_singular() )
		return;

	// Add grid.
	beans_wrap_inner_markup( 'beans_content', 'beans_child_posts_grid', 'div', array(
		'data-uk-grid' => '{gutter: 20}'
	) );
	beans_wrap_markup( 'beans_post', 'beans_child_post_grid_column', 'div', array(
		'class' => 'uk-width-large-1-3 uk-width-medium-1-2'
	) );

	// Move the posts pagination after the new grid markup.
	beans_modify_action_hook( 'beans_posts_pagination', 'beans_child_posts_grid_after_markup' );

}
You can see what it looks like in the screenshot below:
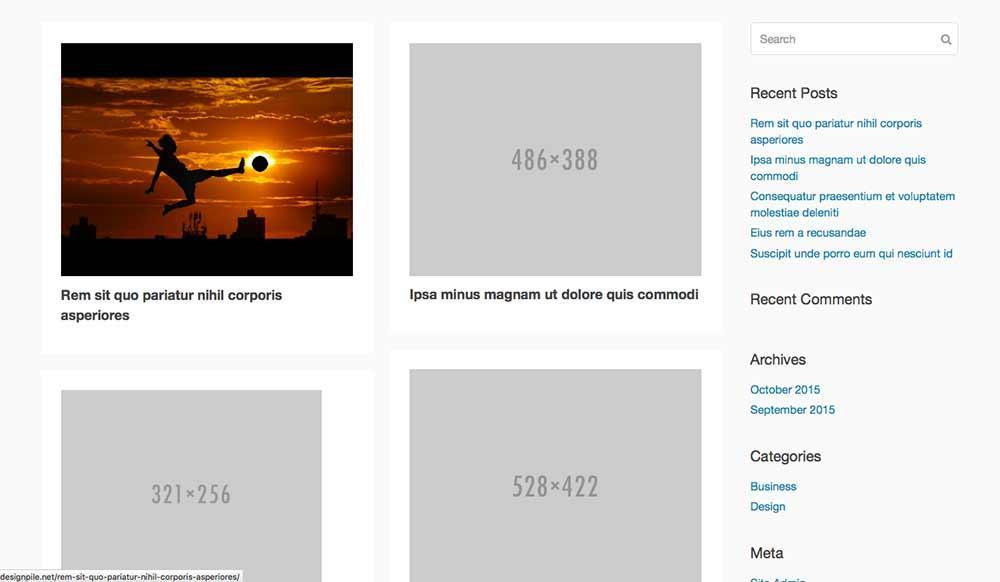
You can see from the screenshot that it doesn’t look so pretty at the moment, but you can change the way the layout is structured from within the functions.php file. You can also take away and reorder elements. I don’t like the order of content inside the post. Currently the title is first, followed by the meta, and then the image. I want the image to be the first thing, because readers generally respond more to visual stimuli. All I have to do in order to change this is add the following code to my functions.php file.
// Move the post image above the post title.
beans_modify_action_hook( 'beans_post_image', 'beans_post_title_before_markup' );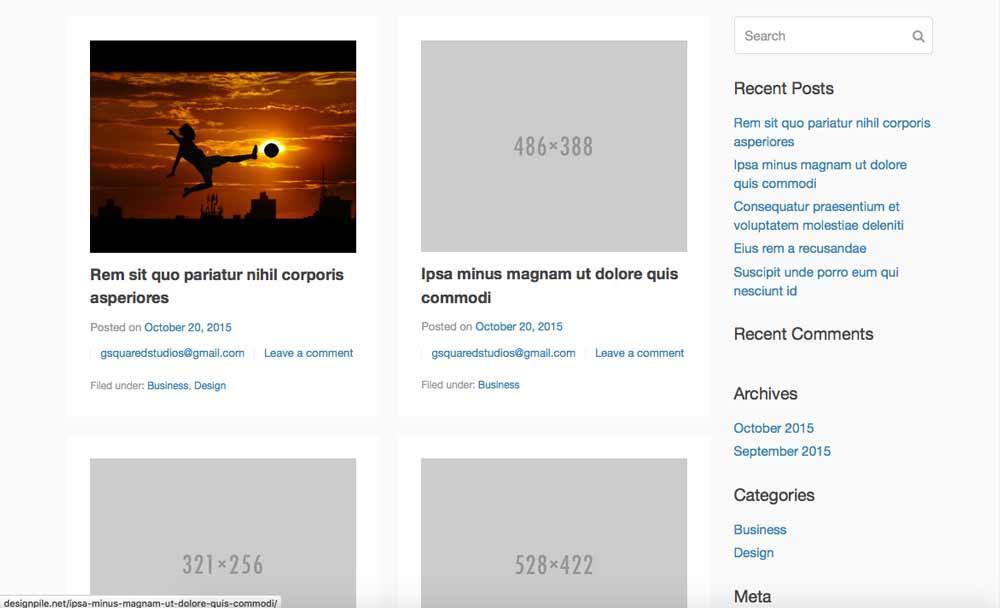
As you can see from the screenshot, this little bit of code immediately moved the post image above everything. I also feel like the grid layout doesn’t have room for all of the extended information, so I am going to remove the meta information and categories. You do this by placing the following code in functions.php:
// Remove the post meta categories.
beans_remove_action( 'beans_post_meta_categories' );
// Remove the post meta.
beans_remove_action( 'beans_post_meta' );
Customizing the Design
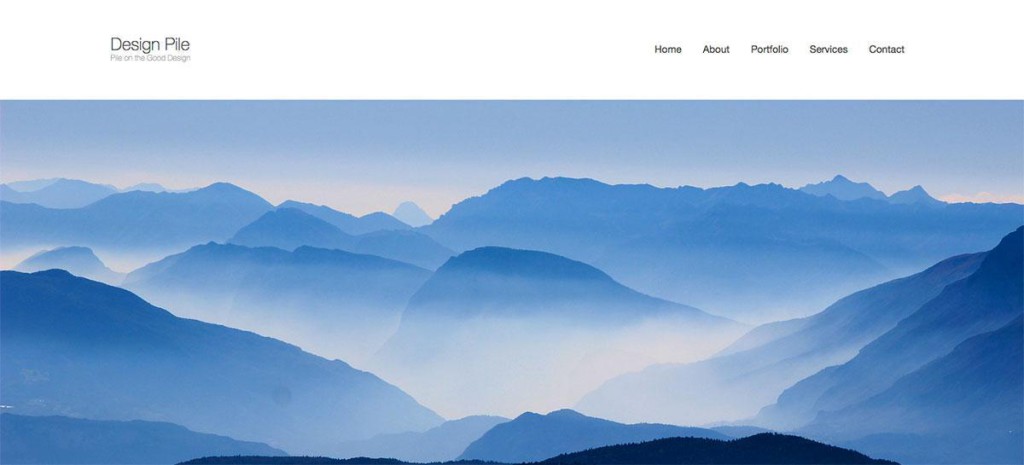
Adding design elements to your site is simple. If you want something to only show on a specific page, you’ll create your own function. I added a cover image to the child theme’s home page. I created the following function:
add_action( 'beans_header_after_markup', 'beans_child_home_add_cover' );
function beans_child_home_add_cover() {
	// Only apply to home page.
	if ( !is_home() )
	   return;
	?>
	<div class="uk-cover-background uk-position-relative">
		<img src="http://designpile.net/wp-content/uploads/2015/10/mountains-863474_1920-e1445350970446.jpg" width="" height="" alt="welcome mountains">
	</div>
	<?php
}
The code above looks daunting until you break it down. First, you’re adding an action, just like you would on any other functions.php file. Then, you’re specifying that after the header markup, you want to create a function that adds a cover image to the home page.
Next, you’re telling Beans what that function is. You’ll specify that it only applies to the home page. This basically checks to see if the current page is the home page, and if it is, that you want to add a responsive cover image.
The divs with ‘uk’ classes applied to them are specific to the UIkit integration, which you can find in the documentation section or on the UIkit website.
Once you refresh the page, you can see from the screenshot below that the cover image has been placed on the home page, just after the header markup. This places it before the post content and the sidebar. You’ll create a function like the one above for each section of any custom page you create.
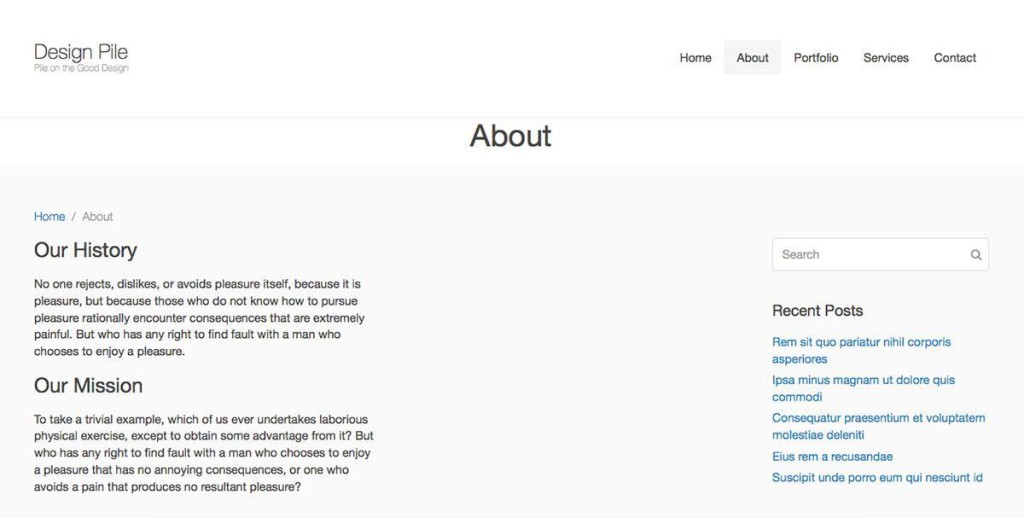
Excessive Customizations
One thing you’ll want to do is take note of creating a lot of customizations per page. If you realize that you are adding a lot of customizations, such as a custom layout, added features, etc., you’ll be better off creating a page template. You create a page template like you normally would, using a named template tag, but you’ll also need to add the Beans specific code. The example code below shows adding two columns of text on the about page.
<?php
/* Template Name: About */ ?>
<?php
add_action( 'beans_header_after_markup', 'beans_child_view_add_title' );
function beans_child_view_add_title() {
   ?>
   <div class="uk-container uk-container-center">
        <h1 class="uk-text-center">About</h1>
   </div>
   <?php
}
add_action( 'beans_content_prepend_markup', 'beans_child_view_add_layout' );
function beans_child_view_add_layout() {
    ?><div class="uk-container uk-block">
	<div class="uk-width-medium-1-2">
       <h2>Our History</h2><p>No one rejects, dislikes, or avoids pleasure itself, because it is pleasure, but because those who do not know how to pursue pleasure rationally encounter consequences that are extremely painful. But who has any right to find fault with a man who chooses to enjoy a pleasure.</p>
    </div>
	<div class="uk-width-medium-1-2">
       <h2>Our Mission</h2><p>To take a trivial example, which of us ever undertakes laborious physical exercise, except to obtain some advantage from it? But who has any right to find fault with a man who chooses to enjoy a pleasure that has no annoying consequences, or one who avoids a pain that produces no resultant pleasure?</p>
    </div>
</div><?php
}

// When using page template, it is very important to load the document after the customizations.
beans_load_document();
Notice the integration of UIkit markup. This is how you build the structure of your site. Doing it the way I show above is okay for a limited basis, but if you are pulling in large amounts of content, such as an array of posts, you’ll want to use the hooks that Beans provides in its documentation.
Beans’ hooks allow you to tie into the WordPress structure wherever you specify. For example, the sample code:
do_action ( 'beans_after_posts_loop' )initiates your command after the lists of posts that are displayed. Something you might place here would be pagination. If you wanted to add breadcrumbs, you might use:
do_action ( 'beans_before_posts_loop' )Conclusion
It may take you a short time to familiarize yourself with the Beans framework, but once you do, you’ll be able to create a highly customized website in a fraction of the time you normally would. You can develop custom layouts for every page, while keeping the entire site lightweight.
When compared with the Genesis framework, you can do anything with Beans that you can do with Genesis, but you have a lot more options for structure, design, and customization without having to sift through existing code or the need of other plugins.
Interested? Head here to get started with Beans today.
 James George
James George is a professional web developer and graphic designer. James is an expert in design, and a professional web developer, with a special interest in WordPress. Founder of Design Crawl, James has been a professional designer since 2005.