In part 1, we built our server part. Now we can build our client. We are going to use AngularJS to make a Single Page Application. We will use a very basic bootstrap template, built on the fly.
![]()
Planning
Our application will be made up of three screens.
- Login Screen: a simple login screen. The user will insert their email and password. If something goes wrong, an error will be shown. Otherwise, the user will be redirected to the Main Screen. They will also be able to click on a “Signup” link, to open the Signup Screen;
- Signup Screen: a simple signup screen, used to create a new account in the application. After specifying all the required data, the user will automatically log in;
- Main Screen: the main application screen. From here, the user will be able to get a list of their books, add new titles, and update and remove the existing ones;
Preparing a Basic Frontend Work Environment
We need to plan where we are placing our app. We can do as we like, but for this article series and for the sake of continuation, a very simple and “integrated” setup will do.
First we’ll create a basic Laravel Blade view, named index.blade.php, that will “host” the app. Frontend dependencies will be handled by Bower, which is already included in Homestead Improved. Another good reason to switch to VMs, if you have not already done so.
Let’s prepare our basic view. In the terminal, we go to the public folder of the project and type, in sequence:
bower install jquery bootstrap angular angular-route angular-local-storage restangular
We already know the first three elements: jquery, bootstrap and angular. The fourth, angular-route, will be used as a router for our single page application. The fifth, angular-local-storage, will be used to locally store our authentication token. We will use the last one, restangular, to create a “resource” in Angular that will communicate directly with our server via HTTP requests.
Let’s come back to Laravel for a second now. Let’s go to the app/Http/routes.php file and add this entry:
Route::get('/', function () {
    return view('index');
});
Other entries can be deleted.
Note: don’t confuse the routes.php file with the api_routes.php file.
Let’s build the Blade template we are going to use and create a new file named index.blade.php in resources/views.
<!DOCTYPE html>
<html lang="en">
    <head>
        <meta charset="utf-8">
        <meta http-equiv="X-UA-Compatible" content="IE=edge">
        <meta name="viewport" content="width=device-width, initial-scale=1">

        <title>Book Wishlist Application</title>

        <link href="bower_components/bootstrap/dist/css/bootstrap.min.css" rel="stylesheet">

        <script src="bower_components/angular/angular.min.js"></script>
        <script src="bower_components/lodash/lodash.min.js"></script>
        <script src="bower_components/angular-route/angular-route.min.js"></script>
        <script src="bower_components/angular-local-storage/dist/angular-local-storage.min.js"></script>
        <script src="bower_components/restangular/dist/restangular.min.js"></script>

        <style>

            li {
                padding-bottom: 8px;
            }

        </style>
    </head>

    <body>
        <div class="container">
            <div class="row">
                <div class="col-md-12">
                    <h1>Book Wishlist Application</h1>
                </div>
            </div>
        </div>

        <script src="bower_components/jquery/dist/jquery.min.js"></script>
        <script src="bower_components/bootstrap/dist/js/bootstrap.min.js"></script>
    </body>
</html>
In this file, we can find everything we need.
Basic Routing
We will start with the first two screens: the Login screen and the Signup screen. This will involve our angular-router. The basic principle is very similar to the Laravel routing process: we assign a certain “screen” to a certain route.
For every single screen, we are going to build an Angular controller. This controller will handle every logic operation, leaving the presentation responsibility to the view.
Let’s create a folder in public named js. Then, we will make a new app.js file inside. It will be our main single page application file:
var bookWishlistApp = angular.module('bookWishlistApp', [
  'ngRoute',
  'bookWishlistAppControllers'
]);

bookWishlistApp.config(['$routeProvider', function($routeProvider) {

    $routeProvider.
    when('/login', {
        templateUrl: 'partials/login.html',
        controller: 'LoginController'
    }).
    when('/signup', {
        templateUrl: 'partials/signup.html',
        controller: 'SignupController'
    }).
    when('/', {
        templateUrl: 'partials/index.html',
        controller: 'MainController'
    }).
    otherwise({
        redirectTo: '/'
    });

}]);
We are defining the routing structure of our application. As you can see, we have three possible routes.
- the
/loginroute, for the Login screen; - the
/signuproute, for the Signup screen; - the
/, for the Main application screen;
Declaring the module, at the top of the file, we are injecting two dependencies. The first one is ngRoute, used for the routing functionality. The second one is bookWishlistAppControllers, the module that is going to contain all our application controllers.
Let’s create another file in the same folder, named controllers.js.
var bookWishlistAppControllers = angular.module('bookWishlistAppControllers', []);

bookWishlistAppControllers.controller('LoginController', ['$scope', '$http', function ($scope, $http) {

}]);

bookWishlistAppControllers.controller('SignupController', ['$scope', '$http', function ($scope, $http) {

}]);

bookWishlistAppControllers.controller('MainController', ['$scope', '$http', function ($scope, $http) {

}]);
As we can see, they are all empty right now. We will fill them out later. Right now, we just want to test our routing system.
Let’s create another folder in the public one: partials. We’ll place three files inside: index.html, login.html and signup.html. Inside each of them, just place some demo text for now.
In index.html insert:
<p>main screen</p>
In login.html:
<p>login screen</p>
… and in signup.html:
<p>signup screen</p>
We now change our Blade view:
<!DOCTYPE html>
<html lang="en" ng-app="bookWishlistApp">
    <head>
        <meta charset="utf-8">
        <meta http-equiv="X-UA-Compatible" content="IE=edge">
        <meta name="viewport" content="width=device-width, initial-scale=1">

        <title>Book Wishlist Application</title>

        <link href="bower_components/bootstrap/dist/css/bootstrap.min.css" rel="stylesheet">

        <script src="bower_components/angular/angular.min.js"></script>
        <script src="bower_components/lodash/lodash.min.js"></script>
        <script src="bower_components/angular-route/angular-route.min.js"></script>
        <script src="bower_components/angular-local-storage/dist/angular-local-storage.min.js"></script>
        <script src="bower_components/restangular/dist/restangular.min.js"></script>

        <script src="js/app.js"></script>
        <script src="js/controllers.js"></script>

        <style>

            li {
                padding-bottom: 8px;
            }

        </style>
    </head>

    <body>

        <div class="container">
            <div class="row">
                <div class="col-md-12">
                    <h1>Book Wishlist Application</h1>
                </div>
            </div>

            <div ng-view></div>
        </div>

        <script src="bower_components/jquery/dist/jquery.min.js"></script>
        <script src="bower_components/bootstrap/dist/js/bootstrap.min.js"></script>
    </body>
</html>
We added the ng-app="bookWishlistApp" attribute in the html element, and the ng-view attribute to a new div element. This will be the “container” for our partials.
We will also need to add the
<script src="js/app.js"></script>
<script src="js/controllers.js"></script>
lines, to load the main app file and the bookWishlistAppControllers module that will be injected as a dependency.
If we test it, this is what we will see:
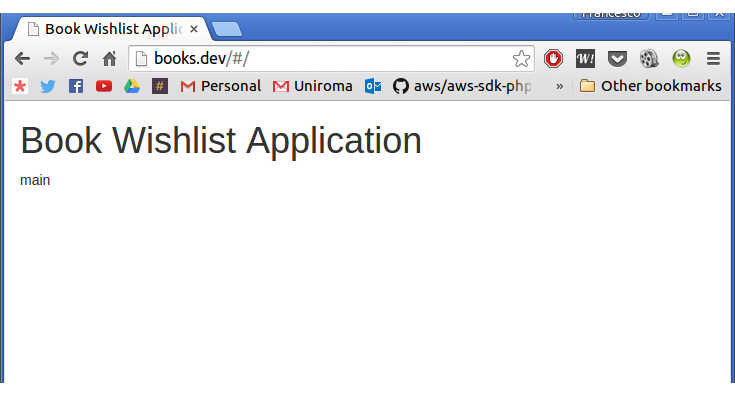
The Angular routing component automatically added the /#/ to the URL. Now, if we manually add login to the string, this is what we will get:
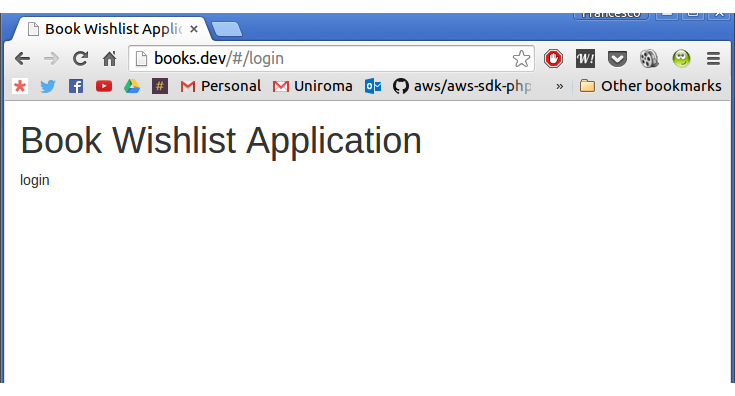
Yay! Our routing works perfectly.
Signup and Login
In order to build the Login and Signup screens, we will encapsulate some user access related logic in a separate userService.
Let’s create a new file in public/js and name it services.js:
var bookWishlistAppServices = angular.module('bookWishlistAppServices', [
    'LocalStorageModule'
]);

bookWishlistAppServices.factory('userService', ['$http', 'localStorageService', function($http, localStorageService) {

    function checkIfLoggedIn() {

        if(localStorageService.get('token'))
            return true;
        else
            return false;

    }

    function signup(name, email, password, onSuccess, onError) {

        $http.post('/api/auth/signup',
        {
            name: name,
            email: email,
            password: password
        }).
        then(function(response) {

            localStorageService.set('token', response.data.token);
            onSuccess(response);

        }, function(response) {

            onError(response);

        });

    }

    function login(email, password, onSuccess, onError){

        $http.post('/api/auth/login',
        {
            email: email,
            password: password
        }).
        then(function(response) {

            localStorageService.set('token', response.data.token);
            onSuccess(response);

        }, function(response) {

            onError(response);

        });

    }

    function logout(){

        localStorageService.remove('token');

    }

    function getCurrentToken(){
        return localStorageService.get('token');
    }

    return {
        checkIfLoggedIn: checkIfLoggedIn,
        signup: signup,
        login: login,
        logout: logout,
        getCurrentToken: getCurrentToken
    }

}]);
We used the basic Angular $http functionality to make some HTTP calls. To be more precise, we implemented:
- a
checkIfLoggedInmethod that checks if a token is actually present or not; - a
signupmethod which takes a name, an email and a password as parameters. If the sign up process goes well, a token is automatically stored in local storage, ready to be used; - a
loginmethod which takes an email and a password as parameters. If everything goes well, a token is stored in local storage; - a
logoutmethod to delete the stored token; - a
getCurrentTokenmethod, used to get the actual stored token. We will use it later, when making requests to protected endpoints of our APIs;
Obviously, we will have to add this file to the main blade view as well: resources/views/index.blade.php.
<script src="js/app.js"></script>
<script src="js/controllers.js"></script>
<script src="js/services.js"></script>
Now that we have our service, we can start with the signup screen. It will be a very simple one: just a welcome text, three text boxes and a submit button.
Let’s start from the view. We’ll open public/partials/signup.html and add:
<div class="row">
    <div class="col-md-4 col-md-offset-4">
        <h2>Signup</h2>
        <p>Welcome! If you want to sign up to our awesome service, fill this form and press on "Signup"!</p>

        <hr>

        <p><input type="text" class="form-control" placeholder="Name..." ng-model="name" required /></p>
        <p><input type="text" class="form-control" placeholder="Email Address..." ng-model="email" required /></p>
        <p><input type="password" class="form-control" placeholder="Password..." ng-model="password" required /></p>

        <hr>

        <p><button type="button" class="btn btn-success form-control" ng-click="signup()">Signup</button></p>

        <hr>

        <p><a href="#login">Already signed up? <b>Log in!</b></a></p>
    </div>
</div>
With the ng-click in the button, we will call our controller’s signup() method.
Now, let’s open the js/controllers.js file and fill the SignupController with
bookWishlistAppControllers.controller('SignupController', ['$scope', '$location', 'userService', function ($scope, $location, userService) {

    $scope.signup = function() {
        userService.signup(
            $scope.name, $scope.email, $scope.password,
            function(response){
                alert('Great! You are now signed in! Welcome, ' + $scope.name + '!');
                $location.path('/');
            },
            function(response){
                alert('Something went wrong with the signup process. Try again later.');
            }
        );
    }

    $scope.name = '';
    $scope.email = '';
    $scope.password = '';

    if(userService.checkIfLoggedIn())
        $location.path('/');

}]);
Let’s explain.
First we made the signup method. Due to this being an already very long tutorial, we skipped form validation. The only thing it does is call the signup method of the userService we just made. If everything is ok, it shows an alert and redirects the user to the main application screen.
Note: Don’t forget that the signup method already saves our token in the storage. This is why we are redirecting the user immediately if the operation is successful.
Finally, we do a very basic login check:
    if(userService.checkIfLoggedIn())
        $location.path('/');
If a token is already present, the user will be automatically redirected to the main page.
The login page will be very similar. Let’s edit public/partials/login.html:
<div class="row">
    <div class="col-md-4 col-md-offset-4">
        <h2>Login</h2>
        <p>Welcome! Use this form to log into your application.</p>

        <hr>

        <p><input type="text" class="form-control" placeholder="Email Address..." ng-model="email" required /></p>
        <p><input type="password" class="form-control" placeholder="Password..." ng-model="password" required /></p>

        <hr>

        <p><button type="button" class="btn btn-success form-control" ng-click="login()">Login</button></p>

        <hr>

        <p><a href="#signup">First time here? <b>Sign up!</b></a></p>
    </div>
</div>
We will create a login() method in the LoginController now. Open public/js/controllers.js and add:
bookWishlistAppControllers.controller('LoginController', ['$scope', '$http', '$location', 'userService', function ($scope, $http, $location, userService) {

    $scope.login = function() {
        userService.login(
            $scope.email, $scope.password,
            function(response){
                $location.path('/');
            },
            function(response){
                alert('Something went wrong with the login process. Try again later!');
            }
        );
    }

    $scope.email = '';
    $scope.password = '';

    if(userService.checkIfLoggedIn())
        $location.path('/');

}]);
Once again, we used the userService login() method. If everything goes well, the user is redirected to the main page. Otherwise, an error alert is shown.
Books Management
The last thing we have to do is to implement the book management part. We will do everything in the MainController, from showing the list and the creation process, to update and removal.
Again, we will build a service for everything we need about books’ persistence – something like a repository. In public/js/services.js we add a new service: bookService.
bookWishlistAppServices.factory('bookService', ['Restangular', 'userService', function(Restangular, userService) {

    function getAll(onSuccess, onError){
        Restangular.all('api/books').getList().then(function(response){

            onSuccess(response);

        }, function(){

            onError(response);

        });
    }

    function getById(bookId, onSuccess, onError){

        Restangular.one('api/books', bookId).get().then(function(response){

            onSuccess(response);

        }, function(response){

            onError(response);

        });

    }

    function create(data, onSuccess, onError){

        Restangular.all('api/books').post(data).then(function(response){

            onSuccess(response);

        }, function(response){

            onError(response);

        });

    }

    function update(bookId, data, onSuccess, onError){

        Restangular.one("api/books").customPUT(data, bookId).then(function(response) {

                onSuccess(response);

            }, function(response){

                onError(response);

            }
        );

    }

    function remove(bookId, onSuccess, onError){
        Restangular.one('api/books/', bookId).remove().then(function(){

            onSuccess();

        }, function(response){

            onError(response);

        });
    }

    Restangular.setDefaultHeaders({ 'Authorization' : 'Bearer ' + userService.getCurrentToken() });

    return {
        getAll: getAll,
        getById: getById,
        create: create,
        update: update,
        remove: remove
    }

}]);
Note: Don’t forget to add restangular as a module dependency.
As we can see, Restangular was used to deal with the API endpoints. To be more precise, we have five methods.
- a
getAllmethod, to retrieve the complete books list for the current user; - a
getByIdmethod, to retrieve a specific book, given its id; - a
createmethod, to store a new book; - an
updatemethod, to update an existing one, given its id; - a
removemethod, to remove an existing book from the list, given its id;
In this service we are also dealing with headers and their settings, using the getCurrentToken method of the userService we already have.
Note: a thing worth noting is the presence of a custom update method. Usually, the update flow is made up of two steps. Getting the entity, and then updating it. We already have a getById method here, so we don’t need the get part because we already know the book id. By using the customPUT we managed to build an “alternative” version of the update procedure, without the need for an extra call to the API service.
We can start by showing the list. public/partials/index.html:
<hr>

<div class="pull-right"><button type="button" class="btn btn-info" ng-click="logout()">Logout!</button></div>

<div class="clearfix"></div>

<hr>

<div class="row">
    <div class="col-md-12">
        <p>You currently have <b>{{ books.length }}</b> books in your wishlist.</p>
        <ul>
            <li ng-repeat="book in books">
                <b>{{ book.title }}</b> by <i>{{ book.author_name }}</i>
            </li>
        </ul>
    </div>
</div>
In this first template, we are just showing a list of books. To retrieve our data we will create a refresh method in the controller. In the controllers.js logout method which calls the method with the same name in the userService, we add this code to the MainController:
bookWishlistAppControllers.controller('MainController', ['$scope', '$location', 'userService', 'bookService', function ($scope, $location, userService, bookService) {

    $scope.logout = function(){
        userService.logout();
        $location.path('/login');
    }

    $scope.refresh = function(){

        bookService.getAll(function(response){

            $scope.books = response;

        }, function(){

            alert('Some errors occurred while communicating with the service. Try again later.');

        });

    }

    if(!userService.checkIfLoggedIn())
        $location.path('/login');

    $scope.books = [];

    $scope.refresh();

}]);
We added two methods: logout calls the one with the same name in the userService, and refresh. The latter calls the getAll method in the booksService. Then, it assigns the result to the $scope.books variable which is already bound to the view. If something goes wrong, an error is displayed.
Now we have to implement the book creation functionality. For this purpose, let’s return to our public/partials/index.html view. Let’s add a modal that we will use to add a new book, and a button to toggle it.
<hr>
<div class="pull-left"><button type="button" class="btn btn-success" data-toggle="modal" data-target="#addBookModal">+ Add Book</button></div>
<div class="pull-right"><button type="button" class="btn btn-info" ng-click="logout()">Logout!</button></div>
<div class="clearfix"></div>
<hr>
<div class="row">
<div class="col-md-12">
<p>You currently have <b>{{ books.length }}</b> books in your wishlist.</p>
<ul>
<li ng-repeat="book in books">
<b>{{ book.title }}</b> by <i>{{ book.author_name }}</i>
</li>
</ul>
</div>
</div>
<div class="modal fade" id="addBookModal">
<div class="modal-dialog">
<div class="modal-content">
<div class="modal-header">
<button type="button" class="close" data-dismiss="modal" aria-label="Close"><span aria-hidden="true">×</span></button>
<h4 class="modal-title">Add a Book</h4>
</div>
<div class="modal-body">
<p><input class="form-control" ng-model="currentBookTitle" placeholder="Title..." type="text"></p>
<p><input class="form-control" ng-model="currentBookAuthorName" placeholder="Author Name..." type="text"></p>
<p><input class="form-control" ng-model="currentBookPagesCount" placeholder="Pages Count..." type="text"></p>
</div>
<div class="modal-footer">
<button type="button" class="btn btn-default" data-dismiss="modal">Close</button>
<button type="button" class="btn btn-primary" ng-click="create()">Save Book</button>
</div>
</div><!-- /.modal-content -->
</div><!-- /.modal-dialog -->
</div><!-- /.modal -->
Now, let’s go back to the MainController and implement the create method:
bookWishlistAppControllers.controller('MainController', ['$scope', '$location', 'userService', 'bookService', function ($scope, $location, userService, bookService) {

    $scope.logout = function(){
        userService.logout();
        $location.path('/login');
    }

    $scope.create = function(){

        bookService.create({
            title: $scope.currentBookTitle,
            author_name: $scope.currentBookAuthorName,
            pages_count: $scope.currentBookPagesCount
        }, function(){

            $('#addBookModal').modal('toggle');
            $scope.currentBookReset();
            $scope.refresh();

        }, function(){

            alert('Some errors occurred while communicating with the service. Try again later.');

        });

    }

    $scope.refresh = function(){

        bookService.getAll(function(response){

            $scope.books = response;

        }, function(){

            alert('Some errors occurred while communicating with the service. Try again later.');

        });

    }

    $scope.currentBookReset = function(){
        $scope.currentBookTitle = '';
        $scope.currentBookAuthorName = '';
        $scope.currentBookPagesCount = '';
    }

    if(!userService.checkIfLoggedIn())
        $location.path('/login');

    $scope.books = [];

    $scope.currentBookReset();
    $scope.refresh();

}]);
Our controller grows: we can see the create, and the currentBookReset method that resets all the scope variables. The create method obviously uses the create method of the bookService. The app should now already work well!
We still have to implement the updating and removal of books. Let’s start with the easier one, the remove method.
In public/partials/index.html we add a delete button in the Angular repeater that will call the remove method in the MainController:
<ul>
    <li ng-repeat="book in books">
        <b>{{ book.title }}</b> by <i>{{ book.author_name }}</i> |
        <button ng-click="delete(book.id)" class="btn btn-danger btn-xs">Delete</button>
    </li>
</ul>
We then add the remove method to the MainController:
$scope.remove = function(bookId){

    if(confirm('Are you sure to remove this book from your wishlist?')){
        bookService.remove(bookId, function(){

            alert('Book removed successfully.');

        }, function(){

            alert('Some errors occurred while communicating with the service. Try again later.');

        });
    }

}
The bookService will do its job. If something goes wrong, an alert will be displayed to the user.
We can finally implement our update feature, the last one. In the public/partials/index.html view we’ll add a button to our repeater. This time a blue “info” one. The repeater will now look like this:
<ul>
    <li ng-repeat="book in books">
        <b>{{ book.title }}</b> by <i>{{ book.author_name }}</i> |
        <button ng-click="load(book.id)" class="btn btn-info btn-xs">Update</button>
        <button ng-click="remove(book.id)" class="btn btn-danger btn-xs">Remove</button>
    </li>
</ul>
and this is the modal we are going to add:
<div class="modal fade" id="updateBookModal">
<div class="modal-dialog">
<div class="modal-content">
<div class="modal-header">
<button type="button" class="close" data-dismiss="modal" aria-label="Close"><span aria-hidden="true">×</span></button>
<h4 class="modal-title">Update a Book</h4>
</div>
<div class="modal-body">
<input type="hidden" ng-model="currentBookId" />
<p><input class="form-control" ng-model="currentBookTitle" placeholder="Title..." type="text"></p>
<p><input class="form-control" ng-model="currentBookAuthorName" placeholder="Author Name..." type="text"></p>
<p><input class="form-control" ng-model="currentBookPagesCount" placeholder="Pages Count..." type="text"></p>
</div>
<div class="modal-footer">
<button type="button" class="btn btn-default" data-dismiss="modal">Close</button>
<button type="button" class="btn btn-primary" ng-click="update()">Save Changes</button>
</div>
</div><!-- /.modal-content -->
</div><!-- /.modal-dialog -->
</div><!-- /.modal -->
We will also need some methods in our controller. Back in MainController we add:
$scope.load = function(bookId){

    bookService.getById(bookId, function(response){

        $scope.currentBookId = response.book.id;
        $scope.currentBookTitle = response.book.title;
        $scope.currentBookAuthorName = response.book.author_name;
        $scope.currentBookPagesCount = response.book.pages_count;

        $('#updateBookModal').modal('toggle');

    }, function(){

        alert('Some errors occurred while communicating with the service. Try again later.');

    });

}

$scope.update = function(){

    bookService.update(
        $scope.currentBookId,
        {
            title: $scope.currentBookTitle,
            author_name: $scope.currentBookAuthorName,
            pages_count: $scope.currentBookPagesCount
        },
        function(response){

            $('#updateBookModal').modal('toggle');
            $scope.currentBookReset();
            $scope.refresh();

        }, function(response){
            alert('Some errors occurred while communicating with the service. Try again later.');
        }
    );
}
The load method will retrieve the book data from the API, and show it in the modal. Then, after the edit procedure, the user will click on the “Save Changes” button, which will call the update method. This final method will call the bookService accordingly, storing the edit using the APIs.
Our controller, in its final form, will look like this.
Our application is now complete… and we can use it! Time to store tons of books.
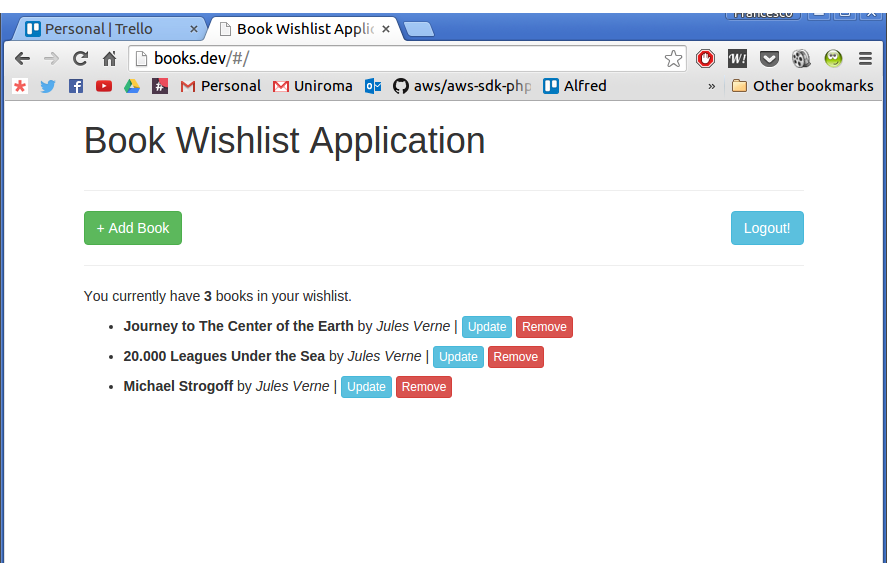
Yeah, I love Jules Verne.
Conclusion
In this series, we used two separate technologies to build a complete (and complex) application in a really easy way. Thanks to some tools like the Laravel API Boilerplate and Restangular, we focused almost entirely on the real business logic instead of wasting time on bootstrapping.
In this part, we took a look at implementing an Angular front end for our Laravel API back end, going from nothing to a fully fledged app. Obviously, the journey doesn’t end here: as an exercise, my suggestion is to implement a mechanism to check if the token has expired, and create another one to refresh it.
In future posts, we might look at various different JS frameworks to achieve the same thing, and judge which one is the simplest. Any suggestions on which ones we should try first?
Frequently Asked Questions (FAQs) on Consuming Laravel API with AngularJS
How can I set up Laravel and AngularJS for my project?
To set up Laravel and AngularJS for your project, you need to first install Laravel using Composer. After Laravel is installed, you can then install AngularJS using Bower or npm. Once both are installed, you can start building your application by creating routes, controllers, and views in Laravel, and then using AngularJS to consume the API provided by Laravel.
What is the role of Laravel in this setup?
Laravel plays a crucial role in this setup as it provides the backend for your application. It handles all the server-side operations such as database interactions, business logic, and data processing. Laravel also provides an API that AngularJS can consume to display data on the frontend.
How does AngularJS consume the Laravel API?
AngularJS consumes the Laravel API using the $http service. This service allows AngularJS to make HTTP requests to the Laravel API and retrieve data. The data is then used to update the view in real-time, providing a seamless user experience.
Can I use other JavaScript frameworks instead of AngularJS with Laravel?
Yes, you can use other JavaScript frameworks like React or Vue.js with Laravel. However, the process of consuming the Laravel API might be slightly different depending on the framework you choose.
How can I handle errors when consuming the Laravel API with AngularJS?
You can handle errors by using the .catch() method of the $http service in AngularJS. This method is triggered when the HTTP request fails, allowing you to handle the error appropriately.
How can I secure my Laravel API?
You can secure your Laravel API by using Laravel’s built-in authentication and authorization features. You can also use API tokens or OAuth for more advanced security measures.
How can I paginate data when consuming the Laravel API with AngularJS?
Laravel provides built-in support for pagination. You can use the paginate() method in your Laravel controller to paginate data. Then, in AngularJS, you can use the data provided by Laravel to create pagination controls.
Can I use Laravel and AngularJS for a large-scale application?
Yes, both Laravel and AngularJS are suitable for large-scale applications. Laravel is a robust and scalable PHP framework, while AngularJS is a powerful JavaScript framework that can handle complex frontend operations.
How can I optimize the performance of my Laravel and AngularJS application?
You can optimize the performance of your application by using techniques such as caching, database indexing, and minimizing HTTP requests. Laravel and AngularJS both provide features to help with these optimizations.
Can I test my Laravel and AngularJS application?
Yes, both Laravel and AngularJS provide testing tools. Laravel provides PHPUnit for backend testing, while AngularJS provides tools like Jasmine and Karma for frontend testing.
 Francesco Malatesta
Francesco is a web developer and consultant from Italy. He is the founder of Laravel-Italia, the official Italian Laravel Community, and writes for HTML.IT, the first italian web development portal. He also translated some books about Laravel. In the meantime he follows other projects, works as a freelance backend consultant for PHP applications and studies IT Engineering in Rome. He loves to learn new things, not only about PHP or development but everything. He hopes to work for IBM, sooner or later.