![]()
tl;dr; – Is Packer a tool you’ll need in your tool box as a PHP developer? It depends.
If you do a lot of server work for your clients or on the job, along with development work, then yes. Packer can help you a lot.
If you are only a developer and don’t really do much work on the server directly, then no. Packer won’t be very helpful.
That being said, it is wise for any PHP developer to learn the basics of creating server environments. You will run into these technologies in your career in one way or another (everything you create runs on them!). This specialized knowledge will help your career in the future for sure! At a minimum, you’ll understand your dev-ops colleagues and the work they do much better.
If your interest has been piqued, or if you do a lot of manual server work, please do read on.

A Look Back in Time
tl;dr; #2 – If you have a command of Vagrant and understand it’s purpose as a tool, please jump to this section of the article.
Only 10 years ago, developing PHP applications basically worked like this: the developer would throw some code up on a web server via FTP and see if it worked. If it didn’t, they would troubleshoot it, edit in a change in some text editor, reload the affected file via FTP again and see if the changes fixed the problem. In that case, they’d go to the next feature or issue, wash, rinse, repeat (and hope nothing they just worked on broke). They might have had some synchronization going with FTP, too.
This was the workflow of the average lone PHP developer pushing stuff to a development server or, heaven help them, directly to a production server (and still is the same process for some developers today, actually). Building the web server itself back then was usually the work of someone else.
Also, in that not-so-distant past, to get teams of developers to work together, there might have been some form of concurrent versioning system and maybe the team even had an auto-deployment set up. When changes were committed to the repository, it would deploy to either a staging or a production system automatically. This scenario was actually the best technology for web application development back then.
In those good old days, things like continuous integration, virtual machines, cloud computing, infrastructure orchestration, data-center automation and even the term “devops” were basically unknown. They were just coming to life. Amazon was just starting their Web Services business. And remember, this was only 10 years ago!
Ahhh, how simple life was back then, right?
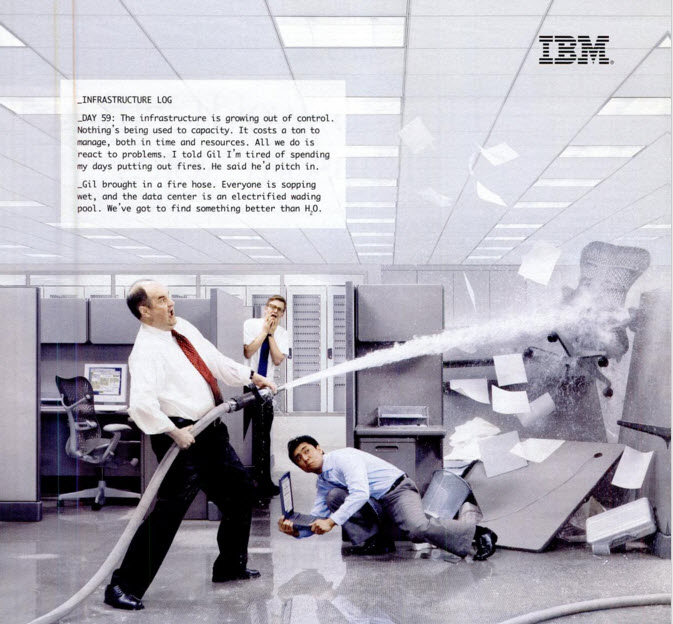
Well, no. Back then, development was slower and more tedious, and also more error prone. Servers also always had to be “put up” for testing, which often meant developers had to wait until the “network guys” got a server ready for use with, say, the newest version of PHP. It was often a fight in a lot of cases and for the “network guys”, keeping servers “in shape” was often like fighting fires.
Computing Today and Virtualization
Today, with the computer technology within everyone’s grasp, developers can carry a much more sophisticated development infrastructure right with them on their own laptop. The computing power of a laptop or PC today is considerably more than what was available just 10 years ago in a web server.
In fact, many of the smart phones we have today are more powerful than the servers of 10 years ago.

Technology is amazing, isn’t it?
Because of the growing amount of computing power available, more and more people started to realize that this computing power could be split off into separate “machines”. This allowed for totally different things to happen on them at the same time. More importantly, the computing power could be much better utilized, saving resources. These were the main drivers for the virtualization of computing power.
In other words, today, with the ability to make virtual machines, developers can carry their own development environments with them and are no longer restricted by another party of people, who have to “give” them a proper environment to work on. More importantly, they can locally build a complete development environment, which mimics a full web server.
Not only does this make developers much more autonomous, there is another big advantage to this kind of local development environment: it is called “development-production parity” – a concept we discuss at length in the newbie friendly “Jump Start PHP Environment” book. Dev-prod parity basically means that the developer can develop on a system virtually identical to the one the app will end up on when deployed live.

The Production Parity Advantage – it allows the developer to produce higher quality code, because they can do the right things, the right way, the first time.
Today, a developer can have everything they need to develop highly complex applications within a highly complex environment, right in their own backpack.
With this ability obviously comes complexity. The virtual servers have to be built and the software has to be installed and configured. All of this can be quite time consuming and time is, as you know, money. It also means that the developer might have to learn a lot to get such environments running. This is also time consuming.
In Comes Vagrant
To help the developer with this “building” of the development environment, a program called Vagrant was brought to life by Hashicorp Inc. With Vagrant, the development environment configuration is code and can be shared, rolled back and rolled forward with ease. A developer is free to try new things, like the latest version of PHP, without worrying that a server might take hours to set up or a failure take hours to unravel. The developer doesn’t have to wait for anyone to make this environment, nor would they bother anyone, should it be completely screwed up.
For More on Vagrant – Re-introducing Vagrant: The Right Way to Start with PHP
But there is still another problem to be solved. Vagrant, although it is really good for building development environments, takes a considerable amount of time to run, especially when there is a lot of provisioning (more on provisioning below). Depending on the software involved, the building of a box and the provisioning of software can take anywhere from 2 to 20 minutes.
This time consumption is compounded by the fact that Vagrant can only build a single box for a single virtualization system (called “the provider”) at one time. If you want to build your environment locally and also build one on AWS, for instance, you’d have to create two different Vagrant files and run them separately. This isn’t really practical. Simply put, Vagrant builds single development environments very well and that’s about it.
In Comes Packer
To continue to follow along, you now have to get more into the shoes of someone in a DevOps role. Packer puts the chore of creating virtualized machine images into a relatively simple central configuration, so you get the same advantages Vagrant has in automating development environments, but also now for developing base images.
A virtual machine image is also called a virtual appliance. It is a pre-built copy of a virtual machine, which can be used to create a new virtual machine. These images are called “boxes” in Vagrant terms.
If you know about the process of creating your own images, you know it is a PITA to do manually. If you don’t, you’re lucky, because you get to skip the headaches of building them manually and can start using Packer now. Though, you will still have to learn some basics of image/ server building. Again, this is valuable knowledge as a developer and any developer really should take the time to get to know the basics.
Once you get started with Packer, and you are already using Vagrant, the first question that will hit you is, “What the heck is the difference between Packer and Vagrant?” We started to go over the differences a bit above. In the end, Packer creates images, which Vagrant can use to build development environments. If you have used a Vagrant box from Hashicorp before, more than likely it was also built with Packer.
Working as a DevOps person armed with Packer, you can offer images of the production environment to the development team, which they can use to develop on with ease. This, again, supports development-production parity and simplifies the development process.
We mentioned saving time earlier. Packer can also build these images and deploy them in parallel. So you could build images for different hosts, your private cloud and for Vagrant, practically all at the same time. Additionally, these “pre-baked” images start up much faster than provisioned boxes in Vagrant. Much faster! If your team is “up”ing and destroying boxes all the time, the images made by Packer with your pre-baked software and configuration will save your team a lot of time.
The Packer process makes creating the base images reproducible too. This means higher quality in your production system, because the recreation of the image as a VM can be tested up front and automated. In other words, Packer helps reduce the chance of human error.
While building images, there are also several sub-processes which you can control. We’ll get to them a little further down. You can also read a lot more about the concepts and features of Packer in the Packer docs. Just be aware that you can build for a good number of different platforms. You can also provision software with a whole slew of provisioners like Chef, Puppet, Ansible, or with Shell scripts. And, you can do post-processing, like creating a Vagrant box or pushing an image to the Docker registry (and a whole lot more).
Phew….that was a lot of theory, wasn’t it?
Let’s do something practical, to help clarify the concepts of Packer and how to use it.
Some Packer Workflow
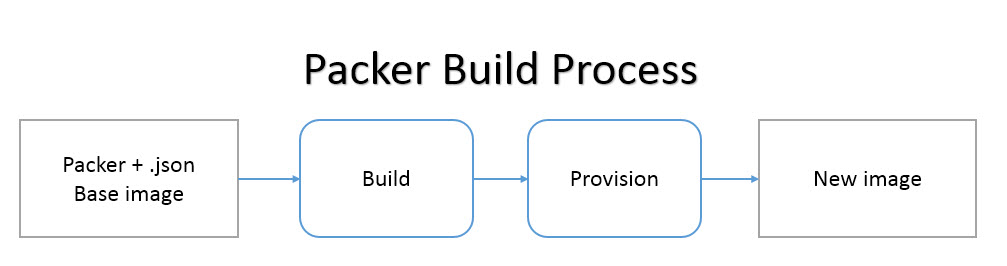
This is a visualization of what we are going to accomplish.
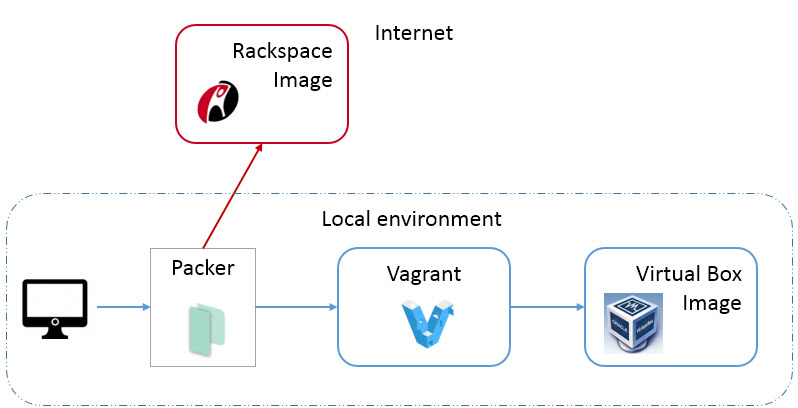
Although Packer doesn’t need Vagrant to make its images, Vagrant was added in the graphic above to give you a better understanding of where it fits in “the pipeline”.
To get you going with the basics of Packer, the goal of the following exercise is to create both an image capable of running on Rackspace and a Virtualbox “box” file. The goal is to show you that you can produce the same image and provisioning to develop with and have on your (theoretical) production server.
We’re using Rackspace because they have a really simple back-end for managing computing infrastructure and because they are using Openstack, which is a standard system for infrastructure management.
We are also using Virtualbox, because it is a free and widely used local virtualization system. You can use other systems like AWS and VMWare if you want, however, you’d need to modify the materials offered in this tutorial, as they are made specifically for these two systems.
PLEASE NOTE: The virtual servers we are building in this article are in no way “production ready”. They are only for demonstration purposes.
The initial image we will be building with Packer will be a Debian Jessie (64bit) image, with Nginx and PHP7 pre-installed.
Requirements: Before we get going, you’ll need Vagrant and the virtualization software Virtualbox (Version 5.0+) installed on your computer. You’ll also need to have a 64bit computer. You should also have Git for Windows installed, if you are on a Windows system, so we can use its bash console.
As I mentioned above, we are using Rackspace for this tutorial, so you’ll need an account there. It’s relatively quick and easy to set one up.
You’ll also need a relatively fast internet connection, as the image download for the Virtualbox build is pretty big (approximately 250MB). Lastly, you’ll need about 12GB of free disk space on your computer for the whole thing.
This article will assume you also know some basics of working with Vagrant, using SSH and Shell commands and have some basic knowledge of Linux and Virtual Machines.
Set up your computer to run Packer
Please follow the instructions to install Packer on your computer.
As of this writing, Packer 0.11.0 had just been released.
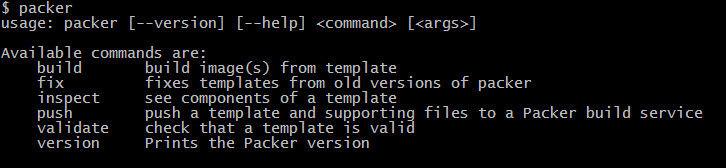
Once installed, enter packer in your (git bash) console. You should see something like this.
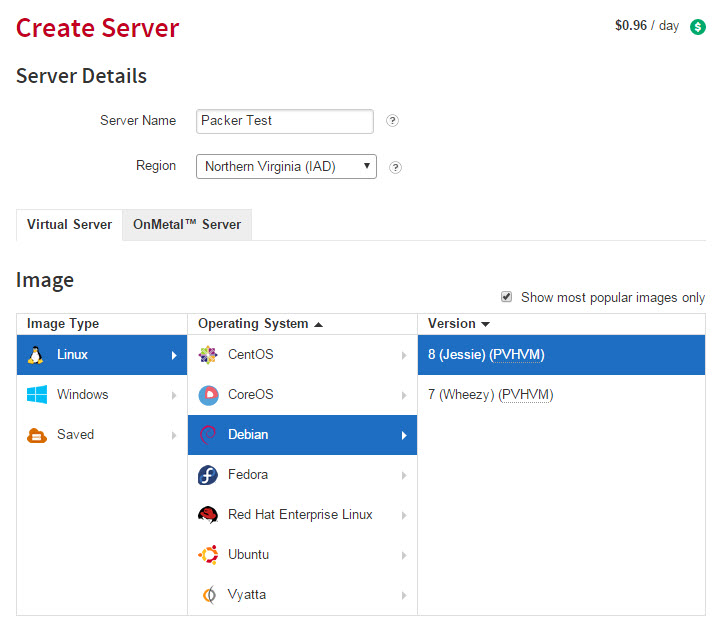
Now we’ll go to Rackspace and spin up a server to then create a base image. First, log into the Rackspace control panel to create the server. NOTE: If you have AWS or some other cloud computing host, which Packer supports as a builder platform, the steps you will need to take will be similar. We are covering Rackspace in this tutorial. Also note, creating servers will cause some charges to your hosting account. The amount will be small, however. Following this tutorial shouldn’t cost more than one dollar.
Go ahead and build a Jessie 8 server and call it “Packer Test”. Rackspace is pretty self explanatory. Fire up a 1GB server to create the image from.
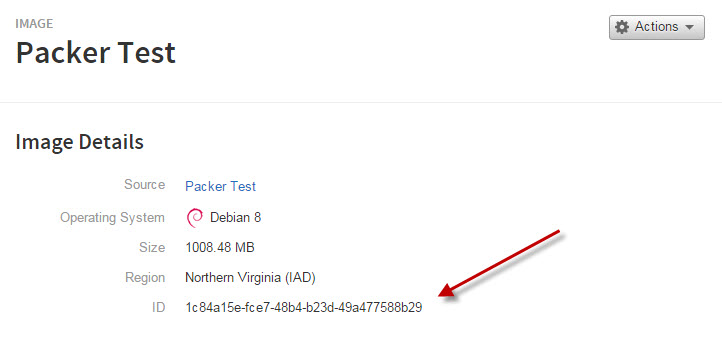
After the server is active, create an image of the newly made server (Actions button, top right corner). Once the image is built and saved, you can delete the server.
Go to “Server -> Images” and you should see your new image. Click on it to go to the image’s detail page. We will need the image ID.
Ok. Now that you have a base image ready to use on Rackspace, we’ll start to build our own images. This process is quite involved actually, especially for those who have only a limited knowledge about server environments and Packer. So to help out a bit, we’ve created a demo Packer repo for you to download. Please clone this repo from your (Git bash) console.
git clone https://github.com/smolinari/PHP-Packer-Demo
Move down into the newly created “PHP-Packer-Demo” directory.
cd PHP-Packer-Demo
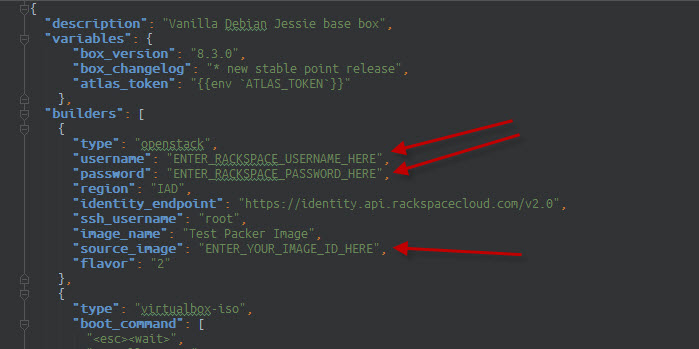
Use your favorite editor and open up the jessie64.json file, then enter your Rackspace user credentials and the image ID.
Quick side note: you can also add your Rackspace API key instead of your password. If you really get into Packer usage, you can also move the access credentials to a separate file and Git ignore them. Doing so goes a bit beyond the scope of this article though.
The jessie64.json file is the heart of Packer. This is the configuration file which controls the actions Packer takes. It is similar in nature to Vagrantfile used in Vagrant (and which we’ve also given you in the download).
Now run Packer with the following command.
packer build jessie64.json
This build process takes several minutes. Since we are in the middle of a tutorial, let’s actually go over what is happening inside of Packer, while we wait for it to finish. This process shouldn’t take more than about 30 minutes or the output in the console should never stop for more than 10 minutes. If it does, something went wrong.
The Builders
First, Packer is starting the build processes with the base images we have defined. The images are started as servers themselves, which we also defined within the jessie64.json file. You can find the particular JSON values for the “builders” at the top of our jessie64.json file.
 "builders": [
    {
      "type": "openstack",
      "username": "ENTER_RACKSPACE_USERNAME_HERE",
      "password": "ENTER_RACKSPACE_PASSWORD_HERE",
      "region": "IAD",
      "identity_endpoint": "https://identity.api.rackspacecloud.com/v2.0",
      "ssh_username": "root",
      "image_name": "Test Packer Image",
      "source_image": "ENTER_YOUR_IMAGE_ID_HERE",
      "flavor": "2"
    },
    {
      "type": "virtualbox-iso",
      "boot_command": [
        "<esc><wait>",
        "install <wait>",
        "preseed/url=http://{{ .HTTPIP }}:{{ .HTTPPort }}/vanilla-debian-8-jessie-preseed.cfg <wait>",
        "debian-installer=en_US <wait>",
        "auto <wait>",
        "locale=en_US <wait>",
        "kbd-chooser/method=us <wait>",
        "netcfg/get_hostname={{ .Name }} <wait>",
        "netcfg/get_domain=vagrantup.com <wait>",
        "fb=false <wait>",
        "debconf/frontend=noninteractive <wait>",
        "console-setup/ask_detect=false <wait>",
        "console-keymaps-at/keymap=us <wait>",
        "keyboard-configuration/xkb-keymap=us <wait>",
        "<enter><wait>"
      ],
      "disk_size": "10140",
      "guest_additions_mode": "disable",
      "guest_os_type": "Debian_64",
      "hard_drive_interface": "sata",
      "headless": true,
      "http_directory": "http",
      "iso_checksum": "dd25bcdde3c6ea5703cc0f313cde621b13d42ff7d252e2538a11663c93bf8654",
      "iso_checksum_type": "sha256",
      "iso_url": "http://cdimage.debian.org/cdimage/release/8.3.0/amd64/iso-cd/debian-8.3.0-amd64-netinst.iso",
      "shutdown_command": "sudo /sbin/halt -p",
      "ssh_password": "vagrant",
      "ssh_username": "vagrant",
      "ssh_port": "22",
      "ssh_wait_timeout": "10000s",
      "vm_name": "debian-jessie",
      "vboxmanage": [
        ["modifyvm", "{{.Name}}", "--memory", "1024"],
        ["modifyvm", "{{.Name}}", "--cpus", "1"]
      ]
    }
  ],
The builders are responsible for making the images you want compatible with the environments you are targeting. For instance, with an AWS AMI, you could actually build your Virtualbox image to be used with Vagrant and with AWS.
In our exercise, we are putting together “openstack” and “virtualbox-iso” images. Unfortunately, Packer cannot use the openstack image to build a Virtualbox image, so we are creating the virtualbox image additionally.
You’ll notice the “boot_command” section in the JSON code above. This is where we are actually automating the entering of the necessary commands in order to install Debian Jessie 8 as an OS in the Virtualbox VM. If you want, you can even watch the installation happen within Virtualbox, as Packer does its building.
Granted, this is a lot of “magic” happening and you’d have to really know the internals of Linux installations and the internals of Packer to put such a Virtualbox image together manually. Thankfully, there are many cool DevOps people who put such Packer .json files up for general use.
The Provisioners
Once the builders have gotten the images up and running in a VM in Rackspace and in Virtualbox, Packer will start to provision the software, which is defined in the shell scripts. With Packer, you can also use systems like Puppet, Chef or Ansible and a number of others to orchestrate the provisioning. We are only using Shell scripts, which you can find in the /scripts directory.
This is the provisioning section in our configuration file.
  "provisioners": [
    {
      "type": "file",
      "source": "transfer_files/",
      "destination": "/tmp"
    },
    {
      "type": "shell",
      "pause_before": "5s",
      "execute_command": "echo 'vagrant'|sudo -S sh '{{.Path}}'",
      "override": {
        "virtualbox-iso": {
          "scripts": [
            "scripts/base.sh",
            "scripts/vagrant.sh",
            "scripts/virtualbox.sh",
            "scripts/setup.sh",
            "scripts/cleanup.sh",
            "scripts/minimize.sh"
          ]
        },
        "openstack": {
          "scripts": [
            "scripts/setup.sh"
          ]
        }
      }
    }
  ],
The “file” provisioner is how we get our configuration onto the VM. It loads config files from our machine to the /tmp directory on the VMs. There are commands in the shell scripts which copy the configuration files to the proper locations on the VMs later in the provisioning process. We have files like the “default” configuration files for Nginx or a modified php.ini file for PHP. You can find the files we are using in the /transfer_files folder.
You’ll also notice the “override” section above. This is telling Packer to only run certain scripts for each image build. In our exercise, we need to do less work with the “openstack” image to get it to be “in parity” with the Virtualbox image, so only the setup.sh script is being processed.
Lastly, there is the post-provision processor section.
  "post-processors": [
    {
      "type": "vagrant",
      "only": ["virtualbox-iso"],
      "output": "jessie64.box"
    }
  ]
This is responsible for actually building the Vagrant box.
It’s important to remember that everything we provision now is “pre-baked” into the images. Packer saves us (or our dev team) a lot of time with this bit of automation!
The Built Images
After Packer provisions all the software we’ve configured in the jessie64.json file, it will shut down the VMs and store the new images of these VMs. For the Rackspace image, you’ll find the new image under the “Saved Images” section of the Rackspace admin control panel. For the Virtualbox image, you’ll find a “jessie64.box” file in your current directory.
That’s it. Packer has done its job!
Now what?
You can now use the Rackspace image to create a new server. Try it. Go to the “Servers” section and select “Create Server”, then go to “Saved Images”. You should see your newly saved image under “Deleted Servers”. Select it and start the server. Once it is active, you can take the IP address given to you and enter it in your browser. You should get the Nginx welcome screen.
For the Virtualbox image, we have a bit more work to do with Vagrant. Follow along carefully now. This is going to get really difficult!
Create the Virtualbox VM
In the directory with the Vagrant file, enter these commands.
vagrant box add jessie64 jessie64.box
vagrant up
That’s it! Ok, granted, we did help you a bit by creating the Vagrant file for you. You’d need to learn more about Vagrant, in order to create a working file yourself. As mentioned before, if you are a serious developer, this should be something you should learn.
You should now be seeing the new image as a VM in Virtualbox’s UI.
The first command above adds the new box into Vagrant, so it knows where to use it from. We’ve given the box the name “jessie64” and are using the box we just created. The second command tells Vagrant to create the virtual machine in Virtualbox and run it.
You’ll also notice, this initial start of the boxes takes only a minute or two. Had we been provisioning everything in Vagrant, it would have taken up to 10-20 minutes. This is time saving again.
Once the “vagrant up” command is finished, enter the URL http://192.168.33.10 in your browser and you should see the same Nginx welcome page. This is your local web server, a perfect copy of the web server on Rackspace.
In both systems, you also have SSH with the “vagrant” user and the password “vagrant”. These servers are not secure!
We’re not finished quite yet!
Let’s do some more fun stuff.
As you are doing this next step, imagine how many times you’ve done this or something similar. We are now automating the process of software installation and configuration!
Let’s say we do a lot of Symfony development work. Let’s go ahead and set up our images to automatically have a version of Symfony installed and ready for us.
Before we get going, delete the server on Rackspace. (We don’t want to spend any unnecessary money.)
Also, in your console, let’s kill and remove the Vagrant box we just loaded. Enter these commands:
vagrant destroy
vagrant box remove jessie64
Installing Symfony (and the Demo) Just For Fun – (or is it?)
Again, let’s imagine we have a team of devs and they work with Symfony a lot. Let’s automate setting up a Symfony-ready server. We’re only going to load the Symfony demo app, but this extra work should give you a pretty good idea of where and how Packer can help with automation to support development and infrastructure orchestration work.
Go into the /scripts directory and open the setup.sh script with your favorite editor and add this Shell script code to the bottom.
# Restart PHP-FPM (only needed so the Symfony demo install works properly)
service php7.0-fpm restart

#Install SQLite Database
apt-get install -y sqlite3

#Install Symfony Installer
echo "Installing Symfony"
echo "Downloading Symfony installer"
curl -LsS https://symfony.com/installer -o /usr/local/bin/symfony

echo "Changing permissions on symfony installer for execution"
chmod a+x /usr/local/bin/symfony

#Install Symfony Demo
echo "Installing Symfony Demo"
echo "Changing to www directory"
cd /var/www/html
echo "Creating the demo"
symfony demo

#Change ownership of the project to the www-data user
echo "Changing ownership of symfony_demo"
chown -R www-data:www-data /var/www/html/symfony_demo

#Change configuration files to preconfigured ones
#To get Nginx to work with Symfony and move the doc root to Symfony's /web directory
echo "Copying new Nginx config file"
cp /tmp/config/default-symfony /etc/nginx/sites-available/default
The code above is basically what we’d need to do to set up Symfony, PHP, and Nginx properly.
Comments have been added to explain what will be happening during these provisioning steps.
Once you’ve added the code above and saved it, let’s let Packer do the heavy lifting once more.
Go back up a level in the file system to where we have our jessie64.json file, and enter the command we entered earlier.
packer build jessie64.json
You can now go and take care of other business or get another coffee (or do some walking on your treadmill). This building of the new Symfony demo images will take a while.
Once done, you should be greeted with a screen looking something like this.

Now that the images are built and ready for us, we can start the openstack image as a new server again on Rackspace.
For your Virtualbox VM, enter the two commands again, which were mentioned above under “Create the Virtualbox VM”.
With the Rackspace server, you will get a new IP. Enter
http://new.server.ip
and you should see the Symfony demo app running.
On your local VM, you can enter the following:
http://192.168.33.10
And you will see the same thing.
Cool, huh?
Conclusion
We’ve gone down memory lane and then came back to the present. Hopefully, we got you to understand the reasons for computer virtualization, and for the creation of software like Vagrant and Packer, as well as the connection between the two.
If you were successful in creating the two servers, then you can also imagine the advantages Packer can offer you both as a member of DevOps and as a developer. They include but aren’t limited to:
Production parity – a development environment pretty much exactly like the one in production.
Time savings – the images are “pre-baked” with software and configuration, which you no longer have to manually add.
Environment testing – The finished images can be considered “complete” and tested, avoiding human error.
Environment versioning – As you change the environment, with Git, you can version the different packer builds.
Supports “Immutable Architecture” – where instead of building on or modifying an existing VM, which can be a source of mistakes, the VM instances are simply “destroyed” and new ones are created.
Hopefully, you’ve enjoyed the article and the exercise of building images with Packer. Let us know what you think about Packer in the comments below.
Frequently Asked Questions (FAQs) about HashiCorp’s Packer for PHP Developers
What is HashiCorp’s Packer and how does it benefit PHP developers?
HashiCorp’s Packer is an open-source tool that automates the creation of any type of machine image. It embraces modern configuration management by allowing you to codify your infrastructure to keep it in version control. For PHP developers, Packer can be a game-changer. It allows you to create identical development environments, reducing the “it works on my machine” problem. It also enables you to create ready-to-go images that can be deployed to production in a matter of minutes, rather than hours or days.
How does Packer compare to other similar tools?
Packer stands out from other similar tools due to its versatility and compatibility. It supports a multitude of platforms, including AWS, DigitalOcean, Docker, Google Cloud, and more. It also integrates well with other HashiCorp tools like Terraform and Vagrant, providing a seamless workflow for managing infrastructure.
How can I install Packer?
Packer is easy to install. It is distributed as a binary package for all supported platforms and architectures. You just need to download the appropriate package for your system from the Packer website, unzip it, and then move it into your PATH.
How can I use Packer to create a machine image?
To create a machine image with Packer, you need to write a template file in JSON format. This file defines the type of machine and software to install. Once the template is ready, you can use the ‘packer build’ command to create the image.
Can I use Packer with my existing configuration management tools?
Yes, Packer works well with existing configuration management tools like Chef, Puppet, Ansible, and others. You can use these tools to provision the software on the machine images that Packer creates.
How does Packer handle failures during the image creation process?
Packer has a robust error handling mechanism. If an error occurs during the image creation process, Packer marks the image as failed and cleans up any resources that were created. This ensures that you don’t end up with half-baked or inconsistent images.
Can I use Packer in a Continuous Integration/Continuous Deployment (CI/CD) pipeline?
Absolutely. Packer fits perfectly into a CI/CD pipeline. You can use it to create machine images as part of your build process and then deploy those images to your production environment.
How can I debug issues with Packer?
Packer provides detailed logs that can help you debug issues. You can also enable the debug mode to get more detailed output during the image creation process.
Can I contribute to the Packer project?
Yes, Packer is an open-source project and welcomes contributions from the community. You can contribute by reporting bugs, suggesting features, improving documentation, or submitting pull requests.
Where can I find more resources to learn about Packer?
The official Packer website and GitHub repository are great places to start. They provide comprehensive documentation, tutorials, and examples. You can also find many blog posts, videos, and online courses about Packer on the internet.
 Scott Molinari
Scott has been supporting customers using powerful PHP applications like Wordpress, vBulletin and Xenforo in his spare time for over 13 years. His company (also ran as a hobby) was the distributor for the German version of vBulletin for 12 of those years. The past year and a half, he's been taking on more of the developer roll and is now learning about new technologies for his new project Skooppa.com. His goal at Sitepoint is to share these new technologies with the PHP community.