
A typical web application is usually composed of several UI components that share data. Often, multiple components are tasked with the responsibility of displaying different properties of the same object. This object represents state which can change at any time. Keeping state consistent among multiple components can be a nightmare, especially if there are multiple channels being used to update the same object.
Take, for example, a site with a shopping cart. At the top we have a UI component showing the number of items in the cart. We could also have another UI component that displays the total cost of items in the cart. If a user clicks the Add to Cart button, both of these components should update immediately with the correct figures. If the user decides to remove an item from the cart, change quantity, add a protection plan, use a coupon or change shipping location, then the relevant UI components should update to display the correct information. As you can see, a simple shopping cart can quickly become difficult to keep in sync as the scope of its features grows.
In this guide, I’ll introduce you to a framework known as Redux, which can help you build complex projects in a way that’s easy to scale and maintain. To make learning easier, we’ll use a simplified shopping cart project to learn how Redux works. You’ll need to be at least familiar with the React library, as you’ll later need to integrate it with Redux.
Prerequisites
Before we get started, make sure you’re familiar with the following topics:
Also, ensure you have the following setup on your machine:
- a NodeJS environment
- a Yarn setup (recommended)
You can access the entire code used in this tutorial on GitHub.
What is Redux
![]() Redux is a popular JavaScript framework that provides a predictable state container for applications. Redux is based on a simplified version of Flux, a framework developed by Facebook. Unlike standard MVC frameworks, where data can flow between UI components and storage in both directions, Redux strictly allows data to flow in one direction only. See the below illustration:
Redux is a popular JavaScript framework that provides a predictable state container for applications. Redux is based on a simplified version of Flux, a framework developed by Facebook. Unlike standard MVC frameworks, where data can flow between UI components and storage in both directions, Redux strictly allows data to flow in one direction only. See the below illustration:
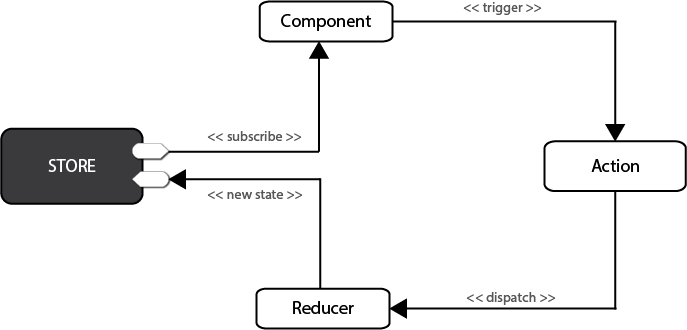
Figure 1: Redux Flow Chart
In Redux, all data — i.e. state — is held in a container known as the store. There can only be one of these within an application. The store is essentially a state tree where states for all objects are kept. Any UI component can access the state of a particular object directly from the store. To change a state from a local or remote component, an action needs to be dispatched. Dispatch in this context means sending actionable information to the store. When a store receives an action, it delegates it to the relevant reducer. A reducer is simply a pure function that looks at the previous state, performs an action and returns a new state. To see all this in action, we need to start coding.
Understand Immutability First
Before we start, I need you to first understand what immutability means in JavaScript. According to the Oxford English Dictionary, immutability means being unchangeable. In programming, we write code that changes the values of variables all the time. This is referred to as mutability. The way we do this can often cause unexpected bugs in our projects. If your code only deals with primitive data types (numbers, strings, booleans), then you don’t need to worry. However, if you’re working with Arrays and Objects, performing mutable operations on them can create unexpected bugs. To demonstrate this, open your terminal and launch the Node interactive shell:
node
Next, let’s create an array, then later assign it to another variable:
> let a = [1,2,3]
> let b = a
> b.push(9)
> console.log(b)
[ 1, 2, 3, 9 ] // b output
> console.log(a)
[ 1, 2, 3, 9 ] // a output
As you can see, updating array b caused array a to change as well. This happens because Objects and Arrays are known referential data types — meaning that such data types don’t actually hold values themselves, but are pointers to a memory location where the values are stored. By assigning a to b, we merely created a second pointer that references the same location. To fix this, we need to copy the referenced values to a new location. In JavaScript, there are three different ways of achieving this:
- using immutable data structures created by Immutable.js
- using JavaScript libraries such as Underscore and Lodash to execute immutable operations
- using native ES6 functions to execute immutable operations.
For this article, we’ll use the ES6 way, since it’s already available in the NodeJS environment. Inside your NodeJS terminal, execute the following:
> a = [1,2,3] // reset a
[ 1, 2, 3 ]
> b = Object.assign([],a) // copy array a to b
[ 1, 2, 3 ]
> b.push(8)
> console.log(b)
[ 1, 2, 3, 8 ] // b output
> console.log(a)
[ 1, 2, 3 ] // a output
In the above code example, array b can now be modified without affecting array a. We’ve used Object.assign() to create a new copy of values that variable b will now point to. We can also use the rest operator(...) to perform an immutable operation like this:
> a = [1,2,3]
[ 1, 2, 3 ]
> b = [...a, 4, 5, 6]
[ 1, 2, 3, 4, 5, 6 ]
> a
[ 1, 2, 3 ]
The rest operator works with object literals too! I won’t go deep into this subject, but here are some additional ES6 functions that we’ll use to perform immutable operations:
- spread syntax — useful in append operations
- map function — useful in an update operation
- filter function — useful in a delete operation
In case the documentation I’ve linked isn’t useful, don’t worry, as you’ll see how they’re used in practice. Let’s start coding!
Setting up Redux
The fastest way to set up a Redux development environment is to use the create-react-app tool. Before we begin, make sure you’ve installed and updated nodejs, npm and yarn. Let’s set up a Redux project by generating a redux-shopping-cart project and installing the Redux package:
create-react-app redux-shopping-cart

cd redux-shopping-cart
yarn add redux # or npm install redux
Delete all files inside the src folder except index.js. Open the file and clear out all existing code. Type the following:
import { createStore } from "redux";

const reducer = function(state, action) {
  return state;
}

const store = createStore(reducer);
Let me explain what the above piece of code does:
- 1st statement. We import a
createStore()function from the Redux package. - 2nd statement. We create an empty function known as a reducer. The first argument,
state, is current data held in the store. The second argument,action, is a container for:- type — a simple string constant e.g.
ADD,UPDATE,DELETEetc. - payload — data for updating state
- type — a simple string constant e.g.
- 3rd statement. We create a Redux store, which can only be constructed using a reducer as a parameter. The data kept in the Redux store can be accessed directly, but can only be updated via the supplied reducer.
You may have noticed I mentioned current data as if it already exists. Currently, our state is undefined or null. To remedy this, just assign a default value to state like this to make it an empty array:
const reducer = function(state=[], action) {
  return state;
}
Now, let’s get practical. The reducer we created is generic. Its name doesn’t describe what it’s for. Then there’s the issue of how we work with multiple reducers. The answer is to use a combineReducers function that’s supplied by the Redux package. Update your code as follows:
// src/index.js
…
import { combineReducers } from 'redux';

const productsReducer = function(state=[], action) {
  return state;
}

const cartReducer = function(state=[], action) {
  return state;
}

const allReducers = {
  products: productsReducer,
  shoppingCart: cartReducer
}

const rootReducer = combineReducers(allReducers);

let store = createStore(rootReducer);
In the code above, we’ve renamed the generic reducer to cartReducer. There’s also a new empty reducer named productsReducer that I’ve created just to show you how to combine multiple reducers within a single store using the combineReducers function.
Next, we’ll look at how we can define some test data for our reducers. Update the code as follows:
// src/index.js
…
const initialState = {
  cart: [
    {
      product: 'bread 700g',
      quantity: 2,
      unitCost: 90
    },
    {
      product: 'milk 500ml',
      quantity: 1,
      unitCost: 47
    }
  ]
}

const cartReducer = function(state=initialState, action) {
  return state;
}
…
let store = createStore(rootReducer);

console.log("initial state: ", store.getState());
Just to confirm that the store has some initial data, we use store.getState() to print out the current state in the console. You can run the dev server by executing npm start or yarn start in the console. Then press Ctrl+Shift+I to open the inspector tab in Chrome in order to view the console tab.

Figure 2: Redux Initial State
Currently, our cartReducer does nothing, yet it’s supposed to manage the state of our shopping cart items within the Redux store. We need to define actions for adding, updating and deleting shopping cart items. Let’s start by defining logic for a ADD_TO_CART action:
// src/index.js
…
const ADD_TO_CART = 'ADD_TO_CART';

const cartReducer = function(state=initialState, action) {
  switch (action.type) {
    case ADD_TO_CART: {
      return {
        ...state,
        cart: [...state.cart, action.payload]
      }
    }

    default:
      return state;
  }
}
…
Take your time to analyze and understand the code. A reducer is expected to handle different action types, hence the need for a SWITCH statement. When an action of type ADD_TO_CART is dispatched anywhere in the application, the code defined here will handle it. As you can see, we’re using the information provided in action.payload to combine to an existing state in order to create a new state.
Next, we’ll define an action, which is needed as a parameter for store.dispatch(). Actions are simply JavaScript objects that must have type and an optional payload. Let’s go ahead and define one right after the cartReducer function:
…
function addToCart(product, quantity, unitCost) {
  return {
    type: ADD_TO_CART,
    payload: { product, quantity, unitCost }
  }
}
…
Here, we’ve defined a function that returns a plain JavaScript object. Nothing fancy. Before we dispatch, let’s add some code that will allow us to listen to store event changes. Place this code right after the console.log() statement:
…
let unsubscribe = store.subscribe(() =>
  console.log(store.getState())
);

unsubscribe();
Next, let’s add several items to the cart by dispatching actions to the store. Place this code before unsubscribe():
…
store.dispatch(addToCart('Coffee 500gm', 1, 250));
store.dispatch(addToCart('Flour 1kg', 2, 110));
store.dispatch(addToCart('Juice 2L', 1, 250));
For clarification purposes, I’ll illustrate below how the entire code should look after making all the above changes:
// src/index.js

import { createStore } from "redux";
import { combineReducers } from 'redux';

const productsReducer = function(state=[], action) {
  return state;
}

const initialState = {
  cart: [
    {
      product: 'bread 700g',
      quantity: 2,
      unitCost: 90
    },
    {
      product: 'milk 500ml',
      quantity: 1,
      unitCost: 47
    }
  ]
}

const ADD_TO_CART = 'ADD_TO_CART';

const cartReducer = function(state=initialState, action) {
  switch (action.type) {
    case ADD_TO_CART: {
      return {
        ...state,
        cart: [...state.cart, action.payload]
      }
    }

    default:
      return state;
  }
}

function addToCart(product, quantity, unitCost) {
  return {
    type: ADD_TO_CART,
    payload: {
      product,
      quantity,
      unitCost
    }
  }
}

const allReducers = {
  products: productsReducer,
  shoppingCart: cartReducer
}

const rootReducer = combineReducers(allReducers);

let store = createStore(rootReducer);

console.log("initial state: ", store.getState());

let unsubscribe = store.subscribe(() =>
  console.log(store.getState())
);

store.dispatch(addToCart('Coffee 500gm', 1, 250));
store.dispatch(addToCart('Flour 1kg', 2, 110));
store.dispatch(addToCart('Juice 2L', 1, 250));

unsubscribe();
After you’ve saved your code, Chrome should automatically refresh. Check the console tab to confirm that the new items have been added:
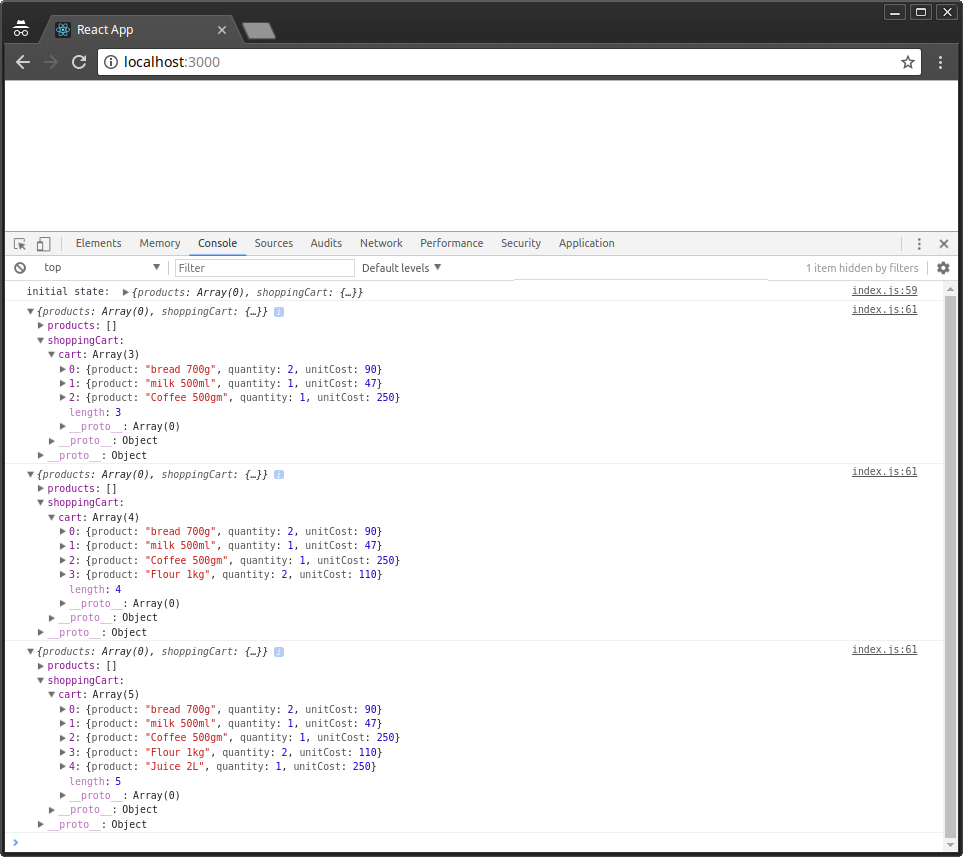
Figure 3: Redux Actions Dispatched
Organizing Redux Code
The index.js file has quickly grown large. This is not how Redux code is written. I’ve only done this to show you how simple Redux is. Let’s look at how a Redux project should be organized. First, create the following folders and files within the src folder, as illustrated below:
src/
├── actions
│   └── cart-actions.js
├── index.js
├── reducers
│   ├── cart-reducer.js
│   ├── index.js
│   └── products-reducer.js
└── store.js
Next, let’s start moving code from index.js to the relevant files:
// src/actions/cart-actions.js

export const ADD_TO_CART = 'ADD_TO_CART';

export function addToCart(product, quantity, unitCost) {
  return {
    type: ADD_TO_CART,
    payload: { product, quantity, unitCost }
  }
}
// src/reducers/products-reducer.js

export default function(state=[], action) {
  return state;
}
// src/reducers/cart-reducer.js

import  { ADD_TO_CART }  from '../actions/cart-actions';

const initialState = {
  cart: [
    {
      product: 'bread 700g',
      quantity: 2,
      unitCost: 90
    },
    {
      product: 'milk 500ml',
      quantity: 1,
      unitCost: 47
    }
  ]
}

export default function(state=initialState, action) {
  switch (action.type) {
    case ADD_TO_CART: {
      return {
        ...state,
        cart: [...state.cart, action.payload]
      }
    }

    default:
      return state;
  }
}
// src/reducers/index.js

import { combineReducers } from 'redux';
import productsReducer from './products-reducer';
import cartReducer from './cart-reducer';

const allReducers = {
  products: productsReducer,
  shoppingCart: cartReducer
}

const rootReducer = combineReducers(allReducers);

export default rootReducer;
// src/store.js

import { createStore } from "redux";
import rootReducer from './reducers';

let store = createStore(rootReducer);

export default store;
// src/index.js

import store from './store.js';
import { addToCart }  from './actions/cart-actions';

console.log("initial state: ", store.getState());

let unsubscribe = store.subscribe(() =>
  console.log(store.getState())
);

store.dispatch(addToCart('Coffee 500gm', 1, 250));
store.dispatch(addToCart('Flour 1kg', 2, 110));
store.dispatch(addToCart('Juice 2L', 1, 250));

unsubscribe();
After you’ve finished updating the code, the application should run as before now that it’s better organized. Let’s now look at how we can update and delete items from the shopping cart. Open cart-reducer.js and update the code as follows:
// src/reducers/cart-actions.js
…
export const UPDATE_CART = 'UPDATE_CART';
export const DELETE_FROM_CART = 'DELETE_FROM_CART';
…
export function updateCart(product, quantity, unitCost) {
  return {
    type: UPDATE_CART,
    payload: {
      product,
      quantity,
      unitCost
    }
  }
}

export function deleteFromCart(product) {
  return {
    type: DELETE_FROM_CART,
    payload: {
      product
    }
  }
}
Next, update cart-reducer.js as follows:
// src/reducers/cart-reducer.js
…
export default function(state=initialState, action) {
  switch (action.type) {
    case ADD_TO_CART: {
      return {
        ...state,
        cart: [...state.cart, action.payload]
      }
    }

    case UPDATE_CART: {
      return {
        ...state,
        cart: state.cart.map(item => item.product === action.payload.product ? action.payload : item)
      }
    }

    case DELETE_FROM_CART: {
      return {
        ...state,
        cart: state.cart.filter(item => item.product !== action.payload.product)
      }
    }

    default:
      return state;
  }
}
Finally, let’s dispatch the UPDATE_CART and DELETE_FROM_CART actions in index.js:
// src/index.js
…
// Update Cart
store.dispatch(updateCart('Flour 1kg', 5, 110));

// Delete from Cart
store.dispatch(deleteFromCart('Coffee 500gm'));
…
Your browser should automatically refresh once you’ve saved all the changes. Check the console tab to confirm the results:
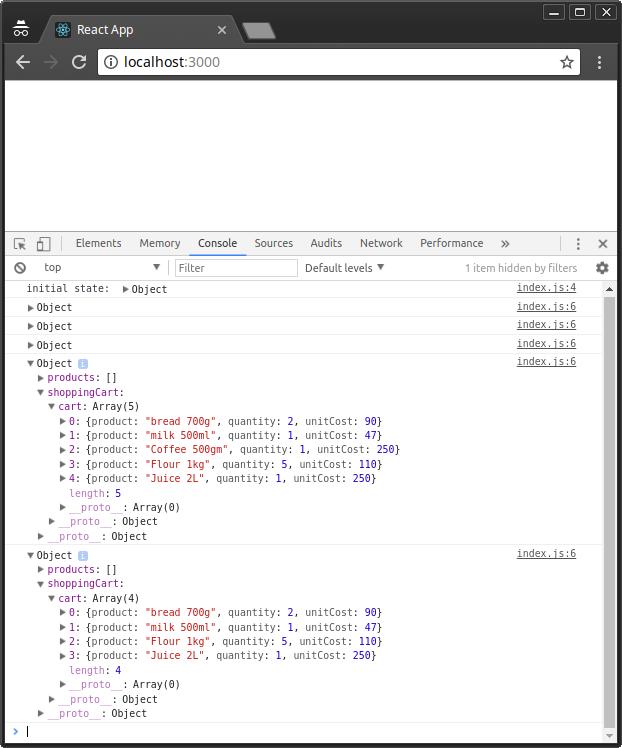
Figure 4: Redux Update and Delete Actions
As confirmed, the quantity for 1kg of flour is updated from 2 to 5, while the the 500gm of coffee gets deleted from cart.
Debugging with Redux tools
Now, if we’ve made a mistake in our code, how do we debug a Redux project?
Redux comes with a lot of third-party debugging tools we can use to analyze code behavior and fix bugs. Probably the most popular one is the time-travelling tool, otherwise known as redux-devtools-extension. Setting it up is a 3-step process. First, go to your Chrome browser and install the Redux Devtools extension.
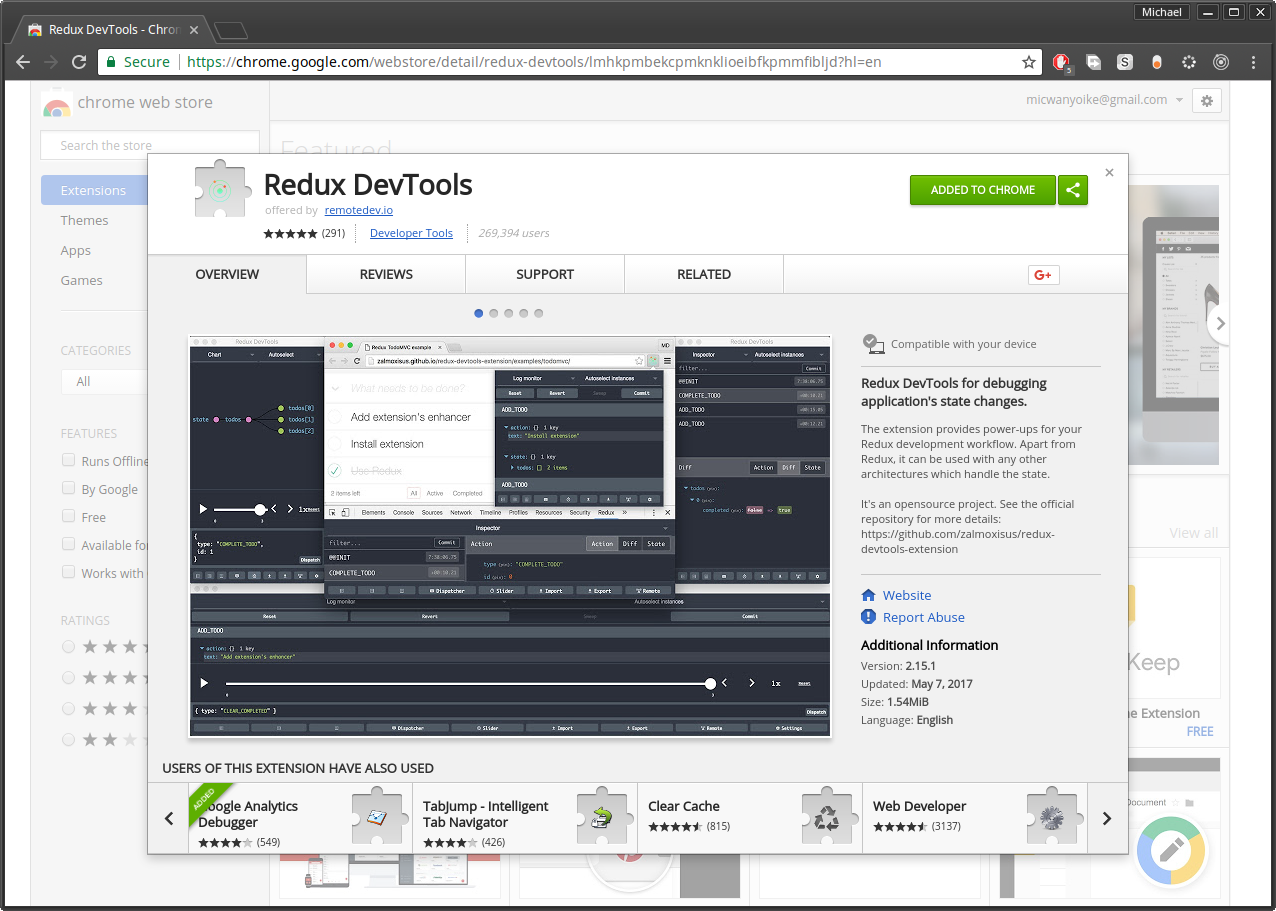
Figure 5: Redux DevTools Chrome Extensions
Next, go to your terminal where your Redux application is running and press Ctrl+C to stop the development server. Next, use npm or yarn to install the redux-devtools-extension package. Personally, I prefer Yarn, since there’s a yarn.lock file that I’d like to keep updated.
yarn add redux-devtools-extension
Once installation is complete, you can start the development server as we implement the final step of implementing the tool. Open store.js and replace the existing code as follows:
// src/store.js
import { createStore } from "redux";
import { composeWithDevTools } from 'redux-devtools-extension';
import rootReducer from './reducers';

const store = createStore(rootReducer, composeWithDevTools());

export default store;
Feel free to update src/index.js and remove all code related with logging to the console and subscribing to the store. This is no longer needed. Now, go back to Chrome and open the Redux DevTools panel by right-clicking the tool’s icon:

Figure 6: Redux DevTools Menu
In my case, I’ve selected to To Bottom option. Feel free to try out other options.
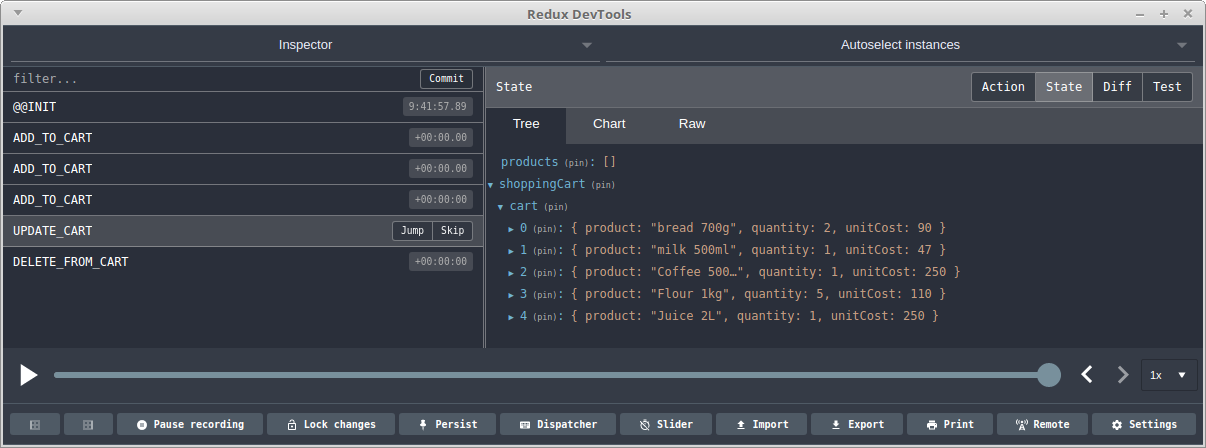
Figure 7: Redux DevTools Panel
As you can see, the Redux Devtool is quite amazing. You can toggle between action, state and diff methods. Select actions on the left panel and observe how the state tree changes. You can also use the slider to play back the sequence of actions. You can even dispatch directly from the tool! Do check out the documentation to learn more on how you can further customize the tool to your needs.
Integration with React
At the beginning of this tutorial, I mentioned Redux really pairs well with React. Well, you only need a few steps to setup the integration. Firstly, stop the development server, as we’ll need to install the react-redux package, the official Redux bindings for React:
yarn add react-redux
Next, update index.js to include some React code. We’ll also use the Provider class to wrap the React application within the Redux container:
// src/index.js
…
import React from 'react';
import ReactDOM from 'react-dom';
import { Provider } from 'react-redux';

const App = <h1>Redux Shopping Cart</h1>;

ReactDOM.render(
  <Provider store={store}>
    { App }
  </Provider> ,
  document.getElementById('root')
);
…
Just like that, we’ve completed the first part of the integration. You can now start the server to see the result. The second part involves linking React’s components with the Redux store and actions using a couple of functions provided by the react-redux package that we just installed. In addition, you’ll need to set up an API using Express or a framework like Feathers. The API will provide our application with access to a database service.
In Redux, we’ll also need to install further packages such as axios to perform API requests via Redux actions. Our React components state will then be handled by Redux, making sure that all components are in sync with the database API. To learn more on how to accomplish all this, do take a look at my other tutorial, “Build a CRUD App Using React, Redux and FeathersJS”.
Summary
I hope this guide has given you a useful introduction to Redux. There’s still quite a bit more for you to learn, though. For example, you need to learn how to deal with async actions, authentication, logging, handling forms and so on. Now that you know what Redux is all about, you’ll find it easier to try out other similar frameworks, such as Flux, Alt.js or Mobx. If you feel Redux is right for you, I highly recommend the following tutorials that will help you gain even more experience in Redux:
- Redux State Management in Vanilla JavaScript
- Redux Logging in Production with LogRocket
- Build a CRUD App Using React, Redux and FeathersJS
- Dealing with Asynchronous APIs in Server-rendered React
Frequently Asked Questions about Redux Data Flow
What is the role of actions in Redux data flow?
Actions in Redux are payloads of information that send data from your application to your store. They are the only source of information for the store. You send them to the store using store.dispatch(). Actions are plain JavaScript objects and must have a type property that indicates the type of action being performed. They can also carry some data.
How does Redux handle data flow?
Redux follows a strict unidirectional data flow. When an action is dispatched, the root reducer function is called with the current state and the dispatched action. The root reducer may divide the task among smaller reducer functions, each managing independent parts of the state. Then, the root reducer combines their results into a single state tree.
What is the purpose of the Redux store?
The Redux store brings together the state, actions, and reducers. It provides methods to dispatch actions, get the current state, and listen for changes. The store is created using the createStore() function, which takes a reducer as the first argument.
How does Redux manage state updates?
In Redux, all state updates are centralized and happen one by one in a strict order. This makes it easier to understand how a particular change leads to a new state. The state is read-only, and you cannot change it directly. Instead, you need to dispatch an action describing the change.
What is the role of reducers in Redux?
Reducers in Redux specify how the application’s state changes in response to actions sent to the store. They are pure functions that take the previous state and an action, and return the next state. It’s important to keep reducers pure with no side-effects, mutations, or API calls.
How does Redux handle asynchronous actions?
Redux itself is synchronous, but middleware like Redux Thunk or Redux Saga can be used to handle asynchronous actions. These middleware allow you to write action creators that return a function instead of an action. The function can then dispatch actions and perform asynchronous tasks.
How can I debug a Redux application?
Redux provides a great developer experience with powerful debugging tools. The Redux DevTools extension allows you to inspect the state and action payload, visualize the state changes, and even travel back in time to previous states.
How does Redux work with React?
Redux can be used with any UI layer, but it works especially well with React. You can use the react-redux library to connect your React components to the Redux store. The connect() function provided by react-redux can be used to make your component aware of the Redux store.
What is the Redux data flow cycle?
The Redux data flow cycle involves four steps: dispatching an action, calling the reducer, storing the new state, and updating the UI. The cycle starts when an action is dispatched. The reducer then calculates a new state based on the current state and the dispatched action. The new state is stored in the Redux store, and finally, the UI updates to reflect the new state.
How can I test Redux reducers?
Since reducers are pure functions, they are relatively easy to test. You can provide a state and an action to your reducer, and then simply check if the output state is as expected. You can use any JavaScript testing framework for this purpose.
 Michael Wanyoike
I write clean, readable and modular code. I love learning new technologies that bring efficiencies and increased productivity to my workflow.