A reusable about dialog box is a good candidate for being stored in an Android library project. In the second part of this three-part series on Android library projects, I introduced you to a simple about dialog box example. In this article, I show you how to access the about dialog box project from an app project.
I used Android SDK Release 20 along with the Android 2.3.3 (API Level 10) and Android 4.1 (API Level 16) platforms to develop and test this article’s code.
About Dialog Box Android Library Project Demonstration
I’ve created a simple app that demonstrates the about dialog box Android library project. It does so in the context of the options menu, which is an activity’s primary collection of menu items. On Android 2.3.3, you activate this menu by pressing the MENU button. On Android 4.1, press the action bar’s vertical ellipsis icon.
Exploring Source Code and Resources
The about dialog box demonstration app project consists of a single source file (AboutDemo.java) and three resources files: main.xml, options.xml, and strings.xml. Listing 1 presents AboutDemo.java.
package ca.tutortutor.aboutdemo;

import android.app.Activity;

import android.os.Bundle;

import android.view.Menu;
import android.view.MenuInflater;
import android.view.MenuItem;

import ca.tutortutor.about.About;

public class AboutDemo extends Activity
{
   @Override
   public void onCreate(Bundle savedInstanceState)
   {
      super.onCreate(savedInstanceState);
      setContentView(R.layout.main);
   }

   @Override
   public boolean onCreateOptionsMenu(Menu menu)
   {
      MenuInflater inflater = getMenuInflater();
      inflater.inflate(R.menu.options, menu);
      return true;
   }

   @Override
   public boolean onOptionsItemSelected(MenuItem item)
   {
      switch (item.getItemId())
      {
         case R.id.menu_info:
              About.show(AboutDemo.this, getString(R.string.about),
                         getString(R.string.close));
              return true;

         default:
              return super.onOptionsItemSelected(item);
      }
   }
}
Listing 1: AboutDemo.java
Listing 1 overrides three Activity methods. The onCreate() method is called when the activity is created, and inflates the activity’s view hierarchy from main.xml (discussed later). The onCreateOptionsMenu() and onOptionsItemSelected() methods support the options menu.
onCreateOptionsMenu() is called when the user opens the options menu (by pressing MENU or the action bar’s vertical ellipsis icon). It’s called with a Menu object to which menu items are attached, obtains a menu inflater (by invoking getMenuInflater()), and uses the inflater to inflate options.xml into a menu that menu references. The returned true value causes the menu to be shown.
onOptionsItemSelected() is called when a menu item from the options menu is selected. It calls the MenuItem argument’s getItemId() method to obtain the selected menu item’s resource ID. If this ID corresponds to the menu_info ID, About‘s show() method is called to display the about text (corresponding to the about string ID) and close button text (corresponding to the close string ID).
Because of this app’s simplicity, I don’t require a switch statement. Also, because there is only one menu item on this menu, the default case won’t be executed. I chose this architecture because I might decide to add more menu items to the options menu, and I might not want to process these menu items immediately. When completing the app, I’d probably remove the default case.
Listing 2 presents main.xml.
<?xml version="1.0" encoding="utf-8"?>
<LinearLayout xmlns:android="http://schemas.android.com/apk/res/android"
              android:orientation="vertical"
              android:layout_width="fill_parent"
              android:layout_height="fill_parent">
  <TextView android:layout_width="fill_parent"
            android:layout_height="wrap_content"
            android:text="@string/app_name"/>
</LinearLayout>
Listing 2: main.xml
Listing 2’s layout resource wraps a textview widget in a linear layout that occupies the entire screen. This widget also occupies the entire width of the screen, but its height is constrained to be no larger than its content (plus padding), so it appears at the top of the screen when the AboutDemo activity is displayed.
Listing 3 presents options.xml.
<?xml version="1.0" encoding="utf-8"?>
<menu xmlns:android="http://schemas.android.com/apk/res/android">
  <item android:id="@+id/menu_info"
        android:icon="@android:drawable/ic_menu_info_details"
        android:title="@string/menu_info"/>
</menu>
Listing 3: options.xml
Listing 3 describes an options menu named options — it presents a single info (about) menu item. The @android:drawable/ic_menu_info_details value assigned to the icon attribute identifies the standard icon for an info menu item. The title is obtained from the string resources so that I can localize it when necessary.
Listing 4 presents strings.xml.
<?xml version="1.0" encoding="utf-8"?>
<resources>
  <string name="about"><![CDATA[Demonstrate the about dialog box.<p>
                                Copyright (c) 2013 by Jeff Friesen<br>
                                All rights reserved.<p>
                                <a href="http://tutortutor.ca/">www.tutortutor.ca</a><p>
                                <a href="mailto:jeff@tutortutor.ca">jeff@tutortutor.ca</a><p>
                                1-800-555-1234<p>
                                <i>This app is distributed on an "as is" basis, without warranty.
                                Although every precaution has been taken in the app\'s creation, Jeff
                                Friesen shall not have any liability to any person or entity with
                                respect to any loss or damage caused or alleged to be caused directly
                                or indirectly by the app.</i>]]></string>
  <string name="app_name">AboutDemo</string>
  <string name="close">Close</string>
  <string name="menu_info">Info</string>
</resources>
Listing 4: strings.xml
Listing 4 describes the app’s string resources. One of these resources (about) needs to include HTML tags such as <br> and <p>. To prevent a parser error when the XML is being parsed (by aapt, the Android Asset Packaging Tool), the resource text is sandwiched between a ![CDATA[ prefix and the corresponding ]]> suffix.
Tip: To support another locale (such as fr — French), create a res\values-suffix directory where suffix identifies a locale (res\values-fr, for example), and copy a strings.xml file to this directory that’s identical to Listing 4 except for localized content between the <string> and </string> tags.
Creating, Initializing, Installing, and Running AboutDemo
Let’s create and initialize this app project. The first step is to create the project. I used the following command line to accomplish this task on my Windows platform:
android create project -t 1 -p C:\prj\ap\AboutDemo -a AboutDemo -k ca.tutortutor.aboutdemo
Target 1 identifies Android 2.3.3 on my platform. (Execute android list targets to obtain the equivalent target number on your platform.) I store this project in my C:\prj\ap\AboutDemo directory. Finally, the project’s package name is ca.tutortutor.aboutdemo.
Next, copy an AboutDemo.java file containing Listing 1’s contents into the AboutDemo\src\ca\tutortutor\aboutdemo directory. Also, copy the following resource files into the appropriate directories:
-
main.xmlcontaining Listing 2’s contents intoAboutDemo\res\layout -
options.xmlcontaining Listing 3’s contents intoAboutDemo\res\menu— you’ll have to first create themenudirectory -
strings.xmlcontaining Listing 4’s contents intoAboutDemo\res\values
Before you can build this project, you need to update it to reference the about dialog box library project. I used the following command to accomplish this task:
android update project -t 1 -p C:\prj\ap\AboutDemo -l ..\About
Execute ant debug to build this project. Assuming a BUILD SUCCESSFUL message, execute the following command to install the resulting AboutDemo-debug.apk file on the current Android Virtual Device (AVD):
adb install AboutDemo-debug.apk
You might have to repeat this command if the first attempt fails.
The app is installed on the AVD with a default icon. Press this icon to run the app. Assuming an Android 2.3.3 device, press the MENU button to display the options menu. Figure 1 shows the result.
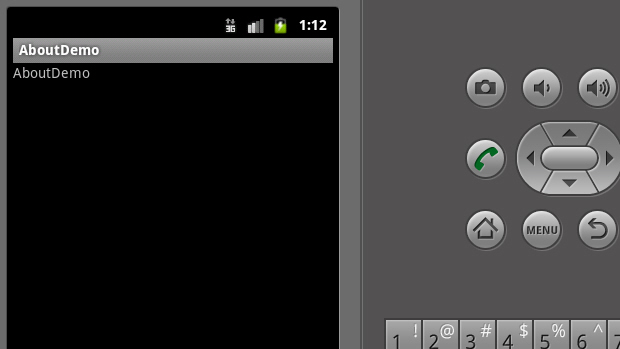
Figure 1: Viewing the options menu under Android 2.3.3.
Press the Info menu item and you should observe Figure 2’s about dialog box.
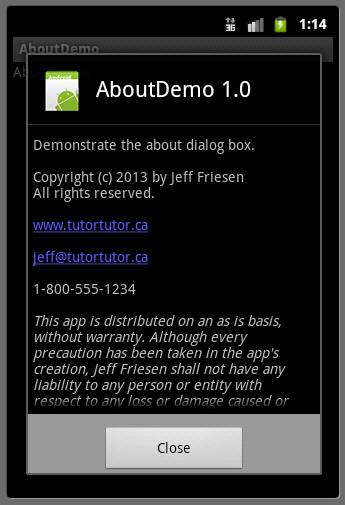
Figure 2: Scroll the dialog box to observe more of the about text. Pressing the email link results in an ‘Unsupported Action’ dialog.
Let’s run this app under Android 4.1. Start up an AVD configured for API Level 16. After it starts up, install AboutDemo-debug.apk and press its icon followed by the vertical ellipsis on the action bar. You should observe Figure 3.
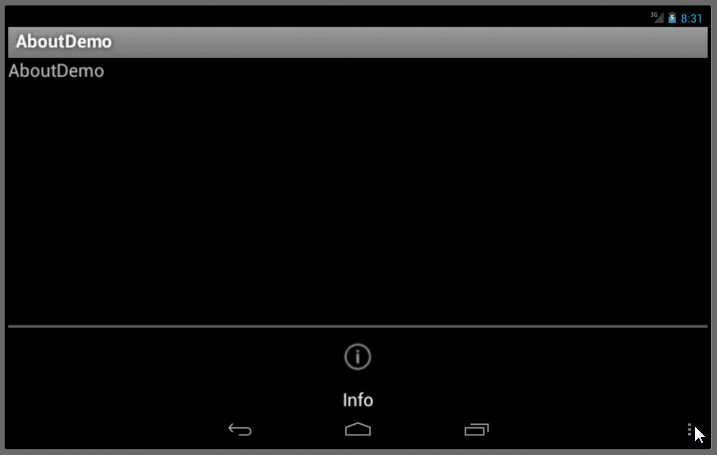
Figure 3: Viewing the options menu under Android 4.1.
Press the Info menu item and you should observe Figure 4’s about dialog box.
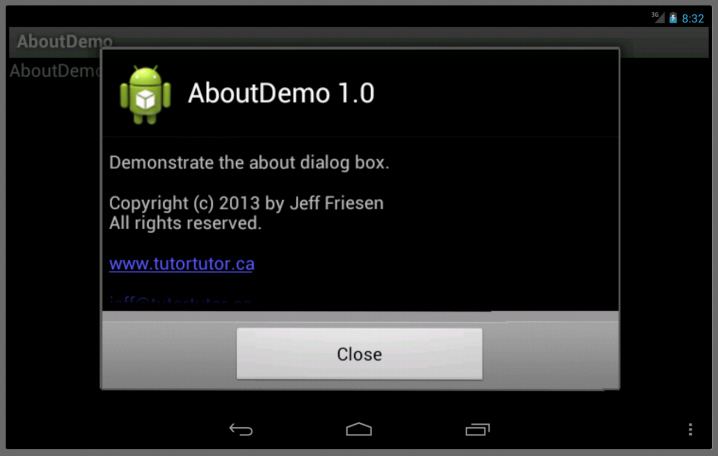
Figure 4: Scroll the dialog box to observe more of the about text. Pressing the email link results in an ‘Unsupported Action’ dialog.
Conclusion
Android library projects are easy to create and use. Now that you have a basic understanding of them, you’ll probably want to practice with more examples. How about developing a reusable help dialog box that uses WebView to present HTML-based help? Also, consider developing an image-processing library.
 Jeff Friesen
Jeff Friesen is a freelance tutor and software developer with an emphasis on Java and mobile technologies. In addition to writing Java and Android books for Apress, Jeff has written numerous articles on Java and other technologies for SitePoint, InformIT, JavaWorld, java.net, and DevSource.