Human beings have an innate ability to detect, process and recognize faces — we’re born with it. Computers can do it, too — it just takes some clever algorithms, reams of code and some training of the algorithms.
Face detection is the process of identifying faces in digital images. It shouldn’t be confused with facial recognition — i.e., trying to work out who someone is from a photograph — but it’s the first part of the process. Facial recognition is a huge topic for another time, but face detection is the subject of this article.
To illustrate the process, here’s an example image:

…and here’s what the face detection does:
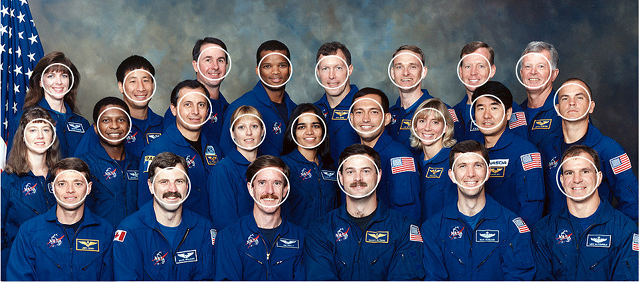
(Original image from Wikipedia)
Applications of Face Detection
There are numerous applications of face detection. Some modern biometrics systems detect faces and then use facial recognition to compare those faces to images in their databases, in order to try and identify someone without having to resort to good old-fashioned passwords. Some cameras use face detection for auto focussing. And like so many things, it also has applications in marketing.
For the purposes of this tutorial, we’ll replicate a feature that you may well have used yourself if you’re a Facebook user. When you upload a photo of your friends, Facebook often shows it back to you with any faces highlighted, in order to prompt you to “tag” people in it. We’re going to build something similar.
A Little Background
Before we dig into the code, let’s look at some of the tools and concepts we’re going to be using.
OpenCV and the Viola-Jones Object Detection Algorithm
OpenCV (Open Source Computer Vision) is an open-source library of hundreds of computer vision algorithms. Although OpenCV is written in C++, we can use it in Node.js applications thanks to the opencv package.
Amongst the algorithms implemented in OpenCV is the Viola-Jones object detection framework, which is used to detect features in images.
Face detection is simply a sub-set of feature (object) detection, but the algorithm is geared towards the challenges involved in detecting faces specifically.
Of course when we talk about feature detection in this context, it’s nothing to do with the sort of feature detection provided by libraries such as Modernizr and yepnope!
First presented in a 2004 article by Paul Viola and Michael J. Jones, this approach has become the de facto standard for face detection.
You’ll find some additional resources on the framework listed under Further Reading later on in this tutorial.
Cascades and Classifiers
An important aspect of the Viola-Jones algorithm is a cascade of classifiers, which is described as “a cascade of boosted classifiers working with haar-like features”. In practical terms, what this means is that it’s a set of visual features that OpenCV has been “trained” to look for in an image, in order to identify a particular type of object — in our case, faces. You’ll find more information about cascades and classifiers in the documentation. A cascade designed specifically for identifying faces is provided for us, as we’ll see when we look at the implementation.
Installation
Before we can start playing with face detection, we need to install a few pre-requisites.
The easiest (and recommended) way to get up-and-running is to use Vagrant. You’ll find the necessary configuration and provisioning script in the repository which accompanies this article. If you use this approach, there’s no need to go through these installation steps.
Installing OpenCV
Linux (Debian-based systems)
OpenCV has a number of pre-requisites itself, which we can install using apt-get:
sudo apt-get install build-essential
sudo apt-get install cmake git libgtk2.0-dev pkg-config libavcodec-dev libavformat-dev libswscale-dev
There are also some optional dependencies:
sudo apt-get install python-dev python-numpy libtbb2 libtbb-dev libjpeg-dev libpng-dev libtiff-dev libjasper-dev libdc1394-22-devThe easiest way to install OpenCV itself it is to use apt-get:
sudo apt-get install libopencv-devAt time of writing, this installs version 2.4.8, although the latest 2.x version is 2.4.11 and there is currently a version 3.0.0. However, there are currently issues with the Node.js wrapper on version 3.0.0., so this version is just fine.
Building from Source
If you want to build from source, start by installing the dependencies listed above, then download and extract the files from the downloads page.
As noted above, there are currently issues with the 3.0.0. in conjunction with the Node.js module, so it’s best to download version 2.4.11.
Now we need to build it:
cd ~/opencv-2.4.11
mkdir release
cd release
cmake -D CMAKE_BUILD_TYPE=RELEASE -D CMAKE_INSTALL_PREFIX=/usr/local ..
make
sudo make install
Be warned, that last step might take a while!
Windows
If you’re using Windows, installation is as simple as downloading and running an executable file from the website. You’ll find a direct link to the latest version (at time of writing) right here.
Mac OSX
The easiest way to install on OSX is to use Homebrew:
brew tap homebrew/science
brew install opencv
You’ll find further instructions here.
Imagemagick
You’ll also need Imagemagick, which is a dependency of the image-processing library we’re going to be using.
Debian-based Systems
apt-get install imagemagick Mac OSX
brew install imagemagick Windows
Download and run the appropriate Windows Binary Release — which is an executable file — from this page.
Building Our Application
A reminder that all the source code for this tutorial is available on Github.
Let’s start by defining a a few dependencies:
- We’re using express as the basis of our web application
- Handlebars is for templating, along with express-handlebars
- The lodash utility library
- multer is a middleware for handling file uploads
- easyimage is an image-handling package
- Lastly, we’re using async to try and avoid callback hell
So without further ado, here’s our package.json:
{
  "name": "sitepoint/face-detection",
  "version": "1.0.0",
  "description": "A simple application which demonstrates face detection in Node.js",
  "main": "index.js",
  "author": "Lukas White",
  "license": "MIT",
  "dependencies": {
    "async": "^1.4.2",
    "busboy": "^0.2.9",
    "connect-busboy": "0.0.2",
    "easyimage": "^2.0.3",
    "express": "^4.13.3",
    "express-handlebars": "^2.0.1",
    "lodash": "^3.10.1",
    "multer": "^1.0.3",
    "opencv": "^3.0.0"
  }
}
Install the dependencies with npm install.
Next, create a few directories:
mkdir public
mkdir public/css
mkdir public/images
mkdir views
mkdir views/layouts
mkdir uploads
Now create a basic layout for our application (views/layouts/default.hbs):
<!DOCTYPE html>
<html>
  <head>
    <meta charset="utf-8">
    <title>Face Detection Example</title>
    <link rel="stylesheet" href="/css/bootstrap.min.css">
    <link rel="stylesheet" href="/css/bootstrap-theme.min.css">
    <link rel="stylesheet" href="/css/styles.css">
  </head>
  <body>

    <nav class="navbar navbar-inverse navbar-fixed-top">
      <div class="container">
        <div class="navbar-header">
          <a class="navbar-brand" href="/">Face Detection Example</a>
        </div>
      </div>
    </nav>

    <div id="main" class="container">
      {{{body}}}
    </div>
  </body>
</html>
I’m referencing the Bootstrap framework to prettify the application slightly, but this is optional. Either download the files yourself, or you’ll find them in the repository which accompanies this article.
Add some basic styles (public/css/styles.css):
#main {
  margin-top: 50px;
}

.frame {
  position: relative;
}

.frame a {
  display: block;
  position: absolute;
  border: solid 2px #fff;
  border-radius: 50%;
}

.frame a:hover {
  background: rgba(0,0,0,0.5);
}
Now let’s implement a skeleton Express app (index.js):
var express   = require('express')
    , http    = require('http')
    , async   = require('async')
    , multer  = require('multer')
    , upload  = multer({ dest: 'uploads/' })
    , exphbs  = require('express-handlebars')
    , easyimg = require('easyimage')
    , _       = require('lodash')
    , cv      = require('opencv');

// MIME types for image uploads
var exts = {
  'image/jpeg': '.jpg',
  'image/png' : '.png',
  'image/gif' : '.gif'
};

var port = 8080;
var app = express();
app.use(express.static(__dirname + '/public'))

// Configure Handlebars
app.engine('.hbs', exphbs({ extname: '.hbs', defaultLayout: 'default' }));
app.set('view engine', '.hbs');

/**
 * This is a placeholder for the application code
 */

http.createServer(app)
  .listen(port, function(server) {
    console.log('Listening on port %d', port);
  });
Hopefully the comments will provide you with an understanding of what’s going on here.
We’ll also need a simple GET route:
app.get('/', function( req, res, next ) {
  return res.render('index');
});
The corresponding view (views/index.hbs) is essentially just a file upload form:
<div>
  <h2>Please upload an image.</h2>
  <p><em>Note: please ensure it's at least 960 x 300 pixels in size.</em></p>
</div>

<form method="post" action="/upload" enctype="multipart/form-data">
  <div class="form-group">
    <input type="file" name="file">
  </div>
  <div class="form-group">
    <input type="submit" value="Submit" class="btn btn-primary">
  </div>
</form>
Before we can get into the nitty-gritty of face detection, we need to build a simple file upload mechanism. This will allow users to upload an image, which we’ll resize to a sensible size and then show it back to them.
Here’s the code:
// POST callback for the file upload form.
app.post('/upload', upload.single('file'), function(req, res, next){

  // Use filename generated for us, plus the appropriate extension
  var filename = req.file.filename + exts[req.file.mimetype]
  // and source and destination filepaths
  , src = __dirname + '/' + req.file.path
  , dst = __dirname + '/public/images/' + filename;

  async.waterfall(
    [
      function(callback){
        // Check the mimetype to ensure the uploaded file is an image
        if (!_.contains(['image/jpeg','image/png','image/gif'],req.file.mimetype)){
          return callback(new Error(
            'Invalid file - please upload an image (.jpg, .png, .gif).')
          )
        }

        return callback();
      },
      function(callback){
        // Get some information about the uploaded file
        easyimg.info(src).then(
          function(file){
            // Check that the image is suitably large
            if ((file.width < 960) || (file.height < 300)){
              return callback(new Error('Image must be at least 640 x 300 pixels'));
            }

            return callback();
          }
        );
      },
      function(callback){
        //Resize the image to a sensible size
        easyimg.resize({
          width: 960,
          src: src,
          dst: dst
        }).then(
          function(image){
            return callback();
          }
        );
      },
      function(callback){
        // Placeholder
      },
      function(im, callback){
        // Placeholder
      }
    ],
    function(err, faces){
    // If an error occurred somewhere along the way, render the error page.
      if (err){
        return res.render('error', {message : err.message});
      }
      // Otherwise render the result page.
      return res.render('result', {filename: filename, faces: faces});
    }
  );
});
All we’re doing here is grabbing an uploaded file, ensuring it’s an image, checking it’s of a minimum size, and if it is, we’re resizing it to 960px. The face detection code has been left out for now. We’ll come to that in a moment.
I won’t go into too much detail about this process, as it’s not the primary focus of the article — but if you want to understand what’s going on, check out the multer and easyimage documentation.
Next we need to read the image using the OpenCV library. Behind the scenes, this converts the image into a matrix of pixels, which it can then run the feature detection algortithm on.
The method we use to do this has the following signature:
cv.readImage(filepath, function(err, im){
  // do something with the matrix referred to by the im variable
});
Because we’re using the async module, we can simply pass it the callback as its second argument. The first argument is the destination dst; that is, the result of the resizing process. So the function in question looks like this:
function(callback){
  //Use OpenCV to read the (resized) image
  cv.readImage(dst, callback);
},
Next, we need to run the feature detection algorthim, which is a method on the Matrix class. Here’s the signature:
im.detectObject(classifier, options, function(err, faces){
  // faces contains an array of data about any faces it's found
});
All being well, the faces variable will contain an array of hashes, one for each face it’s found. Each hash will contain x and y co-ordinates (0,0 being the top-left corner of the image), along with a width and height — thus defining the area in the image that the face is thought to cover.
Integrated into our asynchronous “waterfall”, it’ll look like this:
function(im, callback){
  // Run the face detection algorithm
  im.detectObject(cv.FACE_CASCADE, {}, callback);
}
Notice we’re specifying a pre-built classifier (cv.FACE_CASCADE) specifically designed for face detection.
In our final callback — the second argument to async.waterfall() — we’re rendering an error template if something went wrong, otherwise we render the result, which we pass the filename of the uploaded image, along with our array of faces data.
This concludes the changes we need to make to index.js. Please take a moment to view the completed file on GitHub.
The last thing we need to do, is to define our two remaining views. The error view (views/error.hbs) simply displays the message to the user:
<div class="alert alert-error" role="alert">
<strong>An error has occured:</strong>
{{ message }}
</div>
<a href="/" class="btn btn-default">← Go back and try again</a>
The result view (views\result.hbs) is slightly more interesting:
{{#if faces.length}}
  <div class="alert alert-success" role="alert">
    I found <strong>{{faces.length}}</strong> face(s).
  </div>
{{else}}
  <div class="alert alert-warning" role="alert">
    Sorry, but I couldn't find any faces...
  </div>
{{/if}}

<div class="frame">
  <img src="/images/{{ filename }}">
  {{#each faces}}
    <a href="#" style="width: {{ width }}px;
                       height: {{ height }}px;
                       left: {{ x }}px;
                       top: {{ y }}px;"></a>
  {{/each}}
</div>

<a href="/" class="btn btn-default">Go back and try another</a>
What we’re doing here is wrapping the image in a <div>, which we’ve assigned position: relative, then rendered a link for each face. Each link is shown as an absolutely positioned block, and we use the face data to define its position and dimensions.
Now run the application:
node index.jsNote that you may see the following warning:
libdc1394 error: Failed to initialize libdc1394Because libdc1394 isn’t required for our purposes, you can simply disable it as noted in this Stackoverflow answer with the following command:
sudo ln /dev/null /dev/raw1394Use this with caution, as it may impact other applications installed on your system
Now visit the application in your browser. If you’re using Vagrant, you’ll find it here:
http://192.168.10.10:8080/All being well, you should see the upload form:
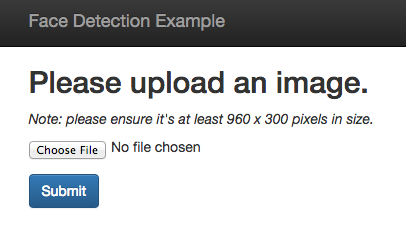
Here’s an example of the results of a successful face detection attempt:
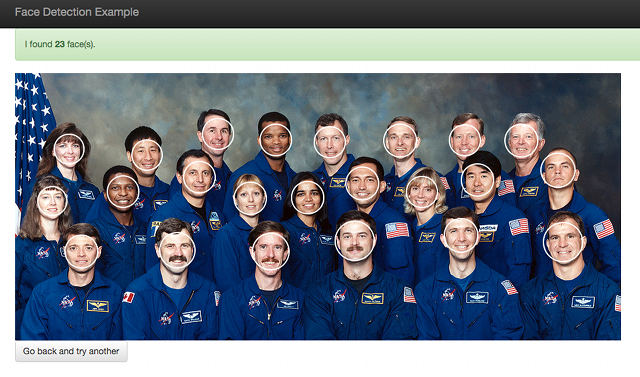
You can grab the image shown in the screenshot from here, or try with your own images. One thing to note is that this method requires that the faces be in full view, front-facing and upright.
Summary and Further Reading
That concludes our brief introduction to face detection, during which we’re built the basis of a clone of Facebook’s photo tagging widget.
If you’d like a really in-depth guide to the implementation of the Viola-Jones object detection framework, you might be interested in this thesis by Ole Helvig Jensen at the Technical University of Denmark. You might also find this YouTube video useful background.
There’s a lot more to explore in OpenCV; a good start is the documentation and in particular the tutorials; note, though, that these are primarily C++ focussed.
What other applications can you come up with? Let me know in the comments.
Frequently Asked Questions (FAQs) on Face Detection with Node.js and OpenCV
What is the role of OpenCV in face detection?
OpenCV, which stands for Open Source Computer Vision, is a library of programming functions mainly aimed at real-time computer vision. In the context of face detection, OpenCV provides a robust framework that allows developers to process images and detect objects, such as faces, within them. It uses machine learning algorithms to search for faces within a picture. For developers using Node.js, OpenCV provides a binding to JavaScript, which makes it possible to use this powerful library within your Node.js applications.
How does face detection work in Node.js using OpenCV?
Face detection in Node.js using OpenCV involves several steps. First, you need to install the necessary packages and dependencies, including OpenCV and Node.js itself. Once these are installed, you can use OpenCV’s functions to read an image, convert it to grayscale (which simplifies the image processing), and then use a cascade classifier to detect faces in the image. The cascade classifier uses machine learning algorithms to detect features that typically appear in human faces.
What is a Cascade Classifier?
A Cascade Classifier is a machine learning object detection algorithm used to identify objects in an image or video and based on some features. For face detection, the classifier would be trained on thousands of images of faces so that it can learn to identify features that typically appear in human faces. Once trained, the classifier can be used to detect faces in new images.
How can I improve the accuracy of face detection?
The accuracy of face detection can be improved in several ways. One way is by using a more advanced face detection algorithm. OpenCV provides several pre-trained classifiers, but you can also train your own classifier. Another way to improve accuracy is by preprocessing the images to make it easier for the classifier to detect faces. This could involve resizing the images, converting them to grayscale, or applying a blur filter.
Can I use face detection for video in Node.js with OpenCV?
Yes, you can use face detection for video in Node.js with OpenCV. The process is similar to face detection for images, but instead of processing a single image, you process a series of images (frames) from the video. This can be more challenging because the faces in the video can change position, size, and orientation from frame to frame.
How can I handle multiple faces in an image?
OpenCV’s face detection functions return a list of rectangles, where each rectangle corresponds to a detected face. So, if there are multiple faces in an image, the function will return multiple rectangles. You can then process each rectangle (face) individually.
Can I use face detection in real-time applications?
Yes, you can use face detection in real-time applications. However, keep in mind that face detection can be computationally intensive, especially for high-resolution images or videos. Therefore, the performance of your application may depend on the processing power of your computer.
What are the limitations of face detection with Node.js and OpenCV?
While face detection with Node.js and OpenCV is powerful, it does have some limitations. For example, it may struggle to detect faces that are partially obscured, tilted at an extreme angle, or under poor lighting conditions. Furthermore, the accuracy of face detection can be affected by the quality of the image or video.
Can I use face detection on mobile devices?
Yes, you can use face detection on mobile devices. However, keep in mind that the processing power of mobile devices is typically less than that of desktop computers, so the performance may be lower. Also, you would need to use a JavaScript engine that supports Node.js on the mobile device.
How can I learn more about face detection with Node.js and OpenCV?
There are many resources available for learning more about face detection with Node.js and OpenCV. These include the official OpenCV documentation, online tutorials, and books on the subject. You can also look at the source code of open-source projects that use face detection.
 Lukas White
Lukas is a freelance web and mobile developer based in Manchester in the North of England. He's been developing in PHP since moving away from those early days in web development of using all manner of tools such as Java Server Pages, classic ASP and XML data islands, along with JavaScript - back when it really was JavaScript and Netscape ruled the roost. When he's not developing websites and mobile applications and complaining that this was all fields, Lukas likes to cook all manner of World foods.


