If there’s one thing cooler than playing games, it’s building games.
Whether you’re building 2D games like Angry Birds, or 3D games like Counter Strike, you can earn money by publishing them at places like Play Store, App Store or on the Web.
How to Get Started Building Games
There are many tools for creating games, and in this article, we’ll look at the very popular Unity 5, a gaming platform that facilitates 2D and 3D game development for a variety of platforms such as OS X, Linux, Windows, Unity Webplayer, Android, iOS, BlackBerry 10, Windows Phone, Tizen, WebGL, PlayStation, Wii U, Nintendo, Xbox, Android TV, Samsung Smart TV, Oculus Rift, HTC Vive and Gear VR.
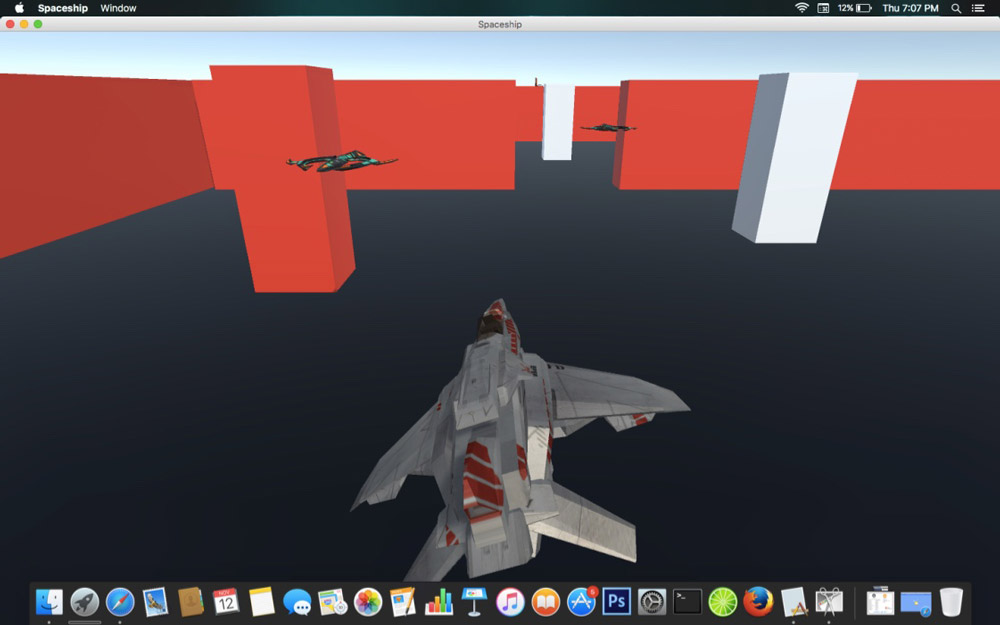
In this article, we’ll look at how to build a 3D spaceship game full of obstacles, enemies, maneuvering and shooting. After we finish building our game, it will look like this:
We’ll walk through the installation of Unity3D Personal Edition, develop a 3D game employing 3D modeling, Unity’s resourceful asset store, scripting (JavaScript) and Unity’s powerful physics engine.
There are no pre-requisites for following this tutorial, although a basic knowledge of JavaScript would to be helpful.
Installation
Installing Unity is as easy as downloading the installer for your respective platform from here.
The download manager is a small file that prompts you to select which components you can download. These downloads are typically large in size (in gigabytes), so you might want to sit back or read through this tutorial before your installation process is complete.
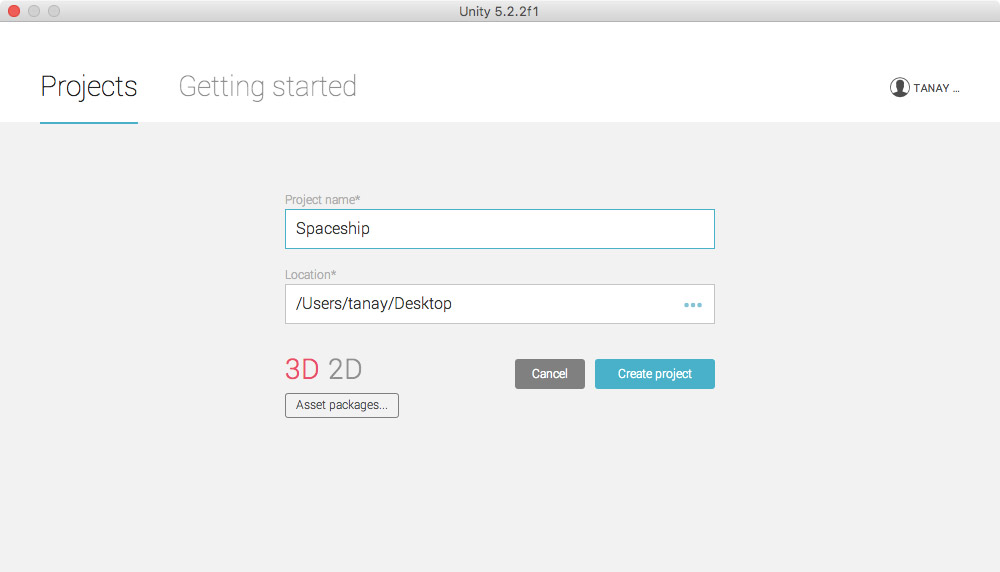
After installation, open Unity 5 and select New Project under the Create a Project option. Enter the name of the project and select the 3D option to import the asset packages for 3D games, and finally click on Create Project.
Understanding 3D Models and the Camera
If you’ve followed all the steps in the Installation section successfully, you’ll get the Unity 5 interface for creating games. Since we’re building a 3D game, we’ll need to have 3D objects in our gameplay. You can insert a 3D model into the game by selecting GameObject > 3D Object. I inserted a cube into the scene. Your screen should now look like this:
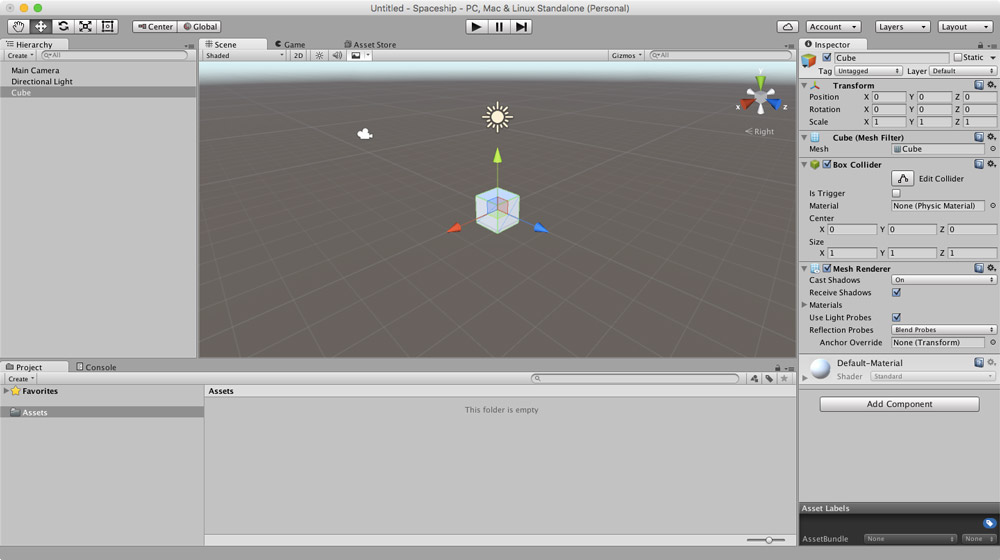
Upon clicking on the cube, you’ll see a number of options related to the 3D object you’ve selected – such as Transform, Mesh, Box Collider and Mesh Renderer.
These 3D models interact with each other and the gameplay using what’s called a Physics Engine. You can apply physics rules to any 3D object by clicking on it and selecting Components > Physics > Rigidbody.
This will cause Unity’s gaming engine to treat the object as a real-word Rigid Body and apply various real-world interactions to it, such as collisions and gravity.
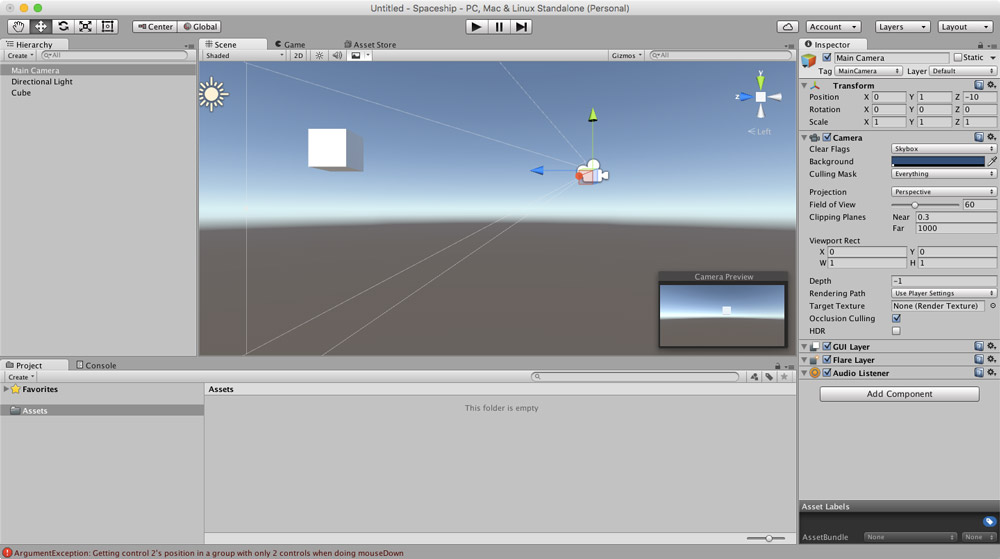
Unity uses cameras to render the objects in the game space. When you enter the Game mode to have a look at your game field, you’ll be able to view it from the camera’s viewpoint – which is also what players of the game will see.
The following image shows the field of view of the camera and the camera preview that can be opened by clicking on the camera object:
It’s worth playing around a bit with 3D models and cameras, as the more familiar you are with them, the better you’ll understand the steps that follow.
Using Unity Asset Store
Since we’ve just started, it’s difficult for beginners to develop very complicated players as well as scenery for the game. Unity’s asset store comes to the rescue to help us solve this problem.
Unity’s asset store is a collection of various models, materials, sounds, animations and more. The assets can be of many types and many models may have animations and sounds attached with them for making your work easier.
Just like any other store, there are free as well as paid assets available for building a game. Since we’re building a spaceship game, let’s get a cool looking spaceship for our game.
You can open the Asset Store by clicking on the Asset Store tab beside the Game tab. I chose a spaceship set for the game and my screen looked like this:
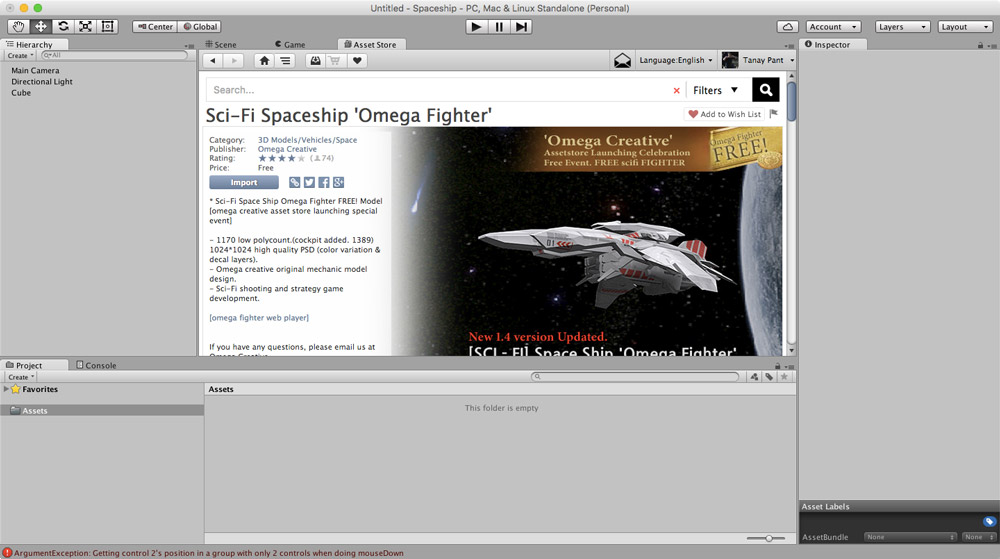
You can also download this asset set by clicking here. Now click on Import to import this asset set to your project. You can bring the spaceship to the gameplay by clicking on omega_fighter_01 > model and dragging omega_fighter to the Hierarchy pane on the left side of the screen. Your model should now be in the game area.
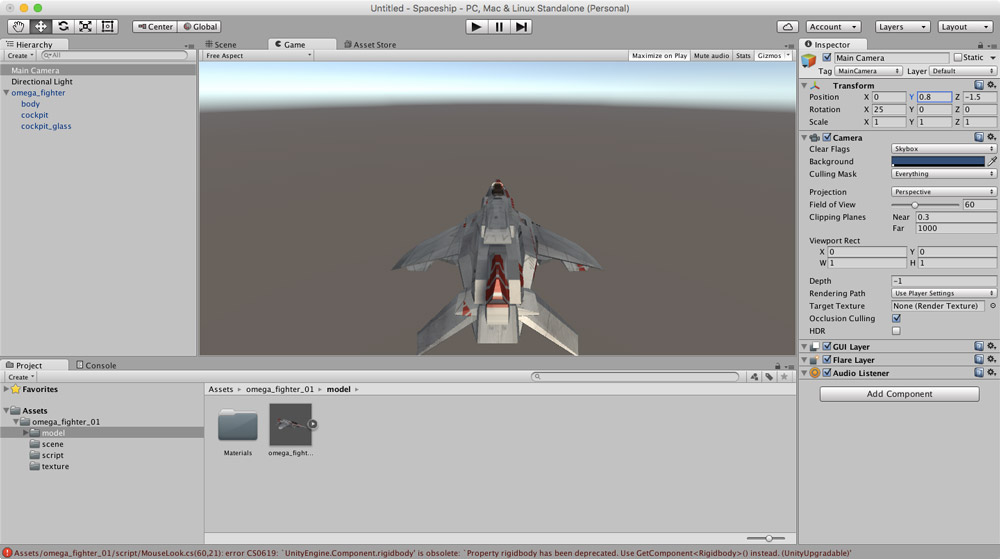
You should now reposition the spaceship at origin (0, 0, 0) by clicking on the spaceship and entering the respective values in the Transform menu on the right pane. You will also need to reposition the camera using the same technique.
For me (0, 0.8, -1.5) with a rotation of (25, 0, 0) worked well. Enter the game mode by clicking on the Game tab and add the Rigidbody character to spaceship. Don’t forget to remove the tick from the Use Gravity option under the Rigidbody option in the right pane (you wouldn’t want your spaceship to fall off the sky, would you?). Your screen should now look something like this:
Constructing the Game Setting
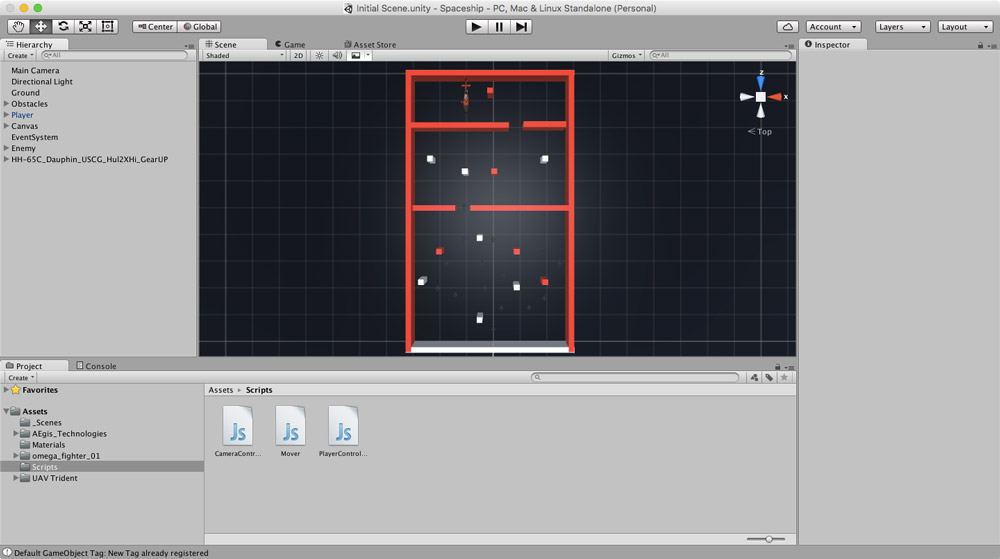
Let’s construct a simple game setting by setting up some obstacles. Place a ground with the help of Components > 3D Objects > Plane options and add some pillars.
You can develop a maze where your spaceship has to avoid all the obstacles and have to reach the ending wall and has to touch it to avoid being hit. Add rigid body component to all of them. Here’s how my game field looks like from the top view:
Adding Behavior to Objects
Your game now needs logic to run. You’ll have to program how the spaceship moves, what happens when the spaceship collides and so on.
CameraController
You’ll have to program your Main Camera to move along with your player, otherwise you won’t be able to keep track of your spaceship once it moves out of the camera’s field of view.
From the menu bar, select Assets > Create > Javascript to create a JavaScript file. Now click on Main Camera and select the Add Component > Scripts > CameraController button from the bottom of the right pane.
#pragma strict

// variable offset of the type Vector3
var offset : Vector3;

// variable player of the type GameObject
var player : GameObject;

function Start () {
    offset = transform.position - player.transform.position;
}

function LateUpdate () {
    transform.position = player.transform.position + offset;
}
The above code will calculate the difference between the positions of the camera object and the GameObject and will update the camera’s position (using the LateUpdate() function) according to the player’s position.
Now, add a script to the Player object.
#pragma strict
import UnityEngine.UI;

var loseText : Text;
var winText : Text;
var rb : Rigidbody;
var speed : float;
var tilt : float;

// initialising variables
function Start () {
    rb = GetComponent.<Rigidbody> ();
    loseText.text = "";
    winText.text = "";
}

function Update () {

  function FixedUpdate () {

    // take input from keyboard
    var moveHorizontal : float = Input.GetAxis ("Horizontal");
    var moveVertical : float = Input.GetAxis ("Vertical");

    // map the movement with Vector3
    var movement : Vector3 = new Vector3 (moveHorizontal, 0.0f, moveVertical);

    // add force to the object
    rb.AddForce (movement * speed);

    // add rotation to the object
    rb.rotation = Quaternion.Euler (0.0f, 0.0f, rb.velocity.x * -tilt);
}

// works when two objects collide with each other
function OnTriggerEnter(other : Collider) {
    if (other.tag == "Obstacles") {
        Destroy(gameObject);
        Destroy(other.gameObject);
        loseText.text = "You Lose!";
    }
    if (other.tag == "Win") {
        Destroy(gameObject);
        Destroy(other.gameObject);
        winText.text = "You Win!";
    }
}
Here we have imported UnityEngine.UI to import the datatype Text, which is present in the UI toolkit of Unity. The above code maps the movements of the spaceship (player object) with the arrow keys (using the Input.GetAxis function), and moves it using the AddForce function.
It also introduces a tilt to the spaceship as the spaceship moves left or right. The Quaternion.Euler function is used for the rotation of the spaceship depending on the force acting on the Rigidbody. Both the rotation and AddForce methods make use of a Vector3 object for taking information on the direction where the movement should take place.
We have introduced logic that if the player touches an object with the tag Obstacles, the Destroy function destroys the spaceship and the object with which it collides and then You Lose!
text is displayed. If it touches an object with the tag Win, it displays You Win!
. The latter object is the last wall of the maze.
Now, going back to the game window, you’ll notice that the scripts have been attached to the respective objects.
You’ll now need to create text objects, which is possible by selecting GameObject > UI > Text. Position the text accordingly. Now click on the Player Object and have a look at the settings under the script section.
There should be options like Lose Text and Win Text. Assign the empty fields the appropriate objects by dragging the right game objects from under the hierarchy in the left pane to the empty fields. Setting Speed 8.5 and Tilt 4 worked well for me. Similarly, add appropriate options to the Camera object. You can now test the game by clicking on the Play icon on the top (center) of the window.
Compiling and Building a Standalone
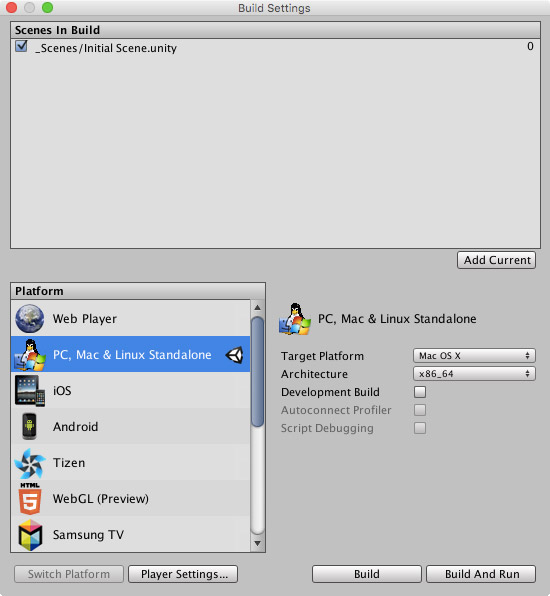
Your brand new spaceship game is now constructed. Save the scene by clicking on File > Save Scene as…. Now select File > Build Settings. Select your operating system and click on the Build button. Your screen should look like this:
This will create a standalone file for your operating system. Your game is now ready to be played and distributed. Here’s a video of the gameplay:
As you see at the end of the video, I put a huge helicopter in the game – from the Asset Store – and added the Win tag to it. In this way, if my spaceship reaches the helicopter, the game ends – and you’re a winner!
Conclusion
Unity 5 provides a great opportunity for interested people to develop 2D as well as 3D games. As we’ve seen, the game development workflow – including the scripting – is quite elementary, and you can easily develop games of varying complexity using the same workflow.
An example of a game that you could publish and sell would be a spaceship game where enemies fire at you and you fire back at them. The game might consist of several levels or stages.
The learning curve for developing professional games for Unity is not very steep. The Unity Asset Store is a great resource for finding interesting assets for your game, so that you don’t have to start working on your new game from scratch.
Have you developed any games with the help of Unity? What is your favorite gaming engine?
Frequently Asked Questions about Developing 3D Games with Unity 5
What are the basic requirements for developing 3D games with Unity 5?
To start developing 3D games with Unity 5, you need a computer with a Windows or macOS operating system. Unity 5 supports both these platforms. You also need to download and install the Unity 5 software, which is available for free on the Unity website. A basic understanding of programming, particularly in C#, is also beneficial as Unity uses C# for scripting. Lastly, creativity and patience are key as game development involves a lot of trial and error and problem-solving.
How can I start learning Unity 5 for 3D game development?
Unity provides a wealth of resources for beginners. The Unity Learn platform offers tutorials, projects, and courses to help you get started. You can also find numerous tutorials on YouTube and other online platforms. Additionally, Unity’s extensive documentation provides detailed information about its features and how to use them. It’s a good idea to start with simple projects and gradually move on to more complex ones as you gain confidence and experience.
What are the key features of Unity 5 for 3D game development?
Unity 5 comes with a host of features that make 3D game development easier and more efficient. These include a powerful rendering engine, a physics engine, animation tools, a scripting API in C#, and support for a wide range of platforms. Unity 5 also includes a user-friendly editor with a drag-and-drop interface, making it easier to design game levels and implement game mechanics.
Can I develop 3D games with Unity 5 without any programming knowledge?
While it’s possible to create simple games in Unity without any programming knowledge, using scripts is essential for creating more complex and interactive games. Unity uses C# for scripting, which is a popular and versatile programming language. If you’re new to programming, there are many resources available online to help you learn C#, including tutorials and courses specifically designed for Unity game development.
How can I optimize my 3D game for better performance in Unity 5?
Optimizing your game for better performance involves various strategies. These include efficient use of resources, optimizing graphics and animations, and efficient scripting. Unity provides tools and features to help with optimization, such as the Profiler, which allows you to monitor your game’s performance in real-time. It’s also important to test your game on different platforms and devices to ensure it runs smoothly.
Can I publish my Unity 5 game on different platforms?
Yes, one of the key advantages of Unity is its cross-platform support. You can build your game for a wide range of platforms, including Windows, macOS, Android, iOS, and many more. Unity provides tools and resources to help with the process of porting your game to different platforms.
How can I add multiplayer functionality to my Unity 5 game?
Unity provides a networking system that allows you to add multiplayer functionality to your game. This involves creating and managing network connections, synchronizing game data, and handling different network conditions. Unity’s documentation provides detailed information on how to use the networking system.
Can I monetize my Unity 5 game?
Yes, Unity provides several ways to monetize your game. These include in-app purchases, ads, and selling your game on various platforms. Unity also provides analytics tools to help you understand your players’ behavior and optimize your monetization strategies.
How can I add sound effects and music to my Unity 5 game?
Unity provides a powerful audio system that allows you to add sound effects and music to your game. You can import audio files, control their playback, and even create dynamic sound effects that react to the game’s events. Unity’s documentation provides detailed information on how to use the audio system.
Can I create VR games with Unity 5?
Yes, Unity supports the development of VR games. It provides tools and features specifically designed for VR, such as VR-specific input and interaction systems, and support for popular VR platforms. However, developing VR games requires additional knowledge and skills, and the hardware requirements are also higher compared to non-VR games.
 Tanay Pant
Tanay Pant is an Indian author, hacker, developer and tech enthusiast. He is known for his work on Learning Firefox OS Application Development, which was published by Packt. He is also an official representative of Mozilla, and has been listed in the about:credits of the Firefox web browser. His personal website is tanaypant.com.