As developers, we are usually concerned about the development part of any application. We don’t think much about the deployment part as we consider it to be a responsibility of the SysAdmins. But many times, we don’t have a dedicated SysAdmin available, so we have to put on the SysAdmin hat and get things done. There are many options to deploy your Rails application. Today, I will cover how to deploy a Rails application to Amazon Web Services (AWS) using Capistrano.
We will use the Puma + Nginx + PostgreSQL stack. Puma will be the application server, Nginx the reverse proxy, and PostgreSQL is the database server. This stack can be used on MRI Ruby or JRuby as well. Most of the steps remain same for both rubies, but I’ll highlight where they differ as well.
If you have an existing application, you can skip the following section and jump directly to next section.
Sample Rails Application
Let’s create a sample Rails application with a contact model and CRUD. The app uses Rails 4.2 and PostgreSQL:
rails new contactbook -d postgresql
After the application is generated, create a Contact model and CRUD:
cd contactbook
rails g scaffold Contact name:string address:string city:string phone:string email:string
Setup your database username and password in config/database.yml, then create and migrate the database:
rake db:create && rake db:migrate
Let’s check how its working:
rails s
Point your favorite browser to http://localhost:3000/contacts and check if everything is working properly.
Configuring Puma & Capistrano
We will now configure application for deployment. As previously mentioned, Puma is the application server and Capistrano as our deployment tool. Capistrano provides integration for Puma and RVM, so add those gems to the Gemfile. We will also use the figaro gem to save application configuration, such as the production database password and secret key:
gem 'figaro'
gem 'puma'
group :development do
  gem 'capistrano'
  gem 'capistrano3-puma'
  gem 'capistrano-rails', require: false
  gem 'capistrano-bundler', require: false
  gem 'capistrano-rvm'
end
Install the gems via bundler:
bundle install
It’s time to configure Capistrano, first by generating the config file, as follows:
cap install STAGES=production
This will create configuration files for Capistrano at config/deploy.rb and config/deploy/production.rb. deploy.rb is the main configuration file and production.rb contains environment specific settings, such as server IP, username, etc.
Add the following lines into the Capfile, found in the root of the application. The Capfile includes RVM, Rails, and Puma integration tasks when finished:
require 'capistrano/bundler'
require 'capistrano/rvm'
require 'capistrano/rails/assets' # for asset handling add
require 'capistrano/rails/migrations' # for running migrations
require 'capistrano/puma'
Now, edit deploy.rb as follows:
lock '3.4.0'

set :application, 'contactbook'
set :repo_url, 'git@github.com:devdatta/contactbook.git' # Edit this to match your repository
set :branch, :master
set :deploy_to, '/home/deploy/contactbook'
set :pty, true
set :linked_files, %w{config/database.yml config/application.yml}
set :linked_dirs, %w{bin log tmp/pids tmp/cache tmp/sockets vendor/bundle public/system public/uploads}
set :keep_releases, 5
set :rvm_type, :user
set :rvm_ruby_version, 'jruby-1.7.19' # Edit this if you are using MRI Ruby

set :puma_rackup, -> { File.join(current_path, 'config.ru') }
set :puma_state, "#{shared_path}/tmp/pids/puma.state"
set :puma_pid, "#{shared_path}/tmp/pids/puma.pid"
set :puma_bind, "unix://#{shared_path}/tmp/sockets/puma.sock"    #accept array for multi-bind
set :puma_conf, "#{shared_path}/puma.rb"
set :puma_access_log, "#{shared_path}/log/puma_error.log"
set :puma_error_log, "#{shared_path}/log/puma_access.log"
set :puma_role, :app
set :puma_env, fetch(:rack_env, fetch(:rails_env, 'production'))
set :puma_threads, [0, 8]
set :puma_workers, 0
set :puma_worker_timeout, nil
set :puma_init_active_record, true
set :puma_preload_app, false
We will edit the production.rb later, since we don’t know the server IP and other details yet.
Also, create config/application.yml to save any environment specific settings in the development environment. This file is used by the figaro gem to load the settings into environment variables. We will create the same file on the production server as well.
One thing to remember is to exclude config/database.yml and config/application.yml from the Git repository. Both files contain sensitive data which should not be checked into version control for obvious security concerns.
Creating an EC2 Instance
With the application configured and ready for deployment, it’s time to launch a new EC2 instance. Log in to the EC2 Management Console (obviously, you’ll need to sign up for an AWS account):
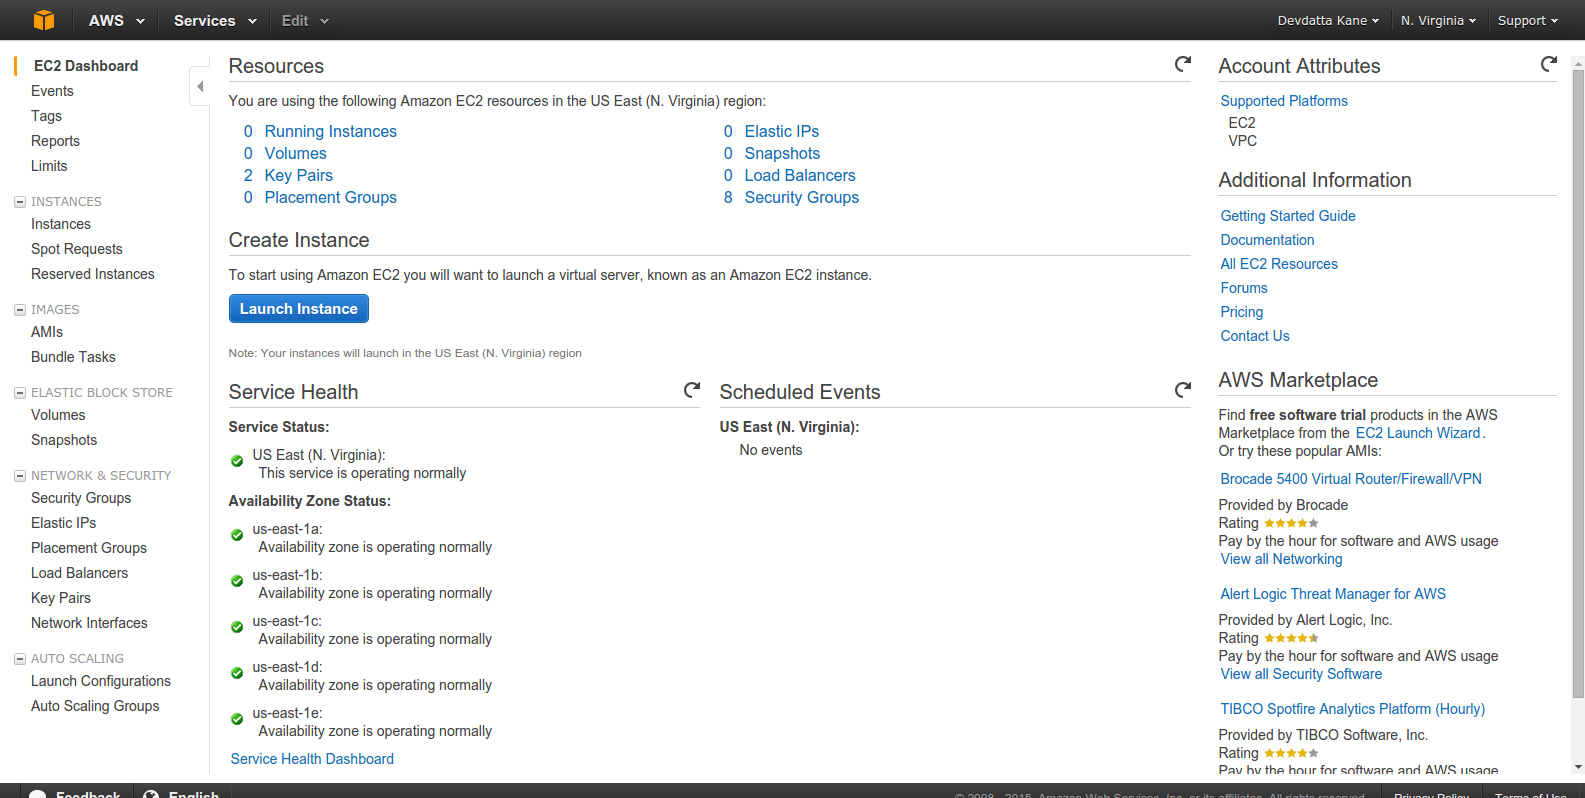
Click ‘Launch Instance’:
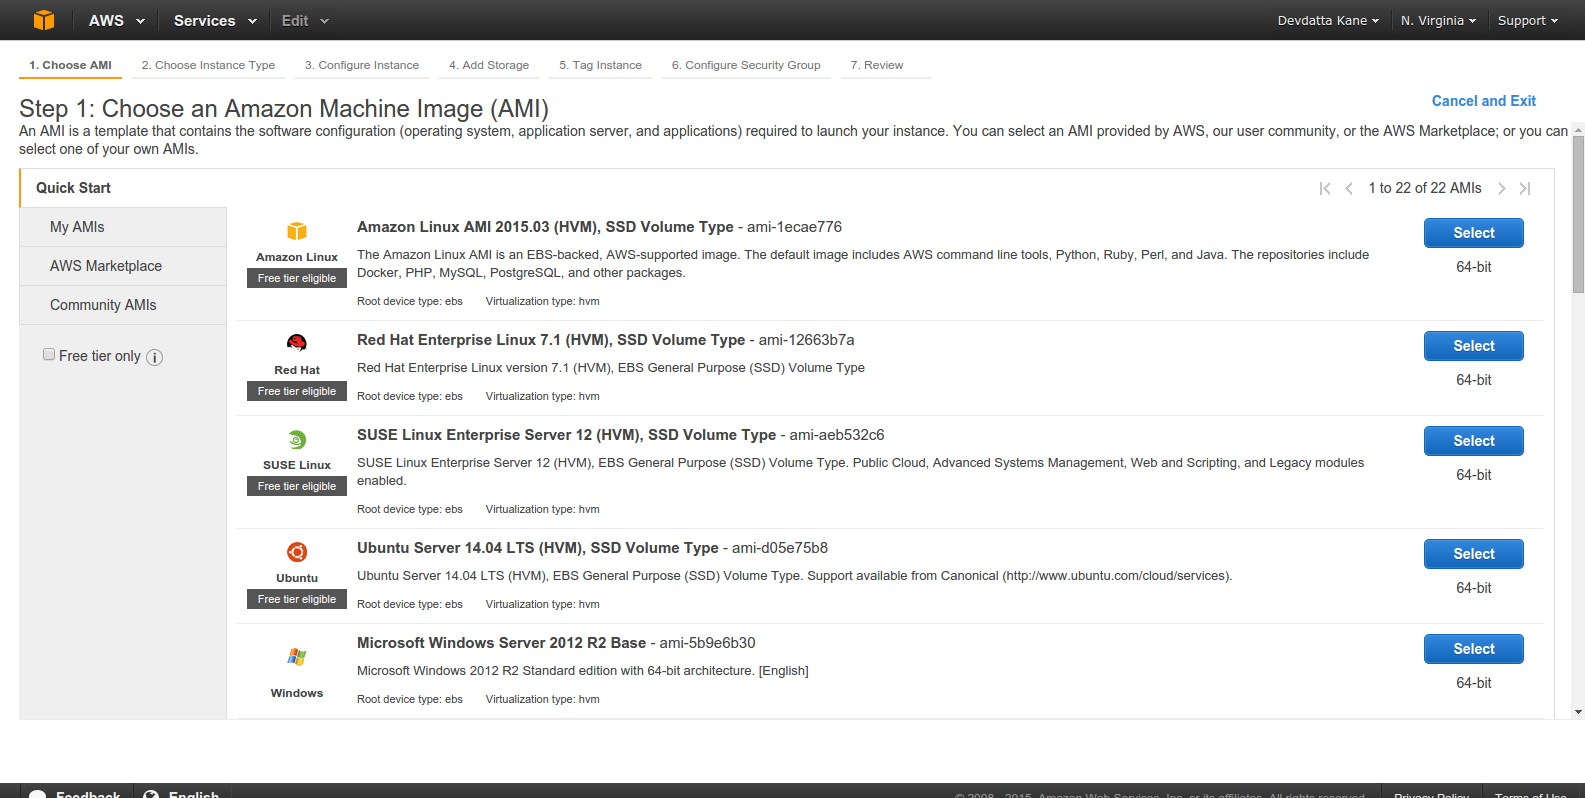
Select an Amazon Machine Image (AMI). We will be using ‘Ubuntu Server 14.04 LTS’:

Select the instance type as per your requirement. I am picking ‘t2.micro’, because it is free/cheap. For a real production server, you’d want to go bigger. Click ‘Next:Configure Instance Details’ to continue.
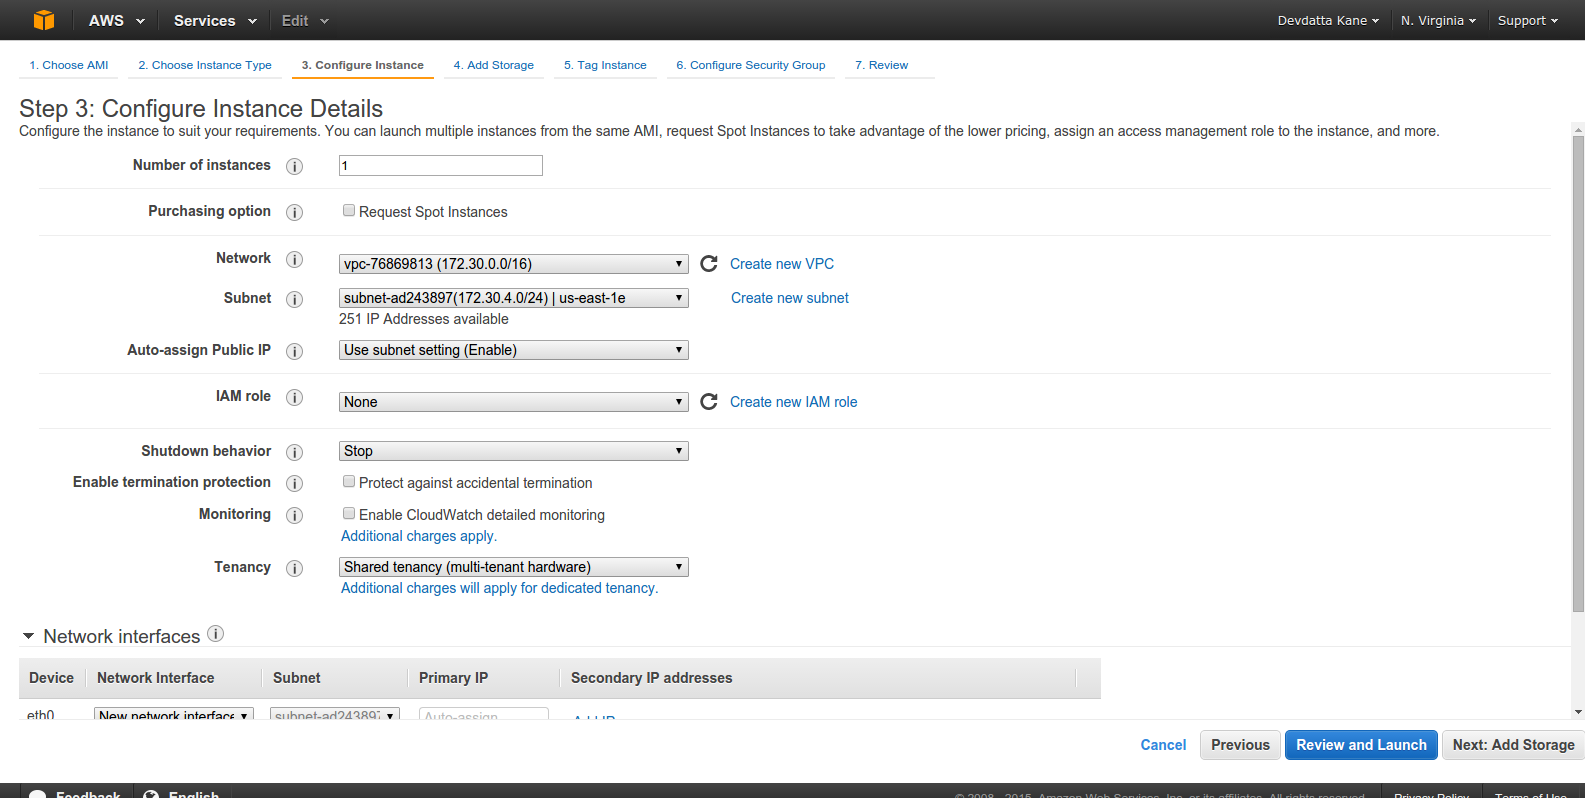
The default settings are good for our tutorial. Click ‘Next: Add Storage’.
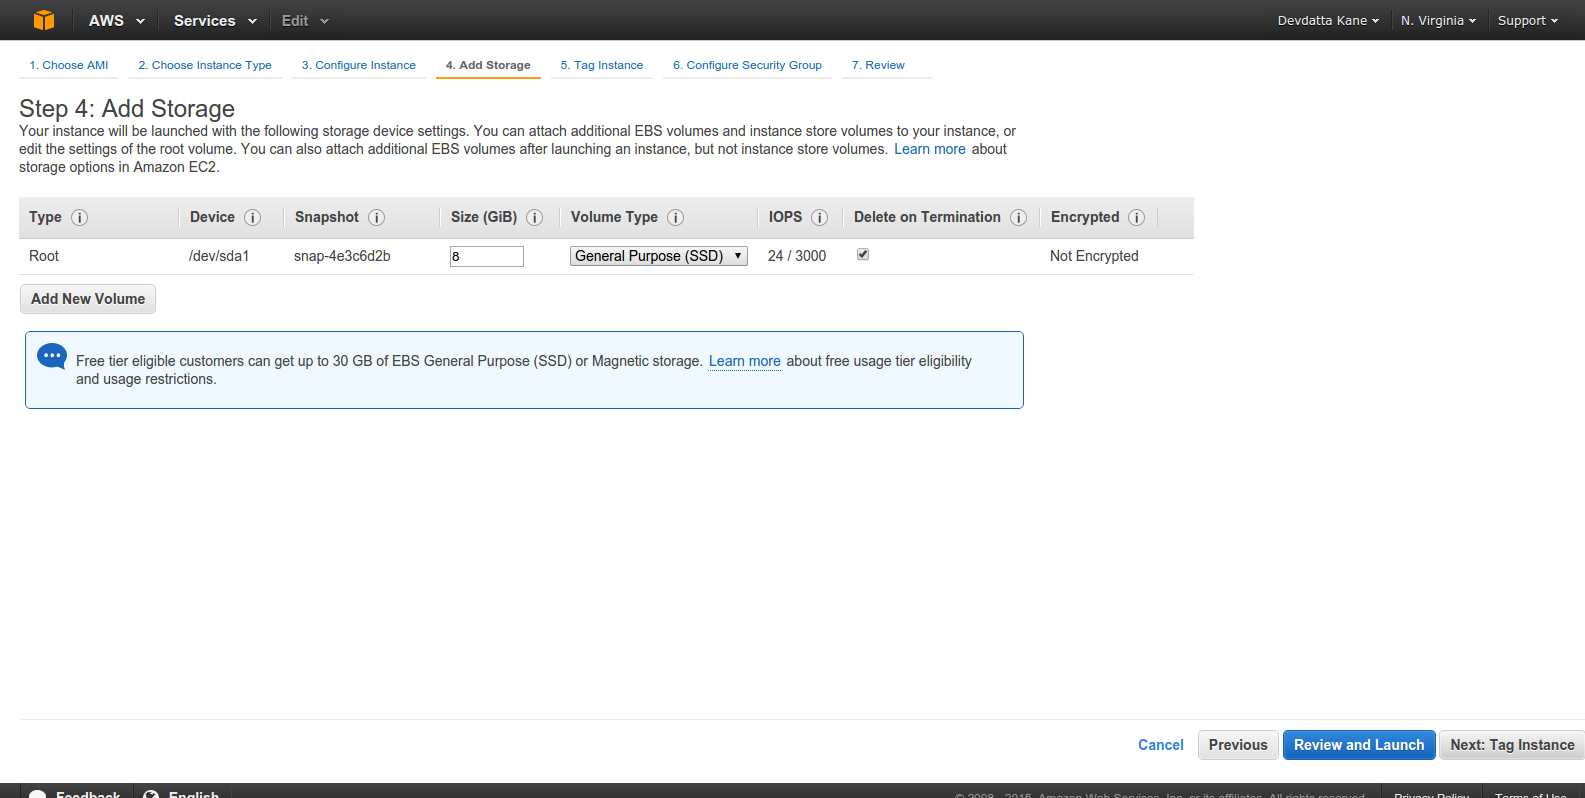
The default storage is 8GB. Adjust as per your space requirement. Click ‘Next: Tag Instance’
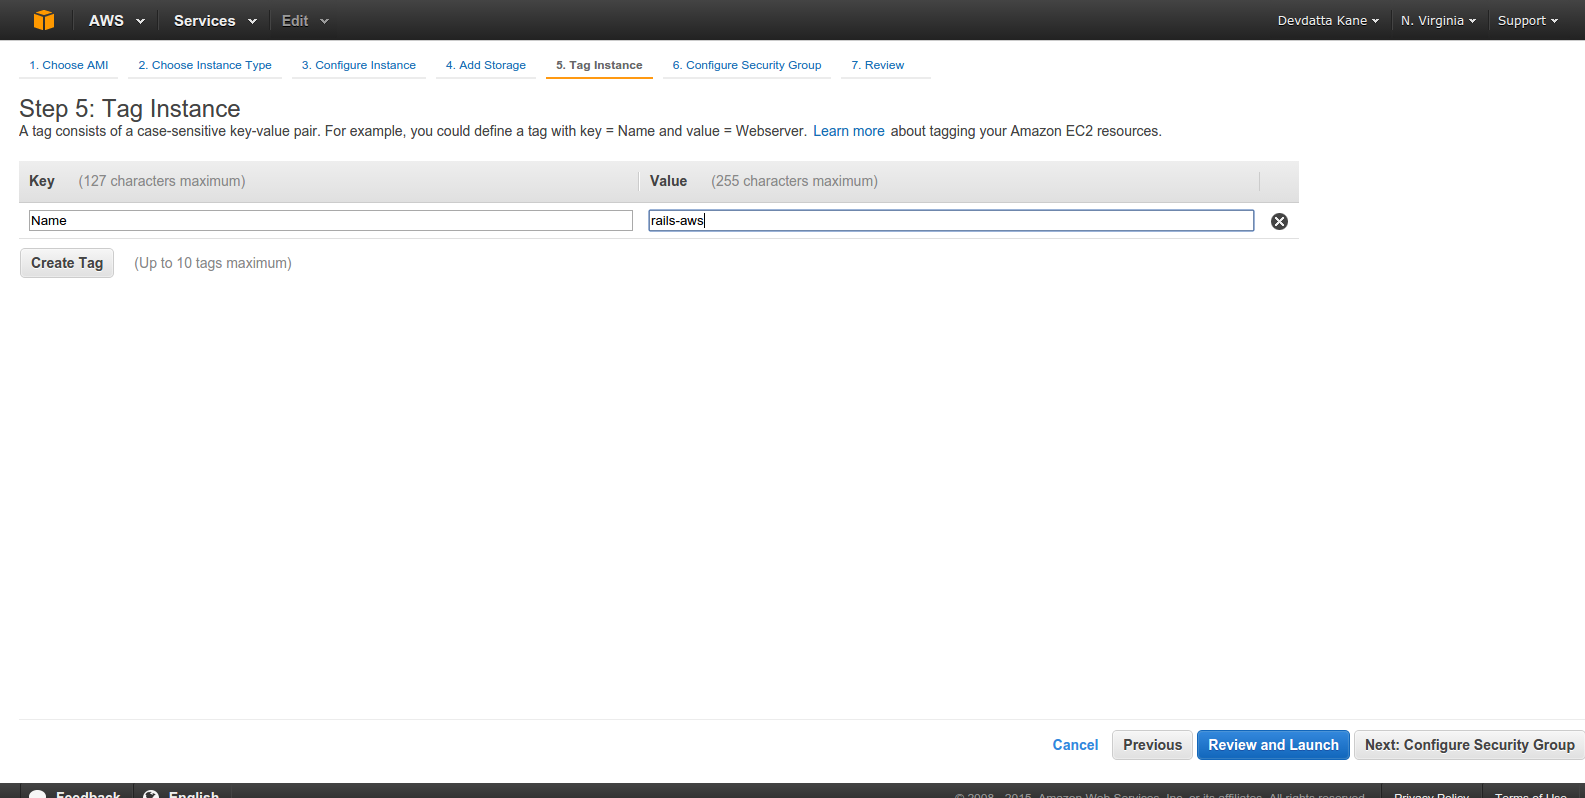
Enter instance name. Click ‘Next: Configure Security Group’.
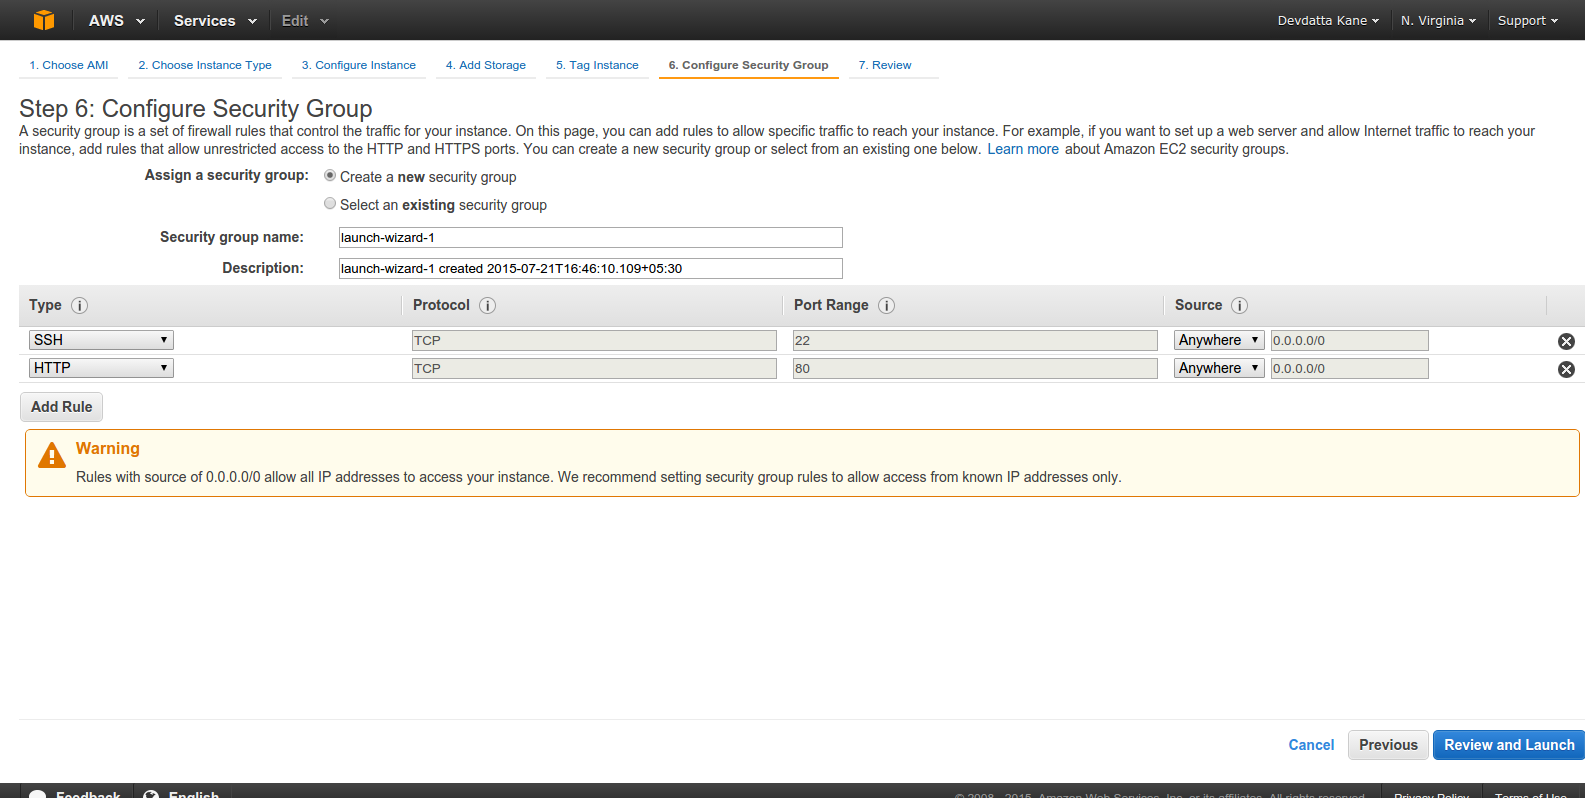
Click ‘Add Rule’. Select ‘HTTP’ from ‘Type’. This is required to make nginx server accessible from the Internet. Click ‘Review and Launch’
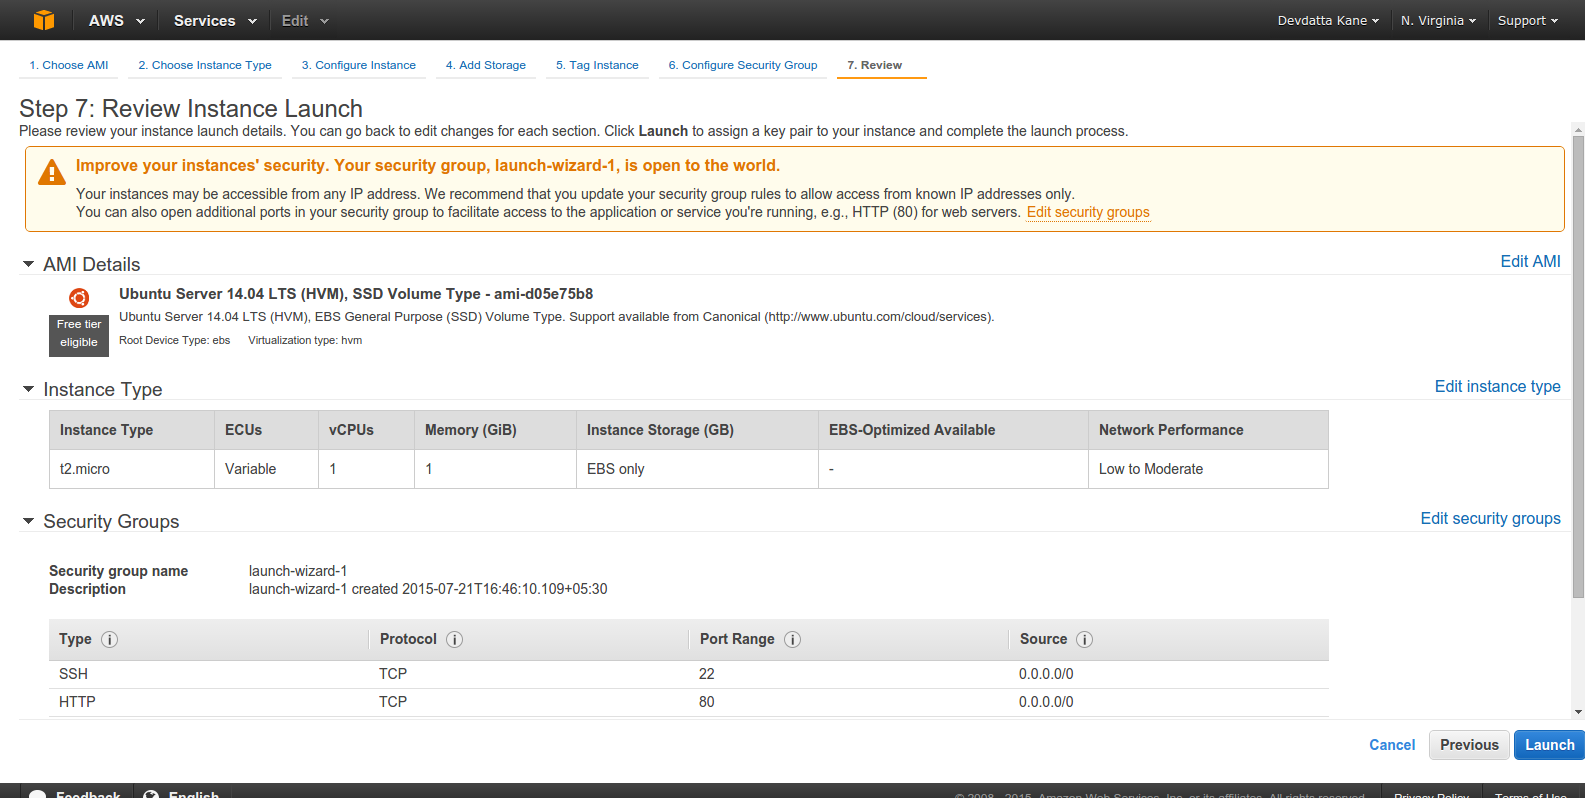
Check if all setting are correct. Click ‘Launch’
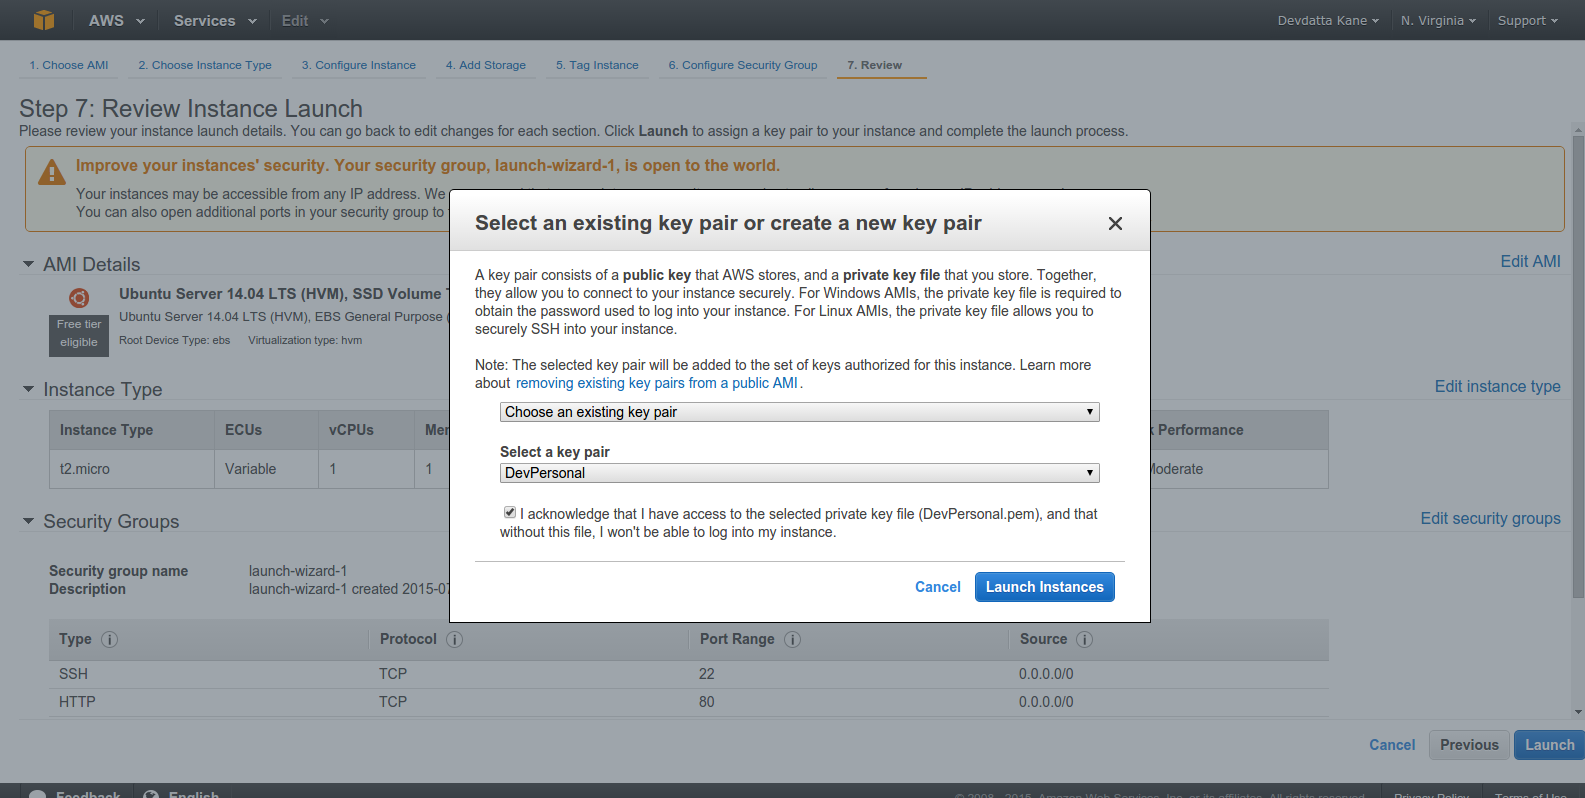
Select or create a keypair to connect to instance. You HAVE to have the private key on your local box in order to ssh into the EC2 instance. The key should live in your ~/.ssh directory. Click the checkbox ‘I acknowledge that…’ and click ‘Launch Instance’. Wait for the instance to launch.
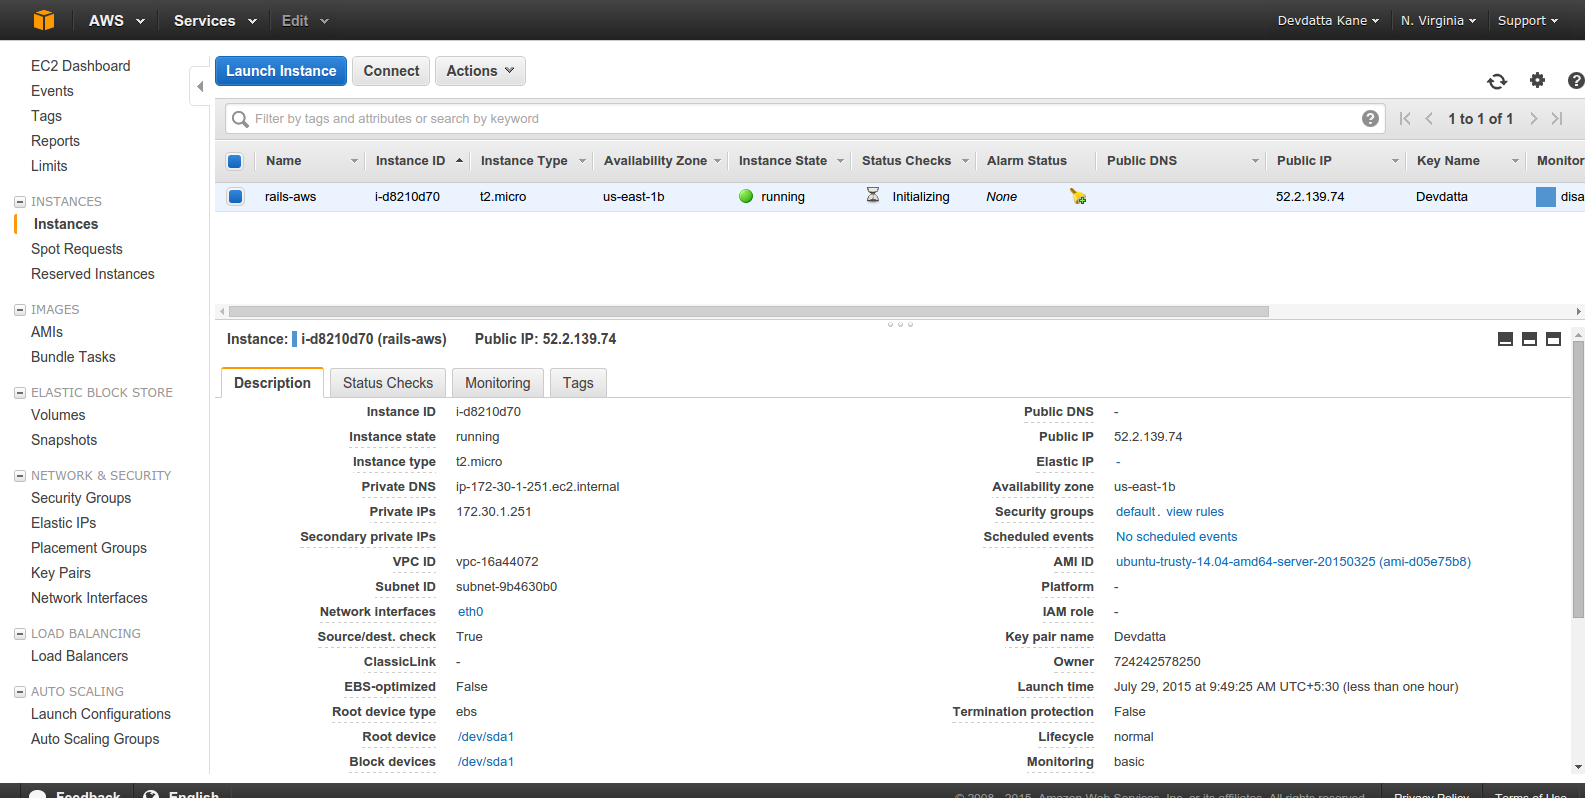
The instance should be in the ‘running’ state. Select the instance and click ‘Connect’.

Note down the ‘Public IP’ address (It’s 52.2.139.74 in the screenshot. Yours will be different.). We will need it to connect to the server.
Setup the Server
We have now provisioned the server and it’s time to setup some basic things. First of all, SSH into the server with our selected private key. Replace ‘Devdatta.pem’ with the full path to your private key:
ssh -i "Devdatta.pem" ubuntu@52.2.139.74
You are logged into the brand new server. Update the existing packages first:
sudo apt-get update && sudo apt-get -y upgrade
Create a user named deploy for deploying the application code:
sudo useradd -d /home/deploy -m deploy
This will create the user deploy along with its home directory. The application will be deployed into this directory. Set the password for deploy user:
sudo passwd deploy
Enter password and confirm it. This password will be required by RVM for the Ruby installation. Also, add the deploy user to sudoers as well. Run sudo visudo and paste the following into the file:
deploy ALL=(ALL:ALL) ALL
Save the file and exit.
As we will be using GitHub to host our Git repository, the deploy user will need access to the repository for deployment. As such, we will generate a key pair for that user now:
su - deploy
ssh-keygen
Do not set a passphrase for the key as it will be used as deploy key.
cat .ssh/id_rsa.pub
Copy the output and set as your deploy key on GitHub.
Capistrano will connect to the server via ssh for deployment as the deploy account. Since AWS allows public key authentication only, copy the public key from your local machine to the deploy user account on the EC2 instance. The public key is your default ~/.ssh/id_rsa.pub key, in most cases. On the server:
nano .ssh/authorized_keys
Paste your local public key into the file. Save and exit.
Git is required for automated deployments via Capistrano, so install Git on the server:
sudo apt-get install git
If you are using JRuby, install a Java Virtual Machine (JVM):
sudo apt-get install openjdk-7-jdk
Installing Nginx
First, install Nginx which is our reverse proxy:
sudo apt-get install nginx
Now, configure the default site as our requirement. Open the site config file:
sudo nano /etc/nginx/sites-available/default
Comment out the existing content and paste the following into the file.
upstream app {
  # Path to Puma SOCK file, as defined previously
  server unix:/home/deploy/contactbook/shared/tmp/sockets/puma.sock fail_timeout=0;
}

server {
  listen 80;
  server_name localhost;

  root /home/deploy/contactbook/public;

  try_files $uri/index.html $uri @app;

  location / {
    proxy_set_header X-Forwarded-Proto $scheme;
    proxy_set_header X-Forwarded-For $proxy_add_x_forwarded_for;
    proxy_set_header X-Real-IP $remote_addr;
    proxy_set_header Host $host;
    proxy_redirect off;
    proxy_http_version 1.1;
    proxy_set_header Connection '';
    proxy_pass http://app;
  }

  location ~ ^/(assets|fonts|system)/|favicon.ico|robots.txt {
    gzip_static on;
    expires max;
    add_header Cache-Control public;
  }

  error_page 500 502 503 504 /500.html;
  client_max_body_size 4G;
  keepalive_timeout 10;
}
Save the file and exit. We have configured nginx as a reverse proxy to redirect HTTP requests to the Puma application server through a UNIX socket. We will not restart nginx just yet, as the application is ready. Let’s install PostgreSQL now.
Installing PostgreSQL
sudo apt-get install postgresql postgresql-contrib libpq-dev
After postgreSQL is installted, create a production database and its user:
sudo -u postgres createuser -s contactbook
Set the user’s password from psql console:
sudo -u postgres psql
After logging into the console, change the password:
postgres=# \password contactbook
Enter your new password and confirm it. Exit the console with \q. It’s time to create a database for our application:
sudo -u postgres createdb -O contactbook contactbook_production
Installing RVM & Ruby
We will use RVM to install our desired Ruby version:
su - deploy
gpg --keyserver hkp://keys.gnupg.net --recv-keys 409B6B1796C275462A1703113804BB82D39DC0E3
\curl -sSL https://get.rvm.io | bash -s stable
This will install RVM into the deploy user’s home directory. Logout and login again to load RVM into the deploy user’s shell. Logout with Ctrl+D and login again with su - deploy.
Now, install Ruby:
For using MRI Ruby – rvm install ruby
For JRuby – rvm install jruby
After Ruby is installed, switch to installed version:
rvm use jruby
OR
rvm use ruby
Install bundler:
gem install bundler --no-ri --no-rdoc
Create the directories and files required by Capistrano. We will create the database.yml and application.yml files to store the database settings and other environment specific data:
mkdir contactbook
mkdir -p contactbook/shared/config
nano contactbook/shared/config/database.yml
Paste the following in database.yml:
production:
  adapter: postgresql
  encoding: unicode
  database: contactbook_production
  username: contactbook
  password: contactbook
  host: localhost
  port: 5432
After that, create application.yml
nano contactbook/shared/config/application.yml
and add the following:
SECRET_KEY_BASE: "8a2ff74119cb2b8f14a85dd6e213fa24d8540fc34dcaa7ef8a35c246ae452bfa8702767d19086461ac911e1435481c22663fbd65c97f21f6a91b3fce7687ce63"
Change the secret to a new secret using the rake secret command.
Okay, we’re almost done with the server. Go back to your local machine to start deployment with Capistrano. Edit the config/deploy/production.rb to set the server IP. Open the file and paste the following into the file. Change the IP address to match with your server’s IP:
server '52.2.139.74', user: 'deploy', roles: %w{web app db}
Now let’s start the deployment using Capistrano:
cap production deploy
Since this is the first deployment, Capistrano will create all the necessary directories and files on the server, which may take some time. Capistrano will deploy the application, migrate the database, and start the Puma application server. Now, login to the server and restart nginx so that our new configuration will reloaded:
sudo service nginx restart
Open up the browser and point it to /contacts. The application should be working properly.

Wrap Up
Today, we learned how to deploy Rails application on AWS with Capistrano. Our application, being simple, does not use additional services such as background jobs, so I did not cover that today. But installation and configuration of such services may be required for complex applications. But that’s for another day.
Your comments and views are always welcome.
Frequently Asked Questions (FAQs) about Deploying Your Rails App to AWS
How can I ensure my Rails app is secure on AWS?
Security is a crucial aspect when deploying your Rails app on AWS. AWS provides several security measures such as Identity and Access Management (IAM) for controlling access to your AWS services and resources, Security Groups to set up firewall rules for your instances, and AWS Shield for DDoS protection. Additionally, ensure your app is up-to-date with the latest security patches and follow best practices for secure coding.
What are the costs associated with deploying a Rails app on AWS?
The cost of deploying a Rails app on AWS can vary depending on the resources you use. This includes the type and size of the EC2 instances, data transfer, storage, and any additional services like RDS or S3. AWS provides a cost calculator to estimate your monthly costs.
How can I scale my Rails app on AWS?
AWS provides several services to help scale your Rails app. Elastic Load Balancing distributes incoming traffic across multiple targets, Auto Scaling adjusts your capacity to maintain steady performance, and Elastic Beanstalk automatically handles the deployment, from capacity provisioning, load balancing, and automatic scaling.
Can I use AWS CodeDeploy to deploy my Rails app?
Yes, AWS CodeDeploy is a deployment service that automates application deployments to EC2 instances. It works with various systems and on-premises servers, allowing you to easily launch and track the status of your deployments.
How can I monitor my Rails app on AWS?
AWS provides several monitoring tools like CloudWatch for collecting and tracking metrics, AWS X-Ray for analyzing and debugging your applications, and AWS Trusted Advisor for providing real-time guidance to help you provision your resources following AWS best practices.
How can I handle database migrations when deploying my Rails app on AWS?
You can handle database migrations by using AWS RDS service. RDS makes it easy to set up, operate, and scale a relational database in the cloud. It provides cost-efficient and resizable capacity while automating time-consuming administration tasks.
Can I use Docker to deploy my Rails app on AWS?
Yes, AWS supports Docker and you can use AWS Elastic Beanstalk to deploy Docker-based Rails applications. Elastic Beanstalk supports multi-container Docker environments, allowing you to run multiple containers per instance in your environment.
How can I automate the deployment process of my Rails app on AWS?
AWS provides several services for automating the deployment process. AWS CodePipeline is a continuous integration and continuous delivery service, AWS CodeBuild is a fully managed build service, and AWS CodeDeploy automates software deployments.
How can I handle session management in my Rails app on AWS?
You can handle session management by using AWS ElastiCache. ElastiCache is a web service that makes it easy to deploy, operate, and scale an in-memory cache in the cloud, which can be used for managing sessions in your Rails app.
How can I backup my Rails app on AWS?
AWS provides several services for backing up your Rails app. Amazon S3 is an object storage service that offers industry-leading scalability, data availability, security, and performance. AWS Backup is a fully managed backup service that makes it easy to centralize and automate the backup of data across AWS services.
 Devdatta Kane
Devdatta Kane is a software developer and designer based in Pune, India. He works with Radinik Technologies building traceability solutions for a variety of industries. He is also the lead developer of refers2, a CRM for small businesses. He works in Ruby on Rails, but likes to dabble with various new technologies as well. An aspiring photographer and passionate traveler, he loves traveling on his motorcycle, capturing experiences through camera.