Custom Android Layouts with Your Own ArrayAdapter

Android provides a series of different layouts to suit your apps needs. One of the quickest and easiest ways to display information to users is via the ListView component. This component creates a simple scrollable region that can display unique sets of information. The great thing about ListViews is their customizability, giving you the power to create your own data layouts. For example, to display an image on the left and a title on the right for each entry. This is possible by creating and using custom ArrayAdapters.
In this tutorial you’re going to learn how to take a ListView and create a customized layout using an extended ArrayAdapter. Once you have these topics covered you will be able to create awesome looking scrollable lists of information.
Key Takeaways
- Utilize custom ArrayAdapter in Android to enhance the visual appeal and functionality of ListView components by displaying complex data layouts.
- Learn the process of creating a custom ArrayAdapter which involves defining a data source, customizing the ArrayAdapter, and implementing it in a ListView.
- Follow a step-by-step guide to construct a detailed property listing app, showcasing rental properties with images, descriptions, and prices using a custom layout.
- Understand the importance of customizing the getView method in ArrayAdapter to control how each item in the ListView is displayed.
- Explore the potential to dynamically change layouts within the ListView based on conditions such as featured properties, enhancing user engagement.
- Implement click event handling in ListView to initiate actions like opening new activities, providing interactive user experiences.
Components of the Android ArrayAdapter
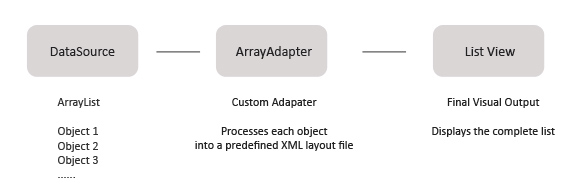
There are several interconnected smaller pieces to create your final customized ListView. You will need the following:
- A data source, generally as a list of objects
- A customized
ArrayAdapterobject which dictates how your information will be processed for each entry in the data source. - A
ListViewin the UI that will use the customizedArrayAdapterto generate the final output
It’s easier to think of this process visually. You need a data source, an Adapter to control the layout, and the component to visually display the results
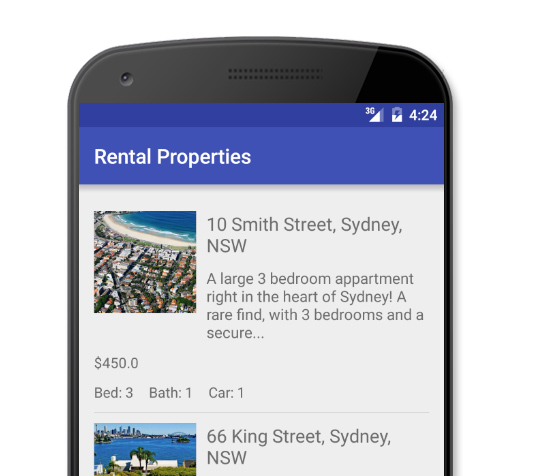
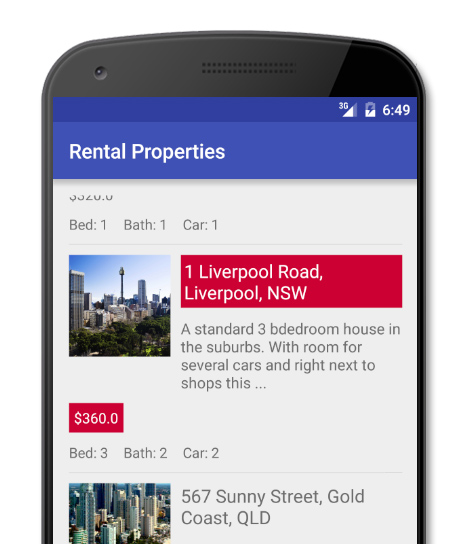
A Custom Rental ListView Showcase
As an example you will create a customized ListView which showcases rental properties. Each property will show information such as the address, featured image, price, and a summary of the description. Here’s what you can expect to see at the end.
The idea is to learn how to customize the layout, not copy my layout exactly. Once you understand how the principles work you can create a layout that works for you.
The final code for this project is on GitHub.
Creating Your Project
Create a new project in Android Studio that supports Android 4.0.3 (API 15 – Ice Cream Sandwich) and above which will cover a large part of the Android market. Add an Empty Activity and call the project Rental Properties.
Once Android Studio finishes setting up your project you should see a simple MainActivity class and a corresponding activity_main.xml layout file. This is all you need to get started.
Defining a Source Data
Before you can create a ListView you will need data to display. Since each property has a set of information, start by creating a class to set and get the information. Create a new Property class and add the following code:
//Base class to hold information about the property
public class Property {

    //property basics
    private int streetNumber;
    private String streetName;
    private String suburb;
    private String state;
    private String description;
    private String image;
    private Double price;
    private int bedrooms;
    private int bathrooms;
    private int carspots;

    //constructor
    public Property(int streetNumber, String streetName, String suburb, String state, String description, Double price, String image, int bedrooms, int bathrooms, int carspots){

        this.streetNumber = streetNumber;
        this.streetName = streetName;
        this.suburb = suburb;
        this.state = state;
        this.description = description;
        this.price = price;
        this.image = image;
        this.bedrooms = bedrooms;
        this.bathrooms = bathrooms;
        this.carspots = carspots;
    }

    //getters
    public int getStreetNumber() { return streetNumber; }
    public String getStreetName() {return streetName; }
    public String getSuburb() {return suburb; }
    public String getState() {return state; }
    public String getDescription() {return description; }
    public Double getPrice() {return price; }
    public String getImage() { return image; }
    public int getBedrooms(){ return bedrooms; }
    public int getBathrooms(){ return bathrooms; }
    public int getCarspots(){ return carspots; }
}
This creates the structure for the class by adding private fields to hold information such as the street address, state, description etc.
Continue by creating the default Property constructor method used to create new rental properties later as the data source.
Finally define get functions for each of the properties used later to fetch the information you need.
Creating the XML Layout File
Now that you have a class, you need to define the XML layout file used by the custom ArrayAdapter to build output.
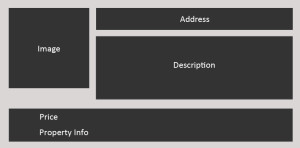
Open your projects top level res folder and find the layout sub-directory. Create a new layout file called ‘property_layout’, and add RelativeLayout as the root tag (this is specific to my design).
The layout design is split into three sections:
- A left section that contains the image.
- A right section that contains the address and description.
- A bottom section that contains property specifics such as the number of bedrooms, bathrooms, car spots, and the price.
When rendered it should look like the below.
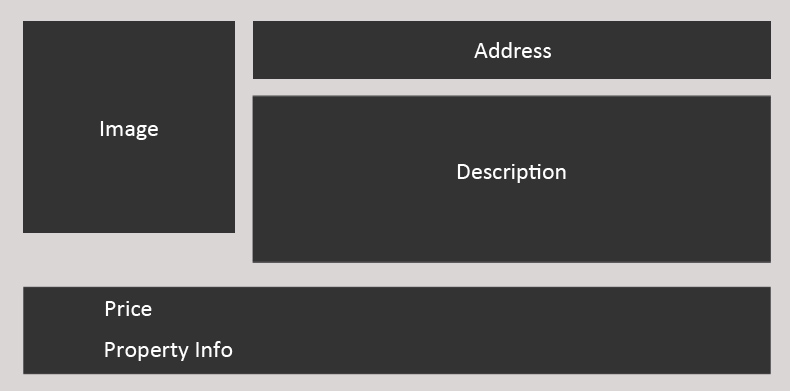
Copy the following into your new layout. Here you created a nested layout where each of section / item has ID’s so you can position and populate them. Feel free to adjust the margins, positions and sizing of the elements as you see fit.
<?xml version="1.0" encoding="utf-8"?>
<RelativeLayout xmlns:android="http://schemas.android.com/apk/res/android"
    android:layout_width="match_parent"
    android:layout_height="match_parent"
    android:orientation="vertical"
    android:paddingTop="10dp"
    android:paddingBottom="10dp">

    <ImageView
        android:id="@+id/image"
        android:layout_width="100dp"
        android:layout_height="100dp"
        android:layout_marginRight="10dp"
        android:contentDescription="Property Image" />

    <LinearLayout
        android:id="@+id/infoSection"
        android:layout_width="match_parent"
        android:layout_height="wrap_content"
        android:layout_toRightOf="@+id/image"
        android:orientation="vertical">

        <TextView
            android:id="@+id/address"
            android:layout_width="match_parent"
            android:layout_height="wrap_content"
            android:layout_marginBottom="10dp"
            android:text="Street Address"
            android:textSize="18sp" />

        <TextView
            android:id="@+id/description"
            android:layout_width="match_parent"
            android:layout_height="wrap_content"
            android:layout_marginBottom="10dp"
            android:text="Description"
            android:textSize="15sp" />
    </LinearLayout>

    <RelativeLayout
        android:id="@+id/pricingSection"
        android:layout_width="match_parent"
        android:layout_height="wrap_content"
        android:layout_below="@+id/infoSection"
        android:orientation="vertical">

        <TextView
            android:id="@+id/price"
            android:layout_width="match_parent"
            android:layout_height="wrap_content"
            android:layout_marginBottom="10dp"
            android:text="Price" />

        <TextView
            android:id="@+id/bedroom"
            android:layout_width="wrap_content"
            android:layout_height="wrap_content"
            android:layout_below="@id/price"
            android:layout_marginRight="15dp"
            android:text="Bed:" />

        <TextView
            android:id="@+id/bathroom"
            android:layout_width="wrap_content"
            android:layout_height="wrap_content"
            android:layout_below="@id/price"
            android:layout_marginRight="15dp"
            android:layout_toRightOf="@id/bedroom"
            android:text="Bath:" />

        <TextView
            android:id="@+id/carspot"
            android:layout_width="wrap_content"
            android:layout_height="wrap_content"
            android:layout_below="@id/price"
            android:layout_marginRight="15dp"
            android:layout_toRightOf="@id/bathroom"
            android:text="Car:" />

    </RelativeLayout>

</RelativeLayout>
And replace the TextView in activity_main.xml with :
<ListView
       android:layout_width="match_parent"
       android:layout_height="match_parent"
       android:id="@+id/customListView"></ListView>
Adding Images
Most of the UI components are just TextView elements, but you have a single ImageView component to handle.
Each of the properties has a corresponding image drawn when the view is rendered. In this example I’ve used the name property_image_X for each of the images displayed. Since you will add 4 properties you will need 4 images, you can find the images I used here.
If you haven’t added images to an Android Studio project before, copy all the images you want added to your project and select paste on the drawable folder.
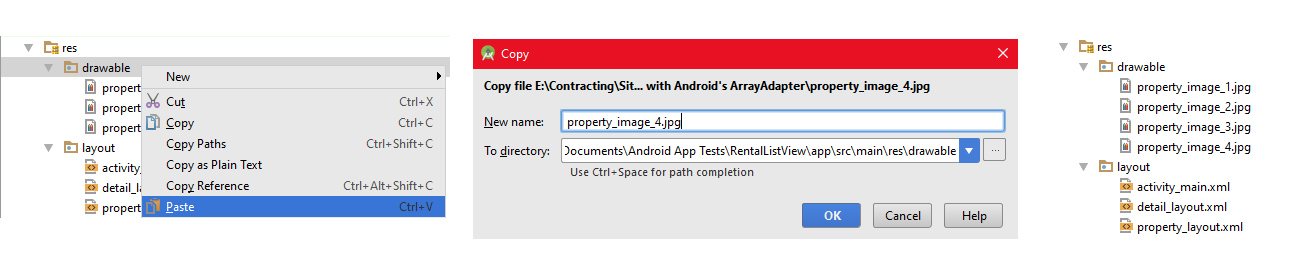
Selecting images and dragging them into the drawable folder won’t work.
Populating Data for Use
Since you have a base Property class set up and a XML file defined, you can move onto the next step of creating the data that will display in the list.
After the opening of the MainActivity class, add the ArrayList private property so that every method inside this class can access to it.
private ArrayList<Property> rentalProperties = new ArrayList<>();
Now jump into the onCreate method inside the MainActivity class just before the closing bracket to populate the data. Customize this if you want, but note that all these fields are mandatory and need to be defined as the constructor expects (i.e. a street number first, then street name, then suburb etc).
//create property elements
rentalProperties.add(
    new Property(10, "Smith Street", "Sydney", "NSW", "A large 3 bedroom apartment right in the heart of Sydney! A rare find, with 3 bedrooms and a secured car park.", 450.00, "property_image_1", 3, 1, 1));

rentalProperties.add(
    new Property(66, "King Street", "Sydney", "NSW", "A fully furnished studio apartment overlooking the harbour. Minutes from the CBD and next to transport, this is a perfect set-up for city living.", 320.00, "property_image_2", 1, 1, 1));

rentalProperties.add(
    new Property(1, "Liverpool Road", "Liverpool", "NSW", "A standard 3 bedroom house in the suburbs. With room for several cars and right next to shops this is perfect for new families.", 360.00, "property_image_3", 3, 2, 2));

rentalProperties.add(
    new Property(567, "Sunny Street", "Gold Coast", "QLD", "Come and see this amazing studio appartment in the heart of the gold coast, featuring stunning waterfront views.", 360.00, "property_image_4" , 1, 1, 1));
In a real-world app you would pull this data from a web source and create objects on-the-fly. For this tutorial it’s easier to define the values in code.
Creating a Custom ArrayAdapter Class
The standard Android ArrayAdapter will display a single line of text for each entry in a list. While that might be fine for simple lists, you need the ability to supply your own layouts and populate them accordingly. You do this by creating your own ArrayAdapter class.
For simplicity I’m creating the new class inside the MainActivty class as a nested class.
//custom ArrayAdapter
class propertyArrayAdapter extends ArrayAdapter<Property>{

    private Context context;
    private List<Property> rentalProperties;

    //constructor, call on creation
    public propertyArrayAdapter(Context context, int resource, ArrayList<Property> objects) {
        super(context, resource, objects);

        this.context = context;
        this.rentalProperties = objects;
    }

    //called when rendering the list
    public View getView(int position, View convertView, ViewGroup parent) {

        //get the property we are displaying
        Property property = rentalProperties.get(position);

        //get the inflater and inflate the XML layout for each item
        LayoutInflater inflater = (LayoutInflater) context.getSystemService(Activity.LAYOUT_INFLATER_SERVICE);
        View view = inflater.inflate(R.layout.property_layout, null);

        TextView description = (TextView) view.findViewById(R.id.description);
        TextView address = (TextView) view.findViewById(R.id.address);
        TextView bedroom = (TextView) view.findViewById(R.id.bedroom);
        TextView bathroom = (TextView) view.findViewById(R.id.bathroom);
        TextView carspot = (TextView) view.findViewById(R.id.carspot);
        TextView price = (TextView) view.findViewById(R.id.price);
        ImageView image = (ImageView) view.findViewById(R.id.image);

        //set address and description
        String completeAddress = property.getStreetNumber() + " " + property.getStreetName() + ", " + property.getSuburb() + ", " + property.getState();
        address.setText(completeAddress);

        //display trimmed excerpt for description
        int descriptionLength = property.getDescription().length();
        if(descriptionLength >= 100){
            String descriptionTrim = property.getDescription().substring(0, 100) + "...";
            description.setText(descriptionTrim);
        }else{
            description.setText(property.getDescription());
        }

        //set price and rental attributes
        price.setText("$" + String.valueOf(property.getPrice()));
        bedroom.setText("Bed: " + String.valueOf(property.getBedrooms()));
        bathroom.setText("Bath: " + String.valueOf(property.getBathrooms()));
        carspot.setText("Car: " + String.valueOf(property.getCarspots()));

        //get the image associated with this property
        int imageID = context.getResources().getIdentifier(property.getImage(), "drawable", context.getPackageName());
        image.setImageResource(imageID);

        return view;
    }
}
Above you created a new adapter called PropertyArrayAdapter and extended it from the standard ArrayAdapterclass.
You added two private fields at the top because you need methods inside the class to access the context and the list of properties.
private Context context;
private List<Property> rentalProperties;
ArrayAdapter Constructor
When extending ArrayAdapter you need to declare a constructor that passes three properties, the context, resource and the objects.
 //constructor, call on creation
public propertyArrayAdapter(Context context, int resource, ArrayList<Property> objects) {
    super(context, resource, objects);

    this.context = context;
    this.rentalProperties = objects;
}
This constructor passes the entire array list of properties and also the context. Both are important and are assigned to the classes private variables for use.
Rendering the View with the getView Method
Each time the ListView needs to render an item, it calls the getView method of the adapter. Since you want to display a custom layout you need to define this method.
//called when rendering the list
public View getView(int position, View convertView, ViewGroup parent) {
    //get the property we are displaying
    Property property = rentalProperties.get(position);

    //get the inflater and inflate the XML layout for each item
    LayoutInflater inflater = (LayoutInflater) context.getSystemService(Activity.LAYOUT_INFLATER_SERVICE);
    View view = inflater.inflate(R.layout.property_layout, null);
}
Since you have access to the position of the element rendered, you can get this element from the array list of rental objects. Now you have this object you can get the address, description and all other fields using the class getter methods.
Loading Our XML Layout File
The next step is using the context saved before to get the LAYOUT_INFLATER_SERVICE service from Android. Create a new LayoutInflater object and it’s this object you use to load the detail_layout XML file that will render the view.
//get the inflater and inflate the XML layout for each item
LayoutInflater inflater = (LayoutInflater) context.getSystemService(Activity.LAYOUT_INFLATER_SERVICE);
View view = inflater.inflate(R.layout.property_layout, null);
Populating the Layout File and Returning It
Since you now have access to the XML file you can find the elements via their ID.
Fetch all the elements and then populate their content. You make the address field by concatenating the streetNumber, streetName and state fields together. Other elements such as description are either displayed as-is, or trimmed to keep the layout tidy.
The image asset is processed differently. On creation each of the properties had a corresponding image name such as property_image_1. You use the getResources method along with getIdentifier to get the image name from the drawable directory. This will give the resource ID to populate the ImageView.
TextView description = (TextView) view.findViewById(R.id.description);
TextView address = (TextView) view.findViewById(R.id.address);
TextView bedroom = (TextView) view.findViewById(R.id.bedroom);
TextView bathroom = (TextView) view.findViewById(R.id.bathroom);
TextView carspot = (TextView) view.findViewById(R.id.carspot);
TextView price = (TextView) view.findViewById(R.id.price);
ImageView image = (ImageView) view.findViewById(R.id.image);

//set address and description
String completeAddress = property.getStreetNumber() + " " + property.getStreetName() + ", " + property.getSuburb() + ", " + property.getState();
address.setText(completeAddress);

//display trimmed excerpt for description
int descriptionLength = property.getDescription().length();
if(descriptionLength >= 100){
    String descriptionTrim = property.getDescription().substring(0, 100) + "...";
    description.setText(descriptionTrim);
}else{
    description.setText(property.getDescription());
}

//set price and rental attributes
price.setText("$" + String.valueOf(property.getPrice()));
bedroom.setText("Bed: " + String.valueOf(property.getBedrooms()));
bathroom.setText("Bath: " + String.valueOf(property.getBathrooms()));
carspot.setText("Car: " + String.valueOf(property.getCarspots()));

//get the image associated with this property
int imageID = context.getResources().getIdentifier(property.getImage(), "drawable", context.getPackageName());
image.setImageResource(imageID);

//return the view, very important
return view;
This process can be as simple or as complex as you need it to be. In our example we’re displaying a fair bit of information and ensure it’s pretty for the end user. You could trim this down to display a few sentences or expand it more to provide more functionality.
Using the Custom ArrayAdapter
Now that you have a new customized ArrayAdapter class, return to the onCreate method inside of the MainActivity class.
Below where you added the rental property data, create the new adapter:
//create our new array adapter
ArrayAdapter<Property> adapter = new propertyArrayAdapter(this, 0, rentalProperties);
The three properties passed into this adapter are:
- The current
context(wherethisreferences theMainActivityclass) - The value of
0for the resources ID.0because you don’t need a custom layout ID, the custom adapter already handles it. - The
ArrayListof rental property objects to display
The next step is attaching this new adapter to the ListView. Do this by finding the ListView and calling the setAdapter method, passing the adapter.
//Find list view and bind it with the custom adapter
ListView listView = (ListView) findViewById(R.id.customListView);
listView.setAdapter(adapter);
And that’s it!
When you run the app you should see the new customized layout defined in the XML file and configured inside the ArrayAdapter.
Bonus – Loading Layouts Dynamically
In this example you displayed all properties using property_layout.xml. This was for simplicity, as generally you want all the list items to look the same.
When each view is rendered inside the ListView, you can choose which layout you want to inflate by specifying a different layout name. You can either load an new layout for a selected item (for example a featured element) or a tweaked version for simplicity.
Return to the example and change it so that featured properties have a different layout.
Change the Property class to add a new featured field:
private Boolean featured;
Add the getter function:
public Boolean getFeatured(){return featured; }
You also need to add it to the constructor to ensure that the passed in data has this extra information.
this.featured = featured;
For the example, set property id 1 to be featured and leave the others as they are.
Copy the property_layout.xml file and rename it to property_layout_alt.xml. Make whatever changes you like, I highlighted the address and the price with a red background.
Inside the MainActivity class, jump into the getView method and change the way the XML file is inflated.
//conditionally inflate either standard or special template
View view;
if(property.getFeatured() == true){
    view = inflater.inflate(R.layout.property_layout_alt, null);
}else{
    view = inflater.inflate(R.layout.property_layout, null);
}
You check to see if it’s featured, and if so load the new property_layout_alt.xml file (which contains the new visual changes)
When run you should see something like this, with the featured properties using the alternate layout
Bonus – Handling Click Events for Your ArrayAdapter
Now that you have your content displayed in a great looking list, you might want to watch for click events so you can trigger actions, such as jumping to a new activity.
Return to the onCreate method inside the MainActivity class and add the following code just before the closing bracket.
//add event listener so we can handle clicks
AdapterView.OnItemClickListener adapterViewListener = new AdapterView.OnItemClickListener() {

    //on click
    public void onItemClick(AdapterView<?> parent, View view, int position, long id) {

        Property property = rentalProperties.get(position);

        Intent intent = new Intent(MainActivity.this, DetailActivity.class);
        intent.putExtra("streetNumber", property.getStreetNumber());
        intent.putExtra("streetName", property.getStreetName());
        intent.putExtra("suburb", property.getSuburb());
        intent.putExtra("state", property.getState());
        intent.putExtra("image", property.getImage());
        intent.putExtra("bedrooms", property.getBedrooms());
        intent.putExtra("bathrooms", property.getBathrooms());
        intent.putExtra("carspots", property.getCarspots());
        intent.putExtra("description", property.getDescription());

        startActivity(intent);
    }
};
//set the listener to the list view
listView.setOnItemClickListener(adapterViewListener);
You create a new onItemClickListener object and implement its onItemClick method, triggered when a user interacts with elements inside the ViewList.
In this example you’re getting the property from the list of rental properties and then setting Intent Extras via the Intent object. Once you’ve set up the extras you can start the next activity, the Detail Activity.
When a user clicks an item it will move into the detail activity. You to add the activity to your project manifest file:
<activity
  android:name=".DetailActivity"
  android:name=".DetailActivity"
  android:parentActivityName=".MainActivity"                  android:label="Rental Detail">
</activity>
Inside the next activity you can pull the Intent Extras passed at the intent stage, creating your detail activity.
Here’s the DetailActivity class:
public class DetailActivity extends AppCompatActivity {
    @Override
    public void onCreate(Bundle savedInstanceState) {
        super.onCreate(savedInstanceState);
        setContentView(R.layout.detail_layout);

        //set the back (up) button
        getSupportActionBar().setDisplayHomeAsUpEnabled(true);

        //find all our view components
        ImageView imageView = (ImageView) findViewById(R.id.image);
        TextView addressTV = (TextView) findViewById(R.id.address);
        TextView descriptionTV = (TextView) findViewById(R.id.description);
        TextView priceTV = (TextView) findViewById(R.id.price);
        TextView bedroomsTV = (TextView) findViewById(R.id.bedrooms);
        TextView bathroomsTV = (TextView) findViewById(R.id.bathrooms);
        TextView carspotsTV = (TextView) findViewById(R.id.carspots);


        //collect our intent and populate our layout
        Intent intent = getIntent();

        Integer streetNumber = intent.getIntExtra("streetNumber", 0);
        String streetName = intent.getStringExtra("streetName");
        String suburb = intent.getStringExtra("suburb");
        String state = intent.getStringExtra("state");
        String description = intent.getStringExtra("description");
        Double price = intent.getDoubleExtra("price", 0.0);
        Integer bedrooms = intent.getIntExtra("bedrooms", 0);
        Integer bathrooms = intent.getIntExtra("bathrooms", 0);
        Integer carspots = intent.getIntExtra("carspots", 0);
        String image = intent.getStringExtra("image");
        Integer imageID = this.getResources().getIdentifier(image, "drawable", this.getPackageName());
        String address = streetNumber + " " + streetName + ", " + suburb + ", " + state;

        //set elements
        imageView.setImageResource(imageID);
        addressTV.setText(address);
        descriptionTV.setText(description);
        priceTV.setText('$' + Double.toString(price));
        bathroomsTV.setText("Bathrooms: " + bathrooms);
        bedroomsTV.setText("Bedrooms: " + bedrooms);
        carspotsTV.setText("Car Spots: " + carspots);

        //set the title of this activity to be the street name
        getSupportActionBar().setTitle(address);
    }
}
And the related activity layout:
<?xml version="1.0" encoding="utf-8"?>
<LinearLayout xmlns:android="http://schemas.android.com/apk/res/android"
    android:layout_width="match_parent"
    android:layout_height="match_parent"
    android:orientation="vertical"
    android:padding="10dp">

    <ScrollView
        android:id="@+id/scrollView"
        android:layout_width="match_parent"
        android:layout_height="match_parent">

        <LinearLayout
            android:layout_width="match_parent"
            android:orientation="vertical"
            android:layout_height="wrap_content">

            <ImageView
                android:id="@+id/image"
                android:layout_width="match_parent"
                android:contentDescription="Property Image"
                android:layout_height="wrap_content"
                android:adjustViewBounds="true"
                android:layout_marginBottom="10dp"
                android:background="#cc0033"/>

            <TextView
                android:id="@+id/address"
                android:layout_width="match_parent"
                android:layout_height="wrap_content"
                android:text="Address goes here"
                android:layout_marginBottom="10dp"
                android:textSize="18sp"/>

            <TextView
                android:id="@+id/description"
                android:layout_width="match_parent"
                android:layout_height="wrap_content"
                android:textSize="15sp"
                android:text="Description here"
                android:layout_marginBottom="15dp"/>

            <TextView
                android:id="@+id/price"
                android:layout_width="match_parent"
                android:layout_height="wrap_content"
                android:layout_marginBottom="10dp"
                android:text="price"/>

            <TextView
                android:id="@+id/bedrooms"
                android:layout_width="match_parent"
                android:layout_height="wrap_content"
                android:text="Bedrooms"
                android:layout_marginBottom="5dp"/>
            <TextView
                android:id="@+id/bathrooms"
                android:layout_width="match_parent"
                android:layout_height="wrap_content"
                android:text="Bathrooms"
                android:layout_marginBottom="5dp"/>
            <TextView
                android:id="@+id/carspots"
                android:layout_width="match_parent"
                android:layout_height="wrap_content"
                android:text="Car Spots"
                android:layout_marginBottom="5dp"/>

        </LinearLayout>

    </ScrollView>

</LinearLayout>
Where to from here?
Now that you know the basics of how to customize the ArrayAdapter class you can build awesome interfaces for your lists. The ArrayAdapter isn’t limited to the ListView component, you can also use it with the GridView or Spinner components.
Creating rich, visually impressive lists is a great way to keep your users interested. You could expand these ideas by adding scroll animations or performing different functions on each item (for example registering one an action triggered on click and another triggered on swipe).
Any comments or questions, please let me know in the comments below.
Frequently Asked Questions on Custom Data Layouts with Android ArrayAdapters
How can I create a custom layout in Android?
Creating a custom layout in Android involves defining a new layout based on the existing ones or completely from scratch. You can do this by extending the ViewGroup class or one of its subclasses. After that, you can override the onMeasure() and onLayout() methods to specify how your layout behaves. Remember to add your custom layout to your XML file and use it in your activity or fragment.
What is an ArrayAdapter and how is it used in Android?
ArrayAdapter is a type of adapter in Android that works with an array of objects. It converts each item in the array into a View object that can be added to a ListView or GridView. ArrayAdapter is useful when you have a data source that is an array or a list and you want to display it in a ListView or GridView.
How can I customize an ArrayAdapter?
To customize an ArrayAdapter, you need to override the getView() method. This method is responsible for converting each item in the data source into a View object. You can inflate a custom layout and populate it with data from the item.
What is the role of the ViewHolder pattern in Android?
The ViewHolder pattern is a design pattern that is used to increase the performance of ListView or GridView. It works by storing the views in a row of the ListView or GridView in a ViewHolder object, so they can be reused without needing to find them again.
How can I use the ViewHolder pattern with ArrayAdapter?
To use the ViewHolder pattern with ArrayAdapter, you need to create a static class in your ArrayAdapter that holds the views in a row. In the getView() method, you check if the convertView is null. If it is, you inflate the layout and create a new ViewHolder object. If it’s not null, you reuse the ViewHolder object attached to the convertView.
How can I handle click events in a ListView or GridView?
You can handle click events in a ListView or GridView by setting an OnItemClickListener. In the onItemClick() method, you can get the item that was clicked and perform an action.
How can I update the data in an ArrayAdapter?
To update the data in an ArrayAdapter, you can call the notifyDataSetChanged() method. This method tells the ArrayAdapter that the underlying data has changed and it needs to refresh the views.
How can I add or remove items from an ArrayAdapter?
You can add or remove items from an ArrayAdapter by calling the add(), insert(), remove(), or clear() methods. After modifying the data, you need to call notifyDataSetChanged() to refresh the views.
How can I filter the data in an ArrayAdapter?
ArrayAdapter has a built-in filter that you can use to filter the data. You can get the filter by calling the getFilter() method and use it to filter the data based on a constraint.
How can I sort the data in an ArrayAdapter?
ArrayAdapter has a built-in method to sort the data. You can call the sort() method with a Comparator to sort the data based on a certain criteria. After sorting the data, you need to call notifyDataSetChanged() to refresh the views.
Full stack developer and overall web enthusiast. I love everything to do with web / design and my passion revolves around creating awesome websites. Focusing primarily on WordPress, I create themes, plugins and bespoke solutions.


Published in
·Android·App Development·iOS·Mobile·Mobile Web Development·Tools & Libraries·January 13, 2015