A lot of welcome enhancements have been introduced in iOS 8, one of the most powerful new features is the concept of extensions. Extensions provide several ways to share functionality and data with iOS or other apps, from your own app.
Extensions in iOS exist in many different forms. Each one deals with a particular part of the the system. Here we will focus on the Today extension, otherwise known as a widget. Widgets appear in the notification center found inside the Today view. Before we create an extension, it’s important to understand the concepts behind them.
What Are Extensions?
Extensions enable you to share custom functionality or content from your app to other areas of iOS. All extensions are created to serve a central purpose, they usually don’t have various components but rather are created to facilitate a certain task.
Many areas of the operating system support widgets. These are referred to as extension points. The functionality you want to provide will determine which extension point you target. With iOS 8, there are seven extension points:
- Today (iOS & OS X) – See quick updates in the Today view.
- Share (iOS & OS X) – Share content with others or post it to a website.
- Action (iOS & OS X) – Edit or view content provided by a host app.
- Photo Editing (iOS) – Edit a photo or video using the stock Photos app.
- Document Provider (iOS) – Access and edit a repository of files.
- Custom Keyboard (iOS) – Provide a customized system keyboard.
- Finder Sync (OS X) – Show information about file sync state within Finder.
Inside Xcode, each extension template is tailored for exactly one of the extension points listed above. There is no concept of a “generic” extension that will work with more than one extension point.
Every extension exists inside a container app as a separate binary. They are added to an existing project as a new target. This means you don’t release extensions individually. Instead, they are released alongside their container app. One app can contain several different extensions.
Now that we have a good understanding of what extensions are, let’s focus on the Today extension we are going to create.
Widget Design Considerations
There are certain rules you should follow when creating a widget. Widgets need to be focused, responsive, and contain quick glance information. This means if you were creating a widget for a sports app, it might display the score for a particular game. It would not include a step intensive process such as signing in, browsing all the scores from multiple sports, etc.
Aside from the user experience, there are technical limitations as well. For example, widgets cannot display the keyboard. The Today view also uses blurring visual effects, so it’s a good idea to keep the background clear. A user’s primary gesture inside the Today view is swiping up or down, so using scrollviews isn’t recommended either.
What Will Our Widget Do?
The widget we are going to create will display geolocation information based on your IP address using an API provided by Telize. When iOS attempts to update the widget, a request is sent to the API for the data if it hasn’t been retrieved yet. The JSON will then be stored in a NSDictionary.
When the data is parsed, a random value from your location will display such as latitude, longitude, country code, etc. There will also be a button to update the label to display a new random value.
Apple recommends that widgets use auto layout. Recently iOS 8 introduced adaptive design, which encourages developers to create their views so that they can be presented correctly on any device. This ensures your widget is capable of delivering an exceptional user experience whether it’s on a iPad, iPhone 4, or iPhone 6 Plus. SitePoint recently published an article on auto layout, take a read if you want to know more.
You can find the final project we are creating on GitHub.
Creating the New Target
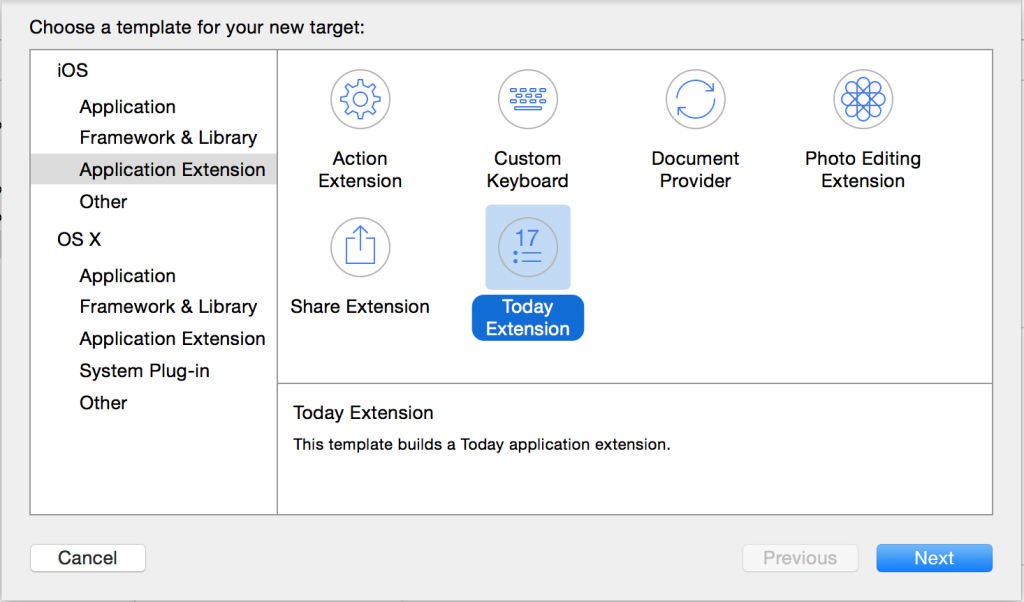
Start by opening Xcode and creating a new project using the single view application template. If you already have an existing app you want to add this widget too, you can skip this step. Add a new target by choosing File > New > Target and then select Today Extension listed under the Application Extension section under iOS extension.
Fill out the options for the product name and organization identifier for the target. If you want to follow along with the code for this tutorial, be sure to choose swift as the programming language. Recall that extensions are housed inside containing apps. That’s why the bundle identifier is based off of the one that already exists for the project. Click finish to add the extension.
The User Interface
Make sure you open the Widget folder before continuing. By default, the widget template adds a view controller, storyboard, and plist file. If you open the MainInterface.storyboard, you’ll notice that one label is provided for the user interface. For our widget, we also need to add a button.
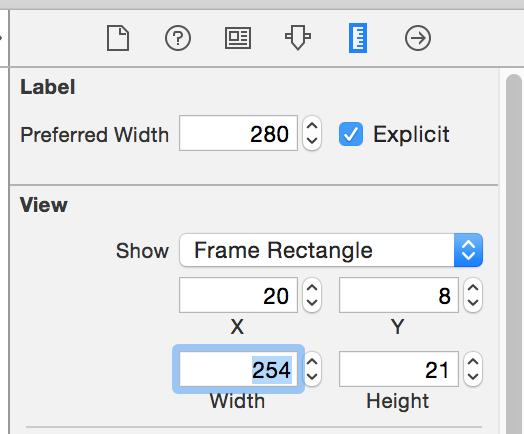
Start by double clicking on the label and type “Loading…” and press enter. Then, open up the Size inspector. Set the Width to 254. The label will turn orange to indicate that the frame has changed and that the current constraints are invalid. We’ll fix this later.
Next, drag a button from the Object library and place it towards the right side of the label. Open the Attributes inspector and set the Type as Info Light and uncheck Shows Touch On Highlight. In the Size inspector set the buttons X to 266 and Y to 8.
Create IBOutlets and IBAction
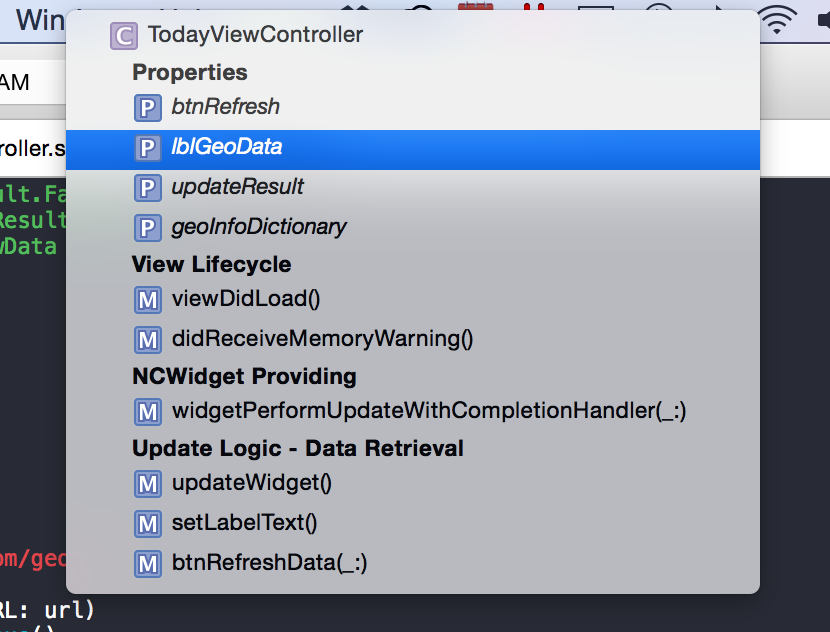
Click the Assistant editor button at the top right of Xcode. The TodayViewController code should be showing on the right side of Xcode. This will make it easy to hook up outlets inside the view controller.
![]()
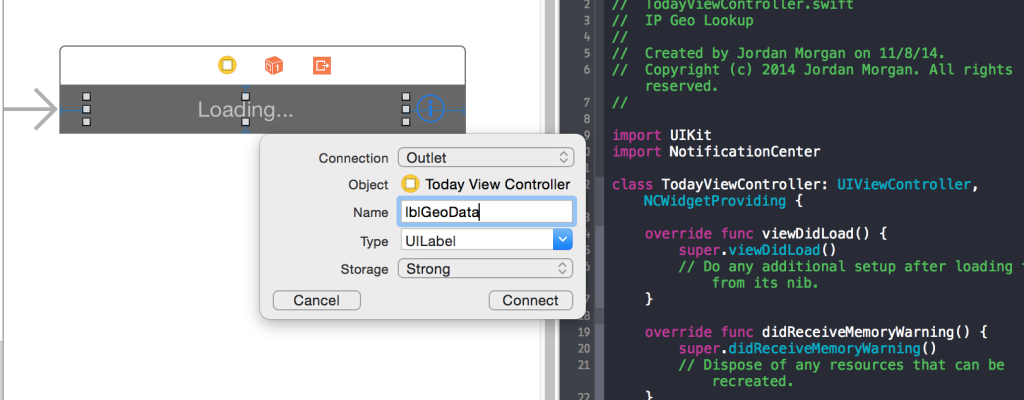
Ctrl+Drag from the label to the top of the TodayViewController and let go. In the prompt , type lblGeoData for the name . Click connect.
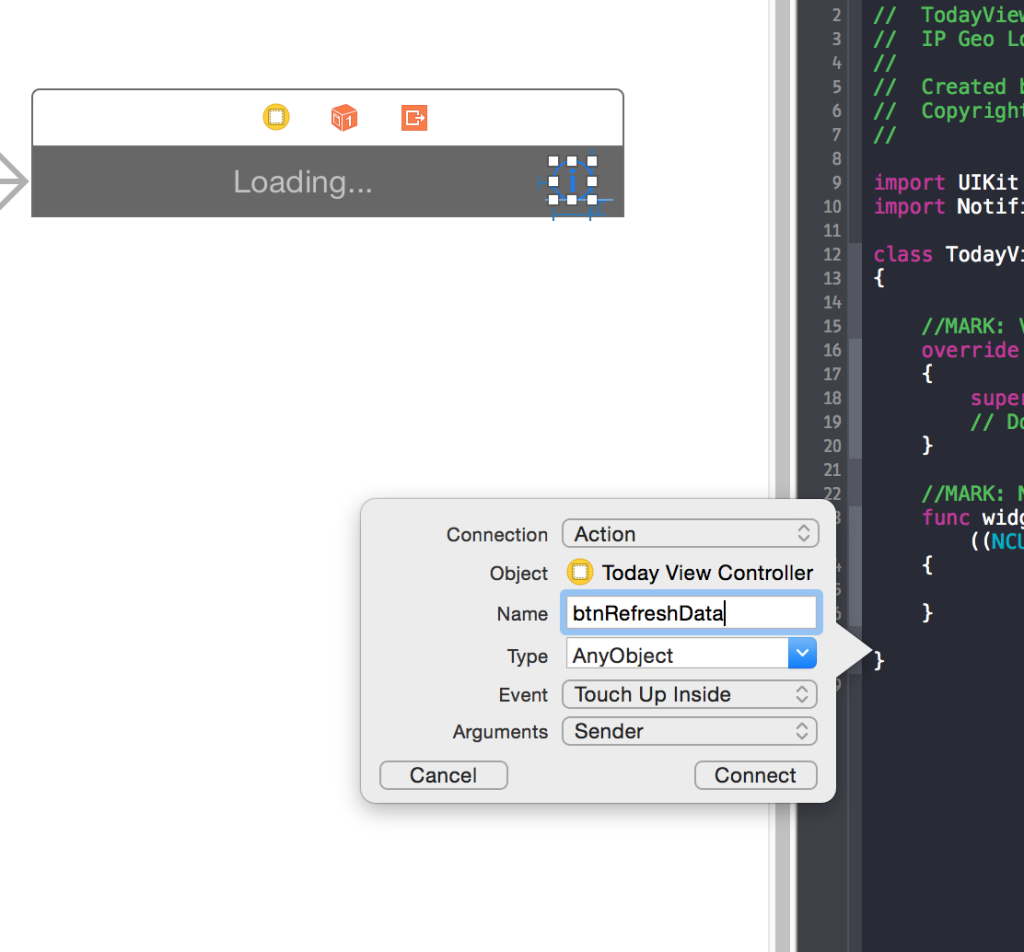
Do the same for the button, but for name call it btnRefresh. Repeat this process one more time, but release the mouse button towards the bottom of the view controller. Set the Connection type to Action and the Name to btnRefreshData.
With the label selected, at the bottom of the storyboard canvas press the “Resolve Auto Layout Issues” button and click Clear Constraints under the All Views section .
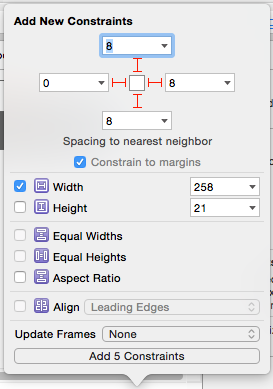
Make sure the label is still selected. Using the Pin button at the bottom of the storyboard canvas, add the constraints shown in the image below and click Add 5 Constraints.
We’ll need to edit some of the priorities on the constraints that were just added. Over in the Size inspector you’ll see all the constraints applied to the label.
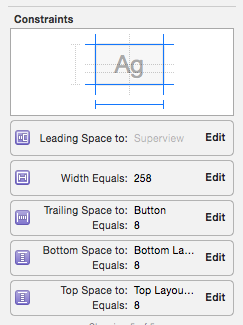
Open the width constraint and change the Relation to Greater than or equal. For both the Top and Bottom constraints, bring down their Priorities to 999.
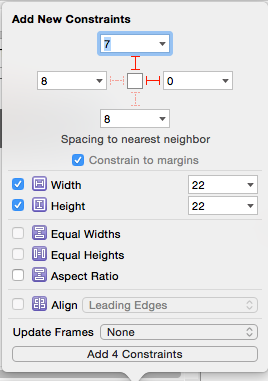
Select the button that we added next to the label and open the Pin popup again. Add the following constraints and click Add 4 Constraints:
Switch back to the Standard editor view by pressing the button right next to the assistant editor.
NCWidgetProviding Protocol
Now that the user interface is all set, open up the TodayViewController.swift file. At their core, widgets are not much more than a single view controller. The one provided here conforms to an important protocol, NCWidgetProviding. This protocol provides functions to customize the appearance and behavior of a widget.
NCWidgetProviding has two delegate functions. The first, widgetPerformUpdateWithCompletionhandler:, is required to be implemented. You don’t need to call this function manually. If we indicate that there is new data within it, a snapshot will then be cached and later used to update the display.
The other delegate function defined in the protocol is widgetMarginInsetsForProposedMarginInsets:. Unlike the last function, this is optional to implement. By default, widgets are created with a left margin inset. If you look at the Apple provided widgets on the Today view such as Calendar, you’ll notice the space on the left side. If you wanted to center your widget, you can return the appropriate UIEdgeInsets here.
Retrieving The Data
We need to write code to consume the API to show data on our widget. First, create a property to maintain the widget’s update status. Add the following property in TodayViewController.swift underneath the existing IBOutlets for our label:
var updateResult:NCUpdateResult = NCUpdateResult.NoDataWe will use this property to tell the system whether or not our user interface should be updated once new data is retrieved from the API.
Create another property called geoInfoDictionary of type NSDictionary. This will cache the data so a new request to the API isn’t required to show new information in the label.
Above viewDidLoad:, your code should now look like this:
@IBOutlet var btnRefresh: UIButton!
@IBOutlet var lblGeoData: UILabel!
var updateResult:NCUpdateResult = NCUpdateResult.NoData
var geoInfoDictionary:NSDictionary?
At this point, it’s time to call the API and get the geo location data about your current IP address. Add this code in the view controller (don’t worry about setLabelText(), we’ll add that next):
//MARK: Update Logic - Data Retrieval
func updateWidget()
{
    if self.geoInfoDictionary == nil
    {
        self.lblGeoData.text = "Refreshing..."

        let urlPath: String = "http://www.telize.com/geoip?"
        let url: NSURL = NSURL(string: urlPath)!
        let request: NSURLRequest = NSURLRequest(URL: url)
        let queue:NSOperationQueue = NSOperationQueue()

        NSURLConnection.sendAsynchronousRequest(request, queue: queue, completionHandler:{ (response: NSURLResponse!, data: NSData!, error: NSError!) -> Void in

            if(error != nil)
            {
                self.updateResult = NCUpdateResult.Failed
                self.lblGeoData.text = "An error occurred while retrieving data"
            }
            else
            {
                let jsonResult: NSDictionary = NSJSONSerialization.JSONObjectWithData(data, options: NSJSONReadingOptions.MutableContainers, error: nil) as NSDictionary
                self.geoInfoDictionary = jsonResult
            }

            self.setLabelText()
        })

    }
    else
    {
        self.setLabelText()
    }

}
Above the function declaration we have what looks like a comment. This is similar to pragma marks in Objective-C. Using //MARK: helps break down the code into logical sections that can be viewed inside the jump bar.
In the updateWidget() function we consume the API. Validation is done first to see if the request was successful. If it wasn’t, the NSError object will be initialized. If that happens, updateResult is set to failed.
If the error is nil, data was received from the response. The geoInfoDictionary is populated with the geo location data.
Next, create this function right below updateWidget():
func setLabelText()
{
    if let geoDictionary = self.geoInfoDictionary
    {
        let randomKeyIndex = Int(arc4random_uniform(UInt32(geoDictionary.count)))
        let randomKey = geoDictionary.allKeys[randomKeyIndex] as String
        let keyValue = geoDictionary[randomKey] as String
        let lblText = "\(randomKey) - \(keyValue)"

        if(self.lblGeoData.text != lblText)
        {
            self.updateResult = NCUpdateResult.NewData
            self.lblGeoData.text = lblText
        }
    }
    else
    {
        self.updateResult = NCUpdateResult.NoData
    }

}
This function will update the label when it’s either refreshed by pressing the button or when the JSON is returned for the first time. A random value is chosen from the geo location dictionary and displayed on the label if it’s different information from what’s showing already.
The button we added earlier will update the label with another value. Complete the btnRefreshData function now:
@IBAction func btnRefreshData(sender: UIButton)
{
    self.geoInfoDictionary == nil ? self.updateWidget() : self.setLabelText()
}
When the button is pressed, it checks to see if we already have a response from the API. If we do, there is no reason to hit the server again. All of the geo location data is saved in the property geoInfoDictionary. Regardless, the label gets updated with something new.
To finish things off, implement viewDidAppear: like this:
override func viewDidAppear(animated: Bool)
{
    super.viewDidAppear(animated)
    self.updateWidget()
}
Calling the completion handler
The widget needs to update when it’s offscreen. This keeps it updated consistently. It’s our responsibility to tell the system whether or not this should occur. Change the protocol function widgetPerformUpdateWithCompletionHandler(completionHandler: to attempt to show fresh data, and then execute the completion handler:
//MARK: NCWidgetProviding Functions
func widgetPerformUpdateWithCompletionHandler(completionHandler: ((NCUpdateResult) -> Void)!)
{
    self.updateWidget()
    completionHandler(self.updateResult)
}
If you are creating a widget similar to this, it would be wise to cache the quotes using NSUserDefaults. App group entitlements can be created for the widget and the containing app if you want to share the quote outside of the widget. This will allow NSUserDefaults to sync between both targets using the initWithSuiteName: initializer.
Setting Margin Insets
If you were to build and run the widget now, the margins would seem a little off. To fix this, set some custom inset values inside widgetMarginInsetsForProposedMarginInsets:.
func widgetMarginInsetsForProposedMarginInsets(defaultMarginInsets: UIEdgeInsets) -> UIEdgeInsets
{
    var newMargins = defaultMarginInsets
    newMargins.right = 10
    newMargins.bottom = 5
    return newMargins
}
Depending on the type of widget you build, you may not even need to implement this. Remember, this is an optional function inside the NCWidgetProviding protocol.
Now that you’ve added this code, your entire view controller should look like this:
import UIKit
import NotificationCenter

class TodayViewController: UIViewController, NCWidgetProviding
{

  //MARK: Properties
  @IBOutlet var btnRefresh: UIButton!
  @IBOutlet var lblGeoData: UILabel!
  var updateResult:NCUpdateResult = NCUpdateResult.NoData
  var geoInfoDictionary:NSDictionary?

  //MARK: View Lifecycle
  override func viewDidLoad()
  {
      super.viewDidLoad()
      // Do any additional setup after loading the view from its nib.
  }

  override func viewDidAppear(animated: Bool)
  {
      super.viewDidAppear(animated)
      self.updateWidget()
  }

  //MARK: NCWidget Providing
  func widgetPerformUpdateWithCompletionHandler(completionHandler: ((NCUpdateResult) -> Void)!)
  {
      self.updateWidget()
      completionHandler(self.updateResult)
  }

  func widgetMarginInsetsForProposedMarginInsets(defaultMarginInsets: UIEdgeInsets) -> UIEdgeInsets
  {
      var newMargins = defaultMarginInsets
      newMargins.right = 10
      newMargins.bottom = 5
      return newMargins
  }

  //MARK: Update Logic - Data Retrieval
  func updateWidget()
  {
      if self.geoInfoDictionary == nil
      {
          self.lblGeoData.text = "Refreshing..."

          let urlPath: String = "http://www.telize.com/geoip?"
          let url: NSURL = NSURL(string: urlPath)!
          let request: NSURLRequest = NSURLRequest(URL: url)
          let queue:NSOperationQueue = NSOperationQueue()

          NSURLConnection.sendAsynchronousRequest(request, queue: queue, completionHandler:{ (response: NSURLResponse!, data: NSData!, error: NSError!) -> Void in

              if(error != nil)
              {
                  self.updateResult = NCUpdateResult.Failed
                  self.lblGeoData.text = "An error occurred while retrieving data"
              }
              else
              {
                  let jsonResult: NSDictionary = NSJSONSerialization.JSONObjectWithData(data, options: NSJSONReadingOptions.MutableContainers, error: nil) as NSDictionary
                  self.geoInfoDictionary = jsonResult
              }

              self.setLabelText()
          })

      }
      else
      {
          self.setLabelText()
      }

  }

  func setLabelText()
  {
      if let geoDictionary = self.geoInfoDictionary
      {
          let randomKeyIndex = Int(arc4random_uniform(UInt32(geoDictionary.count)))
          let randomKey = geoDictionary.allKeys[randomKeyIndex] as String
          let keyValue = geoDictionary[randomKey] as String
          let lblText = "\(randomKey) - \(keyValue)"

          if(self.lblGeoData.text != lblText)
          {
              self.updateResult = NCUpdateResult.NewData
              self.lblGeoData.text = lblText
          }
      }
      else
      {
          self.updateResult = NCUpdateResult.NoData
      }
  }

  @IBAction func btnRefreshData(sender: AnyObject)
  {
      self.geoInfoDictionary == nil ? self.updateWidget() : self.setLabelText()
  }
}
Running the Widget
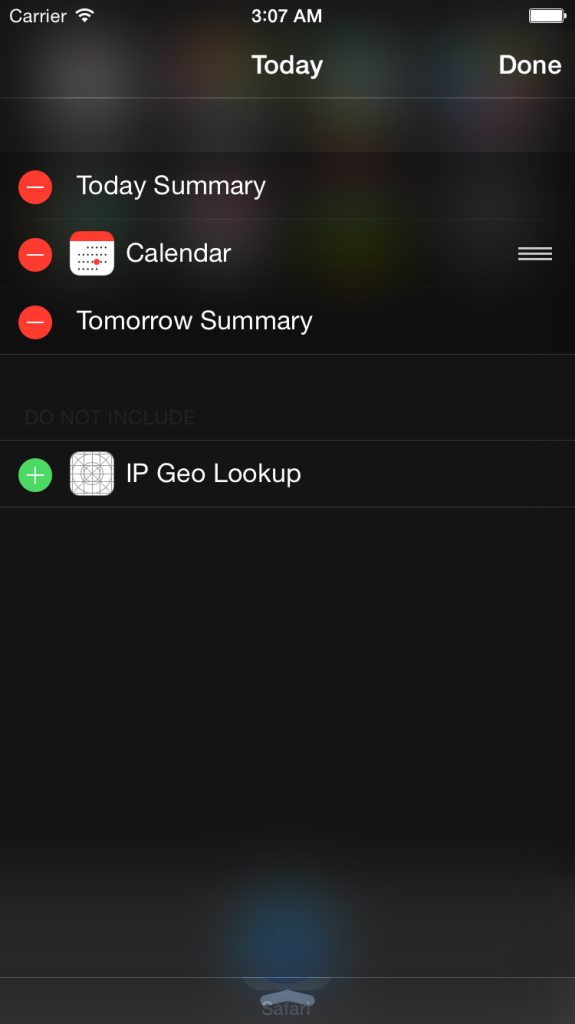
Build and run the widget now by pressing command + R. Since we used auto layout, it doesn’t matter which simulator you choose. You will be prompted to choose an app to run. Select Today. When the simulator runs, you’ll see the Today screen appear. If the the widget doesn’t appear, press “Edit” at the bottom of the screen and add it.
After 5–10 seconds, the response from the API comes back and some random geolocation information is displayed. Press the button a few times to see it cycle through some of the data.

Conclusion
Extensions open up a lot of exciting opportunities for developers. Widgets have proven to be one of the most popular new iOS features among users. If you have existing apps published on the app store, ask yourself if they can benefit from a widget. It doesn’t take much code to get a widget up and running once you understand the concepts of NCWidgetProviding.
Remember to keep them direct, focused, and with performance in mind. Short glances of information are best suited for the Today screen. Pay special attention to how Apple’s widgets function. With the basics covered in this tutorial, you have all you need to get started on your own widget.
 Jordan Morgan
Jordan Morgan is the founder of Dreaming In Binary. He loves teaching and learning about things related to iOS and game development. When he is not busy blogging about programming, he likes to kick back and play video games with his son and wife.