In this part, we will begin to work with the REST interface. Creating a REST Api on Laravel isn’t very difficult. All we need to keep in mind is that we’re dealing with EmberJS and that we don’t want to write a new adapter from scratch. As usual, you can find the source code for this part on github.
Where to start?
That is a hard question. Ember has its own workflow and logic. If we begin to write our REST with that logic in mind we will save some time, we’ll have a nice architecture and something reusable. I think Ember has made a good choice with their REST architecture. Take a look at how Ember expects the data.
Let’s assume that we want to retrieve a user. Ember expects something like this:
{
      "user": {
        "firstName": "firstName",
        "lastName": "lastName"
      }
    }
If we want to retrieve a list of users, Ember would expect a json like this:
{
      "users":
      [
          {
            "firstName": "firstPersonsName",
            "lastName": "lastname"
          },
          {
            "firstName": "secondPersonName",
            "lastName": "lastName"
          }
      ]
    }
The first one requires “user”, but the second one requires “users”. The second one is plural. Ember put in some rules for that too. If you don`t specify the plural yourself by using:
Ember.Inflector.inflector.irregular('formula', 'formulae');EmberJs will make an assumption and request “formulas”. Sometimes, it’s nice that the framework itself provides such things, but on the other hand things can get out of control if you forget these details.
Before venturing deeper with Ember, a warning: Ember is difficult and powerful. Take the time to learn how it works.
If we complicate things a little bit and put some relations between the objects, for example we say that the user has some photos. How would we output that?
{
      "user": {
        "id": 1,
        "name": "firstName",
        "lastname": "lastname,
        "photos": [1, 2, 3]
      },

      "photos":
      [
          {
            "id": 1,
            "title": "Lorem Ipsum"
          },
          {
            "id": 2,
            "title": "Lorem Ipsum"
          }
      ]
    }
This is a one-to-many relation. If we request a user, his photos will be pulled too. We have already set up some relations in Laravel, you can use them if you want and consume those relations on Ember, too.
I started with Ember to see how this framework wants the data. It’s easier if you know how to build the structure. The validation and getting the data from database is easy, but building a solid REST interface and a smart one, that is the hard part.
Preparing for the REST
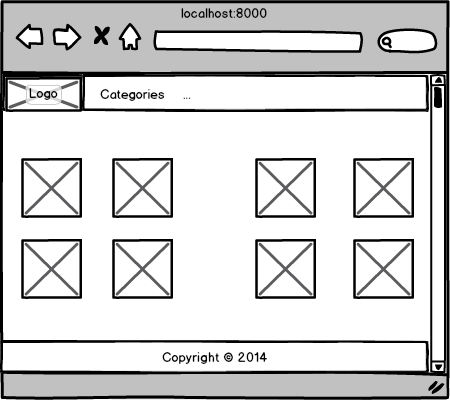
When you develop something, a mockup can be very helpful. Even if you are a guru programmer and you hate dealing with Photoshop or Gimp, there are good tools for prototyping. I used balsamiq and my front-page prototype was this:
Lets start building it. Open /app/views/index.php . This serves as our single page app. We created this file in the first part of this series.
<script type="text/x-handlebars">

        <!-- The navigation top-bar -->
        <nav class="top-bar" data-topbar>

            <ul class="title-area">
                <li class="name">
                    <h1><a href="#">Photo Upload</a></h1>
                </li>
            </ul>

            <section class="top-bar-section">

                <!-- Left Nav Section -->
                <ul class="left">
                    <li class="has-dropdown">
                        <a href="#">Categories</a>
                        <ul class="dropdown">
                            <li><a href="#">Category1</a></li>
                            <li><a href="#">Category2</a></li>
                            <li><a href="#">Category3</a></li>
                            <li><a href="#">Category4</a></li>
                        </ul>
                    </li>
                </ul>

            </section>

            <div class="clearfix"></div>

        </nav><!-- END Navigation -->

        <!-- Content -->
        <div style="margin-top: 50px;">
            <!-- The content will be here -->
        </div><!-- END Content -->

    </script>
Allow me to explain this. The nav tag is responsible for the navigation. The ul tag with the class title-area is text that is used as a logo which links to the first level of the application. I have also added a drop-down with a list of categories. Head to the Foundation 5 docs if you want to learn more. Most of the time it’s just copy/paste operations, so don’t worry about this part.
Also, I used Foundation’s grid system for the content area. This would be filled with all the information and will be changed while navigating. All the internal updates will be handled by Ember. We are going to build only 3 templates here. One for users, one for a single photo and one for the landing page.
Have you noticed that all of our code is inside a script tag? Ember uses handlebars as its template language. The type of text/x-handlebars is a special type of script. If you have used Ember and Handlebars for a while, you probably used template names. I don’t specify them in this one because this template will be used as the container for all of the application. If you don’t specify a name, Ember uses it as the Application Template.
The Resource controllers
As I developed this very simple app, I found that Resource Controllers come in handy when developing REST Apis. That is the point of the REST architecture – everything is a resource. All resources can have an HTTP verb applied: GET, POST, DELETE, PUT (update). Not all verbs are required.
php artisan controller:make PhotoController --except=create,editThis is how we create a Resource Controller via Artisan. The option --except leaves out these two methods from this controller. We don’t need the create and edit methods. The create method deals with the graphical interface of creating that resource. As we are making a one page app, it isn’t wise to create a view outside Ember.
Create another Resource Controller for categories. As you can see, only show and index methods are available in this controller. I think that showing an individual category and retrieving all categories is enough.
php artisan controller:make CategoryController --only=show,indexAnother Controller is the Images Controller. Why images controller if we already have one? Because we need an end point to serve the images. Dropbox holds our images, but we cannot access them from the outside. If you want to make a folder public, you have to pay. That’s the first reason. The second reason is that I don’t want every image to be public. In a nutshell, this controller will grab the image from Dropbox and serve it to the client.
php artisan controller:make ImagesController --only=showAnd the last but not least is the UserController:
php artisan controller:make UserController --only=show,indexThe Route
Now that we have the Controllers, we need to link those controllers with their related routes. Let’s update /app/routes.php. First, group them inside a url namespace by using Route::group.
Route::group(array('prefix' => 'api/v1'), function()
    {


    });
Here we specified a prefix, the namespace. Everything that is inside this group can be accessed like this:
example.com/api/v1Also, we can specify filters inside that group. For example, you can add a Auth::onceBasic('username') filter or create one and add it in this group. You can use other authentications, too.
Add three controllers inside that group. PhotoController, UserController and CategoryController.
Route::group(array('prefix' => 'api/v1'), function()
    {
        Route::resource('photos', 'PhotoController');
        Route::resource('users', 'UserController');
        Route::resource('categories', 'CategoryController');
    });
Add the ImagesController outside that group. I don’t think that this controller needs a namespace – images are images and there is no point in giving them a namespace.
Route::resource('files', 'ImagesController');In the end, the /app/routes.php file should look like this:
Route::get('/', function()
    {
    	return View::make('index');
    });

    Route::group(array('prefix' => 'api/v1'), function()
    {
        Route::resource('photos', 'PhotoController');
        Route::resource('users', 'UserController');
        Route::resource('categories', 'CategoryController');

    });

    Route::resource('files', 'ImagesController');
Notice the resource names are plural, due to Ember’s requirement.
Filling those controllers
Now we can start building something. I’m not going to cover all about REST here because its very difficult to explain all the things – to find out more in greater depth, see this series. Let’s start with the photo controller.
The index() method should return the newest photos from the database. Here, we could do some pagination but I don’t want things to get too complex. If there’ll be enough interest in the comments, we’ll update this application in a future article.
public function index()
	{
        try{
            $statusCode = 200;
            $response = [
              'photos'  => []
            ];

            $photos = Photo::all()->take(9);

            foreach($photos as $photo){

                $response['photos'][] = [
                    'id' => $photo->id,
                    'user_id' => $photo->user_id,
                    'url' => $photo->url,
                    'title' => $photo->title,
                    'description' => $photo->description,
                    'category' => $photo->category,
                ];
            }

        }catch (Exception $e){
            $statusCode = 400;
        }finally{
            return Response::json($response, $statusCode);
        }

	}
Let me explain this. I inserted everything inside a try, catch and finally block. If something goes wrong, return a different json with a status code.
$photos = Photo::all()->take(9);This grabs 9 photos from the database. Then, take every photo and display it in a formatted array that will be converted to json format later on.
If everything goes well or if an Exception isn’t thrown by Eloquent, this displays the right output. If you want to display a specific status code, catch every Exception that can be thrown by Eloquent and display the right status code.
Let’s fill the show() method now. Again, we want to retrieve all the information about the photo with the given id.
public function show($id)
	{
        try{
            $photo = Photo::find($id);
            $statusCode = 200;
            $response = [ "photo" => [
                'id' => (int) $id,
                'user_id' => (int) $photo->user_id,
                'title' => $photo->title,
                'url' => $photo->url,
                'category' => (int) $photo->category,
                'description' => $photo->description
            ]];

        }catch(Exception $e){
            $response = [
                "error" => "File doesn`t exists"
            ];
            $statusCode = 404;
        }finally{
            return Response::json($response, $statusCode);
        }

	}
When building your own app, don’t forget to add validation to user input.
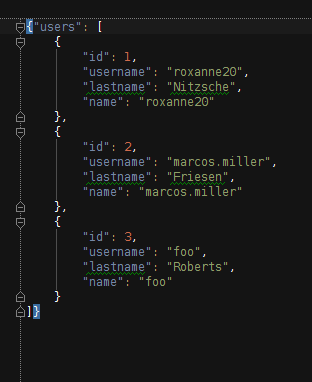
The logic for the UserController is almost the same. This time, we will request the user Model.
public function index()
	{
		try{

            $response = [
                'users' => []
            ];
            $statusCode = 200;
            $users = User::all()->take(9);

            foreach($users as $user){

                $response['users'][] = [
                    'id' => $user->id,
                    'username' => $user->username,
                    'lastname' => $user->lastname,
                    'name' => $user->username
                ];


            }


        }catch (Exception $e){
            $statusCode = 404;
        }finally{
            return Response::json($response, $statusCode);
        }
	}
Everything is almost identical, only the Model and the fields change. The output json. The show method will look like this:
public function show($id)
	{
	    try{

            $response = [
                'user' => []
            ];
            $statusCode = 200;

            $user = User::find($id);

            $response = [
                'id' => $user->id,
                'name' => $user->name,
                'lastname' => $user->lastname,
                'username' => $user->username
            ];

        }catch (Exception $e){
            $statusCode = 404;
        }finally{
            return Response::json($response, $statusCode);
        }

	}
This function retrieves a user with the given id.
The last controller we are dealing with is the ImagesController. The logic is as simple as grabbing the images from the filesystem and serving them. It’s simple when you are saving files and retrieving with the local filesystem or the server filesystem. Unfortunately, you can’t save files to Heroku, so you we’ll use Dropbox and serve those files from this end-point.
Import the Dropbox Client and the Flysystem adapter. If our environment is local, then we will use flysystem with the local adapter; if the environment is production, then use the Dropbox adapter. Assign the Flysystem class into a private variable inside this controller.
if(App::environment() === "local"){

        $this->filesystem = new Filesystem(new Adapter( public_path() . '/images/'));

    }else{

        $client = new Client(Config::get('dropbox.token'), Config::get('dropbox.appName'));
        $this->filesystem = new Filesystem(new Dropbox($client, '/images/'));

    }
The show method will serve that file and the destroy method will delete that file from the filesystem. By using this library we put a level of abstraction into our app.
public function show($name)
	{
        try{
            $file = $this->filesystem->read($name); // Read the file
        }catch (Exception $e){
            return Response::json("{}", 404);       // Return a 404 status code in a error case
        }

        $response = Response::make($file, 200);     // If everything goes ok then return that file and 200 status code

        return $response;

	}
The destroy() function is very simple. Just select that file by using the delete method and passing the name of the file to be deleted. If the file is not found then return a 404.
public function destroy($name)
	{
		try{
            $this->filesystem->delete($name);
            return Response::json("{}", 200);
        }catch (\Dropbox\Exception $e){
            return Response::json("{}", 404);
        }
	}
In the end, the ImageController should look something like this:
/* /app/controllers/ImagesController.php */

    use Dropbox\Client;
    use League\Flysystem\Filesystem;
    use League\Flysystem\Adapter\Local as Adapter;
    use League\Flysystem\Adapter\Dropbox;


    class ImagesController extends \BaseController {

        private $filesystem;

        public function __construct(){

            if(App::environment() === "local"){

                $this->filesystem = new Filesystem(new Adapter( public_path() . '/images/'));

            }else{

                $client = new Client(Config::get('dropbox.token'), Config::get('dropbox.appName'));
                $this->filesystem = new Filesystem(new Dropbox($client, '/images/'));

            }

        }


    	public function show($name)
    	{
            try{
                $file = $this->filesystem->read($name);
            }catch (Exception $e){
                return Response::json("{}", 404);
            }

            $response = Response::make($file, 200);

            return $response;

    	}


    	public function destroy($name)
    	{
    		try{
                $this->filesystem->delete($name);
                return Response::json("{}", 200);
            }catch (\Dropbox\Exception $e){
                return Response::json("{}", 404);
            }
    	}


    }
The format we served is HTML. Ok, that’s a bit weird. We wanted to serve images, not HTML. However, that’s not a problem because the browser looks for the file format and recognizes how to use that file.
Go ahead and try to create the CategoryController. I left it out as an exercise for you.
Testing the Api
I have to admit, I’m in love with PhpStorm, and for testing the Rest APIs I use a tool called Rest Client. It’s a graphical interface which simplifies the testing. You can also use CURL from the terminal if you want. Let’s make some tests:
curl http://localhost:8000/api/v1/usersAnd this is what’s returned:
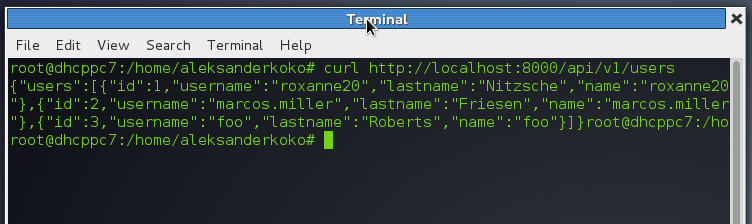
With PhpStorm’s Rest Client, I get the same result in json.
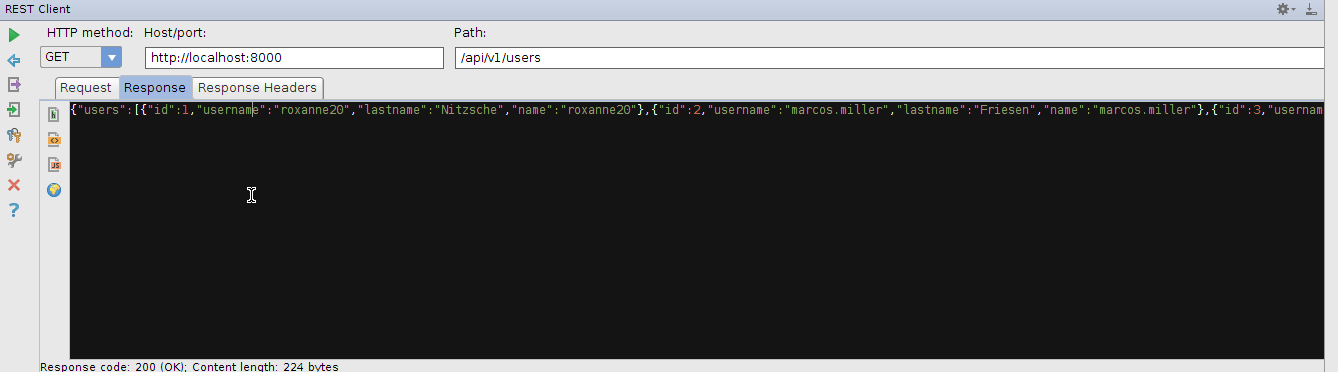
And if I want to see the results in a better format, I can simply press the js icon on the left side of the tool and the Rest Client gives me a nicer representation.
You can also test other verbs like delete and post. Go ahead and test as much as you can. There are other clients that you can use for testing: Rest Console and Postman are two of them. The first is available only on Chrome, and the second one, Postman, is available on both Chrome and Firefox. Postman seems simpler and more user friendly. Go ahead and give them a try.
Conclusion
Laravel simplifies our work for building REST Apis with Resource Controllers. We saw how the interface should be built by using Ember conventions. Ember has choosen a good interface and by sticking to that logic, you can reuse your code on other platforms easily.
In this part, I focused more on the concepts and didn’t do too much coding. Filling all the methods and adding validation would have unnecessarily extended this post, when it’s already long enough and in a long series. When developing, you should always validate input. Don’t forget it, and test, test, test. Testing should be your best friend.
In the final installment of this series, we’ll put it all together into a fully functioning live application.
Frequently Asked Questions about Building REST Resources with Laravel
How do I create a resource controller in Laravel?
In Laravel, you can create a resource controller using the Artisan command-line tool. The command is php artisan make:controller ControllerName --resource. Replace “ControllerName” with the name you want to give to your controller. This command will create a controller with methods for all the necessary CRUD operations. Remember, the name of the controller should be in singular form and should be a valid PHP class name.
What is the purpose of Laravel Eloquent Resources?
Laravel Eloquent Resources are used to transform your Eloquent ORM models and model collections into JSON format. This is particularly useful when building APIs, as it allows you to control the exact shape and format of the data you want to send in your API responses. It provides a consistent and manageable way to control data output.
How do I use Laravel API Resources?
To use Laravel API Resources, you first need to create a resource class. This can be done using the Artisan command php artisan make:resource ResourceName. Once the resource class is created, you can define the transformation in the toArray method of your resource. To return a resource from a route, you simply return a new instance of the resource class, passing in the data you want to transform.
How can I customize the data returned by a Laravel Resource?
You can customize the data returned by a Laravel Resource by modifying the toArray method in your resource class. The toArray method is where you map the Eloquent model attributes to your API response attributes. You can add, remove or change attributes as needed.
What is the difference between a resource and a collection in Laravel?
In Laravel, a resource class represents a single model that needs to be transformed into a JSON structure, while a resource collection class represents a collection of resources. A resource collection is used to transform an array or collection of models into JSON.
How do I create a resource collection in Laravel?
To create a resource collection in Laravel, you can use the Artisan command php artisan make:resource ResourceNameCollection --collection. This will create a resource collection class where you can define the transformation for the collection.
How do I return a resource collection from a route in Laravel?
To return a resource collection from a route in Laravel, you simply return a new instance of the resource collection class, passing in the collection of models you want to transform.
Can I add meta data to a resource response in Laravel?
Yes, you can add meta data to a resource response in Laravel. This can be done by defining a with method on the resource. The with method should return an array of meta data you want to include in the response.
How do I handle conditional attributes in Laravel Resources?
Laravel Resources provide a when method that allows you to conditionally add attributes to the resource response. The when method accepts two arguments: the condition that determines if the attribute should be included, and the value of the attribute if the condition is true.
Can I use Laravel Resources with pagination?
Yes, Laravel Resources work perfectly with Laravel’s built-in pagination. When you paginate a Laravel Eloquent query, Laravel will automatically return a JSON response that includes the paginated results along with pagination links. If you want to customize the paginated response, you can use a resource collection.
 Aleksander Koko
Aleksander is young developer who loves to play with the newest web technologies. In his free time, he reads about PHP, Firefox OS or experiments with a new language. Currently, his main interests are PHP design patterns, laravel, dart and cloud.