Do you have no prior experience of Web Design (or very little)?
If you’ve dabbled with exporting HTML from Microsoft Word, or played around with FrontPage a little and want to understand what you’re doing, then this article’s for you!
Today we’ll explore exactly what XHTML is, and how you can use it to start producing the next generation of Web pages.
This tutorial is broken into multiple parts, as follows:
Part 1 asks “Why use XHTML?”, before we jump straight in and code our first HTML page. We then step through the basic building blocks of the technology, highlighting some of the benefits of XHTML along the way.
Part 2 builds on this knowledge, as we explore the advanced building blocks of XHTML, including comments, text, and more.
Part 3 considers the way XHTML deals with lists, graphics, and linking XHTML documents.
I have used bolding in the example XHTML throughout this article to make it easier for you to understand. The bolding is purely there for this reason and serves no other purpose.
Key Takeaways
- XHTML is an extension of HTML using XML, designed to be more extensible and adaptable for different devices and accessibility needs.
- Hand-coding XHTML rather than using WYSIWYG editors provides deeper understanding and control, producing cleaner, more efficient code that adheres to W3C standards.
- XHTML documents must include specific structural elements like `
`, ``, ``, `
`, and ` ` to be valid. - Elements in XHTML are used to mark up text, indicating the structure and meaning, which aids browsers and assistive technologies in presenting content appropriately.
- Entity references and character references are used in XHTML to insert special characters that might otherwise be interpreted as code.
- White space in XHTML is collapsed into single spaces by browsers, except when using the `
` tag which preserves formatting.
- Comments in XHTML are encapsulated in `` and do not display in the browser, useful for notes and debugging.
Part 1
Why Code Your Own XHTML?
I won’t be showing you how to use any programs that write XHTML for you. I have a firm belief that the best way to create Web pages is to get your hands dirty and write the code yourself. I’ve been doing it for seven years, and it hasn’t let me down yet! Why is hand coding important? For a number of reasons.
Programs that produce HTML for you often do so badly, often producing Web pages that do things the long way. When you code your pages by hand you have an intimate understanding of what you’re doing, and can make the actual size of the Web page file as small as possible. This decreases download times, so your pages load faster and your users are happier.
When you use a program to generate HTML for you, you don’t get the chance to understand how your page is built internally because it’s all done for you. This is not a problem as long as everything works… but what if it doesn’t? If you find that your Web page doesn’t display properly in Internet Explorer 4, and many of your users use that browser, you’re going to have to sort it out. This means forgetting about the program and looking at the code yourself. Will you see the problem? If you’ve been using the program to code the page for you, when problems occur you probably won’t have the knowledge you need to fix them.
The Internet is no longer limited to people with computers viewing Websites through one or two different Web browsers. Everything has a Web browser in it these days: mobile phones, televisions, personal digital assistants, cars… even fridges! Blind users “view” Websites using speech synthesis or Braille devices. There is no way you can test each page you produce in all the possible devices on which it may be used.
But there is a way to ensure you have the best chance your site will work in most scenarios: to produce pages using the standards laid out by the World Wide Web Consortium (W3C), the people who work on XHTML and other Internet standards. The W3C provide a validation service to check that your page meets the standards, and if it does, it therefore has the best chance of being used on any device. I don’t know of any HTML generation programs that produce valid code.
I hope that has persuaded you that the learning curve for XHTML is worth it. If you decide to use a program to do it then that will have a learning curve too, so you might as well take the code option and save yourself hassle in the future.
Why XHTML?
Since 1990, HTML (or Hyper Text Markup Language) has been the language recommended for creating Web pages. And it has been very successful (you didn’t need me to tell you that!). But HTML has its problems. Without going into specifics, as it’s not the subject of this article, HTML has become a mess. To sort this mess out, in 1999 the World Wide Web Consortium came up with XHTML. XHTML stands for eXtended Hyper Text Markup Language, and is written in a language called XML or eXtended Markup Language.
As the name implies, XHTML has the capability to be extended. You can use extra modules to do things with your pages that weren’t possible with HTML. The long-term goal is that your Web pages will be able to be understood by computers as well as humans. How does this work? Allow me to explain.
You may be thinking that computers already understand Web pages because you use a computer to view them. This is true. But computers only understand how to display your pages, not what they mean. Imagine if computers did understand what Web pages meant! You could tell your computer to go and visit all of your local supermarket’s Websites and report back to you on which store is the cheapest for this week’s shopping. Your computer could visit the news sites around the world and bring back the latest headlines that relate to things you’re interested in. The possibilities are endless.
Hopefully you now see why XHTML is so important. I decided to write this tutorial to teach you XHTML from scratch. The main reason for this is that I couldn’t find a beginners XHTML tutorial anywhere, there are plenty of HTML beginner’s articles, and plenty of XHTML introductions for those who can already do HTML, but it seems logical to me that if you are starting learning Web Design now then you might as well use XHTML from the word go. So if you’re still with me, let’s get started.
Hello World
No beginners’ guide would be complete without showing you how to build a “Hello World” page. With XHTML this is pretty simple. Don’t worry if you don’t understand everything, it will all become clear in time. Your “Hello World” Web page code looks like this:
<?xml version="1.0" encoding="iso-8859-1"?>

<!DOCTYPE html PUBLIC "-//W3C//DTD XHTML 1.0 Transitional//EN"

"https://www.w3.org/TR/xhtml1/DTD/xhtml1-transitional.dtd">

<html xml:lang="en" lang="en" xmlns="https://www.w3.org/1999/xhtml">

  <head>

    <title>Hello World</title>

  </head>

  <body>

    <p>My first Web page.</p>

  </body>

</html>
In a visual browser such as Internet Explorer, the page above would look something like this:
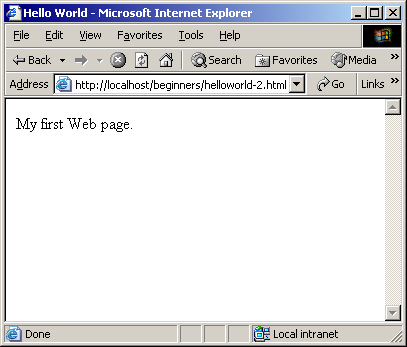
Figure 1
View how this code will appear in your browser.
We aren’t going to worry about the unbolded code for the time being: all you need to know at the moment is that it tells the computer that this page is in XHTML, and that the language used is English. This code needs to be in every page that you produce and release on a live Website but we’ll deal with it later. Don’t sweat it.
XHTML is called a “markup language” because that’s what you do with it: you mark up areas of text to indicate what they mean, so the browser can know what to do with them. This is done using elements. An element consists of two tags, an opening tag and a closing tag. Tags use the angle brackets: < > to show they’re tags, and each closing tag also has a slash /.
Let’s look back at the document we just saw. The <title> element is used to indicate the title of a page. In Internet Explorer this title is displayed in the bar at the top of the window. Our title element looks like this:
<title>Hello World</title>The <title> tag means we’re starting a new title element. This is then followed by the text that we want the title to be. In this case the title will be “Hello World”. To tell the browser that we have finished with the title, we use a closing tag </title>. As mentioned above, the only difference between a start tag and an end tag is the slash /. This is essential, as it’s the only way the computer knows whether you’re starting a new tag or finishing a previous one.
The name of the opening and closing tags must be the same, so:
<title>Hello World</heading>is invalid and will not work.
As well as containing text such as “Hello World” above, elements can contain other elements. If we look just outside the <title> element we can see it appears inside a <head> element like so:
<head>

  <title>Hello World</title>

</head>
This means that the <title> is part of the <head> of the document, because it is inside it. There is no limit to how many elements another element can contain, as long as you follow the rules that we’ll look at in a moment.
The <head> of a document is used to tell the computer things about your document rather than things that should be in it. The <title> is not part of the page itself; it describes what the document is, so it goes in the <head>. All XHTML documents must have a <head> element that contains one <title> element, although others are allowed (again, we’ll look at these a little later).
After the <head> comes the <body>. The <body> is the part of the document that contains the page itself. All XHTML documents must have one <body> element. The body contains things like paragraphs, bulleted lists, pictures and links to other documents. All the information you view when you visit a site is contained in the <body> element.
Our <body> element is very simple; it contains a single element <p>:
<body>

  <p>My first Web page.</p>

</body>
Have you guessed what the <p> element is used for? It marks a paragraph, so our page will have one paragraph with the text “My first Web page.” in it. If we wanted add another paragraph we could do it like this:
<body>

  <p>My first Web page.</p>

  <p>I hope you like it.</p>

</body>
In a visual browser such as Internet Explorer the page above would look something like this:
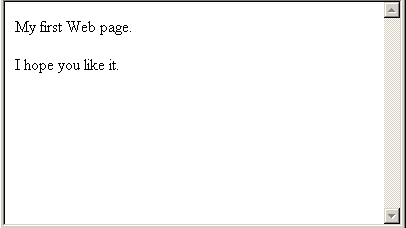
Figure 2
View how this code will appear in your browser.
There’s one more essential ingredient that we haven’t covered. The <head> and <body> elements are contained within an element <html>. Our <html> element above looks like this:
<html>

  <head>

    <title>Hello World</title>

  </head>

  <body>

    <p>My first Web page.</p>

  </body>

</html>
The <html> element must contain one <head> element and one <body> element.
You may be wondering why there’s extra space at the start of some of the lines. This is purely for our benefit and makes no difference to the computer processing your pages. The idea is to add tabs or a set amount of spaces at the start of each line to match the level of your tags. Look at the code above, <html> is not contained in any element so there is no space. <head> is contained by one element, <html>, so it has one tab. <title> is contained by two elements, <html> and <head> so it has two tabs, and so on. Trust me, when your documents get big, this kind of indentation makes life a lot easier.
Now It’s Your Turn
If you’re up to the challenge, have a go at creating some pages yourself before reading any more. First of all try the “Hello World” example that we just looked at. Here’s how.
Open up a text editor of your choice. If you’re using Windows, then:
Start > Programs > Accessories > Notepad
will get you into Notepad, but any text editor will do. Please note that Microsoft Word and other Word processors are not text editors and aren’t suitable for this task.
Now type in the code below. I recommend that you type the code in yourself (rather than using copy and paste), as this will help you to understand what you are doing. The tab key (for the spacing) is usually located above “Caps Lock” on the left of your keyboard.
<html>

  <head>

    <title>Hello World</title>

  </head>

  <body>

    <p>My first Web page.</p>

  </body>

</html>
Once you’ve typed the code into your text editor you will need to save it as a Web page file. Web page files have their own “extension” (the period and the three letters after the file name) to distinguish them from other files such as Microsoft Word (.doc) or Adobe Acrobat (.pdf).
Web pages use an extension of either .htm or .html. I prefer to use .html as it matches the name of the language. The choice is yours. Some old systems will not save files with four letter extensions so .htm may be your only choice.
Once you’ve saved the file, open it up in your Web browser. If you have typed it in correctly, you’ll see something similar to Figure 1 above.
Now that you have your page, try adding some more paragraphs to it like this:
<html>

  <head>

    <title>Hello World</title>

  </head>

  <body>

    <p>My first Web page.</p>

    <p>A second paragraph.</p>

    <p>Yet another paragraph.</p>

  </body>

</html>
Save your document again and refresh your Web browser. You should see the extra paragraphs appear after the first one.
Summary
That’s it for your “Hello World” page. As I said when we started, don’t worry if you didn’t take it all in, we’re going to be looking at each area in greater detail, but hopefully that has given you an idea of how Web pages work. In the next section, we’re going to take a closer look at elements and tags and how they are used to build your documents.
XHTML Building Blocks
Elements and tags are the building blocks of XHTML. You need to fully understand both concepts to be able to write Web pages properly. We already touched on how they work in our example above, but let’s take a closer look now.
An element is used to mark sections of your document in order to tell the computer what that section is. This can range from marking the entire document, as with the <html> element, to marking a single word as important. The concept is the same in all cases.
Elements
Elements are made up of two tags: a start tag and an end tag. Between these tags is the element content.
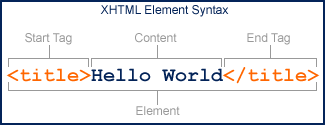
This element tells the computer that its content, “Hello World”, is the title for the document. Without the start and end tags, the computer would have no way of knowing what to do with this text.
Start Tags
A start tag is made up of a left angle bracket, followed by the name of the element, and a right angle bracket.

A start tag tells the computer that we’re starting a new element, and that it should regard everything it now encounters as part of that element’s start tag until it reaches the right angle bracket.
End Tags
End tags are made up of a left angle bracket and a slash, followed by the name of the element, and then a right angle bracket.
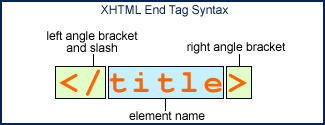
Once the computer gets to the end tag for an element, it knows that element is finished. The slash is necessary to distinguish the end tag from the start tag.
Case Sensitivity
When you enter your tags, you must make sure that the names use lower case letters only. XHTML is case-sensitive. This means that it sees each of the following tags as different from the others:
- <title>
- <Title>
- <TITLE>
Only number 1 is an XHTML tag; the rest do not exist. All tags in XHTML are in lower-case, so it’s not difficult to remember. Just be careful to make sure you get it right.
Empty Elements
Certain elements do not have any content. For these empty elements a special syntax is provided. Instead of inserting an end tag immediately after the start tag has finished, all we have to do is put a slash before the right angle bracket of the start tag to tell the computer that this element is finished.
The <br> element is used to insert a line break into your document. This tells the computer to stop the text at that point and start a new line. As you may have guessed, the <br> element doesn’t contain any content, so instead of entering the element like this:
<br></br>we do this:
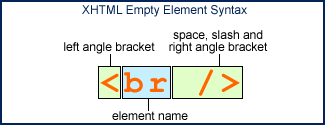
Not only does this save typing, it also makes the code easier to read and more manageable. The space before the slash is necessary to support older Web browsers that do not understand empty elements and will simply ignore the slash as long as there is a space before it.
Content
The element we have just looked at only contained the text “Hello World”. But elements can contain a lot more than just text. If they couldn’t, then XHTML wouldn’t be very useful.
For instance, most of your elements will also contain other elements. In fact a number of elements must contain certain other elements to work properly (and we’ll look at each of these a little later).
An element that contains another element looks like this:
<head>

  <title>The document title</title>

</head>
Here we have a <head> element that contains a <title> element. As we go on you’ll see elements containing more and more elements, as you build up your knowledge and produce larger, more complex documents.
Nesting
No, we’re not talking about preparing for babies. Nesting describes the way in which elements contain other elements. When we say that elements are properly nested, we mean that:
- each element is completely contained within the elements that contain it, and
- it completely contains the elements it contains.
Try and say that after a night out!
That might sound confusing, but it’s really quite simple, as these examples will demonstrate. We are going to be using the elements <em> and <strong> which give text emphasis and strong emphasis, respectively. We’ll look at them in detail later.
<em>The Lord Of The Rings is a <strong>fantastic</strong> story.</em>This is valid XHTML.
<em>The Lord Of The Rings is a <strong>fantastic</em> story. </strong>This is not. The <em> starts outside the <strong> but finishes inside it. The tags are not properly nested. Think of elements as being like boxes. A box can have a box inside it, or can be inside a box, but it can’t be inside a box, and outside it as well. Neither can your elements.
Required Elements
There are four elements that all XHTML documents must contain. We have already seen that you must have a <head> and it must contain a <title>. I’ve also mentioned the <html> and <body> elements. Let’s look at each of these elements in turn, starting from the top.
<html>
The <html> element is the container for your whole document. It starts first and finishes last. It tells the computer that this is an <html> document, and must always be present.
<head>
After <html> the next element should always be <head>. The head contains elements that are about the document rather than elements that are displayed in the page itself. This includes things like the document title, information to be given to search engines, and how this document relates to others on your site.
<title>
Within the <head> of your document you must have a <title> that describes what the document is. Without a <title> your document is not valid.
<body>
Finally your document must have a <body>. The <body> is the Web page itself. It comes after the <head> and is the only other element that can go in your <html> element. Anything that you want to put in your page goes in here.
You can think of an XHTML document as being like a human body. All people are people from head to toe (<html>), they have a head that contains information you don’t see when you look at them (<head>), they have a name (<title>) and they have a body (<body>).
Putting Them All Together
When we put all of these together we get the basic structure for an XHTML document. Here it is.
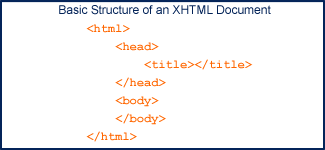
Every XHTML document you produce will have that same basic structure. All other elements go in either the <head> or the <body>.
Attributes
Often an element can’t convey enough information about itself through its name alone. For example, the <img> element, which is used to display an image, is no use on its own. You also need to tell the browser where to find the image file, and other things like a text description for users who don’t get the image for one reason or another.
This is achieved with attributes. Attributes are added to the start tag of your element and come in the form of a name=”value” pair. The name is the name of the attribute you’re using, and “value” is replaced with the value you wish to provide for the attribute. Let’s take a closer look.
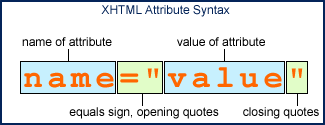
As with element names, all attribute names are in lower case. You have a choice of using either double quotes " or single quotes ' as long as you use the same before and after the value. You must enclose the value in one form of quotes or the other. Without them your document will not be valid, and may not work as you intended.
Let’s look at an example to see an attribute in action. Below is a simple <img> element that tells the browser to fetch an image from /images/logo.gif.
<img src="/images/logo.gif" />You will see attributes used a lot and you’ll soon get the hang of them, so again, don’t sweat it if this seems overwhelming now.
Summary
We have seen that there are rules to be followed when you write your XHTML documents, and we’ve looked at the basic building blocks of XHTML. As long as you follow these rules, plus others that I’ll mention as we go along, you’ll be on your way to creating XHTML Web pages. We’ll now add some elements to your arsenal that are used to mark up text.
Text That Says Something
Congratulations! What for? For getting to here: you’ve got past the hardest section! Whether you understood everything you read so far, or just absorbed as much as you could, the next few sections should be a lot easier, as we look at the different elements in your XHTML arsenal and the implications that they have.
We’re going to start to give more meaning to your text. This includes:
- Making certain words or phrases more important,
- Indicating citations,
- Providing the meaning of abbreviations and acronyms,
- Indicating quotes and
- Indicating computer-related information
Marking Paragraphs with <p>
Before we dive into those, let’s take another look at the paragraph element <p>. The <p> element is used to contain your paragraphs. It is what we call a block or box element. This means that when it occurs in your document (in a visual browser) it will start on a new line, and when it finishes, the next element will start below it. This is best described by the example below.
Take a look at the code, which you’ve already seen in our first example:
<body>

  <p>My first Web page.</p>

  <p>I hope you like it.</p>

</body>
Here we have two paragraphs. Let’s take another look at the way in which they would be displayed to understand what the <p> element is doing. I’ve added three blue bars to the picture to highlight the spacing and the new line that has been created from using the <p> element.
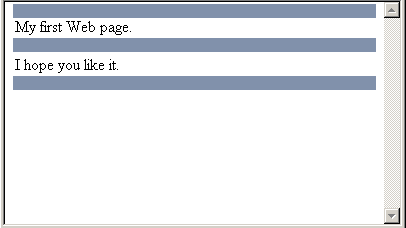
Without the <p> elements there would be no spacing, and the text would just appear in one long line.
Try it without the <p> elements.
This kind of element is called a box or block element because there is an (often invisible) box around the element, which separates it from the rest of the page. This is essential to make your document readable instead of just being one big bunch of text.
The second type of element is called an inline element. This is an element that doesn’t have its own box, and doesn’t effect the flow of text in any way. The elements we’re looking at in this section are inline elements (unless otherwise stated).
Let’s add some meaning to our text!
Adding Emphasis with <em>
First let’s look at <em>. <em> is used to indicate text that should be given greater emphasis. It is more important than the text around it. In the paragraph below the phrase “The Lord Of The Rings” is considered more important, so it is given more emphasis using <em>.
<p><em>The Lord Of The Rings</em> was written by JRR Tolkien.</p>The way in which <em> is handled by a Web browser will vary. A visual browser such as Internet Explorer will usually display the text in italics, whereas an audio browser such as an in-car Web browser or a browser used by the visually impaired may speak the word in a louder voice. Later on, we’ll look at ways in which you can specify how your elements should be displayed, but for now we’ll let the browser decide for us.
Adding Strong Emphasis with <strong>
The <strong> is similar to <em> except that it indicates a stronger emphasis. Let’s alter the example above to give the text “JRR Tolkien” a strong emphasis.
<p><em>The Lord Of The Rings</em> was written by

<strong>JRR Tolkien</strong>.</p>As with <em>, the way in which the <strong> element is handled depends on the browser being used. Visual browsers will usually display the text in bold, a speech browser may use an even louder voice than it does for <em>.
Defining citations with <cite>
<cite> is used to indicate a citation or a reference to another source, such as for further information. For example:<p><cite>Homer Simpson</cite> said, Operator, give me
the number for nine-one-one!.</p>In a visual browser the <cite> element will often be displayed in italics, an audio browser may inform the listener that this is a citation.
Abbreviations and Acronyms with <abbr> and <acronym>
In many fields today, abbreviations and acronyms are common. But not everyone knows what they mean. Using the <abbr> and <acronym> elements enables you to provide their full meaning without cluttering your page.
Both the <abbr> and <acronym> elements work in the same way, and are interchangeable. There is no clear definition of the difference between an abbreviation and an acronym, so use whichever you feel most suitable. I will talk about the <abbr> element but read this as meaning one or the other.
The <abbr> element uses an optional title attribute to show the full version of the abbreviation. For example:
<p>This document is in <abbr title="eXtended

Hyper Text Markup Language">XHTML</abbr>.</p>A visual browser will often alert a user that an explanation of an abbreviation is available; a tool-tip then appears when the user moves their mouse over the term. A speech browser may speak the full version of the abbreviation on request.
Please be aware that Internet Explorer does not support these elements up to version 6 on the PC. If you are using this browser, you won’t see any visual difference in the examples above. However most other recent browsers, including Internet Explorer for the Macintosh, do support this element.
Quotes using <q> and <blockquote>
These elements are used to indicate text quoted from another source. <q> is an inline element (it does not break the text flow) and <blockquote> is a block element (it starts and finishes with a new line).
Let’s start with <q>. <q> is used for short quotes that you want to include in a sentence or paragraph. <q> uses an optional cite attribute to indicate the location of a source for the quotation. For example:
<p>Homer Simpson said, <q cite="http://personal.inet.fi/

taide/karjalainen/homer.html">Operator, give me the

number for nine-one-one!</q>.</p>The cite attribute shows that the quote originally came from http://personal.inet.fi/taide/karjalainen/homer.html. Visual browsers should add quotation marks for you around the quoted text. Speech browsers may indicate that this is a quotation.
The <blockquote> element works in the same way as the <q> element, except that it’s a block element so it starts and finishes with a new line. It is used for longer quotes:
<p>Homer Simpson said:</p>

<blockquote cite="http://personal.inet.fi/

taide/karjalainen/homer.html">The code of the schoolyard, Marge!

The rules that teach a boy to be a man. Let's see. Don't

tattle. Always make fun of those different from you. Never

say anything, unless you're sure everyone feels exactly the

same way you do. What else...</blockquote>Visual browsers display a <blockquote> with extra space on the right and left of the block (it is indented). Speech browsers may indicate that it is a quote. The cite attribute shows where the quote originally came from.
Computer Text with <code>, <samp>, <kbd> and <var>
These elements are used to indicate text that relates to a computer in a certain way, as follows:
<code>
indicates computer program code
<samp>indicates sample output from a computer program
<kbd>indicates text that a user of a program should enter
<var>indicates a computer program variable or argument
If the above explanations mean nothing to you, don’t worry. If you don’t know what they mean, you’re not likely to be using them in your documents. Just remember that they exist.
Marking Document Changes with <ins> and <del>
Once you’ve released a document onto your Website, you may find that some information changes and you need to add or remove sections of text from your documents. While there is nothing to stop you from simply adding or removing text from your document, the <ins> and <del> elements can be used to mark added text and deleted text respectively.
For example, the following text has a section of each type of text:
<p>The code of the schoolyard, Marge! The rules

that teach a boy to be a man. Let's see. <del>Don't tattle.</del>

Always make fun of those different from you. <ins>Never

say anything, unless you're sure everyone feels exactly

the same way you do.</ins> What else...</p>Visual browsers will often underline <ins> elements and put a line through <del> elements. Speech browsers may indicate that the text has been added or removed respectively.
Using Elements for Their Intended Purpose
As you viewed the examples in this section you may have thought of using the elements purely for their visual effect on the text. For example the <del> element above will often be displayed with a line through the marked text. However, you shouldn’t use any element purely for its visual effect. Later on we’ll be looking at style sheets, which will give you full control over the way in which your text is displayed. Elements should only be used to mark text that has that meaning. This is called the “semantics” of your documents.
Summary
That’s it for elements that are specific to certain types of text. Have a go at using them to create a document and get used to creating XHTML documents.
That’s also the end of the first part of this article.
Part 2
Advanced XHTML Building Blocks
Before we look at any more elements, there are a few basic building blocks of XHTML that we need to cover, so that you can grasp the topics we’ll examine next.
Hopefully, you now have an understanding of elements, start tags, end tags, the basic structure of an XHTML document, and the text elements we looked at in the previous section.
In this section, we’ll be looking at the following topics:
- Character References and Entity References
- White Space
- Comments
Character References and Entity References
Character references aren’t as intimidating as they sound (no need to sweat!). Let’s find out why they exist, then we’ll look at how to code and use them.
Take a look at your keyboard. Can you type a copyright symbol, ©, or an inverted exclamation mark, ¡ ? Unless you’re using a pretty strange keyboard, the answer is ‘no.’
Imagine you’re a Web browser (User Agent) reading a Web page file and you come across a left angle bracket <. How do you know if it’s the start of a tag, or an angle bracket used in the content of the document? You don’t.
So, what’s the solution to these two problems? Entity references and character references!
Entity references and character references are extremely similar in XHTML, and people often confuse the two names. Basically, both tell the Web browser (or User Agent) that it should insert a certain character in their place.
If you don’t know what the word “character” specifically refers to, it’s a catch-all word for a letter, number, punctuation mark, etc. A is one character, AB is two characters, N!P 3 is five characters (four? you forgot to count the space!) …You get the idea.
A character reference or entity reference represents one character in XHTML. Entity references can represent more than one character in SGML or XML, but that’s another story — you don’t need to worry about it right now.
The difference between a character reference and an entity reference is this:
- Character references use numbers
- Entity references use names
Let’s look at the copyright symbol we saw above. To insert a copyright symbol into your document, you’d use either of the following:
©Try the © entity reference.
©Try the © character reference.
If you try the examples above (and your Web browser isn’t broken) you’ll see that a copyright symbol displays in both cases. As I said before, the entity reference uses names (in this case, “copy“), while the character reference uses numbers (here, “169“). Observant readers will notice that the character reference also includes a sharp (or hash, or pound) symbol (“#“). Let’s take a closer look.
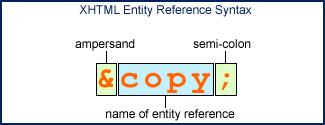
An entity reference begins with an ampersand, which is followed by the name of the entity reference. The whole is finished with a semi-colon, much in the same way that you use a left angle bracket and right angles bracket to denote (delimit) the start and end of a tag.
Character references, on the other hand, begin with an ampersand followed by a sharp symbol. This is followed by the number of the character reference, and is finished with a semi-colon.

Whether you use an entity reference or a character reference is up to you. I tend to use entity references because I find names easier to remember than numbers, but the choice is yours. Just don’t forget that you need to include the sharp symbol in the character reference, and not with the entity reference.
I’ll explain some of the entity and character references available to you in later sections, but I won’t show you all of them individually, as there are far too many (approximately two hundred and fifty). For your reference, though, I’ve prepared three articles detailing the three sets available to you:
- XHTML Latin Character References
- XHTML Special Character References
- XHTML Symbol Character References
Not all these references work in all browsers, so be sure to test the ones you use.
Ampersands and Left Angle Brackets
Although it is possible to enter ampersands, &, and left angle brackets, <, with most keyboards, you should always use an entity or character reference when they appear in your content. Otherwise, as I mentioned above, there’s no way for a computer to know the difference between the start of an entity/character reference, or a tag from an ampersand or a left angle bracket, respectively. Using character or entity references for those characters avoids this problem.
The following code contains an ampersand and a left angle bracket:
<p>Never use a < or an & directly in your content.</p>The above code is wrong and should be written in one of the two following ways. The first uses entity references, while the second is written with character references:
<p>Never use a < or an & directly in your content.</p><p>Never use a < or an & directly in your content.</p>White Space
White space refers to any characters in your document that do not serve any purpose other than creating space. This includes:
- spaces
- tabs
- form feeds
- zero width spaces
A form feed is the character at the end of each line that tells the computer to start a new line. A zero width space is used to separate words in languages such as Thai.
There are two issues relating to white space that you need to be aware of.
White Space Between Words
No matter how much space you leave between your words, Web browsers will always reduce it to a single space character. There is one exception to this rule that we’ll cover in the next section.
What do I mean when I say “words”? I’m referring to any characters that aren’t white space themselves, and which have no white space between them.
That might sound a bit complicated, but it’s not. An example should help you understand.
<p>This    content


   has     a         lot

  of     white   space

between       the


words.</p>If you view the above example in a visual browser you’ll see that all the content appears on a single line, with a single space between each word. That’s all there is to it.
This feature comes in very handy! It means you can use tabs, spaces and new lines to make your code easier to read, and not worry about your document looking funny in a visual browser.
Space Around Tags
You need to be careful about putting white space around your tags, until you get used to this rule. Then it will become second nature.
If you want a space to appear before or after a word that’s contained by an element, you should put that space outside the element. By this I mean you should insert space before the start tag, and after the end tag. If you put the space inside the tags, you might not get any white space between your words.
<p>Always leave white space <strong>outside</strong> your

elements when you want it and

not<strong> inside </strong>.</p>
In the example above, the <strong> element containing the word “outside” has white space outside the tags, which is the correct way to insert space. The <strong> element that contains the word “inside” includes white space inside the tags and not outside. On some Web browsers there may not be any space displayed between the words “not” and “inside”.
Comments
When you create your documents, you may want to include information in the code for yourself or others who view the document code. But how can you ensure this information doesn’t appear to users who view the document in a Web browser? You’ll need to use what we call a “comment”. A comment has the following syntax:

You should be careful not to use two dashes together within your comments, as this could be interpreted by the browser to mark the end of the comment (even without the right angle bracket).
Here’s an example:
<!-- This is the first Web page I ever created. -->

<p>My first Web page.</p>

<!-- This is a comment


spread over two lines. -->As you’ll see if you view this example, the text in the comments is ignored.
Comments are useful for leaving yourself reminders, such as notes on what still needs to be completed in a document.
Summary
In this section we have completed our look at the basic building blocks of XHTML. We’ve seen how to use special characters in our pages with character references and entity references, we’ve looked at the way white space is handled, and we’ve also seen how you can add comments to your code.
In the next section, we’ll continue our coverage of the elements you can use that relate to text, including headings, line breaks and pre-formatted text.
Text That Says Something #2
In this section we’ll look at more of the elements (and a couple of entity references) in the XHTML arsenal that relate to text, further to those covered in the section “Text That Says Something”.
Specifically, we’ll cover:
- Headings with
<h1>through to<h6>, - Subscripts and Superscripts with
<sub>and<sup>, - Line breaks with
<br>, - Non-breaking space with
, - Soft Hyphens with
­, and - Pre-formatted text with
<pre>.
Before we start, I’d like to re-iterate an important point: all elements should be used for their meanings, and not the visual effects they generate. You can make any element look exactly the way you want using style sheets (we’ll be covering this topic in some detail later on).
So please, do yourself a favour and use elements for the reason they’re intended.
There are many benefits to this approach, the most important being that it makes your site much more accessible to disabled users, and those who use alternative browsers such as Personal Digital Assistants and in-car browsers. It also helps you attain a suitable search engine placement.
So now that rant’s over, let’s get on with it!
Headings with <h1> through to <h6>
Any document that’s longer than a few sentences needs to be split up into sections if it’s to be usable. This concept was not invented specially for the Web — it was probably conceived soon after writing was invented.
There are 6 elements you can use to mark headings in your XHTML. As the number associated with the element increases, so does the level of depth of the subheading to which that element is applied. The six elements are:
<h1><h2><h3><h4><h5><h6>
You should always start with <h1>, followed by <h2> for sub-headings, <h3> for sub-sub-headings, and so on. You should never start with <h1> and then jump straight to <h3>, or start with <h2>, for example.
In the past, Web designers started their headings with <h2> or <h3> tags because they wanted the visual effect of smaller text than was commonly offered by the <h1> tag. However, as we’ve discussed, the desired effect can be achieved with style sheets, so this is no longer a valid reason for starting your headings with any other tag than <h1>.
Headings are block level elements, and, as you’d expect, have space above and below them.
It’s important that you use the heading elements to mark your headings, as this ensures visitors using all kinds of user agents can understand your document structure. It also helps you achieve higher rankings in search engines, as the search engines can gain a better idea of what your document is about by examining the headings.
Here’s a sample three-level document. I’m sure you can work out from this, what a document with deeper levels would look like.
<h1>XHTML Web Design for Beginners: Introduction</h1>

<h2>Introduction</h2>

<p>This article is for readers who have either no prior experience...</p>

<h3>Colour</h3>

<p>I have used colour in the example...</p>

<h3>No Programs</h3>

<p>I will not be showing you how...</p>In general, most XHTML documents should include only a single <h1> element. If you decide to use more than one, be sure that they are two separate topics, and you have a good reason to include them on the same page. If two topics appear on the same page, usually they’re connected. Ideally, you’d have a single <h1> that described both topics, and then use <h2>s for each sub-topic. Circumstances in which a page should have two <h1> elements are very rare.
A user agent for the blind will often use headings as a way to give the user an overview of the document, so they can decide which part they wish to hear. The proper use of heading tags is therefore of vital importance from accessibility and usability standpoints.
Subscripts and Superscripts with <sub> and <sup>
Subscripts are letters or digits that appear smaller than the rest of the document’s text, and at the bottom of the line such as the 2 in H2O.
Superscripts are again smaller than the rest of the text, and appear at the top of a line, such as the “th” in the 13th of February.
To mark subscripts and superscripts in XHTML you use the <sub> and <sup> elements respectively. An example should make it clear:
<p>The symbol for water is H<sub>2</sub>0.</p>

<p>This example was written on the 13<sup>th</sup> of February.</p>Line Breaks with <br>
When you’re writing documents you may want to start a new line without closing a paragraph. To do this you can use the <br> element. <br> is an empty element, so you must ensure that you use the empty element syntax by writing it as <br />.
Here’s an example:
<p>

        The Road goes ever on and on<br />

  Down from the door where it began.<br />

  Now far ahead the Road has gone,<br />

  And I must follow, if I can,<br />

  Pursuing it with eager feet,<br />

  Until it joins some larger way<br />

  Where many paths and errands meet.<br />

  And wither then? I cannot say.

</p>
(Copyright The Trustees of The J.R.R. Tolkien 1967 Settlement 1954, 1966)
This element has no effect outside visual browsers.
Non-breaking space with
Web browsers may split a set of words onto two lines. Sometimes this is not what you want. The solution is the entity reference , which stands for “non-breaking space”.
If you insert a between your words instead of a space, and are careful to include no spaces on either side, that text will be treated as a single line, and will never be broken up. Here’s an example:
<p>This is a solid line.</p>If you view the example in a visual browser, try making your browser window thin to see if you can make the text wrap onto 2 lines. You can’t do it! Now, let’s try with normal spaces:
<p>This is not a solid line.</p>This is another element that has no effect outside visual browsers.
Soft Hyphens with ­
Soft Hyphens are used to indicate a point within a word where you’d like it to be split across to two lines if necessary. It simply makes for a slightly nicer appearance when space is limited, such as occasions when you need to display text in a thin column (which we’ll be covering later).
To use soft hyphens, you simply insert ­ within the word at the point where you would like the potential split to occur. Here’s an example:
<p>I have no idea what antidisestablishment­arianism means.</p>In a visual browser, if you collapse your browser window so that this long word (which I won’t repeat!) is against the right hand edge of the window, then the word should be split onto two lines at the point where the soft hyphen occurs.
As you’d expect, this element has no effect outside visual browsers.
Pre-formatted text with <pre>
Remember when we covered white space in the last section? I told you then that any amount of white space is always collapsed into a single space. Well, there’s one exception!
The <pre> element allows you to layout your text in the way in which you want it to appear in a visual user agent. <pre> is a block level element, which (to remind you) means that it has space above and below it.
Using <pre> is simple. Let’s redo the example we created with <br> above, and use <pre> instead:
<pre>The Road goes ever on and on

Down from the door where it began.

Now far ahead the Road has gone,

And I must follow, if I can,

Pursuing it with eager feet,

Until it joins some larger way

Where many paths and errands meet.

And wither then? I cannot say.</pre>
(Copyright The Trustees of The J.R.R. Tolkien 1967 Settlement 1954, 1966)
You’ve guessed it! This is another element that has no effect outside visual browsers.
Summary
That’s nearly it for text elements. Hopefully you now understand most of the elements and entity references you can use in your XHTML documents to mark up your text.
In Part 3 of this series, we’ll look at XHTML’s three different types of lists: ordered lists, unordered lists and definition lists. We’ll also see how we can add graphics to our pages, and how we can link our documents together, and to other documents/sites. See you soon!
Frequently Asked Questions (FAQs) about XHTML Web Design for Beginners
What is the basic structure of an XHTML document?
An XHTML document has a specific structure that includes a DOCTYPE declaration, html, head, and body tags. The DOCTYPE declaration is the first line of an XHTML document and it specifies the version of XHTML. The html tag is the root element of an XHTML document. The head tag contains meta-information about the document such as its title and link to CSS files. The body tag contains the actual content of the web page including text, images, links, etc.
How can I create a simple XHTML page?
Creating a simple XHTML page involves writing the basic structure of an XHTML document and then adding content within the body tags. You can use a text editor to write your XHTML code and save the file with a .html or .xhtml extension. Then, you can open this file in a web browser to view your web page.
What are the differences between HTML and XHTML?
XHTML is a stricter and cleaner version of HTML. It requires that all tags be properly nested and closed, and that attribute values be quoted. Unlike HTML, XHTML documents must be well-formed, meaning they adhere to the rules of XML syntax.
How can I use CSS with XHTML?
CSS can be used with XHTML to style your web pages. You can link to an external CSS file using the link tag within the head tags of your XHTML document. Alternatively, you can write CSS rules directly within your XHTML document using the style tag.
What are some common mistakes to avoid when writing XHTML?
Some common mistakes to avoid when writing XHTML include not closing tags, not nesting tags properly, not quoting attribute values, and using uppercase for tags and attributes. XHTML is case-sensitive, so tags and attributes must be written in lowercase.
How can I validate my XHTML code?
You can validate your XHTML code using an online validator such as the one provided by W3C. This will check your code for errors and compliance with XHTML standards.
Can I use JavaScript with XHTML?
Yes, you can use JavaScript with XHTML. You can include JavaScript code directly in your XHTML document using the script tag, or you can link to an external JavaScript file.
How can I make my XHTML web page responsive?
You can make your XHTML web page responsive by using CSS media queries. These allow you to apply different styles depending on the size of the user’s screen.
What are some good practices for writing XHTML code?
Some good practices for writing XHTML code include using meaningful names for your tags and attributes, commenting your code to explain what it does, and indenting your code to make it easier to read.
How can I learn more about XHTML?
There are many resources available online to learn more about XHTML, including tutorials, documentation, and forums. You can also practice writing XHTML code by creating your own web pages and experimenting with different features.
Nigel is an experienced senior web developer with over twenty years experience. He is the website manager for Swift Plant Spares, a JCB parts supplier based in the UK. He can be found on LinkedIn.