Macromedia’s Flash and Adobe’s Live Motion have stolen much of the spotlight for animation. “Hey,” the programs tell you, “it’s easy!” Both these options require that the user has the Macromedia Flash player installed on their computer. But there is another way…
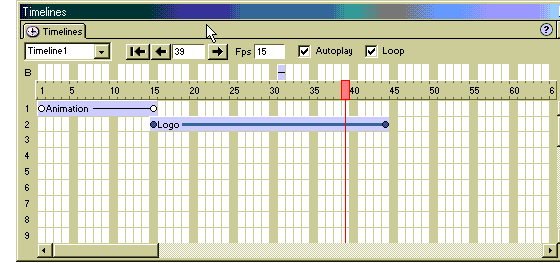
Macromedia’s Dreamweaver does support animation in a little known inspector call the “TimeLine Inspector”, which is shown below.
The Dreamweaver Timeline is the critical inspector for creating animation in a Web page.
Dreamweaver is able to create animation through clever use of JavaScript. Unlike Flash, which creates animation along Vector paths and timelines, JavaScript creates animation by plotting the location of an object in conjunction with time between each plot. At the bare minimum, any animation created in a Web page must have a start and an end point.

Animating From Point A to Point B
Let’s get started — we’ll create a simple animation. The most basic animation moves from one point on the screen to another. We’ll use this to help explain how the various animation tools in Dreamweaver work.
Begin by opening a new page in Dreamweaver and type your company name onto the page. We want the company name to animate onto the top of the page from the left hand border. For any animation to work, the content that’s being animated must be inside a Dreamweaver layer.
Select Insert — Layer, which will immediately add a rectangular layer to the page. The Properties Inspector changes to reflect the new layer’s properties. By default, the layer is called “Layer1”. You will find that if a second layer is added, the new layer will be called “Layer 2” and a third will be called “Layer3”. Each name is alphanumeric and contains no spaces. The name for a layer is very important, as it’s used as the reference point from which all animations will be created. It’s worthwhile to give your own name to a layer, so next, change the name of the layer in the Layers’ Property Inspector to “CompanyLogo”.
With the layer now named correctly, drag the text of your company name into the layer. This provides the basic setup for any animation. Anything you add to a layer can be animated, whether it’s text, images, plugins, forms or tables. If you want to include HTML in a layer, it can be animated too. Now let’s work with the Timeline Inspector, the core manager for animation.
Open the Timeline Inspector by selecting Window — Timelines. Alternatively, you can select SHFT+F9 (Windows) or CMD+F9 (Macintosh). If you’ve worked in Flash or Director you’ll recognize some of the features of the Timeline Inspector. To begin with, the Timeline is made up of two distinct parts: the layers upon which an element can be animated in time, and the Timeline’s commands along the top.
The commands control the speed of the animation, and some basic functions. Moving from left to right, the first set of commands indicates where you are in the animation. If you select either the right or left arrow, you’ll move the animation along one frame at a time. The frame number is highlighted in the box in between the navigation arrows. If you enter a specific frame number into that box, you’ll immediately be moved to that frame. Before you add an animation, the FPS (Frames Per Second), AutoPlay and Loop features are grayed out. Flash developers will be used to the FPS being 15, as this is the default speed for Flash movies, but this number can be increased to speed up the animation or decreased to slow it down. The AutoPlay checkbox will force an animation to begin playing when a Web browser loads a page. The Loop check box forces any animation to begin playing from frame 1 when it reaches the final frame.
A bold red line is, by default, rested on the first frame. The red line is a place-holder to show where in the animation you are currently positioned. Along the right hand side you’ll see a scroll bar that you can use to move between frames. Up to 32 separate animations can be managed simultaneously per timeline.
But enough talk. Let’s create an animation.
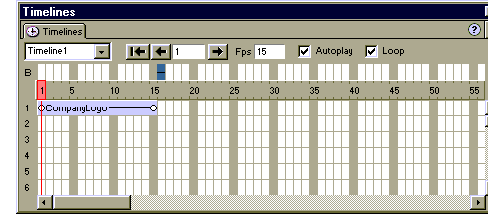
To animate the CompanyLogo layer you created earlier, we’ll have to add it to the Timeline. To do this, select the layer and drag it onto the Timeline. As you do this, a 15 frame long line appears in the Timeline Inspector with the name “CompanyLogo”. This is the length of time for the animation, which is currently 15 frames long. As the animation FPS is set to 15, this means the animation will play for 1 second. Select the AutoPlay and Loop check box as shown here:

The Timeline Inspector displays the CompanyLogo layer, the length of time it will play, and that the Autoplay and Loop checkboxes have been selected.
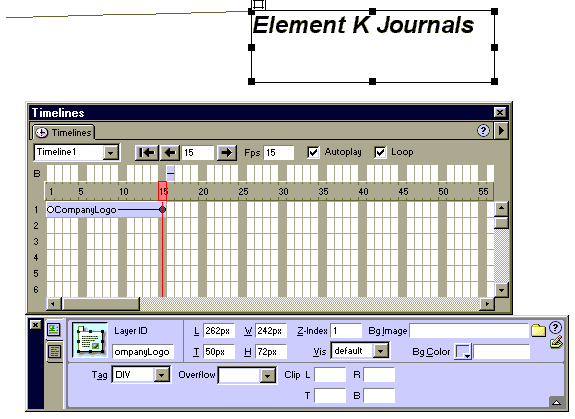
The only thing left to do is the fun bit: the path of animation. Any animation must move from one point to another. This is done with a tool called KeyFrames, and again, Flash and Director developers will be familiar with this terminology. Two keyframes are automatically added to all layers on the timeline: the first and last frame of the animation.
A KeyFrame is identified as a circle placed on the timeline. In Figure B the final KeyFrame is on frame 15. Select the KeyFrame, and you’ll notice that the red vertical line moves to frame 15. On the page, select the layer “CompanyLogo” and drag it from the left hand side of the stage to the right. A gray line is added to the page — this line is called the Path of Animation, and it’s a visual place holder that shows you the animation (as shown below).

The gray line is the Path of Animation.
Now press F12 to view the animation in a Web browser (this animation will work in any Web browser — Microsoft or Netscape – version 4 and above).
To have written this simple animation by hand would have been an arduous task — it takes over 130 lines of HTML and JavaScript! But it took almost no time to complete in Dreamweaver.
Adding Extra Keyframes
Not all animations move in a straight line. What if the animation of the Company-Logo needs to shoot from one side of the page to the other and then bounce back to the middle? This kind of animation can be done id we add keyframes and increase the length of the animation.
The playing time for the animation can be increased by literally dragging the layer. In the Timeline, select the second KeyFrame on the frame 15 Company-Logo layer. With the mouse held down, drag the layer to frame 60 — but note that there’s no limit to how long a layer can play. Our animation will now take longer to play because its length is 60 frames. However, the animation hasn’t changed on the page: all that’s changed is the length of time for which the animation will play.
Right click on frame 15 on the CompanyLogo layer. Choose “Add KeyFrame” from the popup menu that appears, and a circle will display on frame 15. With this frame selected on the Timeline, select from the page the layer Company-Logo, and drag it to the far right hand side of the screen. The Path of Animation has been changed, and now shows the animation moving back and forth across the page. To see this in your default Web browser press F12. The animation now bounces from the left to the right side of the browser, and back to the middle, as shown below.
Complex animation can be created with additional KeyFrames.
There’s no limit to the number of KeyFrames that can be added to a Web page. Why not go ahead and add a couple more to experiment with Keyframes?
To remove a KeyFrame, select it on the Timeline, right click to open the popup menu, and choose “Remove Keyframe”. When you do this, you’ll see that the gray path of the animation will modify the animation as if the previous KeyFrame hadn’t existed.
Multiple Layers of Animation
Any animation will involve the simultaneous movement of multiple objects, in fact, up to 32 objects can move at any one time in any Timeline. It’s as simple as add-ing a new layer to the page, and dragging it onto the Timeline.
As you drag additional layers onto the timeline, see how they stack on top of each other. All layers that you add to a Timeline are controlled by the speed of the Timeline. This is the same with movies in Flash — an object, such as button, can only be animated by the speed of the Timeline it is in.
Flash allows for different animations to move at different speeds through the use of multiple movies, where each movie is given its own timeline. The same can be done in Dreamweaver with the inclusion of additional Timelines.
Time is Everything
Let’s now create a couple of Timelines to demonstrate how the two can interact with each other.
We’ll start by using the Timeline created earlier of the company logo bouncing off the right hand side of the browser. Below the stopping point of the animation you’ll see a second layer with some text. The text is a placeholder with the ex-ception that the final line reads “Click here to exit movie”. What you want instead, is to have the user click on the text to re-animate the movie along a new Timeline.
Before a new Timeline can be added, we must first turn off the “Loop” feature from the original Timeline, to prevent the first animation from continuously ani-mating. Great! Now we can create the exit animation.
Choose Modify — Timeline — Add Timeline to add an extra timeline. The new Timeline is automatically called “Timeline2” on the Timeline Inspector. Select the name and change it to “Exit”. As with a layer, the names of Timelines can be changed to any name, as long as it follows the alphanumeric rules that exist for the naming of layers.
To create the effect of the logo exiting off the page, the exit animation must start where the original animation ends. To do this, move the CompanyLogo layer to the position of the final resting point for the first animation. For this example, the final resting point for the original logo is Left 250PX and Top 50PX. These coor-dinates are located in the Layer’s Property Inspector. In the Exit timeline, change the place of the CompanyLogo to Left 250PX and Top 50PX. This will be the starting point for the Exit animation.
Drag the layer “CompanyLogo” onto the “Exit” timeline. Observe how the setup for the Timeline is exactly the same as Timeline1. The layer starts on frame 1 and the speed of the movie is 15 frames per second.
Change the speed to 12 FPS by typing directly into the FPS text field. Now select frame 15 of the Exit timeline. The CompanyLogo layer is highlighted. From the Property Inspector, select the Top coordinate and change it to –100PX. This will place the layer 100 pixels above the top of the browser screen. Select the forward and reverse buttons on the Timeline to move the animation back and forth. A new animation path shows the CompanyLogo layer moving directly up. The Layer is animated and ready to be played.
Timeline Behaviors
Unlike the first animation, the Autoplay and Loop checkboxes will not be se-lected. Instead, we’ll use a Behavior to trigger the animation.
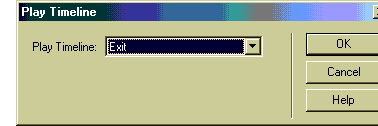
Open the Behaviors Inspector, SHFT+F3 (Windows) or CMD+F3 (Macintosh). Choose the “Click here to exit movie” option. For the Behavior to be added, the text must be a hyper link. In the Properties Inspector add a “#” to the Link field. This will make the text act like a link, without linking to any page. With the cursor on the new link, select from the Behaviors Timeline — Play Timeline. A popup window will ask which Timeline to play. Choose “Exit”, as shown below.

The Play Timeline Behavior will start an animation in a different Timeline.
Press F12 to preview the page. The original animation plays and stops with the CompanyLogo layer in the center of the page. When the link on the page is selected the second timeline plays. Any number of Timelines can be added to a single page. The Timeline Behaviors can control the starting and ending time fore each timeline.
The Behavior Layer
Timelines are, at their most basic, just JavaScript. Because of this additional JavaScript, Behaviors can interact at any time with a Timeline. For this purpose a special Behaviors layer is available on the Timeline, beginning with the letter B above the regular layers.
Objects in layers can’t be dragged from the page onto the Behaviors timeline: only Behaviors can be added.
As an example, select the “Exit” timeline and choose frame 15. Double click in the “B” layer of the Timeline to open the Behaviors Inspector. Select “Pop-up message” from the Behaviors. Add the text “Thank you for viewing our Website” and select OK.
Frame 15 of the “B” layer now displays a purple marker to represent that a Behavior will be activated when this frame is reached. Press F12. The first animation plays. Then click on the link to play the second animation. On the final frame of the second animation, a popup message will appear on screen, as shown here:

Behaviors can be easily added to the “B” layer of a timeline. The Behavior will be triggered when the Timeline reaches it.
A Behavior can be added at any point along a Timeline, allowing you to develop rich interactivity into any page. The Timeline is a good substitute for Flash in simple animations. The rich engagement between Behaviors and Time can result in exciting and engaging sites that present more to the user than just a static Web page. Have fun!
Frequently Asked Questions (FAQs) about Animation in Dreamweaver
How Can I Import OAM Files in Dreamweaver?
Importing OAM files in Dreamweaver is a straightforward process. First, you need to ensure that the OAM file is saved in a location that is easily accessible. Then, open your Dreamweaver application and navigate to the page where you want to insert the animation. Click on the ‘Insert’ menu, then select ‘Media’ and choose ‘Edge Animate Composition’. A dialog box will appear, prompting you to select the OAM file you want to import. Navigate to the location of the file, select it, and click ‘Open’. The animation will then be inserted into your page.
What is the Role of Dreamweaver in Animation?
Dreamweaver is a powerful tool that can be used to create and manage web pages. It supports the integration of various types of animations, including CSS, JavaScript, and HTML5 animations. With Dreamweaver, you can easily insert, manage, and control animations in your web pages, enhancing the overall user experience and engagement.
Can I Create Animations Directly in Dreamweaver?
While Dreamweaver does not have a built-in feature for creating animations from scratch, it supports the integration of animations created using other Adobe tools like Animate or After Effects. You can create your animations in these tools, export them as OAM files, and then import them into Dreamweaver.
How Can I Optimize My Animations in Dreamweaver?
Optimizing your animations in Dreamweaver involves ensuring that they load quickly and run smoothly. This can be achieved by keeping the file size of your animations small, using vector graphics where possible, and limiting the number of frames per second. Additionally, you can use the ‘Preload’ option in Dreamweaver to load your animations in the background, ensuring that they start playing as soon as they are fully loaded.
How Can I Add Interactivity to My Animations in Dreamweaver?
Dreamweaver allows you to add interactivity to your animations using JavaScript and CSS. You can use JavaScript to control the playback of your animations, respond to user input, and create complex interactive elements. CSS can be used to control the appearance and positioning of your animations, as well as create simple animations and transitions.
Can I Use Dreamweaver to Create Animated Characters?
Dreamweaver is primarily a web design and development tool, and while it supports the integration of animations, it does not have the capabilities to create animated characters from scratch. For character animation, tools like Adobe Animate or After Effects are more suitable.
How Can I Preview My Animations in Dreamweaver?
Dreamweaver provides a ‘Live View’ feature that allows you to preview your animations directly in the application. To use this feature, simply open the page containing your animation and click on the ‘Live View’ button. Your page will be rendered as it would appear in a web browser, allowing you to see your animation in action.
Can I Use Dreamweaver to Create 3D Animations?
Dreamweaver does not support the creation of 3D animations directly. However, it does support the integration of 3D animations created using other tools. You can create your 3D animations in a tool like Blender or Maya, export them as a compatible file format, and then integrate them into your Dreamweaver project.
How Can I Control the Playback of My Animations in Dreamweaver?
You can control the playback of your animations in Dreamweaver using JavaScript. This can involve starting or stopping the animation, changing the playback speed, or even responding to user input. Dreamweaver provides a robust JavaScript editor that allows you to write and edit your scripts directly in the application.
Can I Use Dreamweaver to Create Responsive Animations?
Yes, Dreamweaver supports the creation of responsive animations. This involves designing your animations in such a way that they adapt to different screen sizes and orientations. You can achieve this by using relative units for your animation dimensions, and using media queries to adjust the animation parameters based on the screen size.
Matthew’s most recent publications include Flash MX Magic (New Riders), Flash MX Game Design f/x & Design (Coriolis) and content for Everything Ever Needed to Know about Live Motion 2.0, Flash 5 Magic, Inside Dreamweaver 4, Flash 5: Visual FX, Web Publishing Bible and The Dreamweaver Bible.


