What are the buttons, text, dropdowns, etc. that can be seen when playing a game? All of that is part of what is called the User Interface (UI). Most games have some sort of UI which makes it easier for players to switch between levels and activate certain controls (such as pausing the game or restarting a level). In a previous article describing how to create Dodger in Unity, we created a small button to refresh the game if a player lost.
In this tutorial, we are going to take that to the next level, and allow users to pause or restart the game and switch between different scenes. We will also be taking a look at how to show certain UI elements only at certain times – such as when the game is paused or when the player dies/loses.
Most games contain a pause menu, a game over screen, and a main menu. Since these are some of the few elements that are required for a “finished” game, we will insert all three into our Dodger clone. In addition, we will also create an instructions screen so that players will be able to learn the controls they can use before they start playing the game.
The completed game can be played at itch.io.
Creating a Basic Pause Screen
A pause screen has a common set of controls that players are able to use to restart a level, move back to the main menu, or un-pause the game. Pause screens should only be visible when the game is paused. In Unity we are, in general, able to differentiate between a paused and un-paused game by using Time.timescale. If the time scale is zero, the game is paused. If it’s greater than zero, the game is un-paused (we’ll discuss this later). Let’s get started!
Creating Pause Text
First, we are going to need to create a title which tells the player that the game is paused. We should create a text object by right-clicking in the hierarchy pane and selecting UI -> Text. Let’s name the newly created object PauseText.
We need to create a title which tells the player that the game is paused. We should create a text object by right-clicking in the hierarchy pane and selecting UI -> Text. Let’s name the newly created object PauseText.
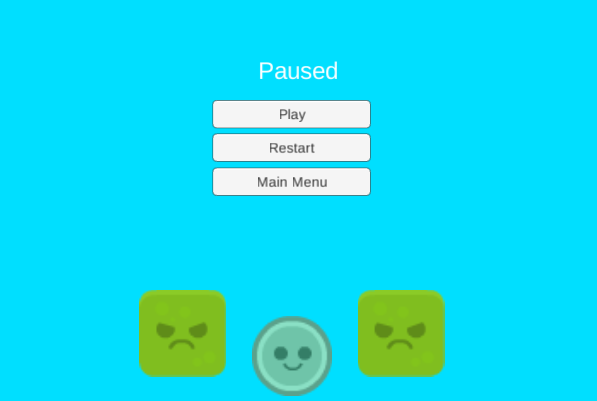
Now we can format the Text object to have it look better within the game screen. In order to change the text of a Text object we have to click in the Inspector pane under the text attribute where the words “New Text” are. Inside the text attribute, we can change the text of our pause text to “Paused”. To keep with the color scheme for the game we should change the color of the text to white. This can be accomplished by clicking under the color object (where black or another color may be selected) and choosing white.

Let’s adjust the placement of our text. The pause text should be centered horizontally on the screen and be at about the top third of the game screen. The pause text can be moved by changing the values of X and Y inside of the Rect Transform attribute or by using the four way arrows in the mouse controls in the top left corner of the Unity editor. If needed or wanted, we can also change the text size by changing the value and by changing the size of the width and height attributes (under Rect Transform).
All we need to do now is tag the object so that the program, after we add code, will be able to tell that we only want this object to show when the game is paused. We can click under the name of the pause text where it says “Untagged” and then click “Add tag…”. Now we can create a tag named “ShowOnPause”. Once this tag is created we need to add it to the pause text.
Creating the Paused Buttons
Since we have created the pause text and added a new tag for game objects that should appear when the game is paused, we can begin creating the buttons that will make up the paused game menu.
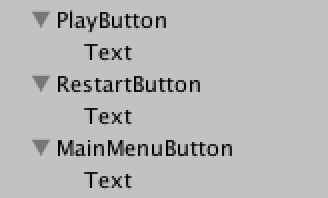
We will be creating three different buttons: a play button, a restart button, and a main menu button. The play button will un-pause the game, the restart button will restart the game, and the main menu button will take players back to the main menu scene of the game.
Let’s begin by creating a new button (right-click in hierarchy -> UI -> Button) and naming it “PlayButton”. We should set the play button’s tag to ShowOnPause so that it will only be shown when the game is paused. Now let’s set the text of the play button to “Play”. This can be done by opening the text child object in the inspector (click the dropdown next to the play button in the hierarchy and select the text object) and then changing the text property to “Play”. We should align the play button with the center of the screen so that it will be under the pause text.
A quick way to create the other two buttons is to select the play button in the hierarchy and duplicating it (Command / CTRL + D) twice. We can name the new buttons “RestartButton” and “MainMenuButton”. We should also give each of the new buttons the appropriate text. The restart button should say “Restart” and the main menu button should say “Main Menu”. Now let’s delete the refresh button that was created in the last tutorial. We can see now that we have a basic pause menu. However, the menu doesn’t do anything because we haven’t attached any code to the objects.
Let’s open the UIManager script that was created in the last tutorial. We should edit our UIManager script so that it looks like the code below.
GameObject[] pauseObjects;

	// Use this for initialization
	void Start () {
		Time.timeScale = 1;
		pauseObjects = GameObject.FindGameObjectsWithTag("ShowOnPause");
		hidePaused();
	}

	// Update is called once per frame
	void Update () {

		//uses the p button to pause and unpause the game
		if(Input.GetKeyDown(KeyCode.P))
		{
			if(Time.timeScale == 1)
			{
				Time.timeScale = 0;
				showPaused();
			} else if (Time.timeScale == 0){
				Debug.Log ("high");
				Time.timeScale = 1;
				hidePaused();
			}
		}
	}


	//Reloads the Level
	public void Reload(){
		Application.LoadLevel(Application.loadedLevel);
	}

	//controls the pausing of the scene
	public void pauseControl(){
			if(Time.timeScale == 1)
			{
				Time.timeScale = 0;
				showPaused();
			} else if (Time.timeScale == 0){
				Time.timeScale = 1;
				hidePaused();
			}
	}

	//shows objects with ShowOnPause tag
	public void showPaused(){
		foreach(GameObject g in pauseObjects){
			g.SetActive(true);
		}
	}

	//hides objects with ShowOnPause tag
	public void hidePaused(){
		foreach(GameObject g in pauseObjects){
			g.SetActive(false);
		}
	}

	//loads inputted level
	public void LoadLevel(string level){
		Application.LoadLevel(level);
	}
Now that we have the code we need accessible in the UIManager script, we can go back to Unity. Inside Unity, let’s select the play button and attach the pauseControl method to it. To do this we can select the play button and drag the UIManager game object onto the game object space under the OnClick() attribute in the inspector pane. With the UIManager game object added, we can now use the second dropdown to select the pauseControl function (UIManager -> pauseControl).
Using the same steps, we can add the reload() method to the restart button and the loadLevel() method to the main menu button. Since the loadLevel() method takes a string parameter, we should type “MainMenu” into the box under the function dropdown.
If we hit play now, we will notice that the play and restart buttons work. Also, if we hit P while the game is playing, we are able to pause and un-pause the game. The only problem is that the main menu button doesn’t work. This is because we haven’t added a scene named “MainMenu” to the build settings.
Creating a Main Menu Scene
Creating the Scene
With the pause menu created in the play scene, we can now create a new scene that will function as the main menu of the game. The main menu we will create will be simple and only contain a Play button that will take players to the play scene.
First, we should save the current scene that we are working in so that the work we have done will not get deleted when we open a new one. Let’s create a new scene (Command / CTRL + N or File -> New Scene). Once the scene is open, save it and name it “MainMenu”.
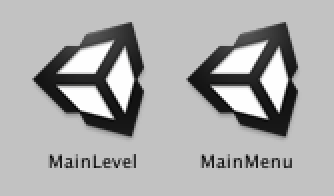
Note: We are naming it “MainMenu” because that is the string property to which we set the main menu button in the play scene. If we wanted a different name, then we could change the string property of the loadLevel() function attached to the main menu button in the play scene.
Creating the Menu
Now that the scene has been saved we can begin working on it. Let’s start by selecting the main camera game object and changing its background to the same color as in the play scene (R: 0, G: 223, B: 255).
For this scene, we will need to be able to access the loadLevel() method inside the UIManager script. This means we need to create a UIManager game object and attach the UIManager script to it so that we can add the function to our button.
Let’s create an empty game object (right-click in hierarchy -> Create Empty) and name it UIManager. Now we can add the UIManager script to the UIManager game object.
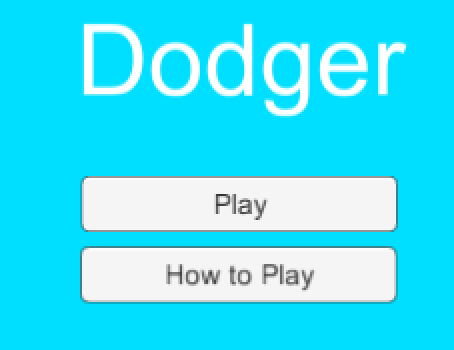
We can begin creating the simple menu that will contain the text that says “Dodger” and a play button. We’ll begin by creating the text (right-click in hierarchy -> UI -> Text) and naming it “TitleText”. We should change the text to say “Dodger” and align it to the center of the screen, a little towards the top. Now let’s set the color of title text to white.
With the text created and edited we can create a new button and name it “PlayButton”. We should change the text of the play button’s child object to “Play”. Finally, let’s add the UIManager game object to the button’s OnClick() attribute and choose the loadLevel() function. The parameter of the loadLevel() function depends on what the name of the play scene from the last tutorial is. We can find the name of the play scene by finding the scene in the Assets pane.
If we run the game and hit the play button, we will notice that the button does not work. The reason is the same as it was when the main menu button didn’t work in our play scene: we haven’t added the MainMenu scene to the build settings. To add our current scene to the build settings, we can open the build settings (File -> Build Settings) and click Add Current.
Finishing the Game
For the game to be considered “finished” it needs to have a game over screen so that players will be able to tell when they have lost. We will also add a score counter to the game, so players will know how high they scored.
Adding a Score
We should save our current scene and open the play scene. With the play scene open, we can create a text object and name it “ScoreText”. The score text object should be aligned to the top of the screen. With the score text object selected we can add a top stretch anchor to it by looking in the Rect transform property and clicking the anchor menu. We should also center the text and make it white.
The condition that we will use to update the score will be blocks going off screen (meaning the blocks the player has already dodged). For this condition to be active we will need to check for the blocks’ collision off screen and increment a variable for the score.
Let’s create an empty game object and name it “BottomBorder”. We add a BoxCollider2D to the bottom border and set the X size to a large number that goes slightly past the camera’s borders. Now we can add a Rigidbody2D to the bottom border object and set the gravity scale attribute to 0 so that the bottom border object doesn’t fall. We can align the bottom border object slightly below the player making sure that it is off screen.
We need to create a new script in order to set a score for the player. Let’s create a new C# script named “PointCounter” inside of our Scripts folder. Once the PointCounter script has been created we can open it in our IDE and type:
public int score;

	// Use this for initialization
	void Start () {
		score = 0;
	}

	// Update is called once per frame
	void Update () {

	}

	//checks for entering a trigger
	void OnTriggerEnter2D(Collider2D other){
		//checks other collider's tag
		if(other.gameObject.tag == "Enemy"){
			score++;								//increments score
			Destroy (other.gameObject);				//destroys other collider's gameobject
		}
	}
The PointCounter script should be added to the bottom border game object so that once a block collides with it, the block will be destroyed and the score updated.
Now, let’s create a script named “PointUpdater” which will update the score text. We can open the PointUpdater script in our IDE and type:
public PointCounter pointCounter;
	// Use this for initialization
	void Start () {
		text = gameObject.GetComponent<Text>();
    text.text = "Score: 0";
	}

	// Update is called once per frame
	void Update () {
		text.text = "Score: " + pointCounter.score.ToString();

	}
We should add the PointUpdater script to the score text game object. The bottom border game object should be added to the point counter value so that the score can be updated.
Creating a Game over Menu
To finish up the game, we need to add a game over menu that will appear when the player has died.
Let’s open the PlayerController script in our IDE and below the last variable declaration add:
public bool alive;
	// Use this for initialization
	void Start () {
		alive = true;
	}
Inside of the EnemyController script let’s add:
void OnTriggerEnter2D(Collider2D other){

  //Checks if other gameobject has a Tag of Player
  if(other.gameObject.tag == "Player"){
    other.gameObject.GetComponent<PlayerController>().alive = false;
    Time.timeScale = 0;
  }
}
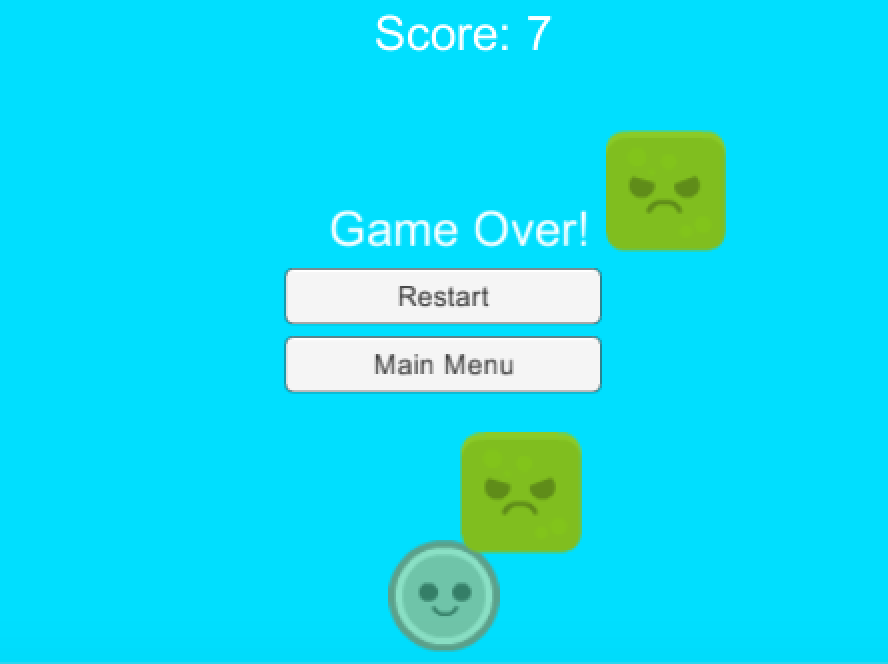
To begin fleshing out the menu, we can create a new text game object and name it “GameOverText”. The text should be set to “Game Over” and the text color should be white. We should align the game over text to be slightly above the center of the screen. To make sure that this menu will only appear when the player has died we should create a new tag named “ShowOnFinish” and add it to the game over text.
Now let’s duplicate the restart and main menu buttons. We should rename the buttons to “FinRestartButon” and “FinMainMenuButton” and add the ShowOnFinish tag to both of the buttons.
Finally, let’s open the UIManager script in our IDE and edit it so that it looks like the code below.
GameObject[] pauseObjects;
	GameObject[] finishObjects;
	PlayerController playerController;
	// Use this for initialization
	void Start () {
		Time.timeScale = 1;

		pauseObjects = GameObject.FindGameObjectsWithTag("ShowOnPause");			//gets all objects with tag ShowOnPause
		finishObjects = GameObject.FindGameObjectsWithTag("ShowOnFinish");			//gets all objects with tag ShowOnFinish


		hidePaused();
		hideFinished();

		//Checks to make sure MainLevel is the loaded level
		if(Application.loadedLevelName == "MainLevel")
			playerController = GameObject.FindGameObjectWithTag("Player").GetComponent<PlayerController>();
	}

	// Update is called once per frame
	void Update () {

		//uses the p button to pause and unpause the game
		if(Input.GetKeyDown(KeyCode.P))
		{
			if(Time.timeScale == 1 && playerController.alive == true)
			{
				Time.timeScale = 0;
				showPaused();
			} else if (Time.timeScale == 0 && playerController.alive == true){
				Time.timeScale = 1;
				hidePaused();
			}
		}

		//shows finish gameobjects if player is dead and timescale = 0
		if (Time.timeScale == 0 && playerController.alive == false){
			showFinished();
		}
	}


	//Reloads the Level
	public void Reload(){
		Application.LoadLevel(Application.loadedLevel);
	}

	//controls the pausing of the scene
	public void pauseControl(){
			if(Time.timeScale == 1)
			{
				Time.timeScale = 0;
				showPaused();
			} else if (Time.timeScale == 0){
				Time.timeScale = 1;
				hidePaused();
			}
	}

	//shows objects with ShowOnPause tag
	public void showPaused(){
		foreach(GameObject g in pauseObjects){
			g.SetActive(true);
		}
	}

	//hides objects with ShowOnPause tag
	public void hidePaused(){
		foreach(GameObject g in pauseObjects){
			g.SetActive(false);
		}
	}

	//shows objects with ShowOnFinish tag
	public void showFinished(){
		foreach(GameObject g in finishObjects){
			g.SetActive(true);
		}
	}

	//hides objects with ShowOnFinish tag
	public void hideFinished(){
		foreach(GameObject g in finishObjects){
			g.SetActive(false);
		}
	}

	//loads inputted level
	public void LoadLevel(string level){
		Application.LoadLevel(level);
	}
Conclusion
We have now added a simple UI to our game. Players will now be able to move through the two scenes using the buttons. We have also gained experience in modular Unity development and DRY coding (Don’t-Repeat-Yourself). The way we created the score text is a good example of how Unity code should be divided so that it is recyclable.
Questions? Comments? Please leave them below!
The finished project can be downloaded from GitHub.
Frequently Asked Questions (FAQs) about Adding Pause, Main Menu, and Game Over Screens in Unity
How Can I Add a Pause Button in Unity?
Adding a pause button in Unity involves creating a UI button and attaching a script to it that controls the game’s time scale. The time scale is a global multiplier that affects the speed at which the game time progresses. By setting it to zero, you effectively pause the game. The script attached to the pause button should include a function that toggles the time scale between 1 (normal speed) and 0 (paused) when the button is clicked.
How Can I Create a Main Menu in Unity?
Creating a main menu in Unity involves creating a new scene that will serve as the menu. This scene should include UI elements like buttons that allow the player to start the game, adjust settings, or quit. Each button should have a script attached that performs the appropriate action when clicked. For example, the start button’s script might load the game scene, while the quit button’s script might close the application.
How Can I Add a Game Over Screen in Unity?
Adding a game over screen in Unity is similar to adding a main menu. You’ll need to create a new scene that will serve as the game over screen, complete with UI elements that provide options for the player, such as restarting the game or returning to the main menu. These elements should have scripts attached that perform the appropriate actions when clicked.
How Can I Transition Between Scenes in Unity?
Transitioning between scenes in Unity can be accomplished using the SceneManager class. This class provides functions for loading and unloading scenes, as well as for querying information about the current scene. To transition to a new scene, you can use the SceneManager.LoadScene function, passing in either the name or index of the scene you want to load.
How Can I Customize the Appearance of My UI Elements in Unity?
Unity provides a variety of options for customizing the appearance of UI elements. You can adjust properties like color, size, and position directly in the Unity editor. For more advanced customization, you can use the UI system’s powerful animation capabilities, or even create your own custom UI components by extending the existing classes.
How Can I Add Sound Effects to My UI Elements in Unity?
Adding sound effects to UI elements in Unity can be accomplished by attaching an AudioSource component to the element and configuring it to play a sound when the element is interacted with. For example, you might configure a button to play a click sound when it’s pressed.
How Can I Make My UI Responsive to Different Screen Sizes in Unity?
Unity’s UI system includes a feature called the Canvas Scaler that makes it easy to create UI that scales and adjusts to different screen sizes. By setting the Canvas Scaler’s UI Scale Mode to “Scale With Screen Size,” you can ensure that your UI elements maintain a consistent size and layout across different devices.
How Can I Test My UI in Unity?
Testing your UI in Unity can be done directly in the Unity editor. The Game view provides a real-time preview of your game, including any UI elements. You can interact with your UI in the Game view just as a player would in the actual game, allowing you to test functionality and check for any issues.
How Can I Optimize My UI for Performance in Unity?
Optimizing your UI for performance in Unity can involve a variety of strategies, such as minimizing the use of complex graphics, avoiding unnecessary updates, and using the Canvas Scaler to reduce the resolution of your UI on lower-end devices. Unity’s Profiler tool can be a valuable resource for identifying performance bottlenecks in your UI.
How Can I Learn More About Unity’s UI System?
Unity provides extensive documentation on its UI system, including tutorials, API references, and best practices. Additionally, there are many online communities and resources where you can learn from other Unity developers, such as the Unity forums, Stack Overflow, and various tutorial websites.
 Vincent Quarles
Vincent Quarles is a student at Drexel University majoring in Interactive Digital Media. Vincent has always been fascinated by computers and technology, but more specifically video games and how to create them. When he isn't coding games he can be found rock-climbing, dancing, or sleeping. Along with various hobbies, Vincent, is also the the Stylist for IlluMANous, a men's advice blog soon to be released.