Creating an online shop is as easy as A, B, C with the availability of so many open-source e-commerce platforms. In less than five minutes, you can create your very own online storefront like Amazon and offer physical and digital products for sale. OpenCart is a robust e-commerce solution for Internet merchants giving them the ability to create their own online presence and participate in e-commerce at a minimal cost. In this two-part series I’ll explain all of the necessary steps to create your own e-commerce site with OpenCart. In this article I’ll start with its installation.
OpenCart Features
OpenCart is a powerful, open source shopping cart system that is designed to be feature rich and user friendly. Some of its features worth checking out include: Open SourceThe best thing about OpenCart is that it is free to download and use. There is no need for you to worry about licensing cost for using it. And if you ever make modifications to the OpenCart source code, you can share them back with the OpenCart developers so the community at large can benefit from them too. Unlimited Categories/Products/Manufacturers
In an online store one would need to have unlimited Categories, products and manufacturers. In OpenCart you can create unlimited number of Categories for your products, add unlimited number of products to your store and add unlimited number of manufacturers. Guest Shopping/Checkout
There are times you want to order a product online on an online store and don’t want to register before you can buy any goods. OpenCart allows guest shopping and checkout which enables a customer to add goods to their shopping cart, pay for the goods and checkout without them registering. To learn more about OpenCart, be sure to visit their website at opencart.com.
Installing OpenCart
To install OpenCart, you first need to visit GitHub and download the latest version of the software. OpenCart comes as a ZIP archive, so afterwards you have to extract the archive’s contents into a folder of your choosing. After extracting it, you’ll see a folder called upload and three text files namedinstall.txt, license.txt, and upgrade.txt.
The install.txt file contains installation notes, license.txt contains the GNU General Public License under which OpenCart is released, and upgrade.txt contains instructions for upgrading an earlier version of OpenCart to the latest version if you’re already using it. The upload directory contains the files you need to upload to your web host.
Copy all the files and folders found in the upload folder to the public directory of your web host. The name of the public directory may vary depending on your host and configuration, but usually it’s named something like public_html.
After copying the files, you need to make sure the following files and directories are writable:
image/

image/cache/

image/data/

system/cache/

system/logs/

download/

config.php

admin/config.php
To make them writable, make sure the file’s permissions are 666 (rw-rw-rw) and directory permissions are 777 (rwxrwxrwx). You can do this with the chmod command if you have shell access, or easily through your host’s cPanel install.
To do this in cPanel, all you need to do is go the directory that you uploaded your OpenCart files to, right click on each of the file and folder choose “Change Permissions” for the pop up box.
Now create a MySQL database with a new user created and attached to it.
To create a MySQL database, you’ll need to login to your database backend. If it’s a shell, you can then use the CREATE DATABASE command and create a user with appropriate access privileges with GRANT.
If you’re using phpMyAdmin, under Create New Database enter the name of the database you want to create and click on the Create Button. Then to attach a new user to the newly created database, click on the Privileges tab at the top and then click on the the Add New User button. Enter the username, host (most likely “local”), and your chosen password twice. Under the Database then for the user select the None option. Under Global privileges click on the check all link.
After you have done all this, you should open the storefront in a browser to begin the installation wizard. The exact URL will depend on where you’ve uploaded the files; for example, if you’ve uploaded the files to public_html then you would open your domain, like www.example.com. If you’ve created public_files/store and uploaded the files there, then you would open www.example.com/store.
After you have visited the URL of where you uploaded your OpenCart files, you will be shown the first step which is “Step 1 – License”. All you need to do here is accept the GNU General Public License by ticking “I agree to the License” after which you click on the continue button.
The next step is “Step 2 – Pre-Installation”. The pre-installation screen displays all the installation requirements, and PHP settings and extensions. It would also check whether the correct permissions are set for the files and directories. If there are no errors, you can click on the continue button.
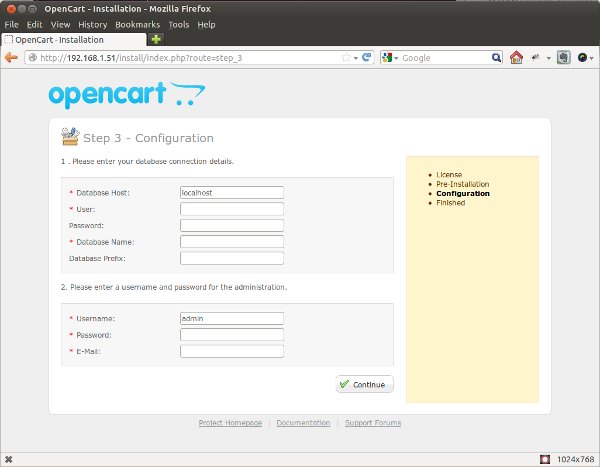
The next step is “Step 3 – Configuration”. This is where you enter the database host, the username and password of the MySQL user you created earlier, and the database name.
The next three options, Username, Password, and Email, are for the admin account. This is where you enter the username, password, and email address that you will be using to login to the administrative backend.
A screenshot of the “Step – 3 Configuration” screen is shown below.

install directory from your server. This is the “installation directory” noted in the final wizard screen.
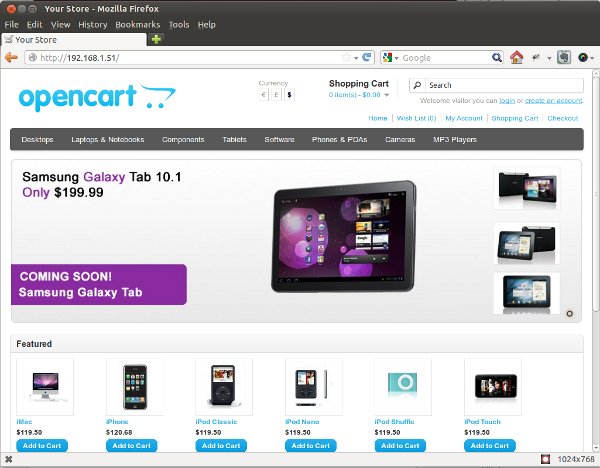
OpenCart installs a sample store during installation, and this is how the sample storefront looks:

Configuring Your Store
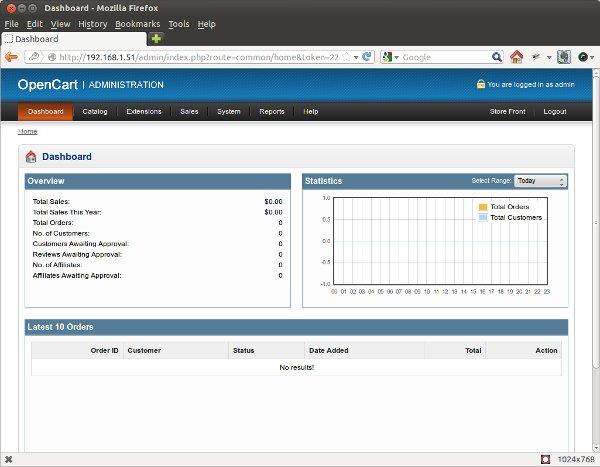
One of the joys of having your own online store is being able to add your own products and set their prices. To do all, first you need to login in to the administrative back-end and set up a few categories to keep things organized. To access the administrative back-end, go to www.example.com/admin. Log in with the username and password you provided to the install wizard and you will be taken to the Administration Dashboard.

Creating Your Own Categories
Categories are classification of related products. For example, the IPhone 5, Blackberry 9800, and Samsung S2 are all products that could be classified as SmartPhones. In OpenCart you can create an unlimited number of categories and sub-categories to organize your products how you see fit. To create your own categories, navigate to Catalog > Categories. Click the Insert button on the categories page and you’ll see this form:
Creating Your Own Manufacturers
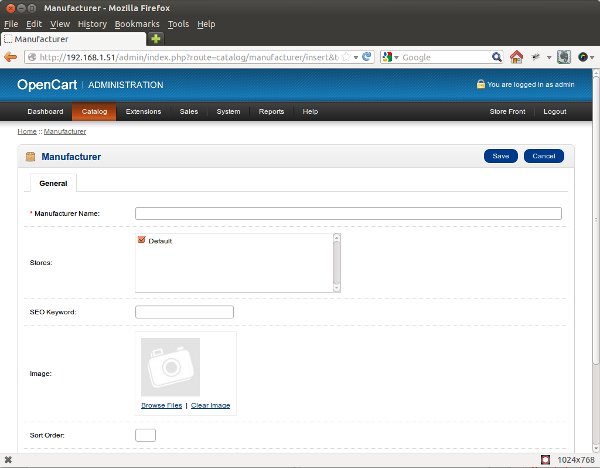
Manufacturers are the makers and producers of your products. For example Apple, HP, Nike are all examples of manufacturers. Adding a new manufacturer is as easy as clicking Catalog > Manufacturers and then clicking the manufacturers page’s Insert button.
Summary
This is where I’ll end the first part of this tutorial. So far you’ve learned how to install OpenCart, log in to the administration section and create categories and manufacturers. In the next article in this series I’ll dig deeper into OpenCart and talk about adding options, attributes, attribute groups, and most importantly products! Stay tuned. Image via FotoliaFrequently Asked Questions about Setting Up Your First Ecommerce Store with OpenCart
How can I customize my OpenCart store to match my brand?
OpenCart offers a variety of themes and extensions that you can use to customize your store. You can change the color scheme, layout, and even add custom logos to match your brand. Additionally, OpenCart allows you to edit the CSS and HTML of your store if you have the technical skills. This means you can completely customize your store to match your brand’s aesthetic and create a unique shopping experience for your customers.
Can I integrate other payment gateways with my OpenCart store?
Yes, OpenCart supports a wide range of payment gateways. You can choose from popular options like PayPal, Stripe, and Authorize.Net, among others. To integrate a payment gateway, you’ll need to install the corresponding extension and configure it with your payment gateway account details.
How can I optimize my OpenCart store for SEO?
OpenCart has built-in SEO features that you can use to optimize your store. You can add meta tags, keywords, and descriptions to your products and categories. Additionally, you can use SEO-friendly URLs to make your store more search engine friendly. There are also several SEO extensions available that can help you further optimize your store.
How can I manage my inventory in OpenCart?
OpenCart has a comprehensive inventory management system. You can add products, set stock levels, and track inventory right from your admin dashboard. You can also set up alerts to notify you when a product’s stock level is low.
Can I sell digital products on my OpenCart store?
Yes, OpenCart supports the sale of both physical and digital products. You can easily add digital products to your store and customers can download them directly after purchase.
How can I add multiple languages to my OpenCart store?
OpenCart supports multiple languages. You can install language packs from the OpenCart extension directory and configure them in your admin dashboard. This allows you to cater to a global audience and provide a localized shopping experience.
Can I set up different shipping methods in OpenCart?
Yes, OpenCart allows you to set up different shipping methods. You can choose from flat rate, free shipping, pickup from store, and more. You can also integrate with popular shipping carriers like UPS, FedEx, and DHL.
How can I ensure the security of my OpenCart store?
OpenCart has several built-in security features. You can set up SSL encryption, use two-factor authentication, and regularly update your software to ensure your store is secure. Additionally, there are several security extensions available that can help you further secure your store.
Can I integrate my OpenCart store with other platforms?
Yes, OpenCart supports integration with a variety of platforms. You can integrate with CRM systems, email marketing tools, social media platforms, and more. This allows you to streamline your operations and manage your business more efficiently.
How can I track the performance of my OpenCart store?
OpenCart has built-in analytics that you can use to track your store’s performance. You can view sales reports, customer activity, and more. Additionally, you can integrate with Google Analytics to get more detailed insights into your store’s performance.
Tunbosun is a freelance web designer and developer currently studying computer science in the University of Ilorin.

