Working with the Facebook API in a Cordova App

In this tutorial we’ll be creating a Cordova app that connects to the Facebook API using the official Facebook plugin for Cordova. We’ll cover how to login and logout of Facebook, use dialogs, and make calls to the Graph API. Note that this tutorial isn’t for beginners, I will assume that you have already setup your machine to work with Cordova and deploy to an Android device.
Create a Facebook App
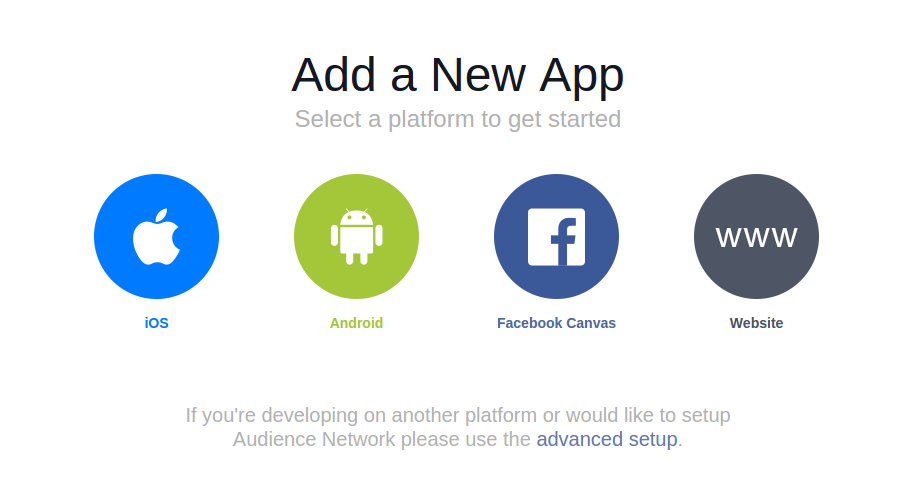
First create an app on the Facebook Developer Website. Hover over the My Apps menu and select add a new app. This will open a modal window that allows you to select the platform for your app. In this case we’ll be deploying to an Android device so select Android from the modal window.
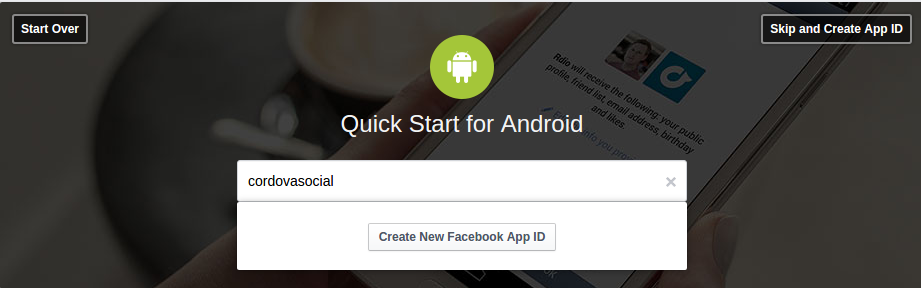
Enter a name for the app and click the Create New Facebook App ID button.
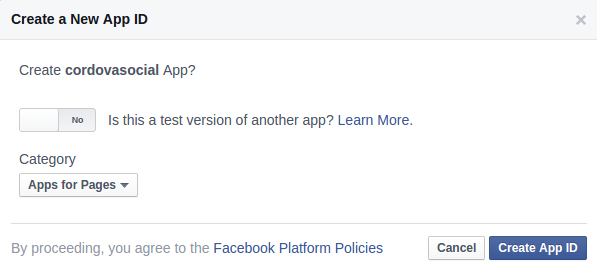
This will ask you if the app is a test version of an existing app, leave it on the no default. The other option is the category, select apps for pages then click on the create app ID button.
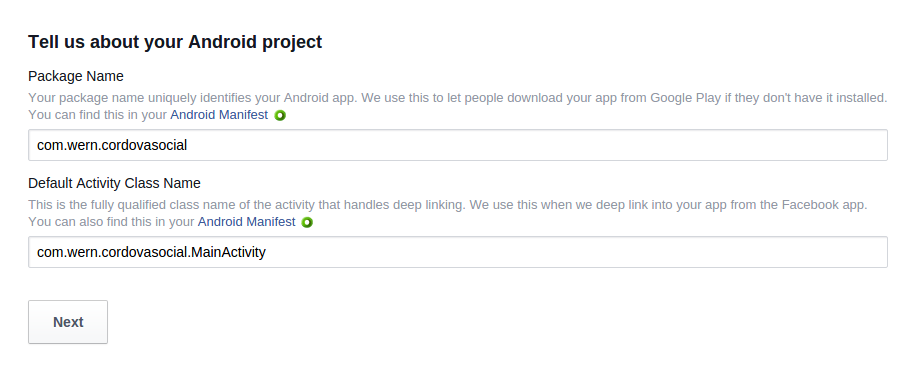
Next you will be asked to add the Facebook SDK to your project. We don’t need to do this for our app so keep scrolling down until you find the Tell us about your Android project section. Enter com.yourname.appname for the package name and then com.yourname.appname.MainActivity for the default activity class name, replacing with appropriate values for your project.
Once that’s complete we need to add the development and release key hashes. These validate the authenticity of your app so that Facebook is sure you are the author of the app and requests made to their API are from you.
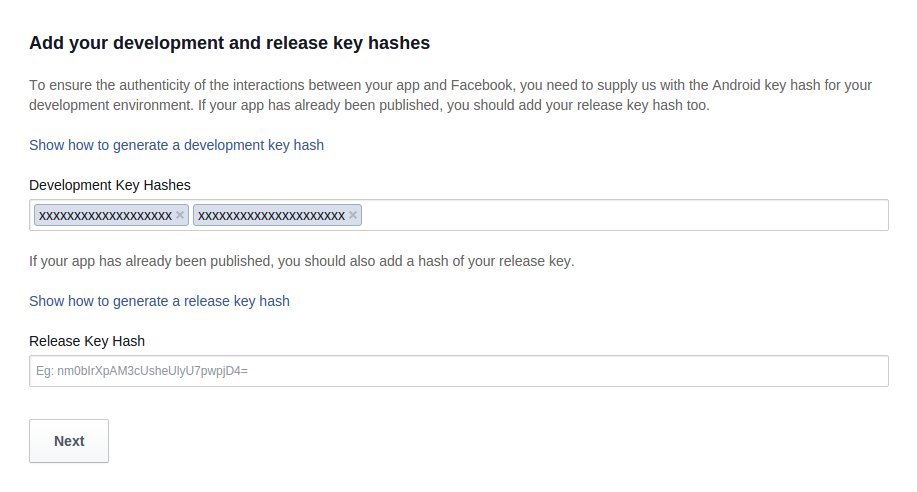
Before you can generate a hash, you first need a keystore. You can generate one by executing the following command in a terminal window.
keytool -genkey -v -keystore cordova-social.keystore -alias cordovaSocial -keyalg RSA -keysize 2048 -validity 10000Get the hash from the keystore:
keytool -exportcert -alias androiddebugkey -keystore cordova-social.keystore | openssl sha1 -binary | openssl base64This should ask you for a password. Just use the same password used when you created the keystore. Once entered it should return the hash for that keystore. Copy and paste it in the development hashes field.
Click next and refresh the page. Your app should now be listed when you click on the My Apps menu. Note the App ID as we will be needing it later when we install the Facebook plugin.
Building the App
Now we’re ready to build the app. Install Ionic (which we will use for creating our app) with the following command:
npm install -g ionicCreate a new blank app:
ionic start your_app_name blank
cd your_app_name
Add the android platform:
ionic platform add androidInstalling Dependencies
Next we need to install the following plugins:
Cordova-Plugin-Whitelist
Allows us to control which domains the app can make requests to.
Cordova-Plugin-Camera
Allows us to use the device camera to capture photos.
org.apache.cordova.file-Transfer
Allows us to upload photos captured by the camera plugin to a remote server.
Note: We’re using the old version of this plugin since the latest version is incompatible with the current Cordova version (5.0.0) at the time of writing. If you’re reading this in the future you might want to try using the following command: cordova plugin add cordova-plugin-file-transfer and see if it works for you. Otherwise use the command below.
phonegap-facebook-plugin
The official Facebook plugin used for performing different operations with the Facebook API.
Install the plugins with the following commands:
cordova plugin add cordova-plugin-whitelist

cordova plugin add cordova-plugin-camera

cordova plugin add org.apache.cordova.file-transfer

cordova plugin add https://github.com/Wizcorp/phonegap-facebook-plugin --variable APP_ID=YOUR_FACEBOOK_APP_ID --variable APP_NAME=YOUR_APP_NAME
Once that’s complete we need to install a front-end dependency called Angular Local Storage. This allows us to work with the local storage for caching data in our app. You can install Angular Local Storage through Bower with the following command:
bower install angular-local-storage --saveIonic installs Bower components in the www/lib directory. You can check the save location by opening the .bowerrc file in the root directory of the project.
{
  "directory": "www/lib"
}
Linking the Files
At this point we’ll be primarily working inside the www directory. Open the index.html file in that directory.
Link to the Angular Local Storage script below the ionic.bundle.js file.
<script src="lib/ionic/js/ionic.bundle.js"></script>

<script src="lib/angular-local-storage/dist/angular-local-storage.min.js"></script>
Below the app.js file link the following scripts:
<script src="js/app.js"></script>

<!--services-->
<script src="js/services/RequestsService.js"></script>
<script src="js/services/CameraService.js"></script>

<!--controllers-->
<script src="js/controllers/LoginController.js"></script>
<script src="js/controllers/DialogController.js"></script>
<script src="js/controllers/UserDetailsController.js"></script>
Later I’ll explain what each of those scripts does. The service scripts are for making HTTP requests and as a wrapper for the Camera plugin. The controller scripts are for the different pages in the app.
Modify the <body> tag (and its contents) to have the following markup. <ion-nav-view> is where the different pages will be loaded later.
<body ng-app="starter">
    <ion-nav-view></ion-nav-view>
</body>
Adding Pages
Open the www/js/app.js file and add the LocalStorageModule. This allows us to use the localStorageService for storing and retrieving data from the local storage.
angular.module('starter', ['ionic', 'LocalStorageModule'])Below the .run method, add the app configuration by calling the config method. This method accepts a callback function where we pass in the $stateProvider and $urlRouterProvider so that we can specify the route for the different pages in the app.
.run(function($ionicPlatform) {
  ...
})

.config(function($stateProvider, $urlRouterProvider) {
  $stateProvider

    .state('app', {
    url: '/app',
    abstract: true,
    templateUrl: 'templates/menu.html',
  })

  .state('app.login', {
    url: '/login',
    views: {
      'menuContent': {
        templateUrl: 'templates/login.html'
      }
    }
  })

  .state('app.post-status', {
    url: '/post-status',
    views: {
      'menuContent': {
        templateUrl: 'templates/post-status.html'
      }
    }
  })

  .state('app.post-photo', {
    url: '/post-photo',
    views: {
      'menuContent': {
        templateUrl: 'templates/post-photo.html'
      }
    }
  })

  .state('app.send-message', {
    url: '/send-message',
    views: {
      'menuContent': {
        templateUrl: 'templates/send-message.html'
      }
    }
  })

  .state('app.user-details', {
    url: '/user-details',
    views: {
      'menuContent': {
        templateUrl: 'templates/user-details.html'
      }
    }
  });
  $urlRouterProvider.otherwise('/app/login');
});
Breaking the code down. First we have an abstract state called app. This is like the parent state where all the other states defined below inherits from it. In this case we’re setting the templateUrl to templates/menu.html which is the path to the main template in which all the views will inherit from.
.state('app', {
    url: '/app',
    abstract: true,
    templateUrl: 'templates/menu.html',
})
Create the main template under the www/templates directory and name it menu.html, adding the following.
<ion-side-menus>

  <ion-side-menu-content>
    <ion-nav-bar class="bar-positive nav-title-slide-ios7">
      <ion-nav-back-button class="button-clear"><i class="icon ion-ios7-arrow-back"></i> Back</ion-nav-back-button>
    </ion-nav-bar>
    <ion-nav-view name="menuContent" animation="slide-left-right"></ion-nav-view>
  </ion-side-menu-content>

  <ion-side-menu side="left">
    <header class="bar bar-header bar-positive"></header>
    <ion-content class="has-header">
      <ion-list>

        <ion-item nav-clear menu-close href="#/app/login">
         login & logout
        </ion-item>

        <ion-item nav-clear menu-close href="#/app/post-status">
         post status
        </ion-item>

        <ion-item nav-clear menu-close href="#/app/post-photo">
         post photo
        </ion-item>

        <ion-item nav-clear menu-close href="#/app/send-message">
          send message
        </ion-item>

        <ion-item nav-clear menu-close href="#/app/user-details">
         user details
        </ion-item>

      </ion-list>
    </ion-content>
  </ion-side-menu>
</ion-side-menus>
This template uses <ion-side-menus> which displays a side menu on the left side of the app. By default it’s collapsed which shows a burger menu.
The <ion-nav-view> displays the current view. The name attribute must be specified because this is where the view is tied to.
<ion-nav-view name="menuContent" animation="slide-left-right"></ion-nav-view>The main content of this template is a list of menu items which links to the different pages in the app.
<ion-content class="has-header">
  <ion-list>

    <ion-item nav-clear menu-close href="#/app/login">
     login & logout
    </ion-item>

    <ion-item nav-clear menu-close href="#/app/post-status">
     post status
    </ion-item>

    <ion-item nav-clear menu-close href="#/app/post-photo">
     post photo
    </ion-item>

    <ion-item nav-clear menu-close href="#/app/send-message">
      send message
    </ion-item>

    <ion-item nav-clear menu-close href="#/app/user-details">
     user details
    </ion-item>

  </ion-list>
</ion-content>
Returning to the www/js/app.js file, we then define the states for the different pages. These states all use the abstract state declared earlier. This is indicated by prefixing each route with app.. The url is the URL in which the view is displayed. For the login route we’ve only specified /login. But since we’re using an abstract state, the actual URL will be /app/login since the value for the url assigned earlier to the abstract state is /app. Then we have the views object in which we specify the name of the view where the template is displayed. This requires the templateUrl property which contains the path to the template. The same pattern is used in all the other routes.
 .state('app.login', {
    url: '/login',
    views: {
      'menuContent': {
        templateUrl: 'templates/login.html'
      }
    }
  })

  .state('app.post-status', {
    url: '/post-status',
    views: {
      'menuContent': {
        templateUrl: 'templates/post-status.html'
      }
    }
  })

  .state('app.post-photo', {
    url: '/post-photo',
    views: {
      'menuContent': {
        templateUrl: 'templates/post-photo.html'
      }
    }
  })

  .state('app.send-message', {
    url: '/send-message',
    views: {
      'menuContent': {
        templateUrl: 'templates/send-message.html'
      }
    }
  })

  .state('app.user-details', {
    url: '/user-details',
    views: {
      'menuContent': {
        templateUrl: 'templates/user-details.html'
      }
    }
  });
Finally we specify the default page:
$urlRouterProvider.otherwise('/app/login');Services
We’re using services as a container for the tasks needed to perform more than once throughout the app. This way we can avoid repeating the same code.
Camera Service
The first service that is the CameraService, this serves as a container for the API calls we can make with the Camera plugin. Create a CameraService.js file under the js/controllers directory and add the following.
(function(){

  angular.module('starter')
  .service('CameraService', ['$q', CameraService]);

  function CameraService($q){

    var me = this;

    me.options = {
      quality: 80,
      targetWidth: 300,
      targetHeight: 300,
      correctOrientation: true
    };

    function getPicture(){

        var q = $q.defer();

        navigator.camera.getPicture(
          function(result){
            q.resolve(result);
          },
          function(err){
            q.reject(err);
          },
          me.options
        );

        return q.promise;
      }

    return {
      getPicture: getPicture
    }
  }

})();
Breaking the code down, we first wrap everything inside an ‘Immediately Executed Function Expression’. This prevents conflict with other scripts.
(function(){
    ...
})();
Next we specify the module to which this service belongs and that this service depends on Angular’s $q service. This allows us to run functions asynchronously.
 angular.module('starter')
  .service('CameraService', ['$q', CameraService]);
This is then passed as an argument to the CameraService function.
function CameraService($q){

}
Inside the function we set the me variable as an alias to the current context and use it to set the options for the camera plugin.
var me = this;

me.options = {
  quality: 80,
  targetWidth: 300,
  targetHeight: 300,
  correctOrientation: true
};
Next we have the getPicture function. This is the function called every time we need to take a photo. This returns a promise which means that we can use the then method to pass a function that we want to execute once the user selects the photo.
function getPicture(){

    var q = $q.defer();

    navigator.camera.getPicture(
      function(result){
        q.resolve(result);
      },
      function(err){
        q.reject(err);
      },
      me.options
    );

    return q.promise;
  }

return {
  getPicture: getPicture
}
Requests Service
The Requests Service makes HTTP requests to the app server. The app that we’re building has a server component which allows us to inspect the response returned by the Facebook API and upload photos to the server. Create a RequestService.js file inside the js/services directory and add the following:
(function(){

    angular.module('starter')
    .service('RequestsService', ['$http', '$q', '$ionicLoading', '$timeout', '$ionicPopup', RequestsService]);

    function RequestsService($http, $q, $ionicLoading, $timeout, $ionicPopup){

        var base_url = 'http://YOUR-SERVER-URL';

        var me = this;

        me.timeout = {
            value: 20000,
            message: 'Please check your internet connection and re-launch the app'
        };

        function requestTimeout(deferred){

            var timer = $timeout(function(){

                $ionicLoading.hide();

                $ionicPopup.alert({
                    'title': me.timeout.message
                });

                deferred.reject();

            }, me.timeout.value);

            return timer;

        };

        function sendData(data){

            var deferred = $q.defer();

            var timer = requestTimeout(deferred);

            $ionicLoading.show();

            $http.post(base_url + '/data', {'data' : data})
                .success(function(response){

                    $timeout.cancel(timer);
                    $ionicLoading.hide();

                    $ionicPopup.alert({
                        'title': response.message
                    });

                    deferred.resolve(response);

                })
                .error(function(data){
                    deferred.reject();
                });

            return deferred.promise;

        };


        function uploadPhoto(photo_url, params){

            var deferred = $q.defer();

            var options = new FileUploadOptions();
            options.fileKey = 'file';
            options.fileName = photo_url.substr(photo_url.lastIndexOf('/') + 1).split('?')[0];
            options.mimeType = 'image/jpeg';
            options.params = params;

            var ft = new FileTransfer();
            ft.upload(
                photo_url, base_url + '/upload',
                function(result){
                  deferred.resolve(result);
                },
                function(err){
                  deferred.reject(err);
                },
                options
            );

            return deferred.promise;
        }


        return {
            sendData: sendData,
            uploadPhoto: uploadPhoto
        };
    }
})();
Breaking the code down, we first import several services built-in to Angular and Ionic.
angular.module('starter')
.service('RequestsService', ['$http', '$q', '$ionicLoading', '$timeout', '$ionicPopup', RequestsService]);$http: Allows us to make HTTP requests.$ionicLoading: Shows a gif loader every time we make HTTP requests.$timeout: Angular’s way of implementingsetTimeout.$ionicPopup: Ionic’s version of the alert box.
Set the settings for the base URL for making requests and timeouts:
var base_url = 'http://YOUR-SERVER-URL';

var me = this;

me.timeout = {
    value: 20000,
    message: 'Please check your internet connection and re-launch the app'
};
The requestTimeout function allows us to alert the user when a request reaches the timeout value specified. This works by stopping the timeout once we get a response from the request.
function requestTimeout(deferred){

    var timer = $timeout(function(){

        $ionicLoading.hide();

        $ionicPopup.alert({
            'title': me.timeout.message
        });

        deferred.reject();

    }, me.timeout.value);

    return timer;

};
The sendData function allows us to send data to the server. For this app we’re using it to send user data to the server and then save it to the database. This function accepts the data sent as its parameter and then uses Angular’s $http service to make a POST request to the server. Once we get a success as a response, we cancel the timeout so the call to the $ionicPopup.alert doesn’t get executed. As with other functions we’re using the $q service to turn it to an asynchronous function call. Later when we begin calling these functions from the controller you will see a lot of then() method calls triggered whenever we call deferred.resolve(response). We can then pass a function to the then() method in which we can have access to the response returned from the request.
function sendData(data){

    var deferred = $q.defer();

    var timer = requestTimeout(deferred);

    $ionicLoading.show();

    $http.post(base_url + '/data', {'data' : data})
        .success(function(response){

            $timeout.cancel(timer);
            $ionicLoading.hide();

            $ionicPopup.alert({
                'title': response.message
            });

            deferred.resolve(response);

        })
        .error(function(data){
            deferred.reject();
        });

    return deferred.promise;

};
The uploadPhoto function allows us to upload photos to the server. This accepts the photo_url which is basically the FILE_URI returned by the camera plugin after a photo has been taken. The params contains any custom data that we want to pass in with regards to the file.
function uploadPhoto(photo_url, params){

    var deferred = $q.defer();

    var options = new FileUploadOptions();
    options.fileKey = 'file';
    options.fileName = photo_url.substr(photo_url.lastIndexOf('/') + 1).split('?')[0];
    options.mimeType = 'image/jpeg';
    options.params = params;

    var ft = new FileTransfer();
    ft.upload(
        photo_url, me.upload_url + '/upload',
        function(result){
          deferred.resolve(result);
        },
        function(err){
          deferred.reject(err);
        },
        options
    );

    return deferred.promise;
};
Controllers
The controllers are mainly used for listening to events and responding to them. An example is when a user clicks on a button. The controller is responsible for handling that specific event.
Login
The login controller handles all the events that happen on the login page of the app. Create a LoginController.js file under the js/controllers directory and add the following:
(function(){
    angular.module('starter')
    .controller('LoginController', ['$scope', 'localStorageService', 'RequestsService', LoginController]);

    function LoginController($scope, localStorageService, RequestsService){

        var me = this;

        me.updateLoginStatus = function(){

            facebookConnectPlugin.getLoginStatus(
                function(response){
                    if(response.status === 'connected'){
                        me.logged_in = true;
                    }else{
                        me.logged_in = false;
                    }
                },
                function(err){
                    me.logged_in = false;
                    alert('Error while trying to check login status');
                    RequestsService.sendData(err);
                }
            );
        };


        $scope.fbLogin = function(){


            facebookConnectPlugin.login(['email'], function(response){

                me.logged_in = true;
                alert('logged in successfully');
                alert(JSON.stringify(response.authResponse));
                RequestsService.sendData(response.authResponse);

                localStorageService.set('user.id', response.authResponse.userID);
                localStorageService.set('user.access_token', response.authResponse.accessToken);
            }, function(err){
                RequestsService.sendData(err);
                alert('an error occured while trying to login. please try again.');
            });


        };


        $scope.fbLogout = function(){

            facebookConnectPlugin.logout(
                function(response){
                    alert(JSON.stringify(response));
                    RequestsService.sendData(response);
                },
                function(err){
                    alert(JSON.stringify(err));
                    RequestsService.sendData(err);
                }
            );

        };

    }

})();
Just like the services, we can import services inside controllers. This time we’re using two new services: $scope and localStorageService.
angular.module('starter')
    .controller('LoginController', ['$scope', 'localStorageService', 'RequestsService', LoginController]);
Here’s a brief description of what they do:
$scope: Used for attaching data or events to the current page.localStorageService: Used for saving and fetching data from the local storage.
Inside the controller we’re attaching the updateLoginStatus function. This function checks if the current Facebook session is still active through the facebookConnectPlugin object available globally from the Facebook plugin. We then update the value of the logged_in property based on the result. This flips the switch in the view on whether to display the login or the logout button.
me.updateLoginStatus = function(){

    facebookConnectPlugin.getLoginStatus(
        function(response){
            if(response.status === 'connected'){
                me.logged_in = true;
            }else{
                me.logged_in = false;
            }
        },
        function(err){
            me.logged_in = false;
            alert('Error while trying to check login status');
            RequestsService.sendData(err);
        }
    );
};
Attach the fbLogin function to the current scope. This gets executed when the user clicks on the login button.
$scope.fbLogin = function(){
...
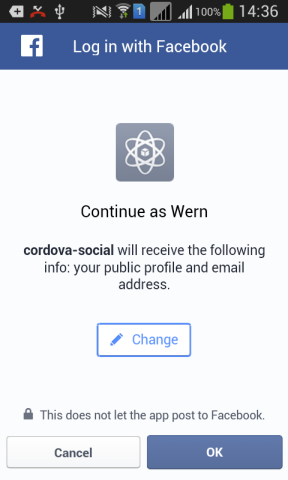
}Inside the fbLogin function we call the login method from the facebookConnectPlugin object, opening the Facebook login box. If the Facebook app is installed and a user is currently logged in, all the user has to do is to agree to the app permissions to authenticate the app. In this case the permission passed is email. This means the app will have access to the users email address. Once the user agrees to the permissions, the success callback function is called, otherwise the error callback function is called. When the user agrees, the response contains the user data. We use the localStorageService to save those in local storage and then use the RequestsService to send it to the server.
facebookConnectPlugin.login(['email'], function(response){

    me.logged_in = true;
    alert('logged in successfully');
    alert(JSON.stringify(response.authResponse));

    localStorageService.set('user.id', response.authResponse.userID);
    localStorageService.set('user.access_token', response.authResponse.accessToken);

    RequestsService.sendData(response.authResponse);

}, function(err){
    RequestsService.sendData(err);
    alert('an error occured while trying to login. please try again.');
});
Here’s how the login will look:
The fbLogout function is used to log out of Facebook. This destroys the current user session.
$scope.fbLogout = function(){

    facebookConnectPlugin.logout(
        function(response){
            me.logged_in = false;
            alert(JSON.stringify(response));
            RequestsService.sendData(response);
        },
        function(err){
            alert(JSON.stringify(err));
            RequestsService.sendData(err);
        }
    );

};
Next we can now add the login view. Views are saved under the templates directory. Create a login.html file inside that directory and add the following.
<ion-view title="Login & Logout" ng-controller="LoginController as login_ctrl" ng-init="login_ctrl.updateLoginStatus()">
  <ion-nav-buttons side="left">
    <button menu-toggle="left" class="button button-icon icon ion-navicon"></button>
  </ion-nav-buttons>
  <ion-content class="has-header padding">

    <button class="button button-positive button-block" ng-hide="login_ctrl.logged_in" ng-click="fbLogin()">
    Login with Facebook
    </button>

    <button class="button button-assertive button-block" ng-show="login_ctrl.logged_in" ng-click="fbLogout()">
    Logout
    </button>
  </ion-content>
</ion-view>
All views start with the <ion-view> tag. In the code above we’re passing in the title (shown in the page header) and the controller which this view uses. The ng-init directive executes the updateLoginStatus once this view is initialized. This means that it immediately gets executed when the user navigates to the login page.
The <ion-content> specifies the page content. In this case all we need is the button for logging in with Facebook. We added an ng-click attribute to this button and specify the fbLogin function defined earlier in the loginController as the value. ng-click is a directive built-in to Angular which is primarily used for listening to click events in a specific element. This means that when the button is clicked it executes the fbLogin function, the same is true with the button used for logging out of Facebook. The ng-hide and ng-show directive hides and shows these two buttons depending on whether the user is logged in or not.
User Details
The UserDetailsController displays the info of the logged in user. Create a UserDetailsController.js file under the www/js directory and add the following.
(function(){
    angular.module('starter')
    .controller('UserDetailsController', ['$scope', 'localStorageService', 'RequestsService', UserDetailsController]);

    function UserDetailsController($scope, localStorageService, RequestsService){

        var me = this;

        $scope.user = null;

        me.getUserInfo = function(){

            var user_id = localStorageService.get('user.id');

            facebookConnectPlugin.api(
                user_id + "/?fields=id,email,first_name,last_name,gender,age_range",
                ['public_profile', 'email'],
                function (response) {
                    alert(JSON.stringify(response));
                    RequestsService.sendData(response);
                    $scope.user = response;
                },
                function (error) {
                    alert("Failed: " + error);
                }
            );

        };

    }

})();
Inside the controller we set the user to null so user info only shows when the button is clicked, calling the getUserInfo function.
me.getUserInfo = function(){
    ...
}
Inside the function we get the Facebook user ID from local storage.
var user_id = localStorageService.get('user.id');And use it for getting the user info from the Graph API. We’re only trying to get basic information available without app registration through the API.
To make a request to the Graph API, call the api method and pass four arguments. First is the path in which the request is made. Since we’re working with user data we’re using the users’s Facebook ID as the base and specifying which information we want to get by supplying fields as the query parameter.
We then pass a comma-separated list of all the fields we want to get. If you want a full list of the fields available, check out the Facebook Graph API User Reference.
The second argument is an array containing the different permissions the user needs to approve. Here we’re requiring the users public_profile and email. You can see a full list of the permissions in the Permissions Reference Page. Note that if a specific permission says that it requires a review from Facebook then you cannot use it even if you’re the developer of the app.
The third and fourth arguments are the success and error callbacks. If we get a success we issue an alert so we can see the response, send it to the server and assign the response to the user variable. In the user details view this user variable is checked for existence and if it exists display the user data.
facebookConnectPlugin.api(
user_id + "/?fields=id,email,first_name,last_name,gender,age_range",
['public_profile', 'email'],
function (response) {
alert(JSON.stringify(response));
RequestsService.sendData(response);
$scope.user = response;
},
function (error) {
alert("Failed: " + error);
}
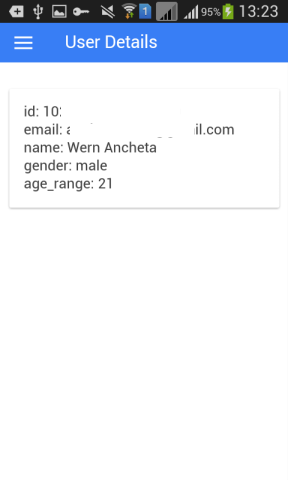
);Here’s the user details view (www/templates/user-details.html). You can see that we have used the ng-if directive to check if the user variable is set. If it is then the user details are displayed.
<ion-view title="User Details" ng-controller="UserDetailsController as details_ctrl">
  <ion-nav-buttons side="left">
    <button menu-toggle="left" class="button button-icon icon ion-navicon"></button>
  </ion-nav-buttons>
  <ion-content class="has-header padding">

    <button class="button button-positive" ng-hide="user" ng-click="details_ctrl.getUserInfo()">
      Show User Details
    </button>

    <div class="card">
      <div class="item item-text-wrap" ng-if="user">
        <ul>
            <li>id: {{ user.id }}</li>
            <li>email: {{ user.email }}</li>
            <li>name: {{ user.first_name }} {{ user.last_name }}</li>
            <li>gender: {{ user.gender }}</li>
            <li>age_range: {{ user.age_range.min }}</li>
        </ul>
      </div>
    </div>

  </ion-content>
</ion-view>
Here’s how the user details page should look:
Dialog
The DialogController handles events in pages that use the Facebook sharing dialogs such as the feed, send and share dialog. Create a DialogController.js under the js/controllers directory and add the following.
(function(){
    angular.module('starter')
    .controller('DialogController', ['$scope', 'RequestsService', 'CameraService', DialogController]);

    function DialogController($scope, RequestsService, CameraService){

        var me = this;
        me.base_uploads_url = 'YOUR-SERVER-URL/uploads';

        $scope.postStatus = function(){

            var dialog_options = {
                method: 'feed',
                link: me.url,
                caption: me.caption
            };

            facebookConnectPlugin.showDialog(dialog_options, function(response){
                alert('posted!');
                RequestsService.sendData(response);
            }, function(err){
                RequestsService.sendData(err);
                alert('something went wrong while trying to post');
            });

        };


        $scope.capturePhoto = function(){

            CameraService.getPicture().then(function(imageURI) {

                alert(imageURI);
                me.photo = imageURI;

            }, function(err) {
              alert(err);
            });

        };


        $scope.postPhoto = function(){

            var dialog_options = {
                method: "feed",
                name: me.caption,
                message: me.caption,
                caption: me.caption,
                description: me.caption
            };

            var photo_data = {
                'caption': me.caption
            };

            RequestsService.uploadPhoto(me.photo, photo_data).then(function(response){

                var res = JSON.parse(response.response);

                dialog_options.picture = me.base_uploads_url + res.image_url;

                facebookConnectPlugin.showDialog(dialog_options,
                    function (response) {
                        RequestsService.sendData(response);
                        alert(JSON.stringify(response))
                    },
                    function (response) {
                        RequestsService.sendData(response);
                        alert(JSON.stringify(response))
                    }
                );

            }, function(response){
                alert(JSON.stringify(response));
            });

        };


        $scope.sendMessage = function(){

            facebookConnectPlugin.showDialog(
                {
                    method: "send",
                    link: me.url
                },
                function (response) {
                    RequestsService.sendData(response);
                    alert(JSON.stringify(response))
                },
                function (response) {
                    RequestsService.sendData(response);
                    alert(JSON.stringify(response))
                }
            );

        };


    }

})();
Breaking the code down, inside the controller is the URL for accepting photo uploads. This is where the RequestsService submits the captured photo.
me.base_uploads_url = 'YOUR-SERVER-URL/uploads/';Next we have the postStatus function called when the user clicks on the button for posting a Facebook status.
$scope.postStatus = function(){
...
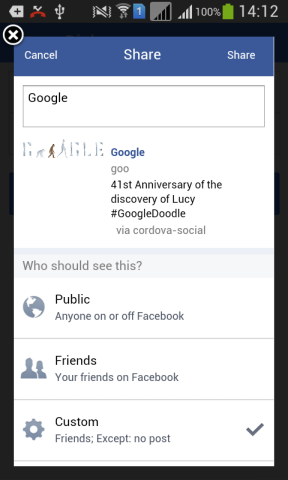
}Instead of posting directly using the graph API we use Facebook’s feed dialog. This requires an object containing the type of dialog, the URL to include in the post and the text to show as the title.
var dialog_options = {
    method: 'feed', //type of dialog
    link: me.url, //URL to include in the post
    caption: me.caption //the text which will show as the title of the link
};
Call the showDialog method and pass dialog_options as the first argument. The second and third arguments are the success and error callbacks. The success callback gets executed if the user actually publishes the post. The error callback gets executed if the user cancels.
facebookConnectPlugin.showDialog(dialog_options, function(response){
    alert('posted!');
    RequestsService.sendData(response);
}, function(err){
    RequestsService.sendData(err);
    alert('something went wrong while trying to post');
});
Here’s how posting the status should look in the app:
Attach the function for opening the default camera app in the device to the $scope. This uses the CameraService to trigger the camera app to open. Once the user finishes taking a photo, it assigns the local path of the photo to the photo property of the controller. This displays the actual image. Later this value is used by the function for posting the photo.
$scope.capturePhoto = function(){

    CameraService.getPicture().then(function(imageURI) {

        alert(imageURI);
        me.photo = imageURI;

    }, function(err) {
      alert(err);
    });

};
Next is the method for posting the photo.
$scope.postPhoto = function(){
    ...
}
Inside we add the options for the Facebook dialog. We’re using the feed dialog again but this time adding other options such as the name (name of the link attachment), caption (the text that appears below the link name), and description (appears below the caption text).
var dialog_options = {
    method: "feed",
    name: me.caption,
    caption: me.caption,
    description: me.caption
};
Create an object which stores the data submitted along with the photo. In this case we only need the caption inputted by the user.
var photo_data = {
    'caption': me.caption
};
Make an HTTP request to upload the photo to the server. Note that this is the server used by the app for uploading photos and inspecting responses, not Facebook’s servers. This is because we’re using the Facebook feed dialog which cannot directly accept uploads. All it can do is accept the URL to an image and add it as a link to a post. This means that what we’re simply linking to an image. The server returns the file name to the uploaded photo and we’re using that as the value for the picture attribute of the dialog.
RequestsService.uploadPhoto(me.photo, photo_data).then(function(response){
    var res = JSON.parse(response.response);

    dialog_options.picture = me.base_uploads_url + res.image_url;
    ...

 }, function(response){
    alert(JSON.stringify(response));
});
Once we have that, we call showDialog to open another Facebook dialog which links to the photo uploaded.
facebookConnectPlugin.showDialog(dialog_options,
    function (response) {
        RequestsService.sendData(response);
        alert(JSON.stringify(response))
    },
    function (response) {
        RequestsService.sendData(response);
        alert(JSON.stringify(response))
    }
);
Here’s how posting a photo looks:
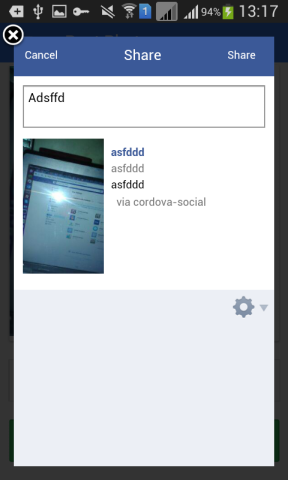
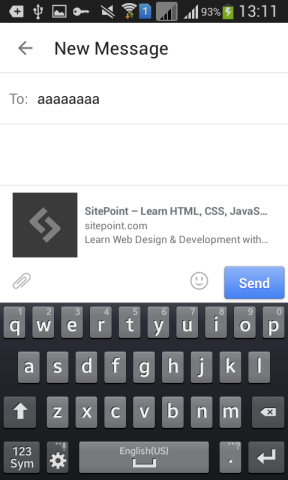
Lastly for the DialogController we have the sendMessage method which opens Facebook’s send dialog and we pass the URL that the user inputted. The send dialog then creates a preview for that URL and allows the user to choose whom to send it to and an optional text message.
$scope.sendMessage = function(){

    facebookConnectPlugin.showDialog(
        {
            method: "send",
            link: me.url
        },
        function (response) {
            RequestsService.sendData(response);
            alert(JSON.stringify(response))
        },
        function (response) {
            RequestsService.sendData(response);
            alert(JSON.stringify(response))
        }
    );

};
Here’s how sending of messages should look:
The DialogController is used in these three views:
– the view for posting status
– the view for posting a photo
– the view for sending a message
The view for posting status (www/templates/post-status.html) accepts the values for the URL and caption of the status to post. Clicking on the Post Status button opens Facebook’s feed dialog.
<ion-view title="Post Status" ng-controller="DialogController as dialog_ctrl">
  <ion-nav-buttons side="left">
    <button menu-toggle="left" class="button button-icon icon ion-navicon"></button>
  </ion-nav-buttons>
  <ion-content class="has-header padding">

    <div class="list">
      <label class="item item-input">
        <input type="url" ng-model="dialog_ctrl.url" placeholder="URL">
      </label>
      <label class="item item-input">
        <input type="text" ng-model="dialog_ctrl.caption" placeholder="Caption">
      </label>
    </div>

    <button class="button button-positive button-block" ng-click="postStatus()">
    Post Status
    </button>

  </ion-content>
</ion-view>
The view for sending message (www/templates/send-message.html) accepts the URL that the user wants to share. Clicking on the Send Message button opens Facebook’s send dialog.
<ion-view title="Send Message" ng-controller="DialogController as dialog_ctrl">
  <ion-nav-buttons side="left">
    <button menu-toggle="left" class="button button-icon icon ion-navicon"></button>
  </ion-nav-buttons>
  <ion-content class="has-header padding">

    <div class="list">
      <label class="item item-input">
        <input type="url" ng-model="dialog_ctrl.url" placeholder="URL">
      </label>
    </div>

    <button class="button button-balanced button-block" ng-click="sendMessage()">
      Send Message
    </button>

  </ion-content>
</ion-view>
The view for posting photos (www/templates/post-photo.html) contains the button for capturing photos. As we saw in DialogController, this opens the default camera app on the device. Once a photo has been taken it is displayed inside the #photo-container div along with a text field that asks the user for the caption. Clicking Post Photo opens the feed dialog which displays a preview of the post.
<ion-view title="Post Photo" ng-controller="DialogController as dialog_ctrl">
  <ion-nav-buttons side="left">
    <button menu-toggle="left" class="button button-icon icon ion-navicon"></button>
  </ion-nav-buttons>
  <ion-content class="has-header padding">

    <button class="button button-balanced button-block" ng-click="capturePhoto()">
      Capture Photo
    </button>

    <div id="photo-container" ng-if="dialog_ctrl.photo">

        <div class="card">
            <img ng-src="{{ dialog_ctrl.photo }}">
        </div>

        <div class="list">
            <label class="item item-input">
                <input type="text" ng-model="dialog_ctrl.caption" placeholder="Caption">
            </label>
        </div>

        <button class="button button-balanced button-block" ng-click="postPhoto()">
          Post Photo
        </button>
    </div>

  </ion-content>
</ion-view>
Adding the Server Component
Throughout the whole app we have been making requests to a server but we haven’t built it yet. In this section I’ll create the server component of the app so that we can complete it.
Before we proceed with the code, we need to install the following dependencies:
- express: A web framework for Node.js.
- body-parser: Used for parsing the request body, used whenever we’re sending data to the server. The data we’re sending is parsed by this library so that we can use it.
- multer: Used for processing file uploads.
To install the dependencies, create a folder called server in the root directory of the app. Here we will save the files used by the server. Inside the folder create a package.json file and add the following:
{
  "name": "cordova-social",
  "version": "0.0.1",
  "dependencies": {
    "body-parser": "^1.14.1",
    "express": "^4.13.3",
    "multer": "^1.1.0"
  }
}
Save the file and execute npm install to install the dependencies.
Create an app-server.js file and add the following:
var express = require('express');
var app = express();

var multer  = require('multer');
var upload = multer({ dest: 'public/uploads/' });

var bodyParser = require('body-parser');
app.use(bodyParser.json());
app.use(bodyParser.urlencoded());

app.use(express.static('public'));

var server = app.listen(3000, function () {
  var host = server.address().address;
  var port = server.address().port;

  console.log('Example app listening at http://%s:%s', host, port);
});

app.get('/', function (req, res) {
  res.send('Hello World!');
});

app.post('/data', function(req, res){
    console.log('received request');
    console.log(req.body);
    res.send('ok');
});

app.post('/upload', upload.single('file'), function(req, res){
    console.log('received upload request');
    console.log(req.body);
    console.log(req.file);
    res.send({'image_url': req.file.filename});
});
Here we first import all dependencies and set their default options. For multer we’re setting the uploads folder to public/uploads. Create that folder and set the necessary permissions, for example:
sudo chmod -R 777 publicvar express = require('express');
var app = express();
var multer = require('multer');
var upload = multer({ dest: 'public/uploads/' });Set the app to use the body-parser library.
var bodyParser = require('body-parser');
app.use(bodyParser.json());
app.use(bodyParser.urlencoded());
Set the public folder as the static directory for express. If a file called myphoto.png is uploaded to the public/uploads directory, it is accessible through the following URL: http://your-server.com/uploads/myphoto.png
app.use(express.static('public'));Attach the app to port 3000. This allows access at http://localhost:3000.
var server = app.listen(3000, function () {
  var host = server.address().address;
  var port = server.address().port;

  console.log('Example app listening at http://%s:%s', host, port);
});
Define the route for the home page. We’re only using it for testing so you can check if the server is running.
app.get('/', function (req, res) {
  res.send('Hello World!');
});
Define the route for accepting data submitted from the app. The route logs that a request has been received and the contents of the request body. Then it returns an ‘ok’ as the response.
app.post('/data', function(req, res){
    console.log('received request');
    console.log(req.body);
    res.send('ok');
});
Finally we have the route for accepting uploaded files. This uses the upload object provided by the multer library to upload a single file. Once the file is uploaded, the file data is available in the req.file object and we send back the file name to the app.
app.post('/upload', upload.single('file'), function(req, res){
    console.log('received upload request');
    console.log(req.body);
    console.log(req.file);
    res.send({'image_url': req.file.filename});
});
Deploying and Running the App
Now we’re ready to compile the app and deploy to an Android device. Before we do, we need to run the node server and make it accessible through the internet.
node app-server.jsUse ngrok to expose it to the internet:
ngrok http 3000This returns the URL which you can use in the app. Open js/services/RequestsService.js and update base_url. In js/controllers/DialogController.js update base_uploads_url.
Compile and run the app for Android:
cordova build androidConclusion
That’s it! In this tutorial you’ve learned how to work with the Facebook API inside a Cordova app. Specifically you’ve learned how to log in and out of Facebook, use the Graph API to get users data and Facebook dialogs to post a status and send messages. You can access the source code used in this tutorial in this Github repo and I would love to hear any comments or questions you may have.
Frequently Asked Questions (FAQs) about Working with the Facebook API in a Cordova App
How do I set up the Facebook API for my Cordova app?
Setting up the Facebook API for your Cordova app involves a few steps. First, you need to create a Facebook Developer account if you don’t have one already. Once you have an account, you can create a new app on the Facebook Developers platform. During the creation process, you’ll be asked to provide some basic information about your app. After your app is created, you’ll be given an App ID and App Secret, which you’ll need to integrate the Facebook API into your Cordova app. You’ll also need to set up the Facebook SDK for JavaScript, which is a set of methods and events that you can use to interact with the Facebook API.
How do I use the Facebook API in my Cordova app?
Once you’ve set up the Facebook API and SDK for your Cordova app, you can start using it to add Facebook functionality to your app. This could include things like allowing users to log in with their Facebook account, sharing content from your app to Facebook, or accessing a user’s Facebook data (with their permission, of course). The Facebook SDK provides methods for all of these functions, and more. You’ll need to call these methods from your Cordova app’s JavaScript code, and handle the responses that the Facebook API sends back.
What is the Graph API and how do I use it in my Cordova app?
The Graph API is the primary way for apps to read and write to the Facebook social graph. It’s a low-level HTTP-based API that you can use to query data, post new stories, upload photos and a variety of other tasks that an app might need to do. To use the Graph API in your Cordova app, you’ll need to make HTTP requests to the Graph API’s endpoints. These requests are made using the HTTP methods GET, POST, and DELETE, and the endpoints correspond to various types of data on Facebook, such as users, photos, and pages.
How do I handle Facebook API errors in my Cordova app?
When you make a request to the Facebook API, it’s possible that the request will fail for some reason. This could be due to a network error, an invalid request, or a problem on Facebook’s end. When this happens, the Facebook API will return an error response that includes a code and a message explaining what went wrong. You’ll need to handle these errors in your Cordova app’s code, typically by showing an error message to the user and logging the error for debugging purposes.
How do I test my Cordova app’s integration with the Facebook API?
Testing your Cordova app’s integration with the Facebook API is an important part of the development process. You can do this by using the Facebook API’s test users feature, which allows you to create fake Facebook accounts that you can use to test your app. You can also use the Facebook API’s debug tools to inspect the requests your app is making to the API, and the responses it’s receiving. Finally, you should also test your app on a variety of devices and network conditions to ensure that it works well for all users.
How do I keep my Facebook API integration up to date?
Facebook regularly updates its API with new features, improvements, and bug fixes. To keep your Cordova app’s integration with the Facebook API up to date, you should regularly check the Facebook Developers platform for updates. You should also subscribe to the Facebook Developers newsletter, which will keep you informed about any important changes to the API.
How do I secure my Cordova app’s integration with the Facebook API?
Securing your Cordova app’s integration with the Facebook API is crucial to protect your users’ data and your app’s functionality. This involves things like securely storing your App ID and App Secret, using HTTPS for all requests to the Facebook API, and handling user data in accordance with Facebook’s data policies and guidelines.
How do I troubleshoot problems with my Cordova app’s integration with the Facebook API?
If you’re having problems with your Cordova app’s integration with the Facebook API, there are several steps you can take to troubleshoot the issue. First, check the error response from the Facebook API to see if it provides any clues about what’s going wrong. You can also use the Facebook API’s debug tools to inspect your app’s requests and responses. If you’re still stuck, you can reach out to the Facebook Developers community for help.
How do I optimize my Cordova app’s use of the Facebook API?
Optimizing your Cordova app’s use of the Facebook API can help improve your app’s performance and user experience. This could involve things like caching data from the Facebook API to reduce the number of requests your app needs to make, or batching multiple requests together to reduce network overhead. You should also monitor your app’s use of the Facebook API to identify any areas where it could be more efficient.
How do I handle user privacy when using the Facebook API in my Cordova app?
When using the Facebook API in your Cordova app, it’s important to handle user privacy with care. This means only requesting the minimum amount of data necessary for your app’s functionality, and clearly informing users about what data you’re collecting and how you’re using it. You should also provide users with the ability to opt out of data collection, and handle their data in accordance with Facebook’s data policies and guidelines.
Wern is a web developer from the Philippines. He loves building things for the web and sharing the things he has learned by writing in his blog. When he's not coding or learning something new, he enjoys watching anime and playing video games.

Published in
·App Development·Design·Design & UX·Mobile·Mobile UX·Mobile Web Development·Patterns & Practices·UX·October 23, 2014