Composer is a fantastic tool that is widely used in modern PHP development to handle your project dependencies. It helps to install and update all related packages or dependencies of your project. Although it is not primarily used in WordPress core yet, as developers we can still take advantage of Composer to bootstrap our WordPress applications.
For references and documentation on using Composer alongside WordPress, I cannot recommend highly enough Rarst’s Composer site. It is a great resource to learn how Composer can be integrated to WordPress in many different ways. Recently, there has also been a few projects that aim to simplify the WordPress setup using Composer such as WP Starter and WordPlate.
According to the official WordPlate website, WordPlate is described as a:
WordPress framework built with Laravel and Symfony components. With a familiar setup for every Laravel enthusiast. Following the don’t repeat yourself principle.

WordPlate is a WordPress boilerplate that takes the idea of managing your WordPress site completely with Composer, and eases up various parts of the development with popular packages from Packagist such as PHP dotenv and Symfony components. The rest of the article will focus on WordPlate, specifically the latest release version of 3.1.0 at the time of writing.
This tutorial assumes that you have a working web server, either locally or remotely with SSH access to use the command line. You are also expected to be comfortable working on command line to follow the tutorial.
Prerequisites
WordPlate requires at least PHP version 5.5.9 with mbstring extension, so for older PHP installation, an update is required. To check on your installed PHP version, simply run the command:
php -vand it will show whatever version of PHP you currently have.
There are also few other things that need to be installed beforehand which are:
- Composer
- Node.js and gulp.js
Installing Composer
To install Composer on Linux or Unix system, simply type the command
curl -sS https://getcomposer.org/installer | php
mv composer.phar /usr/local/bin/composer
The second line is optional, so that you can simply reference composer in your terminal instead of php composer.phar when using Composer. For other systems, please refer to Composer documentation.
To verify you have installed Composer correctly, type in this command in your terminal, and you should be able to see the installed version of Composer with all available commands.
composer -vInstalling Node.js and gulp.js
Node.js can be downloaded, or installed from the source code depending on your operating system by visiting the Node.js download page while gulp.js can be installed by simply running this command:
npm install --global gulpnpm should be available to use once you have Node.js successfully installed. You can find more info on installing gulp.js on their documentation page.
Now, typing in node -v should return the correct version of installed Node.js if everything goes well.
Installation
Now that you have got all the required dependencies out of your way, let’s take a look at actually installing and using the WordPlate itself. Type in the command:
composer create-project wordplate/wordplateThis will tell Composer to download WordPlate into the current directory. You should see the output similar to this:
Installing wordplate/wordplate (3.1.0)
    - Installing wordplate/wordplate (3.1.0)
    Downloading: 100%

  Created project in /srv/www/wordplate
  > php -r "copy('.env.example', '.env');"
  Loading composer repositories with package information
  Installing dependencies (including require-dev)
    - Installing johnpbloch/wordpress-core-installer (0.2.1)
      Loading from cache

    - Installing composer/installers (v1.0.22)
      Loading from cache

    - Installing vlucas/phpdotenv (v2.2.0)
      Loading from cache

    - Installing symfony/polyfill-mbstring (v1.0.1)
      Downloading: 100%

    - Installing symfony/var-dumper (v3.0.1)
      Downloading: 100%

    - Installing symfony/finder (v3.0.1)
      Downloading: 100%

    - Installing psr/log (1.0.0)
      Loading from cache

    - Installing symfony/debug (v3.0.1)
      Downloading: 100%

    - Installing symfony/console (v3.0.1)
      Downloading: 100%

    - Installing johnpbloch/wordpress (4.4.1)
      Downloading: 100%

    - Installing doctrine/inflector (v1.1.0)
      Loading from cache

    - Installing illuminate/contracts (v5.2.7)
      Downloading: 100%

    - Installing illuminate/support (v5.2.7)
      Downloading: 100%

    - Installing illuminate/container (v5.2.7)
      Downloading: 100%

    - Installing illuminate/filesystem (v5.2.7)
      Downloading: 100%

    - Installing illuminate/config (v5.2.7)
      Downloading: 100%

    - Installing filp/whoops (2.0.0)
      Downloading: 100%

    - Installing wordplate/framework (3.1.0)
      Downloading: 100%

    - Installing roots/soil (3.6.2)
      Loading from cache

  symfony/var-dumper suggests installing ext-symfony_debug ()
  symfony/console suggests installing symfony/event-dispatcher ()
  symfony/console suggests installing symfony/process ()
  illuminate/support suggests installing jeremeamia/superclosure (Required to be able to serialize closures (~2.2).)
  illuminate/support suggests installing paragonie/random_compat (Provides a compatible interface like PHP7's random_bytes() in PHP 5 projects (~1.1).)
  illuminate/support suggests installing symfony/polyfill-php56 (Required to use the hash_equals function on PHP 5.5 (~1.0).)
  illuminate/support suggests installing symfony/process (Required to use the composer class (2.8.*|3.0.*).)
  illuminate/filesystem suggests installing league/flysystem (Required to use the Flysystem local and FTP drivers (~1.0).)
  illuminate/filesystem suggests installing league/flysystem-aws-s3-v3 (Required to use the Flysystem S3 driver (~1.0).)
  illuminate/filesystem suggests installing league/flysystem-rackspace (Required to use the Flysystem Rackspace driver (~1.0).)
  filp/whoops suggests installing whoops/soap (Formats errors as SOAP responses)
  Writing lock file
  Generating autoload files
  > php plate salts:generate
  WordPress security salts set successfully.
With a single command, various tasks have been done including downloading the latest version of WordPress, downloading all required packages such as Soil, PHP dotenv and a bunch of Symfony and Laravel packages.
Since WordPlate uses Elixir for frontend assets compilation, all dependencies in the package.json need to be installed as well. Run this command in the terminal, within the directory of WordPlate, to tell npm to install all dependencies.
cd wordplate
npm install
When that is done, you should have all required dependencies, both from Composer and Node.js downloaded into the vendor and node_modules directories respectively.
Directory Structure
It is a good idea to familiarise yourself with the directory structure within WordPlate since you won’t find the default wp-content, wp-admin, wp-includes and all the other related wp- file in the root directory of your project.
If your installation works correctly, this is what you should be seeing inside the main working directory.
- bootstrap/
- config/
- node_modules/
- public/
- resources/
- vendor/
- .editorconfig
- .env
- .env.example
- .gitignore
- composer.json
- composer.lock
- gulpfile.babel.js
- LICENSE
- package.json
- plate
- README.md
Let’s go through each folders and files, and see how each of them is related to WordPlate.
- bootstrap – Contains
autoload.phpthat does the autoloading of Composer package, as well as instantiating the WordPlate app. - config – Contains several files that affect how the WordPress site works, which will be discussed more in next section.
- node_modules – Automatically created directory by npm that contains all Node.js dependencies.
- public – The actual site, which contains files that you would expect from a normal installation of WordPress, with a slight tweak due to Composer usage. Themes defined in
composer.jsonwill be installed topublic/themes/directory, and plugins will go intopublic/pluginsdirectory as per the configuration incomposer.json. WordPress is contained in a separate directory ofpublic/wordpress. - resources – Contains all the scripts, styles and images that will be processed by Elixir into a specified output folder, usually the theme assets folder.
- vendor – Automatically created directory by Composer, that stores all dependencies defined in
composer.json. - .editorconfig – Standard editor config file that can be loaded into your favourite text editor. Learn more at editorconfig.org.
- .env – Used by
phpdotenvto store all general site configuration. Here you can define the WordPress database access, mailer settings and salt keys. - .env.example – Provide a sample
.envof expected configurations in case we need to create another.envfile based on a different environment. - .gitignore – Standard
.gitignorefile. By default, it ignoresnode_modules,vendorand few other files that have sensitive information like.envfile. Note that the public plugin, theme and WordPress folder are also excluded from being tracked by Git since they are all managed via Composer. - composer.json – Standard
composer.jsonwith a few settings adapted to WordPress configuration. All themes and plugins should be defined here in order to be installed. - composer.lock – Used internally by Composer to keep track of the dependencies.
- gulpfile.babel.js – Provides configuration for Elixir to manage the assets compilation inside the
resourcesfolder. - LICENSE – A copy of MIT license.
- package.json – Node.js dependencies are defined here, mostly gulp related packages that are used by Elixir.
- plate – Provide basic command to manage WordPlate via CLI.
- README.md – Project README file.
Configuration
At this point, you will have WordPress and all other dependencies downloaded, but the WordPress site is not installed yet. Before configuring it, we will need to:
- Point the document root of your http server (nginx, apache or others) to the WordPlate public folder.
- Create a database for WordPress to use with user that has privilege to said database.
Once you’ve done both, change the database access appropriately located in the .env file. You wouldn’t need to touch the wp-config.php file since it will all be managed inside this single file instead. You can then proceed to the usual process of WordPress installation by selecting the preferred language, and few other site details in the installation wizard.
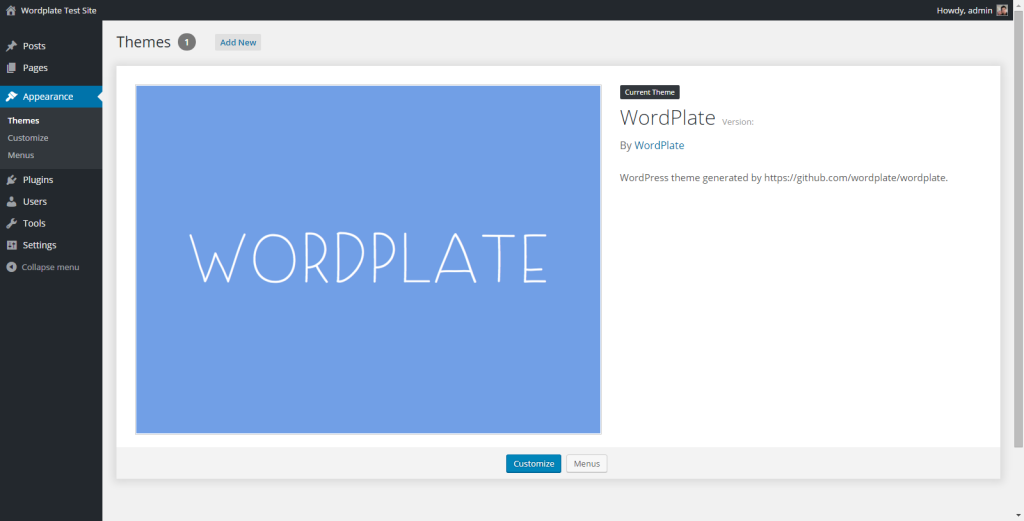
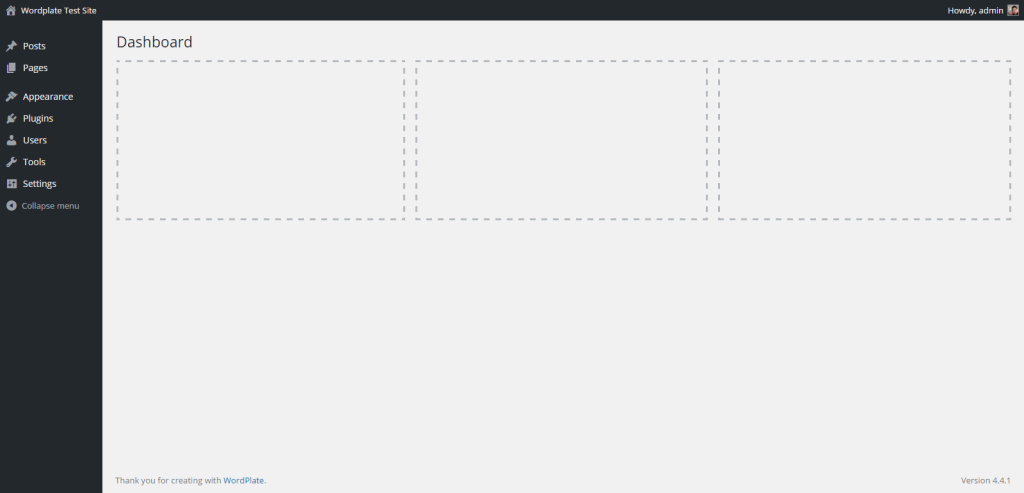
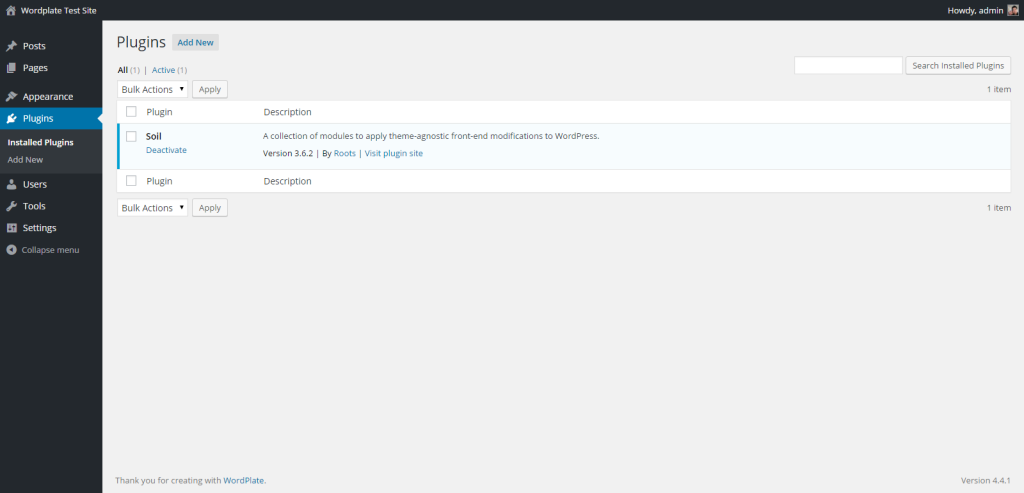
Upon logging in into the WordPress dashboard, you will notice that the dashboard has been stripped down to bare essentials.
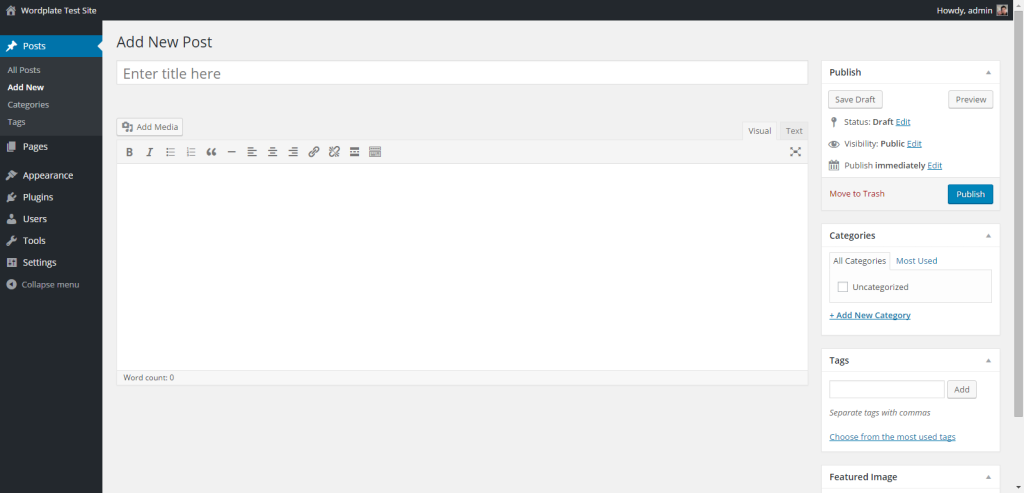
Here are some screenshots of what you’re supposed to see in WordPress dashboard out of the box.
Theme page:
Dashboard:
Installed plugins:
Add new post:
Configuration via .env File
.env file located in the root directory provides a site-wide configuration specific to your installation. As you saw before, this is the place where we can put in the database access details. The WordPress salts should also have been configured for you and stored. Things that can be configured inside the .env file are not limited to what is stated in the .env.example, as you can always introduce your own configuration key inside it.
I will not go into detail about how phpdotenv works, but essentially, you can access the configuration settings via env function, or the $_ENV and $_SERVER superglobals. There are a few examples in the wp-config.php file on how the configuration is loaded.
Extra Configuration Using the config Folder
There are 10 files located inside the config folder that determines how your site works. Each of them already contains helpful comments as to what they control, but it is a good idea to go through them one by one for clarification.
dashboard.php– Controls which widgets are enabled on the dashboard. Comment the specific line to enable the widget (disabled by default).editor.php– Controls how the new post screen looks. You can customize the TinyMCE toolbar, media compression settings as well as which metaboxes that should appear on this screen.footer.php– Controls the text at the footer.login.php– Can be used to change the logo on login page, as well as error message on failed login.mail.php– Configures how WordPress sends out your mail, by default it is configured to send all mail via mailtrap.menus.php– Controls both the admin sidebar and admin menu bar links, as well as disabling Help and Screen Options tab by default. Comment to re-enable preferred links.options.php– Only controls one option for now, which is permalink structure of the site.plugins.php– Set auto activation of plugin when installed by default, and can be changed accordingly.themes.php– Usually the main file that you will need to configure. Controls the site description, timezone and other useful settings.widgets.php– Contains list of built-in widgets that are disabled by default by WordPlate. Comment specific line to re-enable the widget.
All files in config directory are well documented, and should be sufficent to understand how it works.
Plugins and Themes
By default, WordPlate requires roots/soil package that is used in the default WordPlate theme for various frontend cleanup tasks. Other than that, you are free to install any other plugin as usual, via Composer since WordPlate already configures WordPress Packagist for you.
For the uninitiated, WordPress Packagist is a mirror for the official plugins and themes directory, with the difference being that all plugins and themes from WordPress Packagist contain composer.json file which means, all of them are available to be installed normally via Composer.
Managing plugins and themes installations and updates via Composer means that the backend administration for managing themes and plugins won’t be used anymore.
Installing Plugins and Themes
All you need to do is to define your desired plugins/themes to be installed inside the require section of the composer.json. There is already an example of roots/soil being included which is installed by default.
For example, to install Yoast WordPress SEO plugin, simply append the require section with the name of plugin and specific version to install.
...
"require": {
    "php": "^5.5.9 || ^7.0",
    "wordplate/framework": "3.1.*",
    "roots/soil": "^3.6",
    "wpackagist-plugin/wordpress-seo": "3.0.7" //new addition
}
...
Note that composer.json needs to be a valid json, so the comment in the example above is only to illustrate the change that needs to be done. Then, in your terminal, simply run composer update and Composer will fetch the plugin for you.
The same concept is applied for installing and updating themes. For example, to install the latest version of Twenty Sixteen, add this line into your require section of composer.json and run composer update again.
...
"require": {
    "php": "^5.5.9 || ^7.0",
    "wordplate/framework": "3.1.*",
    "roots/soil": "^3.6",
    "wpackagist-plugin/wordpress-seo": "3.0.7",
    "wpackagist-theme/twentysixteen": "1.1" //add new theme
}
...
WordPlate Default Theme
In addition to that, WordPlate also ships with a custom themes. There is nothing much out of the box, with no styling at all. It is because the theme serves a purpose as a starting point that you can use to develop your theme from, with nice defaults. It also demonstrates the use of roots/soil package inside the theme’s functions.php file.
Plates CLI
Plates CLI offers another way to manage some aspects of your site via command line. At the time of writing, it is quite limited but surely the list of available commands will grow in the future.
Here are three commands available to be used.
php plate list– Lists all available commands, and few other options also come with it.php plate help <command-name– Displays helpful information for a given command.php salts:generate– Generates WordPress security salt keys which are defined inside the.envfile.
Conclusion
Composer is a useful tool that has been adopted by developers for many years now to develop modern PHP applications. Although it is not supported natively by WordPress core yet, there is no reason to not start using it as it offers a powerful development workflow with thousand of packages available to be used alongside WordPress itself.
Integrating Composer with WordPress requires a bit of work, but WordPlate has already provided a nice starting point without too much hassle to get you started.
Frequently Asked Questions (FAQs) about WordPlate
What Makes WordPlate Different from Other WordPress Frameworks?
WordPlate is a modern WordPress framework that simplifies the process of creating custom WordPress themes. Unlike traditional WordPress frameworks, WordPlate is built on top of Laravel’s Illuminate components, which means it offers a more streamlined, developer-friendly experience. It also integrates with Advanced Custom Fields (ACF), a powerful tool for building custom fields, providing more flexibility and control over your WordPress site’s content.
How Do I Install WordPlate?
Installing WordPlate is straightforward. You need to have Composer installed on your system. Once you have Composer, you can create a new WordPlate project by running the command composer create-project wordplate/wordplate. After the installation, you can configure your environment variables in the .env file located in the root directory of your project.
Can I Use WordPlate with Existing WordPress Themes?
WordPlate is designed to help you build custom WordPress themes from scratch. Therefore, it doesn’t support existing WordPress themes. However, you can use the concepts and tools provided by WordPlate to enhance your existing themes or to create new, custom themes.
How Do I Update WordPlate?
Updating WordPlate is as simple as running a Composer update command. Just navigate to your WordPlate project directory in your terminal and run composer update. This will update WordPlate and all its dependencies to their latest versions.
How Can I Add Custom Post Types in WordPlate?
WordPlate supports custom post types through its Extended WordPress functions. You can register a custom post type by using the register_extended_post_type() function. This function accepts two parameters: the post type name and an array of arguments to customize the post type.
Does WordPlate Support Multisite?
Yes, WordPlate does support multisite installations. You can enable multisite by setting the WP_ALLOW_MULTISITE constant to true in your .env file. Once multisite is enabled, you can create and manage multiple WordPress sites from a single WordPlate installation.
How Can I Use Advanced Custom Fields with WordPlate?
WordPlate integrates seamlessly with Advanced Custom Fields. You can use the acf_add_local_field_group() function to create custom field groups and fields. You can then use the get_field() function to retrieve and display the values of your custom fields in your templates.
Is WordPlate Secure?
WordPlate is built with security in mind. It uses environment variables to store sensitive information, such as database credentials, keeping them out of your codebase. It also comes with built-in CSRF protection, and it uses Laravel’s Illuminate components, which are designed with security best practices in mind.
Can I Use WordPlate for E-commerce Websites?
Yes, you can use WordPlate to build e-commerce websites. WordPlate is compatible with WooCommerce, the most popular e-commerce plugin for WordPress. You can create custom themes for your WooCommerce store using WordPlate’s developer-friendly tools and features.
How Can I Contribute to WordPlate?
WordPlate is an open-source project, and contributions are welcome. You can contribute by reporting bugs, suggesting new features, improving documentation, or submitting pull requests. To get started, you can check out the project on GitHub and read the contributing guidelines.
 Firdaus Zahari
Firdaus Zahari is a web developer who comes all the way from Malaysia. His passion revolves around (but is not limited to) WordPress and front-end development.