Not long after I wrote a guide on using Unity to build Google Cardboard virtual reality experiences, Google updated their SDK to version 0.6 and changed a few things. Most of these changes weren’t too drastic, however there was one rather large change that caused a bit of confusion. The reticle.
What is a Reticle?
It is a rather absurd sounding word that is a synonym for an equally absurd sounding word — a “graticule”. Basically, in our situation it is another way of describing a more advanced form of crosshair or target. It is a series of lines that mark out where our VR camera is pointing. In the Google Cardboard SDK, it is a circle by default, that grows whenever it has a new object in its sights and shrinks back down when it does not see an object in its path.
Reticles in the Old Cardboard SDK (v0.5.2 and Below)
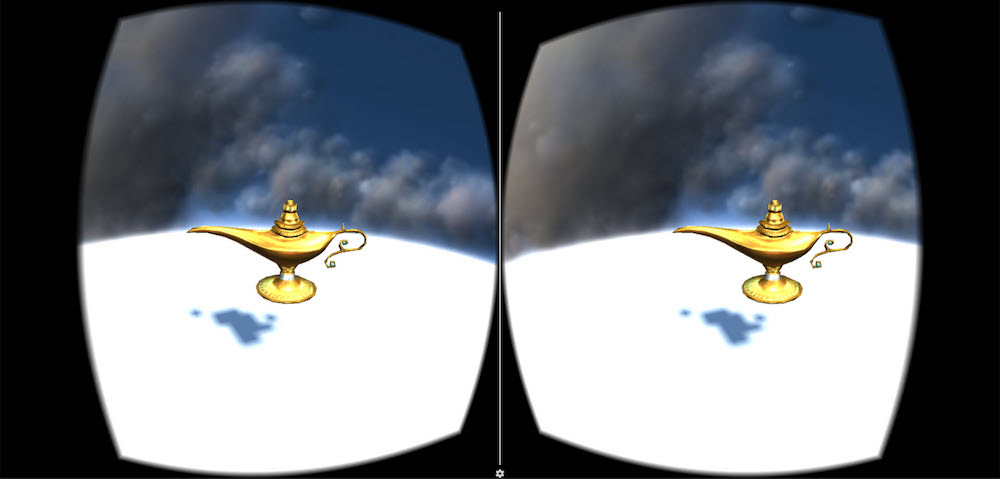
In our previous example within the Building a Google Cardboard VR App in Unity article, we used a target image that looked like so:
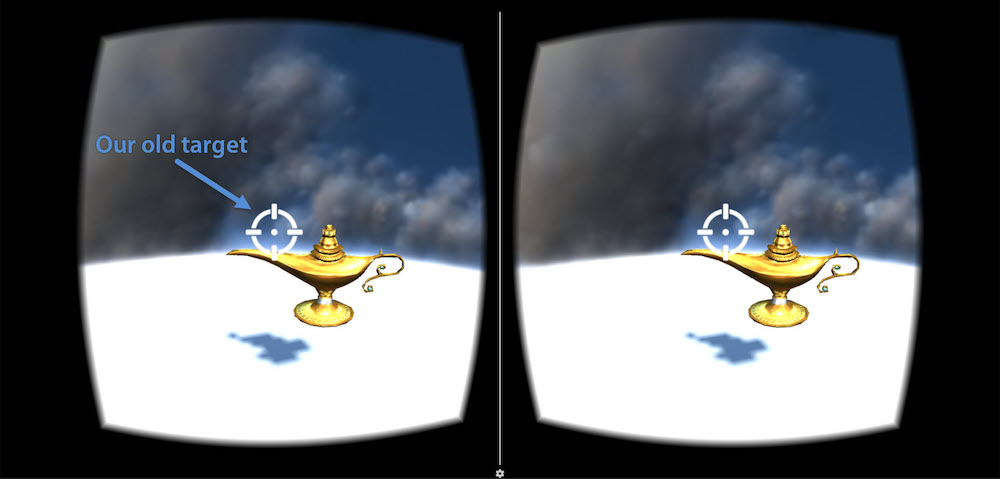
This was basically an image file that appeared whenever you hovered over a clickable object. We could have it represent anything we wanted, so a crosshair made sense. However, Google have changed their approach to one which does not use images any longer! After quite a bit of digging, I couldn’t find a nice and simple way to bring in images once more, however there are a variety of customizations you can do to the Google Cardboard SDK’s new reticle concept that should serve the same purpose.
Updating the Google Cardboard SDK
If you are working with an existing project that uses the old SDK, like the demo built in our last article, here’s a quick guide to upgrading your app.
To start with, you will need to download the latest SDK from the Cardboard SDK for Unity GitHub repo.
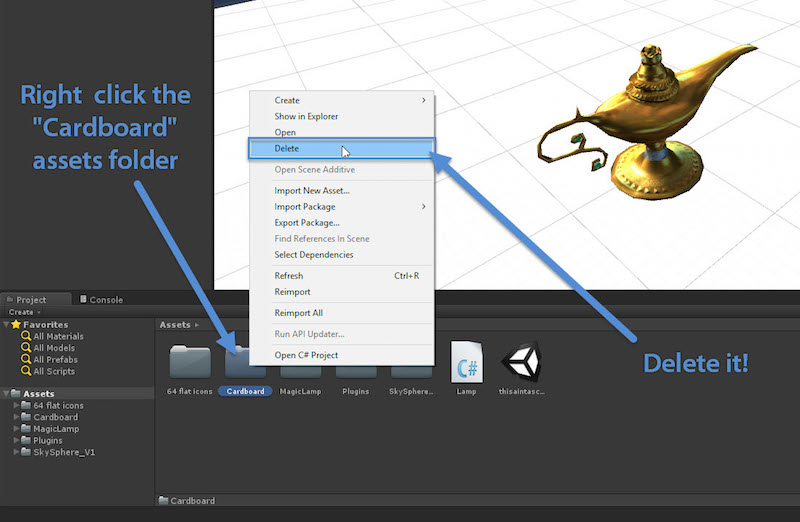
Next, we will want to delete our old Cardboard SDK folder in our assets. Note: Be certain that you have your whole project backed up before upgrading. Also, check that you have not added any of your own custom assets within the “Cardboard” folder before continuing!
Right click your “Cardboard” folder in your assets and choose “Delete”:
Then, reimport your new Google Cardboard SDK by going to Assets > Import Package > Custom Package…:
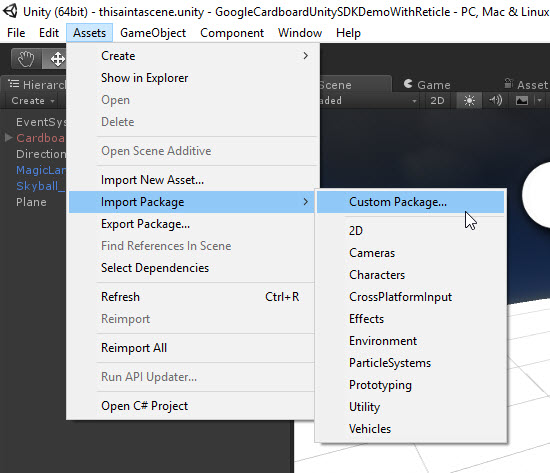
Navigate to your newly downloaded v0.6 Cardboard SDK and select that:

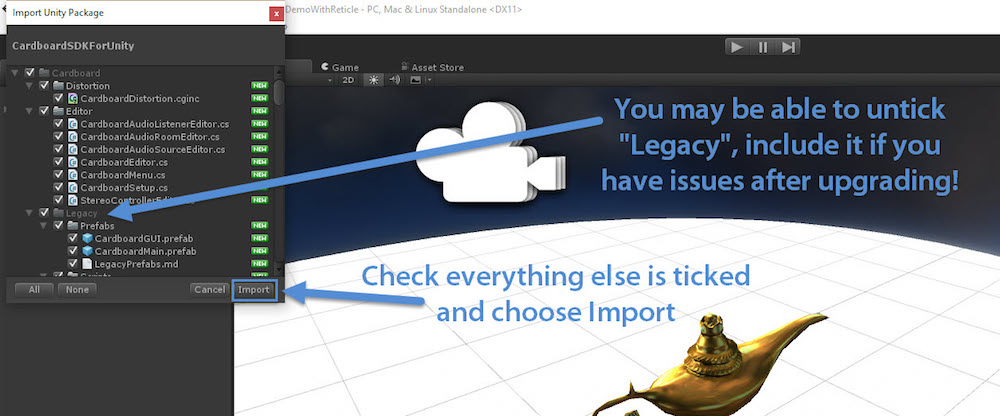
Make sure everything is ticked in the window that appears. You might not need the “Legacy” ones, feel free to untick that and then if you’ve got any issues, import in the rest by repeating this process. I did not need the “Legacy” items when upgrading my project.
If you now play your scene to test, you’ll see everything still works… but any fancy custom crosshair you might have included is missing!
The New CardboardReticle Prefab
Version 0.6 of the Google Cardboard SDK for Unity contains a new prefab called “CardboardReticle”. This appears to be the best option for crosshair style feedback on where the user is looking and is quite simple to set up once you know about it.
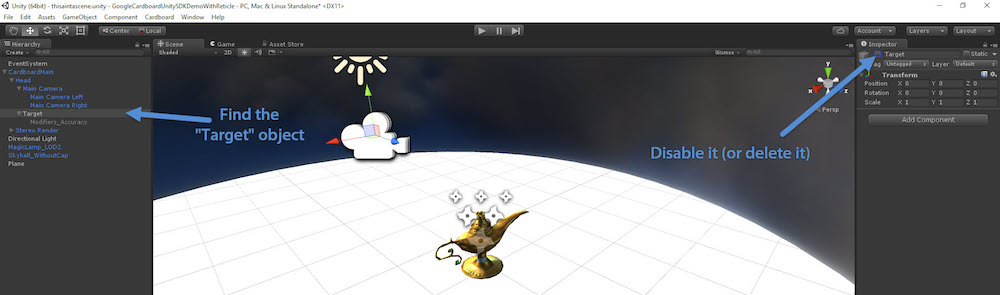
Our first order of business for anyone who is following along from our previous tutorial, is to disable or delete our “Target” game object (it was in CardboardMain > Head > Target). I’ve disabled it in the hope that I’ll come across a way to re-implement an image target in future:
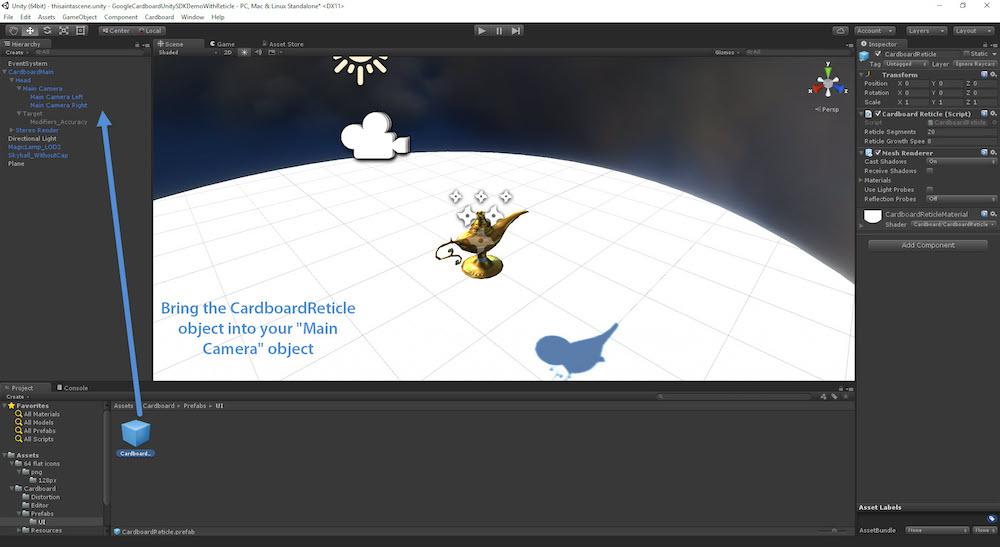
To bring in your new reticle, go to Assets > Cardboard > Prefabs > UI and you will find the “CardboardReticle” prefab. Drag this into the “Main Camera” game object. The CardboardReticle needs to be a child object of the “Main Camera” for this to work.
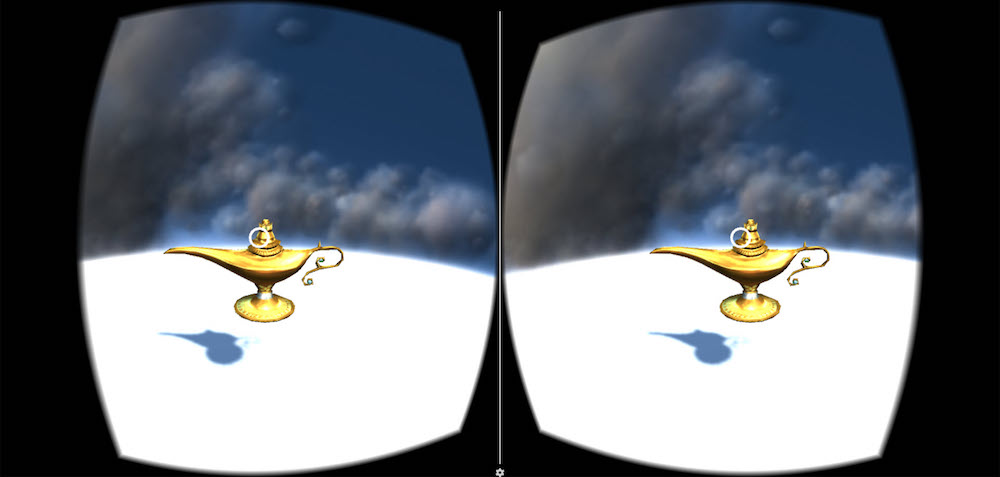
If you play the scene now, you’ll see a small circle following your gaze:
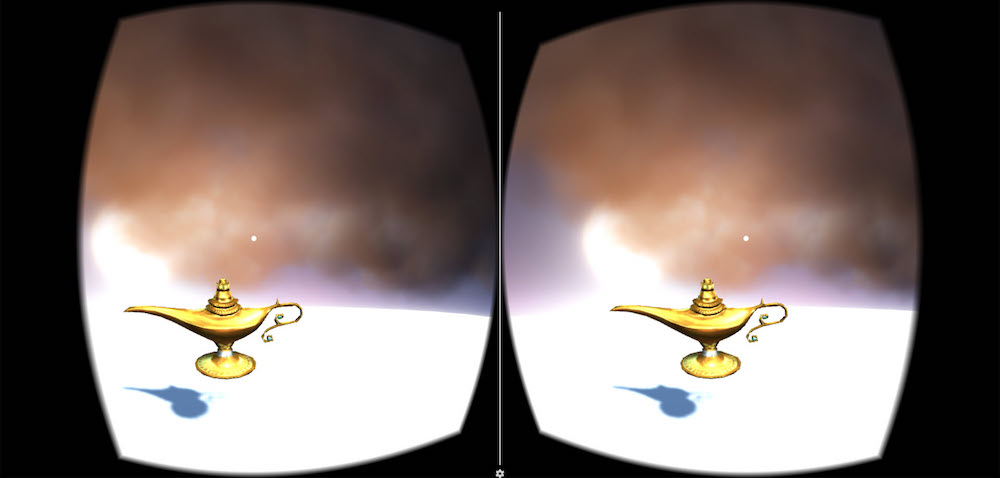
If you hover over an element that can be interacted with, the circle enlarges to show this:
Customizing the CardboardReticle
A circle might not suit your VR app quite as well as other shapes. Or you might want to customize the color. While you can’t set up image crosshairs within here, you can adjust the shape and color of your CardboardReticle.
Making Shapes
The CardboardReticle is made up of a number of segments (lines) which link up to make a shape. By default, the number of segments is 20 which makes a circle shape. If you would like to change the shape, you can adjust the number of segments in the “Reticle Segments” option within your CardboardReticle. Three segments makes a triangle, four makes a diamond, five makes a pentagon, six makes a hexagon and so on:

It is worth noting that you cannot change the number of segments whilst the scene is running — so you’ll need to stop, change the value and then play the scene once more to test out each value.
Reticle Growth Speed
Another option you might want to adjust is the speed at which the reticle grows when it reaches an object it can interact with. This can be done within the “Reticle Growth Speed” option. It is quite self explanatory and you’ll see the difference by trial and error. Personally, I’ve found the default value of 8 to be fine as is. If you go too slowly, the experience gets a bit confusing. You want the user to tell instantly what they can interact with.
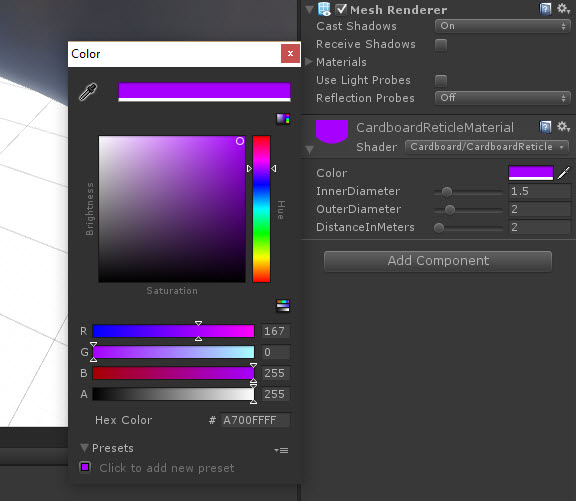
Changing Reticle Color
To change the CardboardReticle color, we can adjust the material which the reticle has. The CardboardReticle has a shader whose options you can expand out like so:
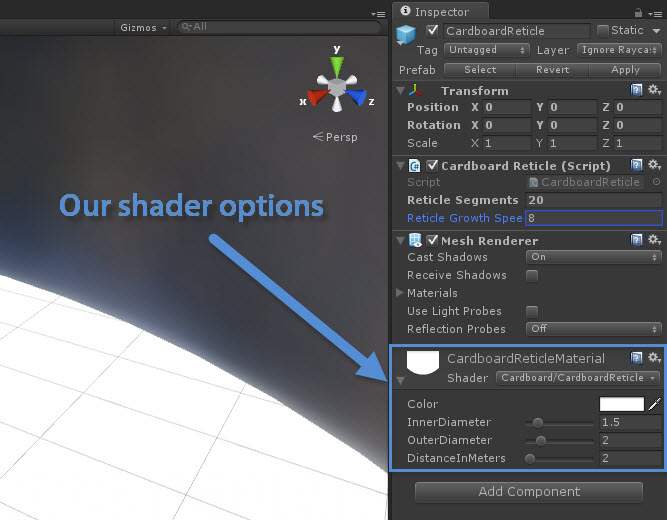
As you can see, we can change the color of the reticle from white to anything we’d like:
The inner diameter, outer diameter and distance in meters do not seem to make any noticeable difference. They seem to be reset to other values when the scene is run. I haven’t seen a need to change these anyway, I assume more features may be added to this in future Cardboard SDK releases.
Conclusion
Creating a custom reticle/graticule/VR crosshair is incredibly simple in the Cardboard SDK once you’ve got an understanding of the new approach behind it. I hope to explore ways of completely customizing the reticle once again with images and other elements soon!
What have you built with the new Cardboard SDK? How have you approached including a reticle? Let me know in the comments below, or get in touch with me on Twitter at @thatpatrickguy. I’ve also got a whole range of resource links for learning VR and Unity over at Dev Diner’s VR with Unity page.
Frequently Asked Questions (FAQs) about Reticle, Cardboard, and Unity SDK
What is the primary function of a reticle in VR development?
A reticle is a critical component in virtual reality (VR) development. It serves as a pointer or a cursor in the VR environment, allowing users to interact with the virtual world. The reticle is usually represented as a small dot or crosshair in the center of the user’s field of view. It moves with the user’s head movement, enabling them to select, highlight, or interact with objects in the VR scene.
How does Google Cardboard contribute to VR development?
Google Cardboard is a low-cost, accessible platform that has significantly contributed to the democratization of VR. It allows developers to create immersive VR experiences that are accessible to anyone with a smartphone and a Cardboard viewer. The Cardboard SDK provides the necessary tools for developers to create VR applications, including head tracking, stereoscopic rendering, and user interaction capabilities.
What is Unity SDK and how is it used in VR development?
Unity SDK is a powerful development tool used to create multi-platform games and interactive content, including VR applications. It provides a comprehensive set of features and libraries that simplify the process of VR development. With Unity SDK, developers can create immersive, interactive 3D and 2D VR experiences, with support for popular VR platforms like Oculus Rift, HTC Vive, and Google Cardboard.
How does a reticle work in a VR environment?
In a VR environment, the reticle works as a focal point for user interaction. It moves based on the user’s head movement, allowing them to “look” at different objects in the VR scene. When the reticle is positioned over an interactive object, the user can trigger an action, such as selecting a menu item or picking up an object, usually by clicking a button on the VR headset or controller.
What are the benefits of using Unity SDK for VR development?
Unity SDK offers several benefits for VR development. It supports a wide range of VR devices, allowing developers to create applications that can be deployed on multiple platforms. It also provides a robust set of tools for creating interactive 3D content, including a powerful physics engine, advanced rendering capabilities, and a flexible scripting system. Additionally, Unity’s asset store offers a vast library of ready-to-use assets, which can significantly speed up the development process.
How can I start developing VR applications with Google Cardboard and Unity SDK?
To start developing VR applications with Google Cardboard and Unity SDK, you will first need to download and install the Unity engine and the Cardboard SDK. Once installed, you can create a new Unity project and import the Cardboard SDK. From there, you can start building your VR scene, adding objects, and scripting interactions. There are also many tutorials and resources available online to help you get started.
What is the difference between a reticle and crosshairs?
While both terms are often used interchangeably, there is a slight difference between a reticle and crosshairs. A reticle is a general term for any marking or pattern in an optical instrument’s field of view used for alignment or measurement. Crosshairs, on the other hand, are a specific type of reticle, typically consisting of two intersecting lines forming a cross.
Can I create a custom reticle for my VR application?
Yes, you can create a custom reticle for your VR application. Both Unity SDK and Google Cardboard SDK allow developers to customize the appearance and behavior of the reticle. This can be done by creating a custom reticle texture or modifying the reticle’s size, color, and movement speed.
What are some common challenges in VR development?
Some common challenges in VR development include ensuring a comfortable user experience, optimizing performance, and creating intuitive user interactions. VR applications must be designed to minimize motion sickness and discomfort. They also need to run smoothly and respond quickly to user input to maintain immersion. Additionally, designing intuitive and natural user interactions in a 3D environment can be challenging.
What resources are available for learning more about VR development with Unity and Google Cardboard?
There are many resources available for learning more about VR development with Unity and Google Cardboard. Both Unity and Google provide extensive documentation and tutorials on their websites. There are also many online courses, forums, and communities where you can learn from other developers and share your own experiences.
 Patrick Catanzariti
PatCat is the founder of Dev Diner, a site that explores developing for emerging tech such as virtual and augmented reality, the Internet of Things, artificial intelligence and wearables. He is a SitePoint contributing editor for emerging tech, an instructor at SitePoint Premium and O'Reilly, a Meta Pioneer and freelance developer who loves every opportunity to tinker with something new in a tech demo.