This article was updated in May 2016 to reflect changes announced at Google IO
Android N is the next installment of Google’s Android platform, due at some point this year.
![]()
What’s There to Know about Android N?
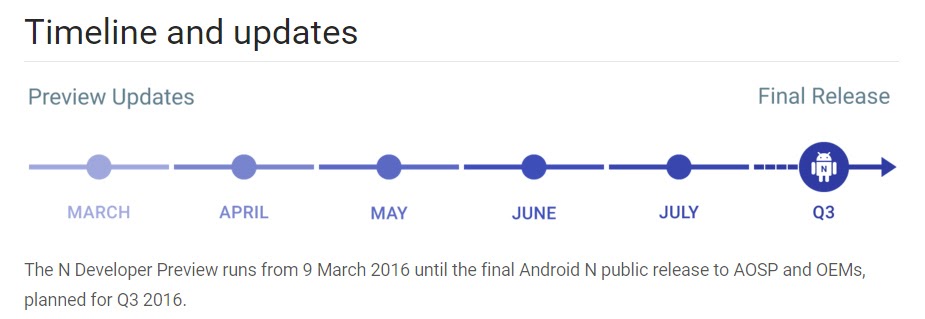
Usually Google announces the next version of Android during the I/O conference in May, but the timeline for Android N is different. Starting from March, Google will be releasing successive previews to give developers time to prepare their apps for a compatible N release. The finalization of Android N (and it’s official naming) won’t be completed until the third quarter of the year.
Like all Android updates, N comes with a range of new features and improvements which I will cover today.
Downloading and Installing the Preview
Getting Android N involves several steps outlined in Google’s getting started guide, but here’s a quick summary based on my experiences.
Download Android Studio 2.1
Download Android Studio 2.1, which is currently in preview. Don’t download 2.0, it has issues with Java 8. If you want to keep your current Android Studio version (for example 1.5) but also test Android N, you should edit your existing Android Studio application name so you can run both.
Once you’ve installed the Android Studio preview, set automatic updates from the ‘Canary Channel’ so you can update your Android N image (and it will update regularly).
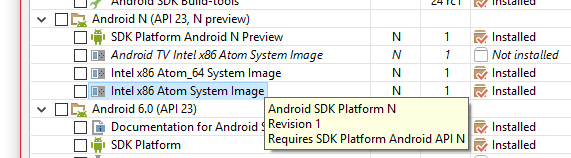
Download the Android N Image
Open up the SDK manager and search for the Android N image, choosing the Intel x86 Atom System Image version. Throughout my testing I could never get the Intel x86 Atom_64 System Image to work but your experiences may vary.
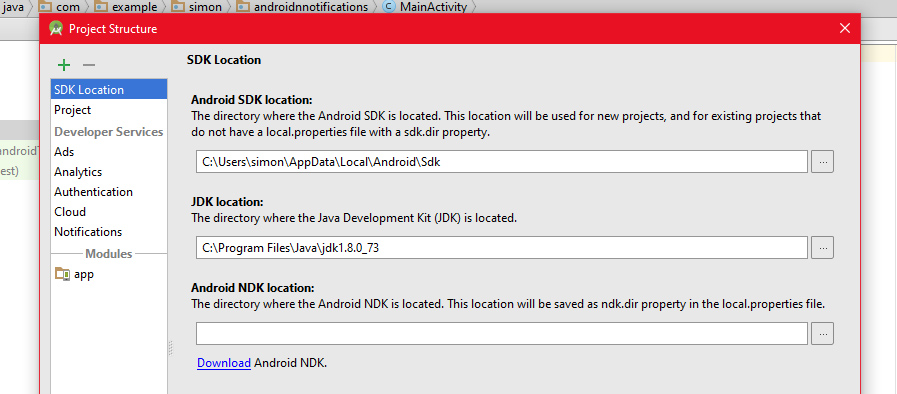
Get the Java 8 JDK / JRE
To compile apps for Android N you will need the Java 8 Development Kit and the Java 8 Runtime Environment, as parts of Android Studio 2.1 require it.
Once you have installed both, open the file structure for any project and point it to the Java 8 runtime.
Update Gradle
Open up any new project inside of Android Studio 2.1 and open build.gradle to check you’re targeting Android N. For all my tests I found the easiest way was to specify that the app would only run with Android N:
android {
  compileSdkVersion 'android-N'
  buildToolsVersion 24.0.0 rc1
  ...

  defaultConfig {
     minSdkVersion 'N'
     targetSdkVersion 'N'
     ...
  }
  ...
}
With this complete you should be able to build your app and see the glory that is Android N!
New Features
Security Improvements
Google are trying hard to improve Android’s bad reputation for security including:
- Direct Boot: A new mode for when a device is on, but locked. This allows certain apps access, but not others.
- File Base Encryption: For fine grained encryption of individual folders and files, instead of complete disk blocks.
- Media Framework Hardening: After the stagefright scare, media handling is broken up into individual components instead of one large component offering too many permissions to a device.
Multi-Window & Freeform Mode
Multi-Window support has been something that device manufacturers have wanted in Android for some time. Multi-Window (also know as Multi-Tasking) lets the user share the screen space by showing two or more apps simultaneously.
These apps can be shown side-by-side or one-above-the-other to let users switch back and forth between multiple tasks. For example, having a web browser open alongside a navigation app.
With Android N, Google is making this a native feature. Look at the screenshot below showing Chrome running side by side Google Maps in Split-screen mode.
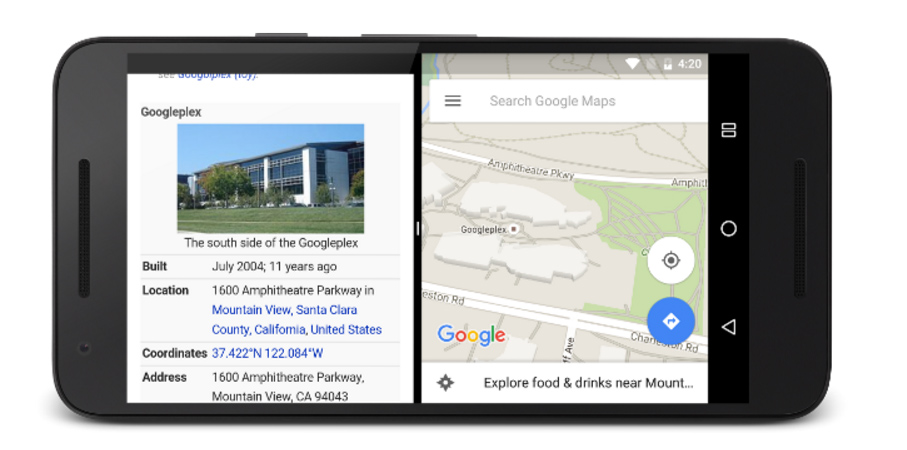
With this side-by-side approach for split screening apps, apps snap to the middle or slightly off-center. Manufacturers of larger devices can also enable ‘Freeform Mode’ which will let users manually control the re-size of each app.
Changes to the Lifecycle for Multi-Window Apps
All apps go through their lifecycle events based on what state the app is transitioning to. For example, when a user presses the home button the active app enters an inactive state. Developers can take advantage of these changes to trigger app functionality.
Because there can now be potentially more than 1 app showing at a time, you need to think about how the app will react when events change. Even though there is only 1 app active at any time, multiple apps could still be visible. When an app enters its ‘paused state’ it shouldn’t kill the UI or change the visual display. An app should only do this in the ‘stop state’ .
Adding Multi-Window Support to Your App
To enable Multi-Window mode in your apps you need to set the new attribute android:resizeableActivity to true inside the manifest file for the entire <application> or each supported <activity>.
By default this is false if your app’s targetSdkVersion is less than android-N, or true otherwise.
Layout Attributes for Multi-Window Apps
Once your app is setup to use Multi-Windows, you can use new layout attributes that determine how the app will re-size.
android:defaultWidth: Specifies the default width of the app when launched in Freeform Mode (in DPs or as a fraction)android:defaultHeight: Specifies the default height of the app when launched in Freeform Mode (in DPs or as a fraction)android:gravity: Initial gravity when the app launches in ‘Freeform Mode’. This will tell the system where this app will snap to in relation to the screen container (e.g snapping to the bottom left withtop|start). Read more about layout gravity here.android:minimumSize: Sets the minimum size (both height and width only in DPs) for the app when launched both in ‘Freeform Mode’ and standard ‘Side-by-side’ multitasking mode.
Query Methods for Multi-Window
As part of this feature, the activity class has been extended so you can query the activity to find out if you are in Multi-Window mode or Picture-in-picture mode. This is useful in case you need to customize your layout or perform other calculations based on the Multi-Window state.
Activity.inMultiWindow(): Tells you if the current activity is inside a Multi-WindowActivity.inPictureInPicture(): Tells you if the current activity is inside the picture-in-picture mode (generally when developing for Android TV)Activity.onMultiWindowChanged(): Called when the app switches in or out of the Multi-Window mode.trueif currently inside the mode orfalseotherwise.Activity.onPictureInPictureChanged(): Called when the picture-in-picture status changes.trueif inside this mode orfalseotherwise.
Reacting to Multi-Window State
Here’s an example of how you could use these events to change a UI.
When an app switches into Multi-Window mode it’s vertical / horizontal dimensions will be anywhere from 30% to 70% smaller (as the user can re-position the Multi-Window to make the app smaller or bigger). If this is the case you might want to scale text sizing up to make it easier to read.
//On Multi-Window, adjust text sizing
public void onMultiWindowChanged(boolean inMultiWindow) {
    super.onMultiWindowChanged(inMultiWindow);

    //find our UI items
    TextView title = (TextView) findViewById(R.id.appTitle);
    TextView subtitle = (TextView) findViewById(R.id.appSubtitle);
    TextView content = (TextView) findViewById(R.id.appContent);

    //read default text sizes (In Sp's from dimension resources) and divide by density to find its size
    Float titleSize = getResources().getDimension(R.dimen.titleTextSize) / getResources().getDisplayMetrics().density; //22 SP
    Float subtitleSize = getResources().getDimension(R.dimen.SubtitleSize) / getResources().getDisplayMetrics().density; //18 SP
    Float contentSize = getResources().getDimension(R.dimen.contentSize) / getResources().getDisplayMetrics().density; //15 SP

    //Entering Multi-window, adjust sizing up
    if(inMultiWindow == true){
        //adjust text size by 25%
        title.setTextSize(TypedValue.COMPLEX_UNIT_SP, (float) (titleSize + (titleSize * 0.25)));
        subtitle.setTextSize(TypedValue.COMPLEX_UNIT_SP, (float) (subtitleSize + (subtitleSize * 0.25)));
        content.setTextSize(TypedValue.COMPLEX_UNIT_SP, (float) (contentSize + (contentSize * 0.25)));
    }
    //Exiting multi-window, adjust size back to normal
    else{
        title.setTextSize(TypedValue.COMPLEX_UNIT_SP, titleSize);
        subtitle.setTextSize(TypedValue.COMPLEX_UNIT_SP, subtitleSize);
        content.setTextSize(TypedValue.COMPLEX_UNIT_SP, contentSize);
    }
}
Here’s what the above code does:
- Inside the activity is the new
onMultiWindowChangedevent listener. - Finds all the UI items (in this case a series of
TextViews). - Gets the SP sizes from the dimension resource file, dividing by the screen density to get the correct sizing.
- Checks to see the value of the
inMultiWindowflag. - If
trueit means the application is entering Multi-Window, so set the text of the UI elements to 25% bigger. - If
falseit means the application exiting Multi-Window, so reset back to the default values from the dimension file.
Here’s a comparison to see this in action. On the left is the app switching into Multi-Window mode with scaled text. On the right is the app in normal full screen mode.
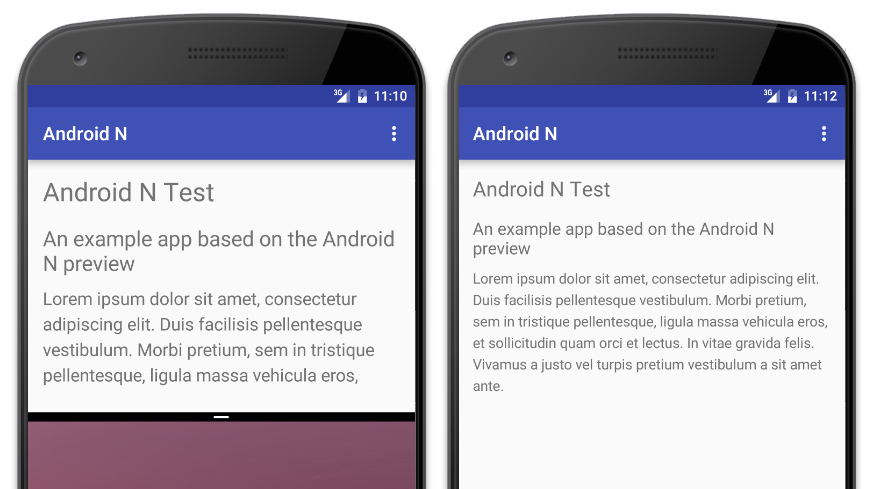
You can use any logic you want here and it’s a perfect place to check if your UI will still look awesome when transitioning into and out of these modes.
Updated Notifications
Notifications have been continually improved since Android 4.1 (Jellybean) and Android N adds direct notification replies and bundled notifications.
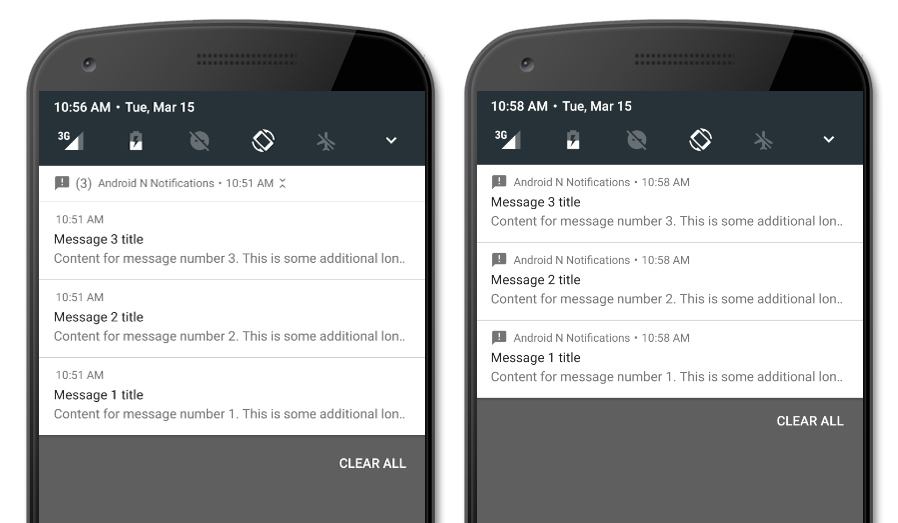
Bundled Notifications
This is one great feature that has made it’s way from Android Wear to phone and tablet devices.
With Wear, when an application sends multiple notifications (for example incoming emails), an app can opt to ‘bundle’ them together. Instead of back to back notifications under each other, a user has one notification at the top and a toggle to see the related notifications. This lets them minimize clutter.

Android N allows developers to group notifications together in stacks. This example creates a scenario with a button, that when pressed, sends multiple notifications.
//stacked notification example
public void startStackedNotifications(View view){

    final String NotificationKey = "notification_key"; //used to group notifications together

    //create 3 notifications
    for(int i = 1; i <= 3; i++){

        //build notification
        NotificationCompat.Builder builder = new NotificationCompat.Builder(this);
        builder.setContentTitle("Message " + i + " title");
        builder.setContentText("Content for message number " + i + ". This is some additional long content that will get trimmed off when it's too long");
        builder.setSmallIcon(R.drawable.ic_announcement);
        builder.setGroup(NotificationKey);

        //If on the last notification, set the notification group
        if(i == 3){
            Bitmap largeIcon = BitmapFactory.decodeResource(getResources(), R.drawable.ic_person);

            NotificationCompat.Builder summaryNotification = new NotificationCompat.Builder(this);
            summaryNotification.setContentTitle("You have messages");
            summaryNotification.setSmallIcon(R.drawable.ic_announcement);
            summaryNotification.setLargeIcon(largeIcon);
            summaryNotification.setGroup(NotificationKey);
            summaryNotification.setGroupSummary(true);

            int summaryNotificationID = 400;
            NotificationManagerCompat summaryManager = NotificationManagerCompat.from(this);
            summaryManager.notify(summaryNotificationID, summaryNotification.build());
        }

         //issue the notification
        int notificationID = (300 + i);
        NotificationManagerCompat manager = NotificationManagerCompat.from(this);
        manager.notify(notificationID, builder.build());
    }
}
This code creates a Button widget inside the activity and sets its click handler to the startStackedNotifications function. This functions purpose is to create the notifications and display them. It then uses a loop to create 3 notifications. Inside each of these, the following happens:
- Create a new notification builder using the
NotificationCompat.Builderclass. It’s this class that sets the title and content for the message. - Call the
setGroupmethod and pass a notification key to group the notifications together (this is important). - If it’s the last loop, create a notification summary used at the top of the grouped notifications. This is the same process as above but sets the
setGroupSummarymethod totrueto tell Android this is the summary. - Use the
NotificationManagerCompatclass and itsnotifymethod to send the notification. - Issue the three main notifications using the
NotificationManagerCompatclass and itsnotifymethod as before.
This is how the notifications look when stacked on the left and separated on the right.
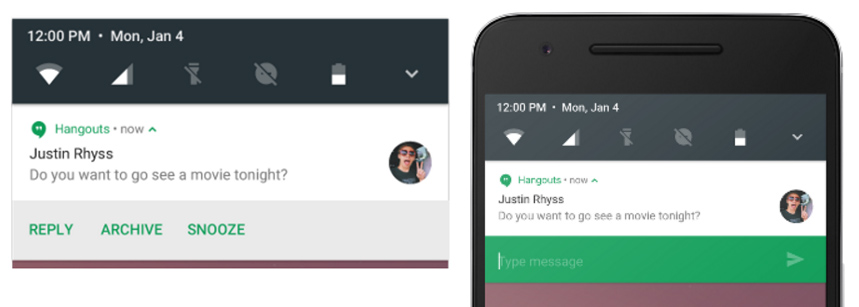
Direct Notification Replies
Direct notification replies let a user reply immediately to a notification when it arrives.
The documentation for Android N notifications provides a good step-by-step guide on how to get these notifications up and running. It’s a good idea to know how notifications work and how they are handled across different devices / platforms, the Android intro to notifications should help.
Data Saver
Beginning with Android N, Google is including more tools and options to let users minimize their data usage. N gives users the ability to enable data saving across their device, sending a signal to apps to use less data. While active, data saving mode will block all background data usage.
This change is part of an update to the ConnectivityManager API. This API provides an interface to access information about the current network state, and provides notifications when the network state changes.
There are three new constants developers can use to detect data saving preferences.
RESRICT_BACKGROUND_STATUS_DISABLED: Data saver is disabled.RESRICT_BACKGROUND_STATUS_ENABLED: Data saver enabled and background data. usage is blocked. A developer should also try to minimize foreground data.RESRICT_BACKGROUND_STATUS_WHITELISTED: Data saver is enabled but your app is whitelisted and background data will be processed as normal. You should try to minimize foreground data.
Detecting Changes to Data Saver Preferences
When users change the data saver preferences your app should adjust accordingly. The ConnectivityManager exposes an ACTION_RESTRICT_BACKGROUND_CHANGED event you can listen for to react as needed.
Inside your activity class add the follow private fields. These are mainly for convenience in accessing the TextView and ConnectivityManager items.
private TextView tv_dataSaverStatus;
private ConnectivityManager conManager;

 protected void onCreate(Bundle savedInstanceState) {

    //find the TextView and set up our connectivity manager
    tv_dataSaverStatus = (TextView) findViewById(R.id.dataSaverStatus);
    conManager = (ConnectivityManager) getSystemService(CONNECTIVITY_SERVICE);
    displayDataSaverStatus(conManager, tv_dataSaverStatus);

    //new intent filter to look for (dataSaver)
    IntentFilter filter = new IntentFilter();
    filter.addAction(conManager.ACTION_RESTRICT_BACKGROUND_CHANGED);

    //new receiver, extending broadcast receiver
    DataSaverReceiver receiver = new DataSaverReceiver();

    //register receiver for us to use
    registerReceiver(receiver, filter);
}
Inside the onCreate function, find the TextView which will display the current Data Saver settings and create the ConnectivityManager object for the display function.
Create an intent filter and apply ACTION_RESTRICT_BACKGROUND_CHANGE to it. This tell’s Android that you want to watch for this event when it’s triggered. Create a new object from the DataSaverReceiver class which will be executed when these settings change (explained further down the page). Finally, tie this all together by registering the receiver.
Below the onCreate method, create a new class extending the BroadcastReceiver class. This is an extended broadcast that will execute when the app is opened and every time the Data Saver settings change. In this example, by calling the function to alter the display.
//custom class for capturing the dataSaver broadcast
public class DataSaverReceiver extends BroadcastReceiver{

    //trigger as we receive the event
    public void onReceive(Context context, Intent intent) {
        //update the dataSaver display
        displayDataSaverStatus(conManager, tv_dataSaverStatus);
    }
}
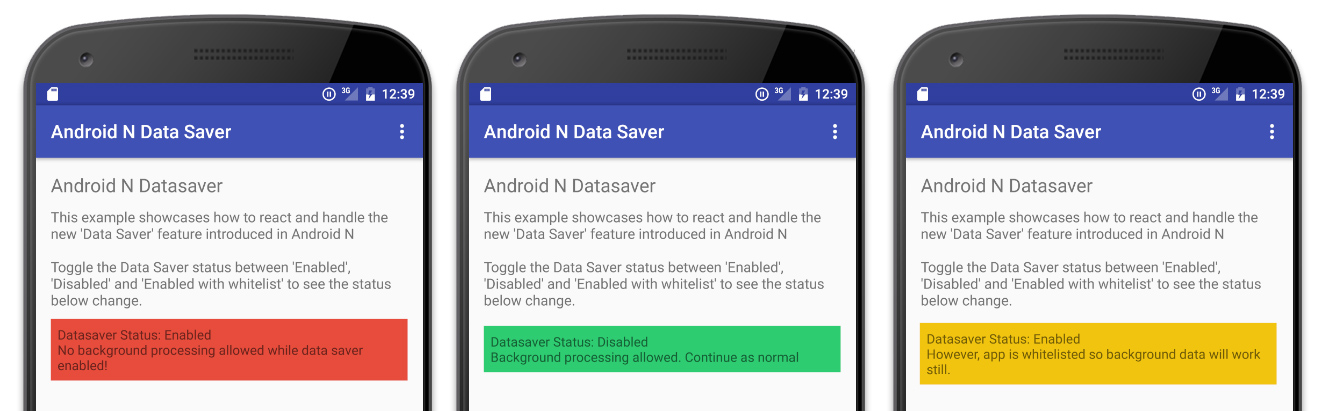
The function checks to see if the user is connected to a mobile network (via isActiveNetworkMetered) and if so, checks to see if it’s due to the Data Saver feature.
Depending on the setting detected, change the text and background color of the TextView.
//writes the current status of the dataSaver setting to the UI
public void displayDataSaverStatus(ConnectivityManager conManager, TextView tv_dataSaverStatus){

     //cellular network
     String message = "";
     int color = R.color.dataDefault;
     if(conManager.isActiveNetworkMetered()){

         int restrictBackgroundStatus = conManager.getRestrictBackgroundStatus();
         if(restrictBackgroundStatus == conManager.RESTRICT_BACKGROUND_STATUS_ENABLED) {
             message = "Datasaver Status: Enabled \nNo background processing allowed while data saver enabled!";
             color = R.color.dataSaverEnable;
         }else if(restrictBackgroundStatus == conManager.RESTRICT_BACKGROUND_STATUS_DISABLED) {
             message = "Datasaver Status: Disabled \nBackground processing allowed. Continue as normal";
             color = R.color.dataSaverDisabled;
         }else if(restrictBackgroundStatus == conManager.RESTRICT_BACKGROUND_STATUS_WHITELISTED) {
             message = "Datasaver Status: Enabled \nHowever, app is whitelisted so background data will work still.";
             color = R.color.dataSaverEnabledWhitelist;
         }
     }
     //normal network
     else{
         message = "Datasaver Status: Irrelevant \n Currently connected to a non-meters network so all good";
         color = R.color.dataDefault;
     }

     tv_dataSaverStatus.setText(message);
     tv_dataSaverStatus.setBackgroundColor(getResources().getColor(color));
 }
This is a simple example, but now that you can retrieve the status of the Data Saver and look for changes in its status, you can adjust your app to match new data saving policies.
Updates to Android ‘Doze’
Android Marshmallow introduced Doze to improve battery usage and longevity by deferring activities such as background syncing and tasks when the device is unplugged, stationary or with its screen off. Doze now works in two phases depending on the state of your device.
When your device’s screen is off, on battery power and is not stationary, the first level of power reduction is enables, deferring jobs and background progresses to minimize power usage.

With N, Google have introduced a more aggressive doze state that will trigger once a device is stationary and has been in the first doze state for a period of time. When this secondary state applies it disables more, such as GPS / WiFi Scans and Wakelocks.
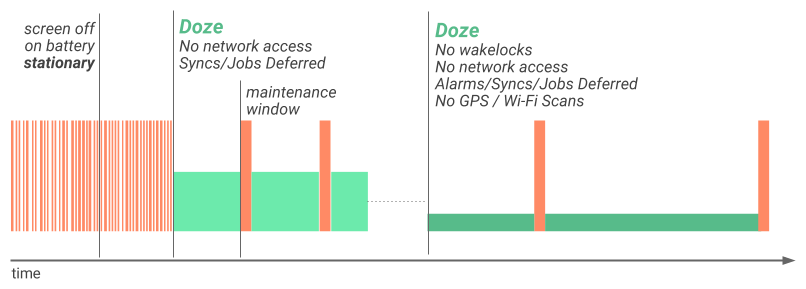
The idea behind this is that if a device is entirely stationary, it’s likely not in use, for example a phone sitting on a desk. Android can leverage this time to save more battery power while still giving performance.
Note: Even if the doze state is active, the device will wake periodically to let apps perform their tasks, ensuring updates and notifications still work.
Java 8 Features
Android N introduces support for Java 8 and its language features. If your app targets the Android N platform then you can use these Java 8 features to your advantage. But make sure you provide fallbacks for older versions of Android.
These features include:
Just-in-Time (JIT) Compilation
Android’s switch to the Android Runtime (ART) with version 5.0 switched completely to ahead-of-time (AOT) code compilation. Android N re-introduces JIT compilation, meaning that running apps after initial installation or OS updates could be much faster. There are times when one compilation method is more appropriate than another, and the Android system will intelligently select the most useful in each case.
Android for Work Improvements
Android for work is Google’s enterprise / business focused model for using Android in the work-place.
Android for work has been available since Android 4.0 via the ‘Android for Work‘ app. Since Android 5.0 and the ‘Work Profile‘ I.T managers have been getting better tools and controls to help them manage enterprise solutions with Android.
With Android N, improvements include:
- Toggling Work Mode: Lets users switch off their work profile. This removes background syncing, notifications and work profile apps temporarily until re-enabled
- Always-On VPN: Forces work users to connect via a VPN to access apps and information, improving security.
- Disable Access to Apps: I.T administrators can suspend access to work apps, ensuring that company data is safe. It can be re-enabled later.
- Remote Booting: Authorized parties can remotely boot a device, which is great for always-on devices like mounted POS terminals.
If you’re interested you can see the full feature notes on the preview website.
Screen Zooming
Android has supported zooming amongst other accessibility issues for some time, giving users the option to scale text and other screen elements. Android N gives the option to scale the entire UI which will zoom or shrink everything proportionally. I recommend you test how your interface looks when using this feature.
Conclusion
Android N improves on a lot of what Android already offered, increasing its flexibility and robustness. The key features of this release for developers are:
- Multi-Window: For true side-by-side multi-tasking with 2 or more apps.
- Data Saver: Helping your users cut down on mobile data and increase battery life.
- Grouped and Direct Notifications: Enhancing the UI with more intuitive and flexible notifications.
You should plan for and test each of these features should in your apps to ensure they work and respect Android’s development guidelines.
Over the course of the next months Google will release further updates to Android N and hopefully during Q3 of 2016 we will see the eventual naming and rollout of the Android N platform.
I for one look forward to enhancing my apps with these new features, what about you?
 Simon Codrington
Full stack developer and overall web enthusiast. I love everything to do with web / design and my passion revolves around creating awesome websites. Focusing primarily on WordPress, I create themes, plugins and bespoke solutions.