I began taking on-line development classes offered at my local college, and students had to upload their scripts and files via FTP to a school server for processing. The necessary security precautions required a boatload of username/password combinations that were strictly enforced and a pain to remember. Getting my project onto the school’s server was possible, but it was easier for me to develop my project locally before uploading them to where they eventually needed to be. This article will explain how a development system solves such a problem and how to install the popular Windows-based web development platform WAMP. As a relative newcomer to the PHP language, I hope this article speaks directly to other new programmers who are interested in honing their development skills to eventually become PHP masters.
The Development Server
Every programmer needs a place to write and develop their programs. A development system is a computer with a group of applications that are installed that perform the same tasks as on a web server. The benefits of this is being able to develop and test your scripts locally without having to upload them first, and the security of maintaining your files locally until they are ready for their intended purpose. Plus you don’t have to be connected to the Internet while you work. We are pretty much always on-line nowadays, but every so often you can find yourself without a connection to the web. Who knows, you may want to crunch code on a laptop while sitting on a beautiful secluded beach.What is a WAMP Server?
A WAMP server is a computer running these applications:- Windows OS
- Apache
- MySQL Database
- PHP
How to Use WampServer
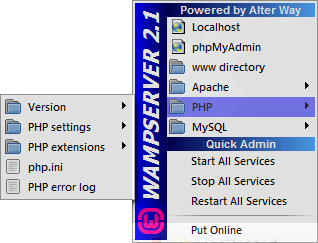
Go to the WampServer homepage and download the package that is applicable for your local machine. The current version available is 2.2E. The application is constantly updated, so plan on checking in periodically to ensure you have access to the latest version available. Once you have installed the package, you should see the WampServer icon in the Windows system tray next to the clock display. You may need to click the “show hidden icons” up arrow to see it.

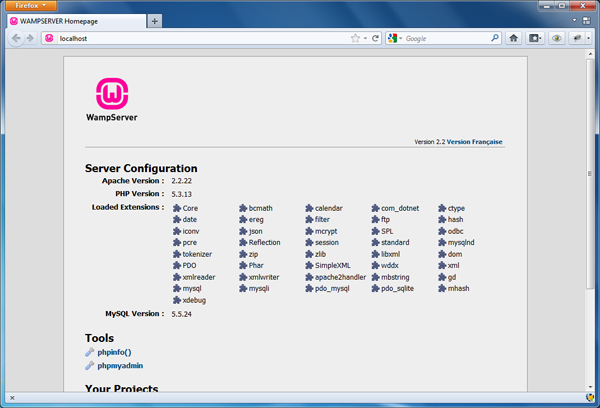
phpinfo() function which, when clicked, will display all of the information related to your particular installation and configuration. Below that you will find a link to the above mentioned phpMyAdmin.
Under the Your Projects heading is a display of the project folders you are working on. Each of your projects should be within its own folder. Your project folders are copied into the www subfolder within the wamp directory.
Running a PHP Script
When clicked, all PHP files and scripts placed in thewww folder will be processed by the Apache server where any PHP code will be parsed and processed by the PHP application. It’s almost magical how a PHP script can establish a database connection, execute a query against the database, and dynamically return the results to the client. Depending on the nature of your script, the results can be returned as HTML back to the client browser for display.
During development, when PHP encounters any code errors (and trust me, as a newbie you will encounter many errors), PHP has the ability to display error messages that are great clues to finding the source of the error. The process of error checking and solution finding is part of the learning curve of any programming, and reason enough to set-up a local development server. Without it, one would go nuts having to upload each file revision using FTP to the web server.
Summary
In closing, server-side programming without doubt has its challenges. But now you are aware that setting up a development server using WampServer can save a lot of time and frustration and provide you with the means to safely develop your next killer application on your local machine. Image via FotoliaFrequently Asked Questions (FAQs) about Using WampServer for Local Development
How do I install WampServer on my computer?
Installing WampServer on your computer is a straightforward process. First, download the WampServer software from the official website. Ensure you choose the correct version that matches your operating system (32 bit or 64 bit). Once downloaded, run the installer and follow the on-screen instructions. During the installation, you may be asked to choose your default browser and text editor. After the installation is complete, you can start WampServer from your desktop or start menu.
Why is my WampServer not starting?
There could be several reasons why your WampServer is not starting. One common issue is port conflict, usually with Skype or another web server software. WampServer uses port 80 by default, and if another program is using the same port, WampServer will not start. You can change the port WampServer uses or close the conflicting program. Another issue could be missing Visual C++ packages. Ensure you have all the required packages installed on your computer.
How do I create a new project in WampServer?
To create a new project in WampServer, first, start WampServer and go to the ‘www’ directory. This directory is where you should create your new project folder. Once you’ve created and named your new folder, you can start adding your PHP files into this folder. To access your project, open your web browser and type ‘localhost/yourprojectname’ in the address bar.
How do I access phpMyAdmin in WampServer?
Accessing phpMyAdmin in WampServer is simple. First, ensure WampServer is running. Open your web browser and type ‘localhost/phpmyadmin’ in the address bar. This will take you to the phpMyAdmin login screen. The default username is ‘root’, and by default, there is no password.
How do I resolve the ‘Forbidden’ error in WampServer?
The ‘Forbidden’ error usually occurs when you try to access your server from another device on your network. This is because, by default, WampServer is configured to deny all network connections. To resolve this, you need to edit the ‘httpd.conf’ file and change the line ‘Require local’ to ‘Require all granted’. Remember to restart all services after making this change.
How do I upgrade WampServer?
To upgrade WampServer, you need to download the new version from the official website. Before installing the new version, ensure you backup all your data. You can then run the installer for the new version. The installer will automatically uninstall the old version and install the new one.
How do I configure WampServer?
WampServer can be configured by editing the configuration files. These files are located in the ‘bin’ directory. The main configuration files are ‘php.ini’, ‘httpd.conf’, and ‘my.ini’. These files allow you to configure PHP, Apache, and MySQL respectively.
How do I use WampServer with WordPress?
To use WampServer with WordPress, you first need to create a new database in phpMyAdmin. Once the database is created, you can install WordPress in a new project folder in the ‘www’ directory. During the WordPress installation, you will be asked for your database details.
How do I secure WampServer?
By default, WampServer is not secure for use in a production environment. To secure WampServer, you should set a password for the MySQL root user, restrict access to the server, and disable any modules or extensions that are not needed. Always ensure you have a backup of your data.
How do I uninstall WampServer?
To uninstall WampServer, you can use the ‘Add or Remove Programs’ feature in Windows. Locate WampServer in the list of installed programs and click ‘Uninstall’. Follow the on-screen instructions to complete the uninstallation.
Matt Bragg lives in Southern California, developing PHP/MySQL security applications used in the thoroughbred horse racing industry. He began studying Fortran many years ago and is currently focused on furthering his knowledge of PHP and developing WordPress sites for music artists. Matt splits his time coding and working as a professional musician. You can follow him on Twitter @braggm.


