
One of the biggest challenges in building an API is authentication. This is one of the most significant attack surfaces an API has. Proper authentication helps avoid security threats and ensures that only the right users can access the required data.
Authentication used to be straightforward when teams were working with server-side applications. A simple session validation on the server was enough to ensure user permissions for operations. However, the advent of APIs has brought about a significant shift in these authentication challenges.
But with an API, you can’t implement sessions. You can’t guarantee that your API will always be invoked using a web browser, so you can’t rely on cookies to secure an API. One of the critical features of an API is that it’s stateless, meaning that every request sent to an API doesn’t depend on any previous or subsequent requests. Therefore, you need an approach capable of carrying the authentication/authorization information necessary to validate a request.
One effective API authentication technique is using JSON Web Tokens (JWTs). In this article, we’ll delve into the details of JWTs and provide a comprehensive guide on how to implement a REST API using Node.js, with JWTs as the security measure.
Key Takeaways
- Implementing JWTs for secure communication. The article provides an in-depth guide on implementing JWTs for authentication in web applications. This includes token generation, transmission and verification. By doing so, it enhances the overall API security by preventing broken access control and by letting only the authorized people access the data.
- Role-based access control in JWT. This article showcases an overview of role-based access control in which specific API endpoints are restricted for certain roles. For example, an administrator can view all users, while a customer can’t. This was implemented in this article by managing custom claims within in the JWT Token.
- Implementation of JWT in a REST API. The article provides a step-by-step approach to building a simple REST API using Node.js, Express, and the jsonwebtoken library for JWT authentication. It includes setting up the project, installing necessary libraries, creating a basic user database, and implementing login and user data endpoints. The process involves generating a token upon user login and validating this token in subsequent requests to authorize or deny access based on the user’s role.
What is a JSON Web Token (JWT)?
A JSON Web Token (JWT) is an open standard (RFC 7519) that defines a method of transferring information between two parties, a client and a server, as a JSON object. It’s important to note that the information being transferred between the two parties is digitally signed using a private signature. Therefore, this is considered verified and safe to use data.
Note: typically, JWT is used to build authentication and authorization flows for an API.
For instance, information that can be used to associate a user with a request is often wrapped in a JWT. This could include a user ID and a role, and your API could use this information to determine if the user sending the request is authorized to do so.
When Should You Use JWT?
There are often two main scenarios in which you should consider using a JWT Token.
- Authentication/authorization. This is one of the most widely accepted use cases of JWT. You can build an authentication token to validate requests on your API and ensure that authorized users are performing authorized actions.
- Information exchange. You can also leverage JWTs to exchange information between parties securely. They serve as a good form of valid and accepted data as JWTs can be signed. For example, using public/private key pairs, you can be sure the senders are who they say they are. This lets you make additional checks to ensure your information hasn’t been tampered with.
Structure of a JWT Token
To achieve all of the functionality, the JWT token is structured in a certain way. It has three key components:
- Header. The header consists of two parts: the token type, JWT, and the signing algorithm being used, such as HMAC SHA256 or RSA.
- Payload. The payload contains your claims. Claims are information that describes the entity you’re issuing the token. For example, if you were issuing a token for a user, you’d have claims like the user ID and role. Apart from that, a JWT token has a standard set of claims such as the issuer, the time of issuing, the expiration time and more.
- Signature. This is something that you need to create. To create the signature, you have to take the encoded header, the encoded payload, a secret, and the algorithm specified in the header and sign that. This is done to ensure the message wasn’t changed along the way.
Note: your JWT token is a plan base64 string that comprises of these three components where each component is seperated using a ..
For example, a simple token might look something like this:
header.payload.signatureAdditionally, your decoded token would like something like pictured below.
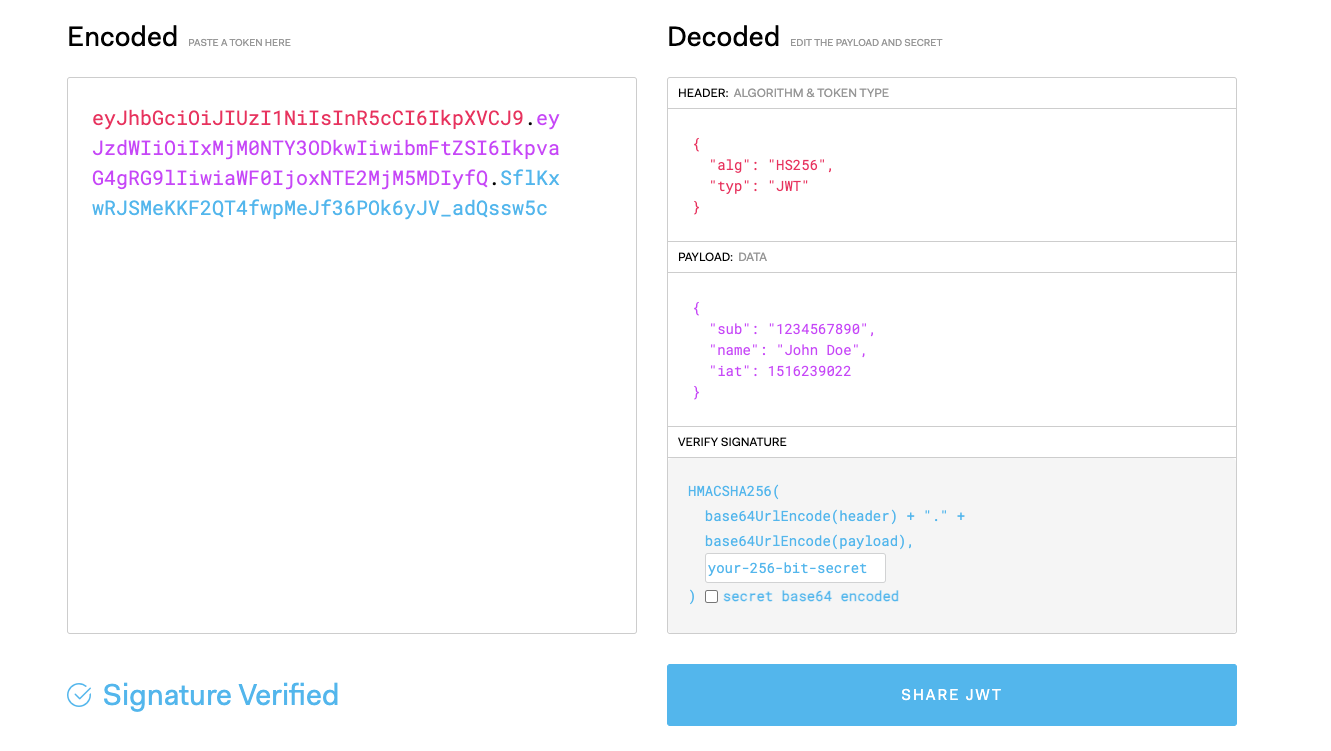
As you can see, the header, payload and signature are decoded and shown above.
Process Flow of a JWT
Now, when you’re building an API with JWT you need to consider the following:
- logging in
- token generation
- token validation
This would look something like what’s pictured below.
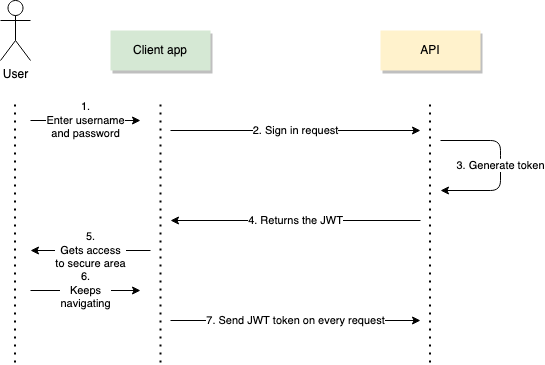
The cycle starts when a user first submits a request to log in to the API. They provide a username and a password. Your API verifies whether the credentials are valid and, if so, generates a JWT token for the user.
Next, your user would include this token in the Request Header — Authorization — as a Bearer token, in every request they execute. Your API would have to look at the request header for all requests and decode and validate the token to authorize the request.
It’s essential to follow this process when working with JWT. The API will reject the request if your header is missing the JWT Token.
Building a REST API with JWT
Building an API with JWT authentication is easier than it seems. There are lot of libraries available that handle the process of token generation and validation through simple API methods.
So, let’s build a simple REST API with JWT Authentication.
To do so, let’s first bootstrap a project using the command:
npm initNote: make sure to proceed with the default configurations.
Next, let’s install the JWT Library that we’re working with. Let’s use the jsonwebtoken library to create and manage JWT tokens.
Note: I’ve chosen this library as it is frequently maintained on GitHub and it has over 14 million downloads per week.
So, install the library using the command:
npm i jsonwebtokenNext, let’s install Express to build the API. To do so, run the command:
// express - to build the api
// cors - to enable cross origin requests
// body-parser - to parse the body as JSON
npm i express cors body-parser
Next, let’s create a database.js file. Since we’re focusing strictly on JWTs here, I won’t spin up a database, but rather maintain an in-code database of users. So, open up your database.js file and include the following code:
const users = [
    { id: '1', name: 'Lakindu', username: 'lak', password: '1234', role: 'customer' },
    { id: '2', name: 'David', username: 'david', password: '1234', role: 'customer' },
    { id: '3', name: 'John', username: 'john', password: '1234', role: 'customer' },
    { id: '4', name: 'Nishanthan', username: 'nishanthan', password: '1234', role: 'customer' },
    { id: '5', name: 'Pasindu', username: 'pasindu', password: '1234', role: 'customer' },
    { id: '6', name: 'Sahan', username: 'sahan', password: '1234', role: 'admin' },
]

module.exports = {
    users
}
As you can see, we’ve defined a list of users that are going to have access to our API.
Note: if you were building this on a production level, I’d recommend using something like Amazon Cognito to manage your users, or consider hashing to store passwords.
Next, create an index.js file to define the API. Open up the index.js file and include the following code:
app.post('/login', (req, res) => {
    const { username, password } = req.body;
    const user = users.find((user) => user.username === username);

    if (!user || user.password !== password) {
        res.status(400);
        res.send({ message: 'Invalid username or password' })
        return;
    }

    if (user.password === password) {
        const token = jwt.sign({
            role: user.role,
        }, tokenSecret, {
            algorithm: 'HS256',
            expiresIn: '5m',
            issuer: 'my-api',
            subject: user.id
        })
        res.send({ token });
        return;
    }
});
We’ve now implemented three API endpoints:
- POST /login. This route attempts to authenticate a user. It expects a username and password to be in the request body. The handler searches for a user with the matching username in the users array. If no user is found or the password doesn’t match, it responds with a 400 status code and an error message. If a user is found, it responds with a message indicating successful login.
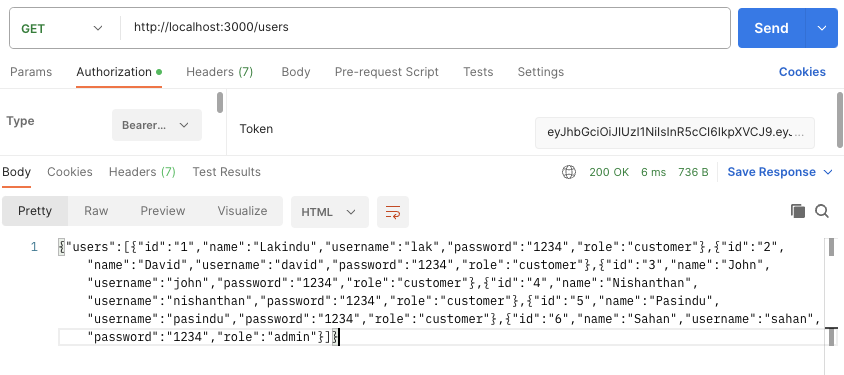
- GET /users. This route responds with a JSON string containing all users.
- GET /users/:userId. This retrieves a
userIdfrom the path parameters and uses it to find a user in the users array.
Now, in our case, we can leverage JWT for several cases:
- When logging in, generate a JWT token and return it to the user.
- When making requests for the users API, they can include the token for authorization. For example, only an admin should be able to fetch a user by ID, and get all users. Customers should not be able to do this.
So, let’s update the login endpoint to generate a token:
const jwt = require('jsonwebtoken');

app.post('/login', (req, res) => {
    const { username, password } = req.body;
    const user = users.find((user) => user.username === username);

    if (!user || user.password !== password) {
        res.status(400);
        res.send({ message: 'Invalid username or password' })
        return;
    }

    if (user.password === password) {
        const token = jwt.sign({
            role: user.role,
        }, tokenSecret, {
            algorithm: 'HS256',
            expiresIn: '5m',
            issuer: 'my-api',
            subject: user.id
        })
        res.send({ token });
        return;
    }
});
As you can see, we’ve updated the login endpoint to leverage the jsonwebtoken library to create a signed token. The token uses the HMAC SHA-256 algorithm, and will expire in five minutes and is issued to the subject with the userId. This means that the token is meant to be used for a particular user.
Additionally, we’ve also passed a tokenSecret. This is a secret key that’s used to decode the token for all future requests. This also adds a layer of security to your token, in which all tokens that can’t be decoded by your secret key can be deemed as tampered.
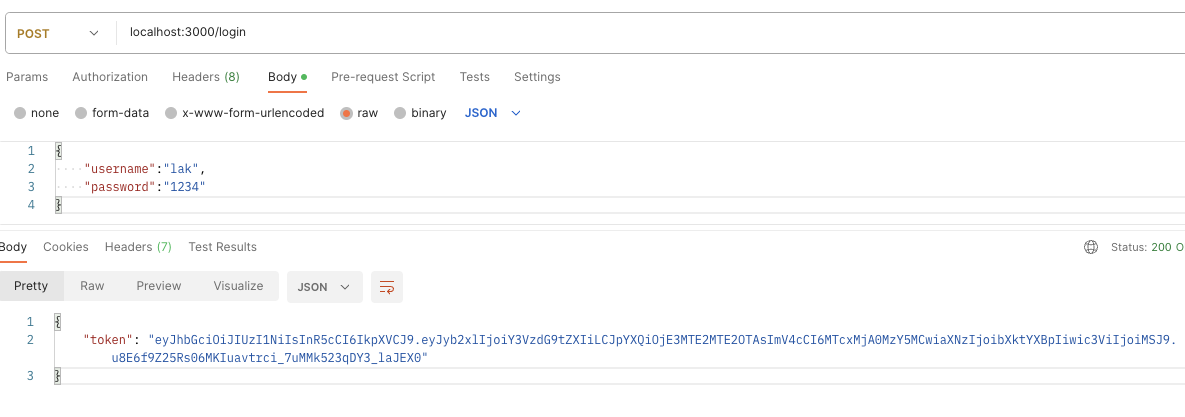
So, when you execute your login endpoint, you should get a token as your output, as pictured below.
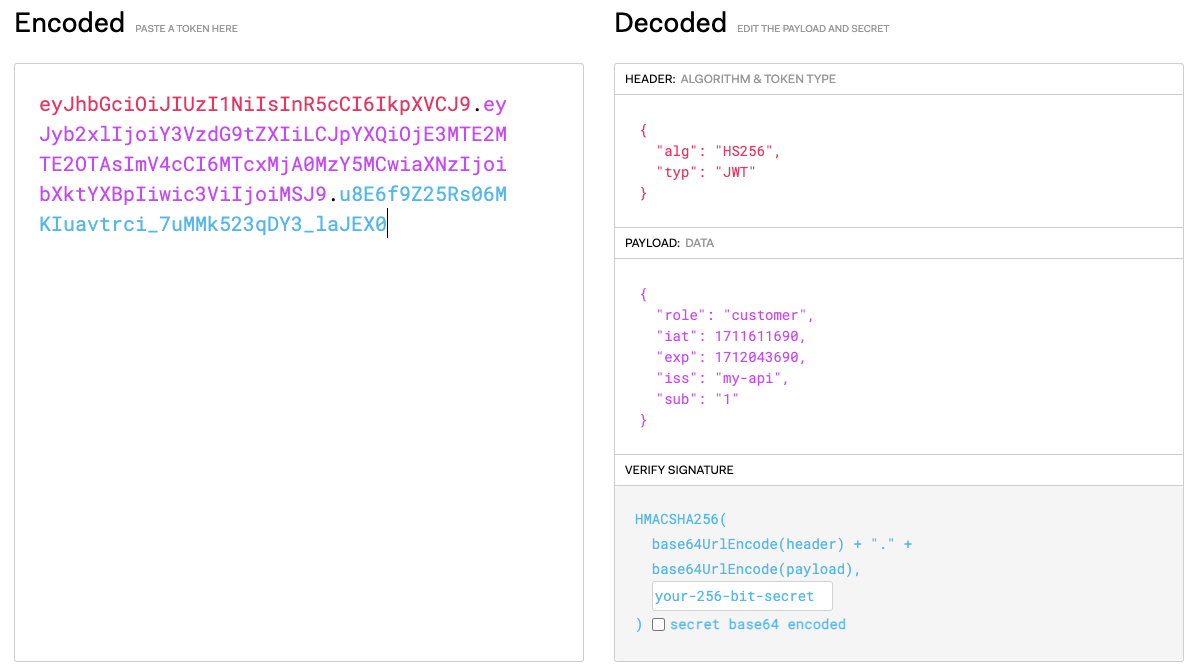
If you paste the token on jwt.io‘s online debugger, you can see the properties pictured below.
Now, let’s update the User API to validate the token. To do so, let’s create a role-based access control (RBAC) function:
const validateRequest = (requiredRole) => {
    return (req, res, next) => {
        const { authorization } = req.headers
        const token = authorization.substring('Bearer '.length);
        try {
            const { exp, iss, role } = jwt.verify(token, tokenSecret);

            if (iss === 'my-api' && exp < Date.now() && role === requiredRole) {
                next();
                return;
            }
        } catch (err) {
            res.sendStatus(403);
            return;
        }
    }
}
Over here, we’ve created a higher-order function that takes a requiredRole parameter and returns a middleware function. This design allows us to create middleware tailored to the role required for accessing specific routes. As a result, the returned function is middleware compatible with Express. It takes the standard req (request), res (response), and next (function to call the next middleware) parameters.
This returned function validates the JWT token by doing the following:
- Extracting the token. It begins by extracting the JWT from the Authorization header of the incoming request. The expected format of the header is Bearer [token], so it removes the
'Bearer 'prefix to isolate the token. - Decoding the token. The token is then decoded using
jwt.decode(token), which parses the JWT and extracts its payload without verifying the signature. The payload is expected to contain at least three claims:exp(expiration time),iss(issuer), androle(user role). - Validation checks. The middleware performs the following checks on the decoded token:
- Issuer. Verifies that the
iss(issuer) claim matches'my-api', indicating that the token was issued by the expected authority. - Expiration. Checks if
exp(expiration time) is less than the current time (Date.now()), which would mean the token is expired. - Role. Compares the role claim in the token to the
requiredRoleparameter passed tovalidateRequest. This ensures the user has the appropriate role for the request.
- Issuer. Verifies that the
Note: if all checks pass (issuer is correct, token has not expired, and user has the required role), it calls next() to proceed to the next middleware or route handler. If any check fails, it sends a 403 Forbidden status code as the response, indicating that the request is unauthorized.
Next, you can add the middleware function to your routes and specify the role required to access the route:
// add the function to let only admin access it
app.get('/users', validateRequest('admin'), (req, res) => {
res.send(JSON.stringify({ users }))
});
// add the function to let only admin access it
app.get('/users/:userId', validateRequest('admin'), (req, res) => {
const { params } = req;
const { userId } = params;
console.log({ userId });
const user = users.find((user) => user.id === userId);
if (!user) {
res.sendStatus(404)
return;
}
res.send({ user })
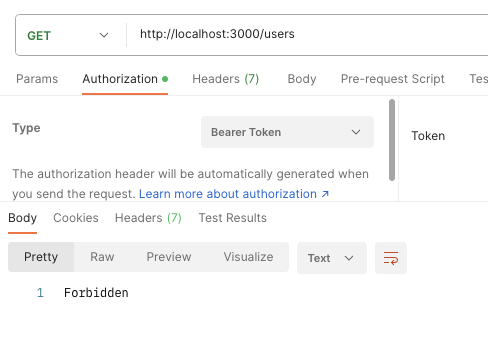
});As shown above, both routes are protected so that only the administrator can access it. Now, if you attempt to access the route as a customer or with an invalid token, you should see the output pictured below.
But, if your token is valid, you should see the output pictured below.
Wrapping Up
And that’s pretty much it for this article. You have successfully built a REST API using JWT based authentication/authorization.
Next, you can utilize this token in your client-side apps like Angular or React and pass the token in all API requests to ensure that your frontend is able to communicate with the API successfully.
If you wish to check out the code, feel free to visit my GitHub repo, or this CodeSandbox demo.
Thank you for reading.
Frequently Asked Questions (FAQs) about Using JSON Web Tokens in Node.js
A JSON Web Token (JWT) is a compact, URL-safe means of representing claims to be transferred between two parties. JWTs are used to securely transmit information between a client and a server as a JSON object, which can be verified and trusted because it is digitally signed.
How do I handle JWT expiration?
JWTs have an expiration field (exp) that determines when the token is no longer valid. To handle expiration in Node.js, you can use a method provided by the token generation library that you have used.
Should I store JWTs in cookies or local storage?
The choice between storing JWTs in cookies or local storage depends on the specific needs and security considerations of your application.
Cookies are generally more secure when properly configured (e.g., HttpOnly, Secure, SameSite), as they are less prone to XSS attacks than local storage. However, cookies can be vulnerable to CSRF attacks. Using local storage makes your token prone to XSS attacks but not CSRF attacks.
Therefore, it’s essential to weigh these considerations and apply additional security measures accordingly, regardless of the technique you adopt.
Yes, JWTs can be refreshed by issuing a new token to the client before the old token expires. This typically involves having a separate refresh token that is used solely to obtain new access tokens.
The refresh token is stored securely on the server and is sent to the client alongside the access token. When the access token is about to expire, the client can request a new one using the refresh token.
How do I send a JSON Web Token to the client?
After generating a token, you can send it to the client in the response to a successful login request. The client should then store the token and include it in the Authorization header of subsequent requests.
How do I protect routes with JSON Web Tokens in Node.js?
To protect routes, you can create a middleware function that verifies the token included in the request’s Authorization header. If the token is valid, the middleware function should call next to allow the request to proceed. If the token is invalid, the middleware function should send a response with an error status code.
How do I handle errors when verifying a token?
When verifying a token, the verify method calls the callback function with an error if the token is invalid. You can handle this error to send a response with an appropriate status code and message. For example, if the error is because the token has expired, you might send a 401 Unauthorized status code with a message saying “Session expired. Please log in again.”
 Lakindu Hewawasam
I am a Senior Software Engineer and an AWS Community Builder with a passion for building great applications. I love experimenting with new technologies and putting it to good use by building products that all of us can use everyday.