Throughout this tutorial I will be outlining how you can leverage the jQuery Interactions libraries to create more interactive and easy to manage admin areas and elements. We will start off with an explanation of what these interactions are along with a summary of the three main libraries we will be using; dragable, dropable and sortable. After we have covered the basics of these libraries I will show you how they can be used in a real world situation to extend your administration areas and create interactive zones.
What are jQuery Interactions?
jQuery Interactions are a collection of different libraries that have been created to abstract away some of the fundamental difficulties of building interactive interfaces. These scripts are part of the jQuery UI (user interface) family and handle interactions such as dragging, dropping and sorting; with these libraries we can create complex functionality without the need of reinventing the wheel.Loading the jQuery Interactions Libraries
WordPress comes pre-intstalled with all of the interactions libraries (such as draggable and droppable). All you need to do is enqueue the required script on either the front end or back end of your site and you will be able to leverage the library however you want. WordPress often enqueues some of the interaction libraries in the administration areas. For example, when on the ‘widgets’ admin screen both draggable and droppable are already loaded (which provides the draggable interface for managing your sidebars / widgets) However it is often better to implicitly load the script you want just in case. You can enqueue the interaction library you want by hooking onto either thewp_enqueue_scripts or admin_enqueue_scripts hooks. These hooks will let you enqueue your script on either the front end or back end respectively.
You will need to edit either your child theme’s functions.phpfiles or another location (such as your plugin file if you are writing a plugin) and hook onto the appropriate hook as displayed below.
You will call the wp_enqueue_scriptfunction to load your script. Since we want to enqueue scripts that are preinstalled with WordPress we simply need to pass the correct name of the library (you can get a listing of all included scripts by going to the codex page for wp_enqueue_scripts).
Since we will be looking at draggable, droppable and sortable here are the names you need to enqueue:
- jquery-ui-draggable
- jquery-ui-droppable
- jquery-ui-sortable
Enqueuing on the front end
Create a function and hook it onto thewp_enqueue_scripts hook.
//enqueue draggable on the front end
function enqueue_scripts_front_end(){
wp_enqueue_script('jquery-ui-draggable');
}
add_action('wp_enqueue_scripts','enqueue_scripts_front_end');
Enqueuing on the back end
Create a function and hook it onto theadmin_enqueue_scripts hook.
//enqueue droppable on the back end
function enqueue_scripts_front_end(){
wp_enqueue_script('jquery-ui-droppable');
}
add_action('admin_enqueue_scripts','enqueue_scripts_front_end');Draggable, Droppable and Sortable a quick summary
Overall the interaction libraries let you create interactions and movement with objects without having to do all of the hard work yourself. Explaining the libraries and all they can do is beyond the scope of this tutorial, however here are my thoughts on the libraries.Draggable
Exactly as it sounds, you can create draggable movements and is often used to drag elements from one area to another (commonly between lists).Droppable
The area in which your draggables will be dropped. There can be many areas you want to drop your things into, or maybe just one. Generally it is within the droppable API you move your items and do other actions (such as detecting when your draggable enters or leaves a correct area etc).Sortable
This lets you easily move your items around without having to position them yourself. This is great for when you have a collection of items and their position is crucial.A Real World Example – A Droppable, Draggable and Sortable Related Pages Module
Let’s look at a scenario where you might want to take advantage of the interaction libraries to create dynamic useful controls for your admin users (or yourself if you manage multiple sites). Pages contain two areas that you can edit. Thetitle of the page and the content of the page.
While this is often all you need on your page, occasionally you might want to have additional information or functionality.
For example, if you wanted the page to link to additional areas in a controlled way you would either have to use shortcodes at the bottom of your content area or you might have to use a special page template.
What we can do is create new functionality for our pages that would allow the admin user to define links to other pages of the website. In this way the user would be able to manage links at the bottom of the page without having to edit the content area at all.
Creating a drop and drag solution along with ordering would be perfect in this situation.
A summary of what we need to do
In our scenario we will be expanding on ourpages administration functionality; We will be creating an interface in which users can select additional pages to be linked to the bottom of the current page. This interface will be a simple drop and drag interface with the option to re-sort page links.
Here is a breakdown of how we will proceed:
- Create your CSS and JS files
- Create a new meta box for pages
- Add a list of ‘draggable’ elements
- Add the ‘droppable’ element
- Saving the related pages
- The CSS elements
- The jQuery elements
- Outputting the related pages
1 – Create your CSS and JS files
Before we begin we will need to load an additional CSS and JS file for our custom styling and scripting respectively. These files need to run only on the admin back-end so you will need to enqueue these two scripts and styles to theadmin_enqueue_scripts hook as follows.
//enqueue the admin scripts / styles for the related pages functionality
function enqueue_related_pages_scripts_and_styles(){
wp_enqueue_style('related-pages-admin-styles', get_stylesheet_directory_uri() . '/admin-related-pages-styles.css');
wp_enqueue_script('releated-pages-admin-script', get_stylesheet_directory_uri() . '/admin-related-pages-scripts.js', array('jquery','jquery-ui-droppable','jquery-ui-draggable', 'jquery-ui-sortable'));
}
add_action('admin_enqueue_scripts','enqueue_related_pages_scripts_and_styles');2 – Create a new meta box for pages
We need to firstly create a new meta box that will hold our related pages functionality. Start by creating a function and attaching it to theadd_meta_boxes hook. Inside this function we will be calling the add_meta_box functionality that defines the new meta box, what post type it relates to and other associated information.
Put the following code in your functions.php or applicable file.
//Add a meta box to the 'pages' post type
function add_related_pages_meta_box_to_pages() {
add_meta_box(
'related_pages_meta_box', //unique ID
'Related Pages', //Name shown in the backend
'display_related_pages_meta_box', //function to output the meta box
'page', //post type this box will attach to
'normal', //position (side, normal etc)
'default' //priority (high, default, low etc)
);
}
add_action('add_meta_boxes','add_related_pages_meta_box_to_pages');display_related_pages_meta_box. This function will be used to display the meta box and as such it takes in a single value of $post.
//defines the output for our related pages meta box
function display_related_pages_meta_box($post){
}
3 – Add a list of ‘draggable’ elements
After we have the meta box set up we need to create a listing of all pages on the website. We need to collect all of the pages and then display them visually as block elements we can set as ‘draggable’ for our interface. Inside theadd_related_pages_meta_box_to_pages function add the following code.
//create nonce
wp_nonce_field('pages_meta_box','pages_meta_box_nonce');
//collect related pages (if we already have some)
$related_pages = get_post_meta($post->ID,'related_pages',true);
//collect all pages on the website
$page_args = array(
'posts_per_page' => -1,
'post_type' => 'page',
'post_status' => 'publish',
'orderby' => 'post_date',
'order' => 'DESC',
'fields' => 'ids'
);
$pages = get_posts($page_args);
//if we have pages to display
if($pages){
echo '<div class="related_pages">';
//left container (all pages)
echo '<div class="left_container">';
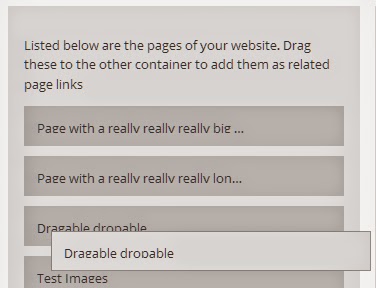
echo '<p> Listed below are the pages of your website.</p>';
echo '<p>Drag these to the other container to add them as related page links </p>';
//loop through all pages
foreach($pages as $page){
//collect their id and name and create the page item
$page_id = $page;
$page_name = get_the_title($page_id);
echo '<div class="page_item" data-page-id="' . $page_id . '">';
echo '<div class="page_title">' . $page_name . '</div>';
echo '<div class="remove_item"> Remove </div>';
echo '</div>';
}
echo '</div>';
//end left container
echo '<div class="clearfix"></div>';
echo '</div>';
}wp_nonce_field function on the codex page. Overall the nonce will output a hidden input type with a value. The first argument is the admin name of the nonce and the second is the name that the hidden input will have (so it can be retrieved and checked later).
We continue by collecting the meta value of related_pages into a variable. This is a post meta field that contains a JSON encoded string representing all of the related pages we want saved. We collect it now so we can use it later in our droppable section.
We use get_post_meta to get the meta value by passing in the ID of the page, the name of the meta field and specifying true so that we return only one field. Have a look at the function definition on the codex.
We are creating a listing of pages by supplying arguments to the get_posts functions (in this case it returns a listing of post ID’s representing the post).
We loop through all of the pages and collect their ID and title.
Using this information we create a page item with a data-page-id attribute corresponding with the page ID (this will later on in jQuery). We add the title of the page along with a remove button.
4 – Add the ‘droppable’ element
We need to create an area for the draggable items to be dropped. Once items have been dropped here they can be sorted as we like. Go back to theadd_related_pages_meta_box_to_pages function and look for the comment that says //end left container. We are going to add additional code after this comment, it will be right after the end of theleft_container but right before the clearix div and the end of the related_pages div.
//Right container
echo '<div class="right_container">';
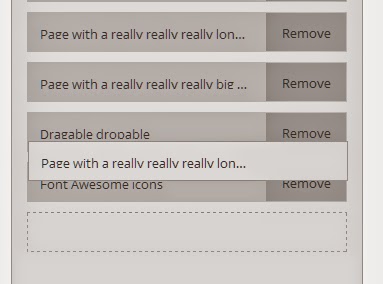
echo '<p>Drag pages from the left container onto this container </p>';
//if we have previous saved related pages
if(!empty($related_pages)){
$related_pages_array = json_decode($related_pages);
foreach($related_pages_array as $related_page){
//page information
$page_id = $related_page;
$page_name = get_the_title($page_id);
echo '<div class="page_item" data-page-id="' . $page_id . '">';
echo '<div class="page_title">' . $page_name . '</div>';
echo '<div class="remove_item active"> Remove </div>';
echo '<input type="hidden" name="related_pages[]" value="' . $page_id . '"/>';
echo '</div>';
}
}
echo '<div class="droppable-helper"></div>';
echo '</div>';related_pages variable we collected before which contains a listing of our already saved page items (on the first edit of a page or if we haven’t chosen anything this will be empty).
If this variable is not empty we decode it using json_decode. This function turns a JSON encoded string value into an array so we can loop through each (look at the PHP documentation if you are interested).
Now we loop through the related pages array with foreach and collect the ID representing the page. We in addition collect the pages name using the get_the_title function (view the codex for more information).
For each of the related pages, we create a page item; this page item has the class page_item and also a data attribute called data-page-id that contains the ID of the page.
Inside the item we specify a remove button (which will be used later so we can remove the item).
Also inside the item we define the hidden field input that contains the value of the page itself. This will be the value that is passed to the form on submit (which we will then save). Notice that the name is related_pages[] with an []. This is important as it means on the form when we process we will be supplying an array of pages.
Finally, outside of the page item we create a droppable helper item that we will use to make dropping items into this zone easier (when you drag an item from the left container to the right container this will activate and will show you where you should drag the item).
5 – Saving the related pages
By this point we have created two containers, one for the listing of all pages and a second for where these pages will be dragged and sorted. Currently without the jQuery they won’t do anything. However, once you have this set up correctly you will be able to drop and drag items from the list into the other list and in doing so you will get a series of hidden inputs that will be passed on pressing save. This is where we need to define our saving function so that we can take these values and put them into a meta value. Copy the following into yourfunctions.php file or similar.
//save our related pages meta information for pages
function save_meta_information_for_page($post_id){

//test for existence of nonce
if(!isset($_POST['pages_meta_box_nonce'])){
return $post_id;
}
//verify nonce
if(!wp_verify_nonce($_POST['pages_meta_box_nonce'],'pages_meta_box')){
return $post_id;
}
//if not autosaving
if(defined('DOING_AUTOSAVE') && DOING_AUTOSAVE){
return $post_id;
}
//check permissions
if(!current_user_can('edit_page',$post_id)){
return $post_id;
}

//SAFE to save data, let's go
$related_pages_value = '';
//collect related pages (if set)
if(isset($_POST['related_pages'])){
$related_pages_array = $_POST['related_pages'];
$related_pages_value = json_encode($related_pages_array);
}

//update post meta
update_post_meta($post_id,'related_pages',$related_pages_value);

}
add_action('save_post_page','save_meta_information_for_page');save_meta_information_for_page and attach it to the save_post_page hook. This hook will fire only when pages are saved / updated. You could use the generic save_post hook (and check the post type inside), however this newer action lets you target specific post types (learn about how to use it on the save_post codex page).
Inside this function we perform security checking before we do anything else.
We first test for the existence of the nonce and then verify to ensure it is correct (if it fails we don’t proceed).
After this we check to make sure we are not auto-saving, we are only interested in full page updates via the save button.
Finally we ensure that the user can access this page and edit it using the current_user_can function. This function determines if the current logged in user can perform certain actions. In our case if the user can edit the page they are refused (Read more about this on its codex page).
Once we are sure that the page is secure we can begin our processing.
We define an empty variable $related_pages_value that will be used to hold our related pages info.
We check the global $_POST variable to see if any hidden input fields called related_pages have come through. If we do have them we assign them to a variable (which will come through as an array). We call the json_encode function to turn this array into a long string we can then save (take a look at the json_encode function if you are interested).
As a last step, we call the update_post_meta function to save this newly created string representing our page values (check out the codex entry for this here). This will ensure that when we come back into the page later we can retrieve these values and automatically put them in the right hand column for our related pages.
6 – The CSS elements
Overall you will need some basic CSS for this tutorial. Our system will consist of two containers, one for the listing of all pages and the other for our desired related pages. Inside these lists we will have page items that represent the page itself. These items will have a name and a remove button (when they are dragged to the related pages area). Please go ahead and open up the admin CSS file you enqueued earlier calledadmin-related-pages-styles.css and add the following.
/*Clearfix for floating elements*/
.clearfix:before,
.clearfix:after {
content: " ";
display: table;
}
.clearfix:after{
clear: both;
}

/*left and right containers*/
.related_pages .left_container,
.related_pages .right_container{
float: left;
min-height: 80px;
width: auto;
background: #eee;
padding: 15px;
-webkit-box-sizing: border-box;
-moz-box-sizing: border-box;
box-sizing: border-box;
display: block;
padding-bottom: 50px;
border: solid 1px transparent;
margin-right: 15px;
}
/*simple description field before page items*/
.related_pages .description{
width: 320px;
}
/*page item itself*/
.related_pages .page_item{
padding: 12px;
background: #ccc;
height: 40px;
margin-bottom: 10px;
width: 320px;
display: block;
-moz-box-sizing: border-box;
box-sizing: border-box;
position: relative;
border: solid 1px transparent;
position: relative;
z-index: 1;
}
/*title for the pages*/
.page_item .page_title{
position: relative;
width: calc(100% - 85px);
height: 100%;
white-space: nowrap;
overflow: hidden;
text-overflow: ellipsis;
}

/*removing an item from related pages*/
.page_item .remove_item{
display: none;
position: absolute;
top: 0px;
right: 0px;
height: 100%;
line-height: 40px;
padding: 0px 10px;
box-sizing: border-box;
background: #aaa;
width: 80px;
text-align: center;
cursor: pointer;
}
.page_item .remove_item.active{
display: block;
}

/*page item while dragging*/
.related_pages .page_item.ui-draggable-dragging,
.related_pages .page_item.ui-sortable-helper {
border: solid 1px #aaa;
background: #eee;
}

/*dragging item over droppable zone*/
.right_container.hover-over-draggable{
border: solid 1px #aaa;
}

/*placeholder text for sorting items*/
.related_pages .my-placeholder{
height: 40px;
border: dashed 1px #aaa;
margin-bottom: 10px;
-moz-box-sizing: border-box;
box-sizing: border-box;
width: 320px;
}
/*placeholder for when hovering over droppable*/
.related_pages .droppable-helper{
width: 320px;
height: 40px;
border: dashed 1px #aaa;
margin-bottom: 10px;
display: none;
-moz-box-sizing: border-box;
box-sizing: border-box;
}
.droppable-helper.active{
display: block;
}7 – The jQuery elements
Now that all of the PHP has been set up we can look at the jQuery and how we intent to use the draggable, droppable and sortable libraries. First go into your admin jQuery file calledadmin-related-pages-scripts.js and add the following code.
//trigger on document ready
jQuery(document).ready(function($){
});$ item.
Left hand side draggable area
Thedraggable library is extensive so please feel free to view the API for a full listing of its options, methods and events.
The left hand side container has a listing of all the page items. When we find a page we like in the left hand side container, we will drag it to the right hand container. When dropped the item will be copied into this list, ready to be sorted and saved.
/*Draggable Area*/
$('.left_container .page_item').draggable({
helper: 'clone',
revert: 'invalid',
scope: 'related_pages_scope',
cursor: 'move',
zIndex: 5
});left_container item and its inner items called page_item (which as you remember are items representing each page).
We call the draggable function (which is part of the draggable library we enqueued previously). This function takes several options however I have specified just a few to get the functionality I wanted.
helper– ‘clone’ means that it will create an identical copy of the item you are dragging (so we can see it as we move it around)revert– ‘invalid’ means that unless we drop this thing into the right container it will bounce back in an animated style (the helper will release and the item will go back to the same location as the dragged item, letting you know nothing has happened)cursor– ‘move’ is the style that your mouse cursor will have when you start dragging. This is an aesthetic choicescope– ‘related_pages_scope’ is a special name that both the draggable and the droppable will share. This option helps link zones together so that they will recognize when a draggable can be dropped successfullyzIndex– 5 is the value I give to thepage_itemelements we are dragging around. In our CSS we have set thepage_itemto have z-index 1 so when we drag these items they will sit higher than our existing page items
Right hand side droppable area
Thedroppable library is extensive so please feel free to view the API for a full listing of its options, methods and events.
The right hand side container is where we will be dragging all of the page items. Each item will be dropped here and then later sorted in the desired order. Start by adding the following code.
/*Droppable Area*/
$('.right_container').droppable({
accept: '.page_item',
scope: 'related_pages_scope',
hoverClass: 'hover-over-draggable',
tolerance: 'touch',
drop: function(event,ui){

//define items for use
var drop_helper = $('.right_container').find('.droppable-helper');
var page_item = ui.draggable.clone();

//on drop trigger actions
page_item.find('.remove_item').addClass('active');
page_item.append('<input type="hidden" name="related_pages[]" value="' + page_item.attr('data-page-id') + '"/>');

//add this new item to the end of the droppable list
drop_helper.before(page_item);
drop_helper.removeClass('active');

trigger_remove_page_item_action();

},
over: function(event,ui){
//when hovering over the droppable area, display the drop helper
$('.right_container').find('.droppable-helper').addClass('active');

},
out: function(event,ui){
$('.right_container').find('.droppable-helper').removeClass('active');
}
});right_container and then calling the droppable function on it. This function has several options and methods, some of which I have defined below.
accept– ‘.page_item’ is the class name of items that will be accepted by this droppable. In our case we want this droppable to take our page itemsscope– ‘related_pages_scope’ is the name that both the droppable and draggable elements share. This connects the two lists together and makes it possible to drag and drop itemshoverClass– ‘hover-over-draggable’ is the class name that will be added to theright_containerwhen we have a correct draggable hovering over the container. This will let us do things such as highlighting the container or enabling helper units.tolerance– ‘touch’ means that as soon as the draggable touches the droppable area it will be able to be dropped (by default most of the item has to be inside the area to drop). This is mainly a look and feel things.drop– This option is the event that will trigger when a correct draggable is dropped onto the droppable. This is where most of our functionality happens- This function has access to the
uiitem, which contains the reference to the item being dragged. We collect the page item being dragged into a local variable by cloning the draggable. - We find the
droppable-helperinside the droppable list. - Now that we have access to a copy of the draggable we add a new hidden input field inside of it and supply the page ID by using append.
- We find the
remove_itembutton inside of the item and set it to active (so later we can remove it if we want) - We get the
droppable-helperitem and insert our chosen related page before it. - We get the
droppable-helperand ensure that when we drop the draggable item we remove its active class (as we only want to see this helper item when we are hovering over the droppable) - We call our function called
trigger_remove_page_item_actionwhich is used to bind a remove event to the remove buttons (so we can remove them from our page list later if we like)
- This function has access to the
over– This option is the event that will trigger when a correct draggable is hovered over a correct droppable. Mainly we use this function to activate our droppable helper item- When hovering over the droppable area, find our
droppable-helperitem and activate it
- When hovering over the droppable area, find our
out– This option is the event that will trigger when a correct draggable is hovered out of a correct droppable (its been removed). We use this to disable our droppable helper item- When hovering out of the droppable area, find our
droppable-helperitem and deactivate it
- When hovering out of the droppable area, find our
Right hand side sortable area
The sortable library is extensive so please feel free to view the API for a full listing of its options, methods and events. Now that we can move items from the left container to the right container, we can start sorting the right container (related page items)./*Sortable Area*/
$('.right_container').sortable({
items: '.page_item',
cursor: 'move',
containment: 'parent',
placeholder: 'my-placeholder'
});right_container again that contains our related page items. We then call the sortable function and define options.
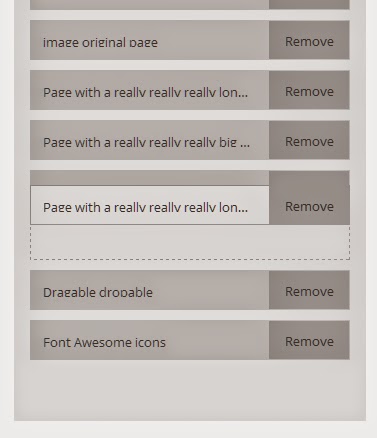
items– ‘.page_item’ is the name of the items that will be sortedcursor– ‘move’ is the type of cursor that will be used when moving the itemcontainment– ‘parent’ will constrain the movement of the sortable items to the parent (this will make it so you cant move the items outside of the right containerplaceholder– ‘my-placeholder’ is the CSS name that will be used when sorting the item. When you sort an item the sortable plugin will add a temporary item into the list of items. This temporary item will move the other items up and down. For this tutorial I have supplied styles so that it will look similar to the droppable helper so you can see the sorting.
Other functions
We also need to add a function to remove an existing page item (for example you may have dragged over a page but now no longer want it). Add the following to the bottom of your JS file.//Remove page item functionality
function trigger_remove_page_item_action(){
$('.remove_item').on('click',function(){
$(this).parents('.page_item').remove();
});
}
trigger_remove_page_item_action();8 – Outputting the related pages
Now that we have the related pages saved to a page, we can create a function to show these pages at the bottom of the applicable page.//Displays the related pages information at the bottom of the page
function display_related_pages_information($html){
global $post;
if($post){
//execute if we are on a page
if(get_post_type($post) == 'page'){
//determine if this page has any related page set
$related_pages = get_post_meta($post->ID,'related_pages',true);
if($related_pages){
//begin related pages output
$html .= '<article class="related_pages">';
$html .= '<h2>Related Pages</h2>';
$related_pages_array = json_decode($related_pages);
foreach($related_pages_array as $related_page){
//get page information
$page_id = $related_page;
$page_name = get_the_title($page_id);
$page_permalink = get_permalink($page_id);
//output related page
$html .= '<section>';
$html .= '<a href="' . $page_permalink . '">';
$html .= $page_name;
$html .= '</a>';
$html .= '</section>';
}
$html .= '</article>';
}
}
}
return $html;
}
add_filter('the_content','display_related_pages_information');display_related_pages_information and add it to the the_content filter. This filter will give us access to the content section of the page (we will be placing our related pages after the main page content area).
We will have access to the $html item which contains the html for the content of the page. We will be adding our output code onto this.
We get the global $post item and then check to see if the post type is page. If we are on a page we will execute our related pages output.
We get the related pages from the meta value related_pages and if we have set pages we begin the output.
We create an article and a header and then for each of the related pages we collect collect their ID, name and permalink. With this information we create a simple link to the desired page.
We return the $html variable at the bottom of our filter and when we view our pages, if they have associated related pages they should look similar to the following.
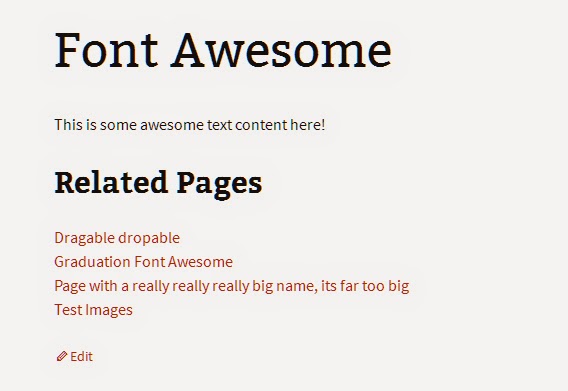 The great thing about this is that you don’t need to edit any template files and the related pages will only be shown if they have been set.
Conclusion
Hopefully, by now, you have a much better handle on the complexities of the jQuery Interactions libraries, and how to create more interactive and easy to manage administration functions, particularly when it comes to the three main different libraries: dragable, dropable and sortable. Please let me know if you have any comments or queries below.Frequently Asked Questions (FAQs) about Using jQuery Interactions in Your WordPress Admin
How can I enqueue scripts on specific WordPress admin pages?
Enqueuing scripts on specific WordPress admin pages can be done using the ‘admin_enqueue_scripts’ action hook. This hook allows you to specify the exact pages where you want your scripts to load. You can use the $hook_suffix global variable to target a specific admin page. This variable contains the current page’s ID which you can use to conditionally enqueue your scripts.
What is the role of jQuery in WordPress?
jQuery is a powerful JavaScript library that simplifies HTML document traversing, event handling, animating, and Ajax interactions for rapid web development. In WordPress, jQuery is used to create dynamic and interactive user interfaces, form validation, handling Ajax requests, and much more. It’s a crucial part of WordPress core and is used extensively in both themes and plugins.
How can I add and use jQuery in WordPress?
WordPress comes with a built-in version of jQuery, so you don’t need to load it from an external source. To use jQuery in your WordPress site, you can enqueue the script in your theme’s functions.php file using the wp_enqueue_script() function. This function ensures that jQuery is loaded in the correct order and prevents any conflicts with other scripts.
How can I enqueue admin scripts on a specific page in WordPress?
To enqueue admin scripts on a specific page in WordPress, you can use the ‘admin_enqueue_scripts’ action hook along with the global $pagenow variable. This variable holds the name of the current page, allowing you to conditionally enqueue your scripts based on the page name.
Why is it important to enqueue scripts in WordPress?
Enqueuing scripts in WordPress is important for several reasons. First, it ensures that scripts and styles are loaded in the correct order, preventing any conflicts or errors. Second, it allows you to specify dependencies for your scripts, meaning that WordPress will automatically load any required scripts before loading your script. Finally, it helps to prevent any potential conflicts with other plugins or themes that may also be enqueuing scripts.
How can I troubleshoot jQuery conflicts in WordPress?
jQuery conflicts in WordPress can be caused by a variety of issues, such as multiple versions of jQuery being loaded, plugins or themes not properly enqueuing scripts, or custom scripts causing errors. To troubleshoot these issues, you can use the browser’s developer tools to check for any JavaScript errors, disable plugins one by one to identify any conflicts, or check your theme’s functions.php file to ensure scripts are being enqueued correctly.
How can I update the jQuery version in WordPress?
WordPress comes with a built-in version of jQuery, which is updated with each new release of WordPress. However, if you need to use a different version of jQuery, you can deregister the built-in version and enqueue your own version. Be aware that this can potentially cause conflicts with plugins or themes that rely on the built-in version of jQuery.
How can I use jQuery in WordPress without conflict?
To use jQuery in WordPress without conflict, you should always use the built-in version of jQuery and enqueue your scripts using the wp_enqueue_script() function. This ensures that jQuery is loaded in the correct order and prevents any conflicts with other scripts. Additionally, you should always use the jQuery noConflict mode, which allows you to use jQuery alongside other JavaScript libraries without any conflicts.
How can I optimize jQuery scripts for better performance in WordPress?
Optimizing jQuery scripts for better performance in WordPress can be achieved in several ways. First, always enqueue your scripts in the footer whenever possible to improve page load times. Second, minimize your scripts using a tool like UglifyJS to reduce their size. Finally, consider using a CDN to serve your scripts, which can significantly improve load times.
How can I use jQuery to create interactive elements in WordPress?
jQuery can be used to create a wide range of interactive elements in WordPress, such as sliders, accordions, tabs, and much more. To do this, you would typically enqueue your jQuery script, then use jQuery’s built-in functions to manipulate HTML elements and create interactive effects. For example, you could use the .slideDown() function to create a sliding effect, or the .fadeIn() function to create a fading effect.
 Simon Codrington
Full stack developer and overall web enthusiast. I love everything to do with web / design and my passion revolves around creating awesome websites. Focusing primarily on WordPress, I create themes, plugins and bespoke solutions.