Web Icons
Users arriving at a website are focused as much on the visual design of a website as they are on the content they are hoping to find there. Traditionally, designers and developers have used individual images/sprite-sheets for their icons; these graphics were a series of pixel-perfect images that would be used in specific parts of the site (such as in the search bar, on navigational elements, as loading icons, etc). Displaying icons with images/sprites worked well for a long time (and many websites will still use them). However, with the focus on responsive design more important than ever, the challenge has been providing stunning iconography that looks great regardless of your device.What Are Font Icons?
Font icons are a way in which we can display fully responsive, customizable icons on our website without the use of additional images or sprite-sheets. Font icons are exactly what they sound like, a font made up entirely of icons. Where a normal font defines characters such as ‘a’, ‘b’, ‘c’, an icon font defines characters that are symbols, such as the search symbol, the menu toggle symbol, and a whole heap of others — all in one font.
Why Would I Use Font Icons?
Traditional images have worked well historically, but icon fonts give us a greater amount of flexibility and let us more easily manage our icons, and do so with responsiveness and ease.Font Icons are Fully Responsive
- These icons are vectors and can be scaled to any size without any loss of quality.
- Traditional images are raster images and created at a set size/dimension (usually based on a grid such as 48×48) These images can look awful when resized or when viewed on a high resolution device.
Font Icons can be styled, positioned and manipulated
- Font icons can be controlled as if they were typical fonts; you can set their color, background color, text alignment, line height and other attributes to style them using CSS.
- Traditional images don’t give you fine control. If you want an image to be slightly different in color or size, you will need to upload a different image.
Font Icons are Cross-Browser and Abundantly Available
- Font Icons have deep compatibility all the way back to ancient browsers (I’m looking at you, IE6)
- There are dozens of great icon fonts that designers have spent countless hours on; these fonts are usually updated frequently and refined to provide the best experience.
 With all the great free icon fonts out there, very little reason exists to use traditional images for icons anymore. However, there are still some debatable downsides to icon fonts.
- Browser and OS differences – Because these are fonts, it’s up to the browser how it renders the icons (there are subtle variations between each OS, between browsers, and even between different versions of the same browser). Traditional images, however, look the same regardless of what they are viewed on.
- Not every icon exists – Designers have covered most of the icons you will need in your projects; however, not all icons imaginable have been created, and so you may find yourself having to rely on images in some situations.
Getting Font Awesome into Your WordPress Project
Font Awesome is included in thousands of projects across the Internet, including WordPress themes (such as SitePoint’s own Base Theme) and plugins. Integrating Font Awesome with WordPress, be it a theme or plugin, is exceptionally easy and requires just a few steps to get up and running. There are dozens of icon fonts to use, but for this tutorial I will be using Font Awesome as they have hundreds of really amazing icons. We will be using version 5.4 of Font Awesome.Use a Local or External Copy of Font Awesome
There are two main options for getting Font Awesome in your project; you can either load the files on your web server or just link to the externally hosted stylesheet on a CDN.Download Font Awesome and Include the Fonts/CSS Manually
Click the download link on the Font Awesome home page and get the zip file. Inside the zip file, you will see the fonts and the required CSS file (there are also LESS/Sass files but we are not going to be using them). Your zip file should have the following resources that you will need to move over to your project (move them into their own applicable directories via FTP). Create a directory in your theme or plugin called ‘fonts’ and another called ‘css’ and move the files into these directories. Go into your theme’sfunctions.php and create a new function that we will use to load our stylesheet. Create a function and attach it to the wp_enqueue_scripts action. Once you have this function call the wp_enqueue_style function and load your stylesheet.
//enqueues our locally supplied font awesome stylesheet
function enqueue_our_required_stylesheets(){
wp_enqueue_style('font-awesome', get_stylesheet_directory_uri() . '/css/font-awesome.css');
}
add_action('wp_enqueue_scripts','enqueue_our_required_stylesheets');
Link to a Hosted CDN
Hosting with a third party CDN makes the process that much easier; all you need to do is create a function inside yourfunctions.php file and attach that function to the wp_enqueue_scripts action. Inside this function you will just enqueue the stylesheet (except this time you will reference the externally hosted link):
//enqueues our external font awesome stylesheet
function enqueue_our_required_stylesheets(){
wp_enqueue_style('font-awesome', '//maxcdn.bootstrapcdn.com/font-awesome/5.4.0/css/font-awesome.min.css');
}
add_action('wp_enqueue_scripts','enqueue_our_required_stylesheets');
How to Use Font Awesome (and Icon Fonts in General)
Font Awesome can be used in two different ways. Which way you implement it is completely up to you, and the needs of your project.A Pseudo Element (a CSS Method)
Using a pseudo method for adding your icon involves using the:before or:after pseudo CSS selectors to style your desired HTML element.
What you do is determine the element you want to apply your icon to and create a CSS style either before or after the element and manually set the icon that will be used (along with its style and design).
Each font in an icon font set has a unique code that represents the icon; this code is Unicode and tells the browser that you want to display the character that corresponds to this code. You would create your pseudo element and set its font to use your font icon family, and you would then set its content value.
The main properties you need to set are content and font-family to their respective values (so that the pseudo element will appear).
Button Example
<!-- Here is the styling -->
<style>

.my-button{
display: inline-block;
padding: 8px 12px;
background: #eee;
border: solid 1px #D5D5D5;
}
.my-button span{
display: inline-block;
}
.my-button span:before{
font-family: 'FontAwesome';
content: '\f085';
position: relative;
margin-right: 5px;
font-size: 110%;
}

</style>

<!-- Here is the HTML markup -->
<div class="my-button">
<span class="text"> Settings Menu </span>
</div>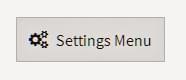 Since we wanted to display the multi gear icon we used to Unicode for that icon. Each of the Font Awesome pages will show the Unicode reference you need to include; this example the Unicode is
 \f085 as indicated on its sample page.
Pseudo-Element Pros
- You can be very specific with your designs; you set the sizing, line height, colours and styles you exactly want
- You don’t need to use an extra HTML element just to generate an icon (you can apply this directly to another element such as a H1 or div and then position it around the element)
Cons
- Need to set everything up manually (you can’t just use a predefined Font Awesome class to make everything bigger, or rotated, or other changes)
- Difficult to target with JavaScript/jQuery (since you are using a CSS method on an element, if you wanted to target an element and change an icon / swap it can’t be done; this is because you can’t target pseudo elements)
- If Font Awesome updates their Unicode references and you update the stylesheet you might need to re-enter the Unicode values)
An Inline Element (an HTML Method)
The simplest way to use Font Awesome is to assign the Font Awesome classes to an element. When you use a font icon this way it will generate a pseudo element before/after the targeted element and generate the styling for the icon. If you want to display an icon you need to assign thefa class to an item (generally elements such as i and span work the best). This class connects your item to the Font Awesome font.
Once your item has the base fa class you can then add the class name that corresponds to the icon you are trying to display; for example, if you wanted to display the camera icon you would also add the fa-camera-retro class. Choosing this corresponding icon class will look up the icon font and display its unicode character (its glyph).
<!--outputs a camera icon-->
<i class="fa fa-camera-retro"></i>Navigation Menu Example
You could build a simple navigation menu using the predefined Font Awesome classes and styles:<!-- CSS for the menu -->
/*Base styles for a drop down*/
.nav-list .nav-item{
display: block;
}
.nav-item .nav-link:first-child{
border-top: solid 1px #ccc;
}
.nav-item .nav-link{
display: block;
padding: 8px 12px;
background: #eee;
border: solid 1px #ccc;
border-top: 0px;
color: #333;
}
.nav-link > i {
margin-right: 10px;
}<!--HTML for the menu -->
<nav class="menu">
<div class="nav-list">
<li class="nav-item">
<a href="/" class="nav-link">
<i class="fa fa-home fa-fw"></i>
<span>Homepage</span>
</a>
<a href="/users" class="nav-link">
<i class="fa fa-user fa-fw"></i>
<span>Our Users</span>
</a>
<a href="/tags" class="nav-link">
<i class="fa fa-tag fa-fw"></i>
<span>View Tags</span>
</a>
</li>
</ul>
</nav>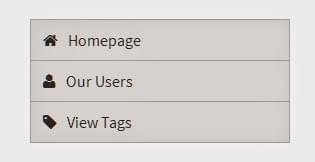
Stacking Icons Example
You can also stack icons together to create different looks. As an example, here is a series of social media buttons:<!--Basic CSS styling -->
.social-bar {
text-align: center;
}
.social-bar .header{
display: inline-block;
margin: 0px 7px 0px 0px;
border-bottom: solid 1px;
font-size: 110%;
}
/*holds the front and back icons*/
.social-bar .icon{
display: inline-block;
}
/*back (square) of the stack*/
.social-bar .icon > .back{
background: #333;
}
/*Front (icon) of the stack*/
.social-bar .icon > .front{
color: #fff;
}<!--HTML for the social media elements -->
<div class="social-bar">
<p class="header">Join our social media </p>
<a href="https://www.facebook.com/">
<span class="icon fa-stack fa-lg">
<i class="back fa fa-square fa-stack-2x"></i>
<i class="front fa fa-facebook fa-stack-1x"></i>
</span>
</a>
<a href="https://twitter.com/">
<span class="icon fa-stack fa-lg">
<i class="back fa fa-square fa-stack-2x"></i>
<i class="front fa fa-twitter fa-stack-1x"></i>
</span>
</a>
<a href="https://www.pinterest.com/">
<span class="icon fa-stack fa-lg">
<i class="back fa fa-square fa-stack-2x"></i>
<i class="front fa fa-pinterest fa-stack-1x"></i>
</span>
<a>
</div> Stacked icons work by wrapping your icons around another element and applying the
 fa-stack class to it.
The icons that you want to stack will need to use the fa-stack class also. You can specify the sizing you need by using the size classes such as fa-stack-1x and fa-stack-2x so that they stack correctly together.
Inline Element Pros
- Very simple to use. Apply the Font Awesome classes you want and then you will see your icon
- You can target the element itself with JavaScript/jQuery, meaning you can then add classes or remove classes to change and alter the icon displayed
- Many different styles and actions to choose from, including stacked icons, animation, sizing and positioning. All of these have been tested to ensure they work well and are cross browser complaint (you don’t have the headache of testing it all yourself)
- Easy visual representation in the HTML to show that you are using an icon (pseudo elements can be overlooked if they are just defined in the CSS)
Cons
- If you require more precise control you need to apply additional styles / override the Font Awesome Classes
Conclusion
Now that you know the fundamentals of getting icon fonts to work in your project, you can expand your designs and hopefully remove older image/sprite based icons in favor of these new fully responsive techniques!Frequently Asked Questions (FAQs) about Using Font Awesome with WordPress
How can I manually add Font Awesome to my WordPress theme?
To manually add Font Awesome to your WordPress theme, you need to download the Font Awesome package from the official website. Once downloaded, extract the files and upload them to your theme directory. Then, you need to enqueue the Font Awesome stylesheet in your theme’s functions.php file. This can be done by adding a function that uses the wp_enqueue_style() function to load the stylesheet.
What are the benefits of using Font Awesome in WordPress?
Font Awesome provides a vast library of scalable vector icons that can be customized in terms of size, color, drop shadow, and more using CSS. This makes it a versatile tool for enhancing the visual appeal and user experience of your WordPress site. It’s also easy to use, with numerous online resources and tutorials available for guidance.
Can I use Font Awesome with any WordPress theme?
Yes, Font Awesome can be used with any WordPress theme. However, the process of integrating it may vary depending on the specific theme. Some themes may have built-in support for Font Awesome, while others may require manual integration.
How can I use Font Awesome icons in my WordPress posts or pages?
To use Font Awesome icons in your WordPress posts or pages, you first need to ensure that Font Awesome is properly integrated with your WordPress theme. Once that’s done, you can use the Font Awesome HTML tags to add icons directly into your posts or pages.
Why are my Font Awesome icons not displaying correctly?
If your Font Awesome icons are not displaying correctly, it could be due to a number of reasons. These include issues with your CSS, conflicts with other plugins or themes, or incorrect usage of the Font Awesome HTML tags. It’s recommended to check your code for errors, disable any conflicting plugins or themes, and ensure you’re using the correct HTML tags.
Can I use Font Awesome icons in my WordPress menu?
Yes, you can use Font Awesome icons in your WordPress menu. This can be done by adding the appropriate Font Awesome classes to your menu items in the WordPress menu editor.
How can I customize the appearance of my Font Awesome icons?
Font Awesome icons can be customized using CSS. You can change the size, color, and other properties of your icons by targeting the appropriate Font Awesome classes in your CSS.
Is Font Awesome compatible with the latest version of WordPress?
Yes, Font Awesome is regularly updated to ensure compatibility with the latest versions of WordPress. However, it’s always a good idea to check the official Font Awesome website for any potential compatibility issues.
Do I need to have coding skills to use Font Awesome in WordPress?
While having some basic knowledge of HTML and CSS can be helpful when using Font Awesome, it’s not strictly necessary. There are numerous online resources and tutorials available that can guide you through the process of integrating and using Font Awesome in WordPress.
Are there any alternatives to Font Awesome for WordPress?
Yes, there are several alternatives to Font Awesome for WordPress. These include other icon libraries like Ionicons, Glyphicons, and Material Icons, as well as various WordPress plugins that provide similar functionality. However, Font Awesome remains one of the most popular and widely used options due to its extensive icon library and ease of use.
 Simon Codrington
Full stack developer and overall web enthusiast. I love everything to do with web / design and my passion revolves around creating awesome websites. Focusing primarily on WordPress, I create themes, plugins and bespoke solutions.