
We’ve compiled a list of the most used and useful APIs that are built in to the standard Node.js runtime. For each module you’ll find simple english explanations and examples to help you understand.
This guide has been adapted from my course Node.js: Novice to Ninja. Check it out there to follow comprehensive course to build your own multi-user real time chat application. It also includes quizzes, videos, code to run your own docker containers.
When building your first Node.js application it’s helpful to know what utilities and APIs node offers out of the box to help with common use cases and development needs.
Useful Node.js APIs
- Process: Retrieve information on environment variables, args, CPU usage and reporting.
- OS: Retrieve OS and system related information that Node is running on: CPUs, Operating system version, home directories, etc.
- Util: A collection of useful and common methods that help with decoding text, type checking and comparing objects.
- URL: Easily create and parse URLs.
- File System API: Interact with the file system to create, read, update, and delete files, directories, and permissions.
- Events: For emitting and subscribing to events in Node.js. Works similarly to client-side event listeners.
- Streams: Used to process large amounts of data in smaller and more manageable chunks to avoid memory issues.
- Worker Threads: Used to separate the execution of functions on separate threads to avoid bottleneck. Useful for CPU-intensive JavaScript operations.
- Child Processes: Allows you to run sub-processes that you can monitor and terminate as necessary.
- Clusters: Allow you to fork any number of identical processes across cores to handle the load more efficiently.
Process
The process object provides information about your Node.js application as well as control methods. Use it to get information like environment variables, and CPU and Memory usage. process is available globally: you can use it without import, although the Node.js documentation recommends you explicitly reference it:
import process from 'process';process.argvreturns an array where the first two items are the Node.js executable path and the script name. The item at index 2 is the first argument passed.process.env: returns an object containing environment name/value pairs—such asprocess.env.NODE_ENV.process.cwd(): returns the current working directory.process.platform: returns a string identifying the operating system:'aix','darwin'(macOS),'freebsd','linux','openbsd','sunos', or'win32'(Windows).process.uptime(): returns the number of seconds the Node.js process has been running.process.cpuUsage(): returns the user and system CPU time usage of the current process—such as{ user: 12345, system: 9876 }. Pass the object back to the method to get a relative reading.process.memoryUsage(): returns an object describing memory usage in bytes.process.version: returns the Node.js version string—such as18.0.0.process.report: generates a diagnostic report.process.exit(code): exits the current application. Use an exit code of0to indicate success or an appropriate error code where necessary.
OS
The os API has similarities to process (see the “Process” section above), but it can also return information about the Operating System Node.js is running in. This provides information such as what OS version, CPUs and up time.
os.cpus(): returns an array of objects with information about each logical CPU core. The “Clusters” section below referencesos.cpus()to fork the process. On a 16-core CPU, you’d have 16 instances of your Node.js application running to improve performance.os.hostname(): the OS host name.os.version(): a string identifying the OS kernel version.os.homedir(): the full path of the user’s home directory.os.tmpdir(): the full path of the operating system’s default temporary file directory.os.uptime(): the number of seconds the OS has been running.
Util
The util module provides an assortment of useful JavaScript methods. One of the most useful is util.promisify(function), which takes an error-first callback style function and returns a promise-based function. The Util module can also help with common patterns like decoding text, type checking, and inspecting objects.
util.callbackify(function): takes a function that returns a promise and returns a callback-based function.util.isDeepStrictEqual(object1, object2): returnstruewhen there’s a deep equality between two objects (all child properties must match).util.format(format, [args]): returns a string using a printf-like format.util.inspect(object, options): returns a string representation of an object for debugging. This is similar to usingconsole.dir(object, { depth: null, color: true });.util.stripVTControlCharacters(str): strips ANSI escape codes from a string.util.typesprovides type checking for common JavaScript and Node.js values. For example:
import util from 'util';

util.types.isDate( new Date() ); // true
util.types.isMap( new Map() );  // true
util.types.isRegExp( /abc/ ); // true
util.types.isAsyncFunction( async () => {} ); // true
URL
URL is another global object that lets you safely create, parse, and modify web URLs. It’s really useful for quickly extracting protocols, ports, parameters and hashes from URLs without resorting to regex. For example:
{
  href: 'https://example.org:8000/path/?abc=123#target',
  origin: 'https://example.org:8000',
  protocol: 'https:',
  username: '',
  password: '',
  host: 'example.org:8000',
  hostname: 'example.org',
  port: '8000',
  pathname: '/path/',
  search: '?abc=123',
  searchParams: URLSearchParams { 'abc' => '123' },
  hash: '#target'
}
You can view and change any property. For example:
myURL.port = 8001;
console.log( myURL.href );
// https://example.org:8001/path/?abc=123#target
You can then use the URLSearchParams API to modify query string values. For example:
myURL.searchParams.delete('abc');
myURL.searchParams.append('xyz', 987);
console.log( myURL.search );
// ?xyz=987
There are also methods for converting file system paths to URLs and back again.
The dns module provides name resolution functions so you can look up the IP address, name server, TXT records, and other domain information.
File System API
The fs API can create, read, update, and delete files, directories, and permissions. Recent releases of the Node.js runtime provide promise-based functions in fs/promises, which make it easier to manage asynchronous file operations.
You’ll often use fs in conjunction with path to resolve file names on different operating systems.
The following example module returns information about a file system object using the stat and access methods:
// fetch file information
import { constants as fsConstants } from 'fs';
import { access, stat } from 'fs/promises';

export async function getFileInfo(file) {

  const fileInfo = {};

  try {
    const info = await stat(file);
    fileInfo.isFile = info.isFile();
    fileInfo.isDir = info.isDirectory();
  }
  catch (e) {
    return { new: true };
  }

  try {
    await access(file, fsConstants.R_OK);
    fileInfo.canRead = true;
  }
  catch (e) {}

  try {
    await access(file, fsConstants.W_OK);
    fileInfo.canWrite = true;
  }
  catch (e) {}

  return fileInfo;

}
When passed a filename, the function returns an object with information about that file. For example:
{
  isFile: true,
  isDir: false,
  canRead: true,
  canWrite: true
}
The main filecompress.js script uses path.resolve() to resolve input and output filenames passed on the command line into absolute file paths, then fetches information using getFileInfo() above:
#!/usr/bin/env node
import path from 'path';
import { readFile, writeFile } from 'fs/promises';
import { getFileInfo } from './lib/fileinfo.js';

// check files
let
  input = path.resolve(process.argv[2] || ''),
  output = path.resolve(process.argv[3] || ''),
  [ inputInfo, outputInfo ] = await Promise.all([ getFileInfo(input), getFileInfo(output) ]),
  error = [];
The code validates the paths and terminates with error messages if necessary:
// use input file name when output is a directory
if (outputInfo.isDir && outputInfo.canWrite && inputInfo.isFile) {
  output = path.resolve(output, path.basename(input));
}

// check for errors
if (!inputInfo.isFile || !inputInfo.canRead) error.push(`cannot read input file ${ input }`);
if (input === output) error.push('input and output files cannot be the same');

if (error.length) {

  console.log('Usage: ./filecompress.js [input file] [output file|dir]');
  console.error('\n  ' + error.join('\n  '));
  process.exit(1);

}
The whole file is then read into a string named content using readFile():
// read file
console.log(`processing ${ input }`);
let content;

try {
  content = await readFile(input, { encoding: 'utf8' });
}
catch (e) {
  console.log(e);
  process.exit(1);
}

let lengthOrig = content.length;
console.log(`file size  ${ lengthOrig }`);
JavaScript regular expressions then remove comments and whitespace:
// compress content
content = content
  .replace(/\n\s+/g, '\n')                // trim leading space from lines
  .replace(/\/\/.*?\n/g, '')              // remove inline // comments
  .replace(/\s+/g, ' ')                   // remove whitespace
  .replace(/\/\*.*?\*\//g, '')            // remove /* comments */
  .replace(/<!--.*?-->/g, '')             // remove <!-- comments -->
  .replace(/\s*([<>(){}}[\]])\s*/g, '$1') // remove space around brackets
  .trim();

let lengthNew = content.length;
The resulting string is output to a file using writeFile(), and a status message shows the saving:
let lengthNew = content.length;

// write file
console.log(`outputting ${output}`);
console.log(`file size  ${ lengthNew } - saved ${ Math.round((lengthOrig - lengthNew) / lengthOrig * 100) }%`);

try {
  content = await writeFile(output, content);
}
catch (e) {
  console.log(e);
  process.exit(1);
}
Run the project code with an example HTML file:
node filecompress.js ./test/example.html ./test/output.htmlEvents
You often need to execute multiple functions when something occurs. For example, a user registers on your app, so the code must add their details to a database, start a new logged-in session, and send a welcome email. The Events module :
// example pseudo code
async function userRegister(name, email, password) {

  try {

    await dbAddUser(name, email, password);
    await new UserSession(email);
    await emailRegister(name, email);

  }
  catch (e) {
    // handle error
  }

}
This series of function calls is tightly coupled to user registration. Further activities incur further function calls. For example:
// updated pseudo code
try {

  await dbAddUser(name, email, password);
  await new UserSession(email);
  await emailRegister(name, email);

  await crmRegister(name, email); // register on customer system
  await emailSales(name, email);  // alert sales team

}
You could have dozens of calls managed in this single, ever-growing code block.
The Node.js Events API provides an alternative way to structure the code using a publish–subscribe pattern. The userRegister() function can emit an event—perhaps named newuser —after the user’s database record is created.
Any number of event handler functions can subscribe and react to newuser events; there’s no need to change the userRegister() function. Each handler runs independently of the others, so they could execute in any order.
Events in Client-side JavaScript
Events and handler functions are frequently used in client-side JavaScript—for example, to run a function when the user clicks an element:
// client-side JS click handler
  document.getElementById('myelement').addEventListener('click', e => {

    // output information about the event
    console.dir(e);

  });
In most situations, you’re attaching handlers for user or browser events, although you can raise your own custom events. Event handling in Node.js is conceptually similar, but the API is different.
Objects that emit events must be instances of the Node.js EventEmitter class. These have an emit() method to raise new events and an on() method for attaching handlers.
The event example project provides a class that triggers a tick event on predefined intervals. The ./lib/ticker.js module exports a default class that extends EventEmitter:
// emits a 'tick' event every interval
import EventEmitter from 'events';
import { setInterval, clearInterval } from 'timers';

export default class extends EventEmitter {
Its constructor must call the parent constructor. It then passes the delay argument to a start() method:
constructor(delay) {
  super();
  this.start(delay);
}
The start() method checks delay is valid, resets the current timer if necessary, and sets the new delay property:
start(delay) {

  if (!delay || delay == this.delay) return;

  if (this.interval) {
    clearInterval(this.interval);
  }

  this.delay = delay;
It then starts a new interval timer that runs the emit() method with the event name "tick". Subscribers to this event receive an object with the delay value and number of seconds since the Node.js application started:C
// start timer
    this.interval = setInterval(() => {

      // raise event
      this.emit('tick', {
        delay:  this.delay,
        time:   performance.now()
      });

    }, this.delay);

  }

}
The main event.js entry script imports the module and sets a delay period of one second (1000 milliseconds):Copy
// create a ticker
import Ticker from './lib/ticker.js';

// trigger a new event every second
const ticker = new Ticker(1000);
It attaches handler functions triggered every time a tick event occurs:
// add handler
ticker.on('tick', e => {
  console.log('handler 1 tick!', e);
});

// add handler
ticker.on('tick', e => {
  console.log('handler 2 tick!', e);
});
A third handler triggers on the first tick event only using the once() method:
// add handler
ticker.once('tick', e => {
  console.log('handler 3 tick!', e);
});
Finally, the current number of listeners is output:
// show number of listenersconsole.log(`listeners: ${ // show number of listeners
console.log(`listeners: ${ ticker.listenerCount('tick') }`);
Run the project code with node event.js.
The output shows handler 3 triggering once, while handler 1 and 2 run on every tick until the app is terminated.
Streams
The file system example code above (in the “File System” section) reads a whole file into memory before outputting the minified result. What if the file was larger than the RAM available? The Node.js application would fail with an “out of memory” error.
The solution is streaming. This processes incoming data in smaller, more manageable chunks. A stream can be:
- readable: from a file, a HTTP request, a TCP socket, stdin, etc.
- writable: to a file, a HTTP response, TCP socket, stdout, etc.
- duplex: a stream that’s both readable and writable
- transform: a duplex stream that transforms data
Each chunk of data is returned as a Buffer object, which represents a fixed-length sequence of bytes. You may need to convert this to a string or another appropriate type for processing.
The example code has a filestream project which uses a transform stream to address the file size problem in the filecompress project. As before, it accepts and validates input and output filenames before declaring a Compress class, which extends Transform:
import { createReadStream, createWriteStream } from 'fs';
import { Transform } from 'stream';

// compression Transform
class Compress extends Transform {

  constructor(opts) {
    super(opts);
    this.chunks = 0;
    this.lengthOrig = 0;
    this.lengthNew = 0;
  }

  _transform(chunk, encoding, callback) {

    const
      data = chunk.toString(),                  // buffer to string
      content = data
        .replace(/\n\s+/g, '\n')                // trim leading spaces
        .replace(/\/\/.*?\n/g, '')              // remove // comments
        .replace(/\s+/g, ' ')                   // remove whitespace
        .replace(/\/\*.*?\*\//g, '')            // remove /* comments */
        .replace(/<!--.*?-->/g, '')             // remove <!-- comments -->
        .replace(/\s*([<>(){}}[\]])\s*/g, '$1') // remove bracket spaces
        .trim();

    this.chunks++;
    this.lengthOrig += data.length;
    this.lengthNew += content.length;

    this.push( content );
    callback();

  }

}
The _transform method is called when a new chunk of data is ready. It’s received as a Buffer object that’s converted to a string, minified, and output using the push() method. A callback() function is called once chunk processing is complete.
The application initiates file read and write streams and instantiates a new compress object:
// process streamconst  readStream = createReadStream(input),  wr// process stream
const
  readStream = createReadStream(input),
  writeStream = createWriteStream(output),
  compress = new Compress();

console.log(`processing ${ input }`)
The incoming file read stream has .pipe() methods defined, which feed the incoming data through a series of functions that may (or may not) alter the contents. The data is piped through the compress transform before that output is piped to the writeable file. A final on('finish') event handler function executes once the stream has ended:
readStream.pipe(compress).pipe(writeStream).on('finish', () => {
  console.log(`file size  ${ compress.lengthOrig }`);  console.log(`output     ${ output }`);  console.log(`chunks     readStream.pipe(compress).pipe(writeStream).on('finish', () => {

  console.log(`file size  ${ compress.lengthOrig }`);
  console.log(`output     ${ output }`);
  console.log(`chunks     ${ compress.chunks }`);
  console.log(`file size  ${ compress.lengthNew } - saved ${ Math.round((compress.lengthOrig - compress.lengthNew) / compress.lengthOrig * 100) }%`);

});
Run the project code with an example HTML file of any size:
node filestream.js ./test/example.html ./test/output.html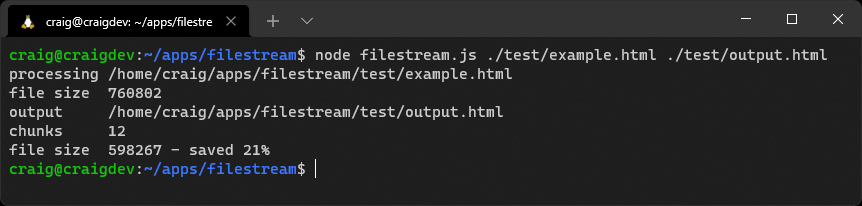
This is a small demonstration of Node.js streams. Stream handling is a complex topic, and you may not use them often. In some cases, a module such as Express uses streaming under the hood but abstracts the complexity from you.
You should also be aware of data chunking challenges. A chunk could be any size and split the incoming data in inconvenient ways. Consider minifying this code:
<script type="module">
  // example script
  console.log('loaded');
</script>
Two chunks could arrive in sequence:
<script type="module">
// example
And:
<script>
  console.log('loaded');
</script>
Processing each chunk independently results in the following invalid minified script:
<script type="module">script console.log('loaded');</script>The solution is to pre-parse each chunk and split it into whole sections that can be processed. In some cases, chunks (or parts of chunks) will be added to the start of the next chunk.
Minification is best applied to whole lines, although an extra complication occurs because <!-- --> and /* */ comments can span more than one line. Here’s a possible algorithm for each incoming chunk:
- Append any data saved from the previous chunk to the start of the new chunk.
- Remove any whole
<!--to-->and/*to*/sections from the chunk. - Split the remaining chunk into two parts, where
part2starts with the first<!--or/*found. If either exists, remove further content frompart2except for that symbol.If neither is found, split at the last carriage return character. If none is found, setpart1to an empty string andpart2to the whole chunk.Ifpart2becomes significantly large—perhaps more than 100,000 characters because there are no carriage returns—appendpart2topart1and setpart2to an empty string. This will ensure saved parts can’t grow indefinitely. - Minify and output
part1. - Save
part2(which is added to the start of the next chunk).
The process runs again for each incoming chunk.
That’s your next coding challenge— if you’re willing to accept it!
Worker Threads
From the docs: “Workers (threads) are useful for performing CPU-intensive JavaScript operations. They do not help much with I/O-intensive work. The Node.js built-in asynchronous I/O operations are more efficient than Workers can be”.
Assume a user could trigger a complex, ten-second JavaScript calculation in your Express application. The calculation would become a bottleneck that halted processing for all users. Your application can’t handle any requests or run other functions until it completes.
Asynchronous Calculations
Complex calculations that process data from a file or database may be less problematic, because each stage runs asynchronously as it waits for data to arrive. Processing occurs on separate iterations of the event loop.
However, long-running calculations written in JavaScript alone—such as image processing or machine-learning algorithms—will hog the current iteration of the event loop.
One solution is worker threads. These are similar to browser web workers and launch a JavaScript process on a separate thread. The main and worker thread can exchange messages to trigger or terminate processing.
Workers and Event Loops
Workers are useful for CPU-intensive JavaScript operations, although the main Node.js event loop should still be used for asynchronous I/O activities.
The example code has a worker project that exports a diceRun() function in lib/dice.js. This throws any number of N-sided dice a number of times and records a count of the total score (which should result in a Normal distribution curve):
// dice throwing
export function diceRun(runs = 1, dice = 2, sides = 6) {

  const stat = [];

  while (runs > 0) {

    let sum = 0;
    for (let d = dice; d > 0; d--) {
      sum += Math.floor( Math.random() * sides ) + 1;
    }

    stat[sum] = (stat[sum] || 0) + 1;

    runs--;
  }

  return stat;

}
The code in index.js starts a process that runs every second and outputs a message:
// run process every second
const timer = setInterval(() => {
  console.log('  another process');
}, 1000);
Two dice are then thrown one billion times using a standard call to the diceRun() function:
import { diceRun } from './lib/dice.js';

// throw 2 dice 1 billion times
const
  numberOfDice = 2,
  runs = 999_999_999;

const stat1 = diceRun(runs, numberOfDice);
This halts the timer, because the Node.js event loop can’t continue to the next iteration until the calculation completes.
The code then tries the same calculation in a new Worker. This loads a script named worker.js and passes the calculation parameters in the workerData property of an options object:
import { Worker } from 'worker_threads';

const worker = new Worker('./worker.js', { workerData: { runs, numberOfDice } });
Event handlers are attached to the worker object running the worker.js script so it can receive incoming results:
// result returned
worker.on('message', result => {
  console.table(result);
});
… and handle errors:
// worker error
worker.on('error', e => {
  console.log(e);
});
… and tidy up once processing has completed:
// worker complete
worker.on('exit', code => {
  // tidy up
});
The worker.js script starts the diceRun() calculation and posts a message to the parent when it’s complete—which is received by the "message" handler above:
// worker threadimport { workerData, parentPort } from 'worker_threads';import { diceRun } from './lib/dice.js';
// worker thread
import { workerData, parentPort } from 'worker_threads';
import { diceRun } from './lib/dice.js';

// start calculation
const stat = diceRun( workerData.runs, workerData.numberOfDice );

// post message to parent script
parentPort.postMessage( stat );
The timer isn’t paused while the worker runs, because it executes on another CPU thread. In other words, the Node.js event loop continues to iterate without long delays.
Run the project code with node index.js.
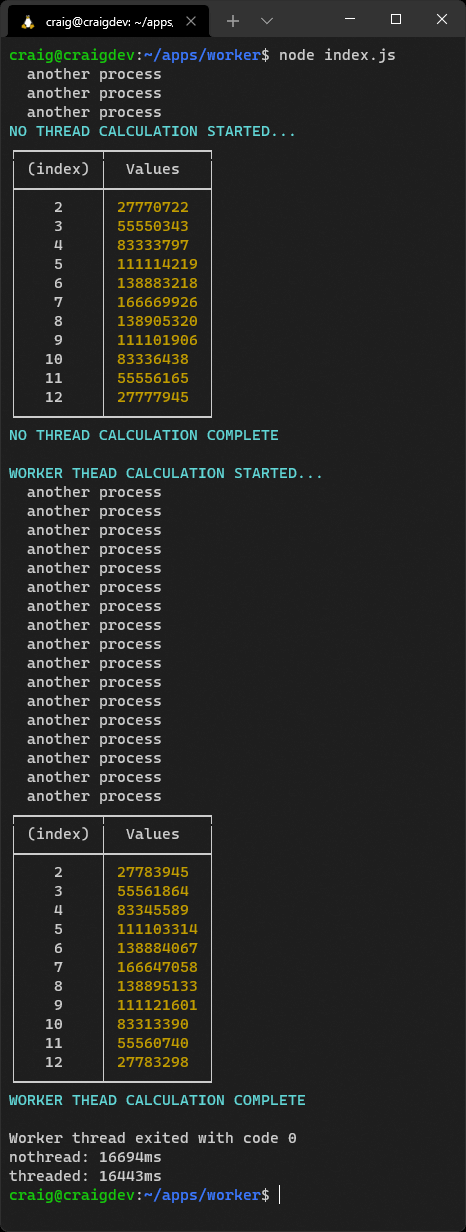
You should note that the worker-based calculation runs slightly faster because the thread is fully dedicated to that process. Consider using workers if you encounter performance bottlenecks in your application.
Child Processes
It’s sometimes necessary to call applications that are either not written in Node.js or have a risk of failure.
A Real-world Example
I worked on an Express application that generated a fuzzy image hash used to identify similar graphics. It ran asynchronously and worked well—until someone uploaded a malformed GIF containing a circular reference (animation frameA referenced frameB which referenced frameA).
The hash calculation never ended. The user gave up and tried uploading again. And again. And again. The whole application eventually crashed with memory errors.
The problem was fixed by running the hashing algorithm in a child process. The Express application remained stable because it launched, monitored, and terminated the calculation when it took too long.
The child process API allows you to run sub-processes that you can monitor and terminate as necessary. There are three options:
spawn: spawns a child process.fork: a special type of spawn that launches a new Node.js process.exec: spawns a shell and runs a command. The result is buffered and returned to a callback function when the process ends.
Unlike worker threads, child processes are independent from the main Node.js script and can’t access the same memory.
Clusters
Is your 64-core server CPU under-utilized when your Node.js application runs on a single core? Clusters allow you to fork any number of identical processes to handle the load more efficiently.
The initial primary process can fork itself—perhaps once for each CPU returned by os.cpus(). It can also handle restarts when a process fails, and broker communication messages between forked processes.
Clusters work amazingly well, but your code can become complex. Simpler and more robust options include:
- process managers such as PM2, which offer an automated Cluster Mode
- a container management system such as Docker or Kubernetes
Both can start, monitor, and restart multiple isolated instances of the same Node.js application. The application will remain active even when one fails.
Write Stateless Applications
It’s worth mentioning: make your application stateless to ensure it can scale and be more resilient. It should be possible to start any number of instances and share the processing load.
Summary
This article has provided a sample of the more useful Node.js APIs, but I encourage you to browse the documentation and discover them for yourself. The documentation is generally good and shows simple examples, but it can be terse in places.
As mentioned, this guide is based on my course Node.js: Novice to Ninja which is available on SitePoint Premium.
Frequently Asked Questions about Built-in Node.js APIs
What are some of the most useful built-in Node.js APIs?
Node.js comes with a variety of built-in APIs that can be used to perform different tasks. Some of the most useful ones include the File System API, which allows you to interact with the file system on your computer, the HTTP/HTTPS API, which allows you to make HTTP requests and create HTTP servers, and the Stream API, which provides a way to handle streaming data. Other notable APIs include the Path API, the Query Strings API, and the URL API.
How can I use the File System API in Node.js?
The File System API in Node.js allows you to interact with the file system on your computer. You can use it to read and write files, create directories, and more. To use it, you first need to require the ‘fs’ module. Once you’ve done that, you can use the various methods provided by the API to interact with the file system.
What is the HTTP/HTTPS API in Node.js used for?
The HTTP/HTTPS API in Node.js is used to make HTTP requests and create HTTP servers. This can be useful for a variety of tasks, such as fetching data from a remote server, or creating a web server that can respond to HTTP requests. The API provides a number of methods for making requests and handling responses, making it a powerful tool for web development.
How can I handle streaming data in Node.js?
Node.js provides the Stream API for handling streaming data. This can be useful for tasks such as reading large files, or handling real-time data. The Stream API provides a number of methods for creating and managing streams, allowing you to handle data in a efficient and scalable way.
What is the Path API in Node.js and how can I use it?
The Path API in Node.js provides a way to work with file and directory paths. It can be used to manipulate and analyze paths, making it easier to work with files and directories. To use the Path API, you first need to require the ‘path’ module. Once you’ve done that, you can use the various methods provided by the API to work with paths.
How can I use the Query Strings API in Node.js?
The Query Strings API in Node.js provides a way to work with query strings. This can be useful for tasks such as parsing the query string from a URL, or creating a query string from an object. To use the Query Strings API, you first need to require the ‘querystring’ module. Once you’ve done that, you can use the various methods provided by the API to work with query strings.
What is the URL API in Node.js and how can I use it?
The URL API in Node.js provides a way to work with URLs. It can be used to parse URLs, format URLs, and more. To use the URL API, you first need to require the ‘url’ module. Once you’ve done that, you can use the various methods provided by the API to work with URLs.
How can I create a HTTP server using Node.js?
Node.js provides the HTTP API for creating HTTP servers. This can be done using the ‘http.createServer()’ method, which creates a new server and returns it. Once you’ve created a server, you can use the ‘server.listen()’ method to start listening for incoming requests.
How can I make a HTTP request using Node.js?
Node.js provides the HTTP API for making HTTP requests. This can be done using the ‘http.request()’ method, which creates a new request and returns it. Once you’ve created a request, you can use the ‘request.end()’ method to send it.
How can I read and write files using Node.js?
Node.js provides the File System API for reading and writing files. This can be done using the ‘fs.readFile()’ and ‘fs.writeFile()’ methods, which read and write files respectively. These methods are asynchronous, meaning they return immediately and do not block the rest of your code from executing.
 Craig Buckler
Craig is a freelance UK web consultant who built his first page for IE2.0 in 1995. Since that time he's been advocating standards, accessibility, and best-practice HTML5 techniques. He's created enterprise specifications, websites and online applications for companies and organisations including the UK Parliament, the European Parliament, the Department of Energy & Climate Change, Microsoft, and more. He's written more than 1,000 articles for SitePoint and you can find him @craigbuckler.