One of the cooler features of the new PHP 5.4 release is a built-in web server designed specifically for development and testing. Now you can write and test your code without having to have a full-fledged LAMP configuration – just launch a the built-in server from the command line, test your code, and then shut it down when you’re finished.
The server lends itself to other creative uses, too. For example, you could distribute portable web applications on CD ROMs or USB sticks, or even as desktop applications, all created with PHP without needing GTK or other graphic libraries.
Some may point out that PHP is a language originally designed to be used on the web in the first place, while other languages like Python and Ruby are not, so it makes more sense for the others to provide a basic server environment to help kick-start web development. They’ll argue PHP doesn’t need a built-in server. Besides, most systems today come with a personal web server already installed or installable with a few commands or clicks.
Indeed the PHP manual stresses that the new built-in server is intended for development use only and recommends against using it in production. There are no special INI directives for it except for one (which colorizes logging output sent to the console), and the general tone of the documentation seems to be “we too have a web server now, stop bothering us.”
Despite this, the server made it in version 5.4, and it’s my opinion it can be a valuable tool for both developing and testing. On my machine for example I use OSX’s pre-installed Apache with a custom configuration that suits my development style, but sometimes I want to try a some new webapp. With PHP’s built-in server, I could test the application right from my download or temp directories and then move it to my regular environment only if I really need to.
Well, it’s not so simple at first because a lot of apps are written with Apache in mind and make use of .htaccess files and mod_rewrite. But I’m quite sure that someone out there (maybe one of you, why not?) will write and adapter for this features and I’d like to be the first to test it.
In this article I’ll explain some basic uses of the new built-in server and show you how to build a portable personal development server useful for quickly testing your applications. I’m sure you’re just as anxious as I am to get started, so let’s do it!
Using the Built-in Server
You’ll need to have PHP 5.4 or greater installed to use the built-in server. To verify your version of PHP, invokephp -v in a terminal. You can then determine if the server is available in your build by running php -h and looking for the -S and -t options which are specific to the server.
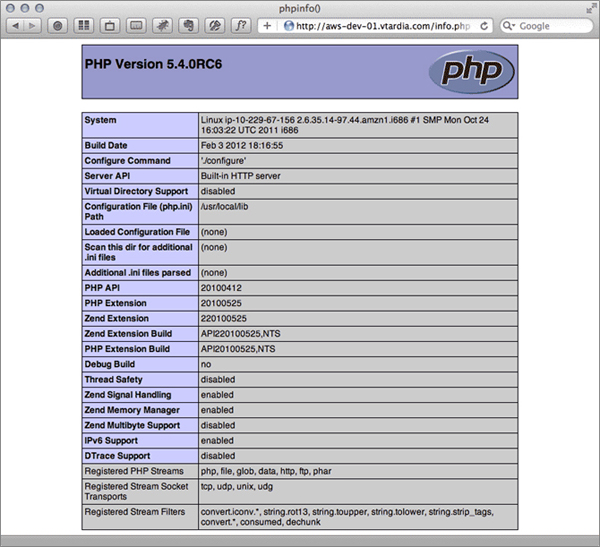
You can test the server by creating a basic index.php file in the your current directory which contains a call to phpinfo(), and then launching the server like so:
[ec2-user@ip-10-229-67-156 ~]$ php -S <localhost or your public IP>:8080
PHP 5.4.0RC7 Development Server started at Fri Feb 26 18:49:29 2012
Listening on <YourIP>:8080
Document root is /home/ec2-user
Press Ctrl-C to quit.
In your browser you should now be able to see the content served by the built-in server.

[Sun Feb 26 18:55:30 2012] 80.180.55.37:36318 [200]: /
[Sun Feb 26 18:56:23 2012] 80.180.55.37:36584 [200]: /
Looking back at the PHP’s command line options,
-S is used to specify the address which the server will bind to. Its value can be:
localhost– the server is accessible only at the local machine0.0.0.0– the server is accessible from any interface of your machine, wired or wireless- any of your public or private IP addresses – the server is accessible only at the specific address
-t allows you to tell the server to target another directory for its document root. For example:
[ec2-user@ip-10-229-67-156 ~]$ php -S <localhost or your public IP>:8090 -t /home/ec2-user/publicAlternatively, you can also provide the name of a specific PHP file, such as an
index.php or a custom router.php file.
[ec2-user@ip-10-229-67-156 ~]$ php -S >localhost or your public IP>:8080 -t /home/ec2-user/public public/index.phpThe output of such a router script will be parsed and executed by the server. Here is a basic example:
<?php
$extensions = array("php", "jpg", "jpeg", "gif", "css");

$path = parse_url($_SERVER["REQUEST_URI"], PHP_URL_PATH);
$ext = pathinfo($path, PATHINFO_EXTENSION);
if (in_array($ext, $extensions)) {
    // let the server handle the request as-is
    return false;
}

echo "<p>Welcome to PHP</p>";Connection: closed Content-Type: text/html Host: aws-dev-01.vtardia.com X-Powered-By: PHP/5.4.0RC7Compare this to the set of typical HTTP headers returned by Apache:
Accept-Ranges: bytes
Connection: Keep-Alive
Content-Length: 631
Content-Type: text/html
Date: Sat, 04 Feb 2012 18:24:42 GMT
Etag: "bbb99-277-4ace8c5470a40"
Keep-Alive: timeout=15, max=100
Last-Modified: Wed, 14 Sep 2011 15:54:09 GMT
Server: Apache/2.2.21 (Unix) DAV/2
If your application makes use of server headers, these must be consistent in both the development/test environment (the built-in server) and the production environment (Apache/IIS/Nginx). Second, the PHP server has a different SAPI (Server API), so you perform the routing conditionally whether
index.php is served from the built-in server or a production server. php_sapi_name() will return “cli-server” when you’re using the built-in server.
<?php
if (php_sapi_name() == "cli-server") {
    // running under built-in server so
    // route static assets and return false
    $extensions = array("php", "jpg", "jpeg", "gif", "css");
    $path = parse_url($_SERVER["REQUEST_URI"], PHP_URL_PATH);
    $ext = pathinfo($path, PATHINFO_EXTENSION);
    if (in_array($ext, $extensions)) {
        return false;
    }
}cli_server.color directive turns on colorized log output in the console output. Create an empty text file called cli-server.ini and insert this line:
cli_server.color = onYou can create a unique configuration environment for your server inside your new custom INI file, and any non specified directives will assume the default value. Here we’ve just specified the
cli_server.color directive.
Kill the previously running process, and start it again but this time use -c to specify the new file.
[ec2-user@ip-10-229-67-156 ~]$ php -S <localhost or your public IP>:8080 -c cli-server.iniIf your terminal supports color you should see colored output lines now. 200 statuses are shown in green, orange is used for 404 statuses, and you’ll see red for errors inside the requested script.
Building a Custom Server
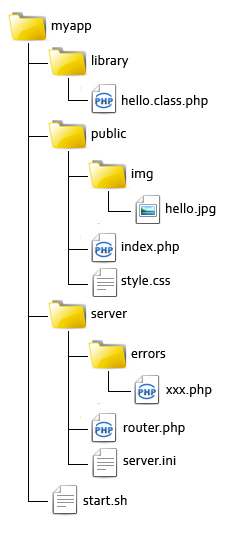
Now that you know all there is to know about the built-in web server in PHP, let’s use that knowledge to do something cool. Let’s program a custom portable server! I’ll start with the following sample directory structure for the application:
library directory contains the application’s code, the public directory will be our document root and will contain the index.php and some sample static files. The focus of this tutorial will be the server directory, so the application will consist on a simple HelloWorld script and some static content (an image and a CSS file).
The goal is to be able to start the server from within the application directory with one command and our server will take care of routing, headers, and HTTP errors.
[ec2-user@ip-10-229-67-156 myapp]$ ./start.shLet’s start to examine the start script, which is a simple shell script: [shell]#! /bin/bash INIFILE=”$(pwd)/server/server.ini” DOCROOT=”$(pwd)/public” ROUTER=”$(pwd)/server/router.php” HOST=0.0.0.0 PORT=8080 PHP=$(which php) if [ $? != 0 ] ; then echo “Unable to find PHP” exit 1 fi $PHP -S $HOST:$PORT -c $INIFILE -t $DOCROOT $ROUTER[/shell] The lines just after the
#! shebang are definable settings. I’m assuming the script is started from the application directory, so the INIFILE, DOCROOT and ROUTER paths are all calculated from there using pwd. Then the path to PHP is identified using the output of the which command. If PHP is not found in the user’s $PATH by which, the command returns a non-zero value and the script will exit with an error.
The approach here works well enough, but you may have to be more robust depending on your needs. An alternate approach would be to provide the user an option to override any of the defined settings from the command line, for example:
[shell]if [ ! -z $INIFILE ]; then
INIFILE=”$(pwd)/server/server.ini”
fi[/shell]
Continuing on, the errors directory contains files for HTTP error messages. Here’s an example of the 403 message; though I’ve used only HTML, the script will be included using include in the router so you can add any PHP you’d like.
<!doctype html>
<html lang="en">
 <head>
  <meta charset="utf-8">
  <title>403</title>
 </head>
 <body>
  <h1>403: Forbidden</h1>
  <p>Sorry, the requested resource is not accessible.</p>
 </body>
</html>router.php file that does all the work. The goal of this file is to grab and manage all the requests and pass them to the server only if they are existing files. All the error pages are managed internally by including the templates.
<?php
// Set timezone
date_default_timezone_set("UTC");

// Directory that contains error pages
define("ERRORS", dirname(__FILE__) . "/errors");

// Default index file
define("DIRECTORY_INDEX", "index.php");

// Optional array of authorized client IPs for a bit of security
$config["hostsAllowed"] = array();

function logAccess($status = 200) {
    file_put_contents("php://stdout", sprintf("[%s] %s:%s [%s]: %sn",
        date("D M j H:i:s Y"), $_SERVER["REMOTE_ADDR"],
        $_SERVER["REMOTE_PORT"], $status, $_SERVER["REQUEST_URI"]));
}

// Parse allowed host list
if (!empty($config['hostsAllowed'])) {
    if (!in_array($_SERVER['REMOTE_ADDR'], $config['hostsAllowed'])) {
        logAccess(403);
        http_response_code(403);
        include ERRORS . '/403.php';
        exit;
    }
}

// if requesting a directory then serve the default index
$path = parse_url($_SERVER["REQUEST_URI"], PHP_URL_PATH);
$ext = pathinfo($path, PATHINFO_EXTENSION);
if (empty($ext)) {
    $path = rtrim($path, "/") . "/" . DIRECTORY_INDEX;
}

// If the file exists then return false and let the server handle it
if (file_exists($_SERVER["DOCUMENT_ROOT"] . $path)) {
    return false;
}

// default behavior
logAccess(404);
http_response_code(404);
include ERRORS . "/404.php";date_default_timezone_set() must match with that of your system or you will have an inconsistency between the log entries of the script and that of the server. I’ve also added an optional list of allowed client IPs to improve the security.
The logAccess() function is needed because when the router script takes care of the request the server default log is bypassed. This function takes only the status code parameter and formats the output to match exactly that of the server.
Our first parsing task is the security check: if a list of hosts is defined above and the client is not in this list we serve an error message and close the script. We need to output a status code different than 200 in case of error and the header() function will not work in this context, so the right function to use is the new http_response_code().
If the client is allowed to go further, the next thing we do is to extract the requested path and its extension. In case the extension is empty the user is requesting a directory so we build the complete path using the default directory index file.
Finally if the requested path corresponds to an existing file the script returns false and let the server handle it. If not, the default behavior is performed, displaying a 404 error page.
Summary
And that’s it. As you can see, the PHP server is simple and rather straightforward to use. Our custom quick server is very basic, the code could be optimized and encapsulated into a more complex and full-featured class. As usual you can download the source code from GitHub to play with. Happy coding! Image via Eugene Kouzmenok / ShutterstockFrequently Asked Questions (FAQs) about PHP’s Built-in Server
What is the PHP built-in server and how does it work?
The PHP built-in server is a simple and convenient tool that allows developers to run PHP scripts without the need for a full-fledged web server like Apache or Nginx. It was introduced in PHP 5.4 and is intended for testing and development purposes. The server runs on your local machine and listens for HTTP requests on a specified port. When a request is received, it executes the corresponding PHP script and returns the result.
How do I start the PHP built-in server?
Starting the PHP built-in server is straightforward. Open your terminal or command prompt, navigate to the directory containing your PHP scripts, and run the command ‘php -S localhost:8000’. This will start the server on localhost port 8000. You can replace ‘8000’ with any port number of your choice.
Can I use the PHP built-in server for production?
The PHP built-in server is not designed for production use. It is a single-threaded server and does not have the performance capabilities or security features required for a production environment. For production purposes, it is recommended to use a robust web server like Apache or Nginx.
How do I stop the PHP built-in server?
To stop the PHP built-in server, you simply need to terminate the command that started it. In most terminals or command prompts, you can do this by pressing ‘Ctrl + C’.
Can I specify a custom router script when starting the PHP built-in server?
Yes, you can specify a custom router script when starting the PHP built-in server. This script will be executed for every request and can be used to customize the server’s behavior. To specify a router script, add its path to the end of the start command, like this: ‘php -S localhost:8000 router.php’.
How do I handle static files with the PHP built-in server?
The PHP built-in server automatically serves static files like HTML, CSS, and images. If a request matches a static file in the server’s root directory, the file is returned directly. If not, the request is treated as a PHP script.
Can I change the document root of the PHP built-in server?
Yes, you can change the document root of the PHP built-in server by specifying it in the start command. For example, ‘php -S localhost:8000 -t public/’ will set the document root to the ‘public’ directory.
Does the PHP built-in server support HTTPS?
No, the PHP built-in server does not support HTTPS. It only supports HTTP. If you need to test your scripts over HTTPS, you will need to use a full-fledged web server that supports it.
Can I run multiple instances of the PHP built-in server?
Yes, you can run multiple instances of the PHP built-in server, as long as they listen on different ports. Each instance will run independently of the others.
How do I debug scripts with the PHP built-in server?
Debugging scripts with the PHP built-in server is similar to debugging with any other server. You can use PHP’s built-in error reporting functions, or you can use a debugging tool like Xdebug. The server also logs errors and requests to the console.
Vito Tardia (a.k.a. Ragman), is a web designer and full stack developer with 20+ years experience. He builds websites and applications in London, UK. Vito is also a skilled guitarist and music composer and enjoys writing music and jamming with local (hard) rock bands. In 2019 he started the BlueMelt instrumental guitar rock project.


