In this article we will continue exploring the powers of Views and focus on how to use relationships, contextual filters and rewrite field outputs. In a previous tutorial I showed you how to create a new View and perform basic customizations for it. We’ve seen how to select a display format, which fields to show and how to filter and sort the results.
In this article we will go a bit further and see what relationships and contextual filters are – the two most important options found under the Advanced fieldset at the right of the View edit page. Additionally, we’ll rewrite the output of our fields and combine their values into one.
To begin with, I have a simple article View that just shows the titles. Very easy to set up if you want to follow along. And there are three things I want to achieve going forward:
- Make it so that the View shows also the username of the article author
- Make is so that the View shows only articles authored by the logged in user
- Make it so that the author username shows up in parenthesis after the title
Relationships
First, let’s have the View include the author of the articles. If the View is displaying fields (rather than view modes or anything else), all we have to do is find the field with the author username, right? Wrong. The problem is the following: the node table only contains a reference to the user entity that created the node (in the form of a user ID – uid). So that’s pretty much all we will find if we look for user related fields: Content: Author uid.
What we need to do is use a relationship to the user entity found in the user table. Relationships are basically a fancy way of saying that table A (in our case node) will join with table B (in our case user) in order to retrieve data related to it from there (such as the name of the user and many others). And the join will happen in our case on the uid field which will match in both tables.
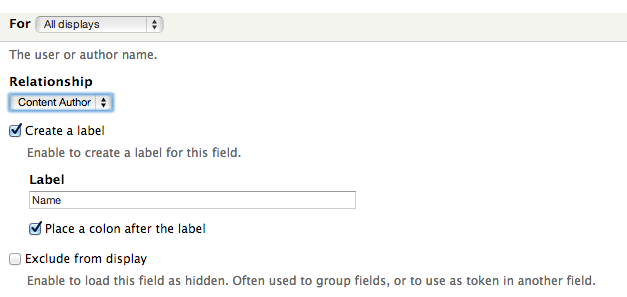
So let’s go ahead and add a new relationship of the type Content: Author. Under Identifier, we can put a descriptive name for this relationship like Content Author. The rest we can leave as default.
Now if you go and add a new field, you’ll notice many others that relate to the user who authored the content. Go ahead and add the User: Name field. In its settings, you’ll see a Relationship select list at the top where the relationship identifier we just specified is automatically selected. That means this field is being pulled in using that relationship (or table join). Saving the field will now add the username of the author, already visible in the View preview.
You can also chain relationships. For instance, if the user entity has a reference to another table using a unique identifier, you can add a second relationship. It will use the first one and bring in fields from that table. So the end result will be that the View will show fields that relate to the node through the user who authored the node but not strictly from the user table but somewhere else connected to the author. And on and on you can join tables like this.
Contextual filters
Contextual filters are similar to regular filters in that you can use mainly the same fields to filter the records on. Where contextual filters differ greatly is that you do not set the filtering value when you create the View, but it is taken from context.
There are many different contexts a filter value can come from, but mainly it comes from the URL. However, you can instruct Views to look elsewhere for contexts as well – such as the ID of the logged in user.
What we’ll do now is add a contextual filter so that the View shows only the articles authored by the logged in user. So go ahead and add a new contextual filter of the type Content: Author uid. Next, under the WHEN THE FILTER VALUE IS NOT IN THE URL fieldset, select the Provide default value radio. Our goal here is to have Views look elsewhere if it does not find the user ID in the URL.
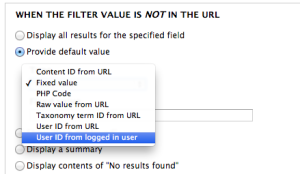
You then have some options under the Type select list, where you should choose User ID from logged in user. This will make Views take the ID of the user that is logged in and pass it to the View as a filter. The rest you can leave as is and save the filter. You’ll immediately notice in your preview that only articles authored by you show up. The filtering is taking place dynamically. If you log in with another user account, you should see only the articles authored by that user account.
A great thing about contextual filters is that if you are displaying a View programatically in a custom module, you can pass the filtering value in code, which opens the door to many possibilities.
Rewriting fields
The last thing we will do in this tutorial is look at rewriting fields in order to concatenate their values. We will illustrate this technique by changing the title field to include the author username in parenthesis.
We’ll start by rearranging the order of the fields and move the title to be the last one showing. The reason we want to do this is that when you rewrite fields, you can use tokens that get values only from fields that are added before the one being rewritten. And since we want to rewrite the title field, we want the token for the username value to be present so we need to move it before the title field.
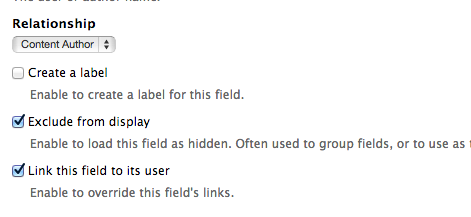
Now that the title field is last, edit the author username field and uncheck the box Create a label and then check the box Exclude from display. You can now save the field. The reason we are excluding this field from being displayed in our View is so that we don’t duplicate it once we concatenate it to the title field.
Next, edit the title field and under REWRITE RESULTS, check the box Rewrite the output of this field. A new textarea should appear below where we will write the new contents of this field. If you write some gibberish in there and save the field, you’ll notice the title gets replaced by that gibberish.
Below this textarea, you’ll notice also some REPLACEMENT PATTERNS. These represent tokens of all the fields in the View loaded before this one (and including this one as well). So if you followed along, you’ll see there [name] and [title], among others.
What we need to do now is put these tokens in this box, wrapped with the text or markup we want. Having said that we want the username to be in parenthesis after the node title, we can add the following to the text box to achieve this:
[title] ([name])Save the field and check out the result. Now you should have the author user in parenthesis. However, it’s still not perfect. We left the title field’s Link this field to the original piece of content box checked and this is breaking the output for us a bit due to also the username having a link to the user profile page. What we want is a clean link to the node title and in parenthesis (which themselves do not link to anything), the username linking to the user profile page.
So first up, add a new field called Content: Path (the path to the node). Make sure you exclude it from display, remove its label and move it before the title field. Then, edit the title field, uncheck the Link this field to the original piece of content box and replace the REWRITE RESULTS text with this:
<a href="[path]">[title]</a> ([name])The [path] token is available from the new field we just added. And after you save, you should see already in the preview a much cleaner display of title nodes and usernames in parenthesis.
Conclusion
In this tutorial we’ve looked at three main aspects of building Views in Drupal 7: relationships, contextual filters and rewriting fields. We’ve seen how with the use of relationships we can use information also from related entities, not just those on the base table a View is built on. Contextual filters are great for when the View needs to display content dynamically depending on various contextual conditions (such as a URL or logged-in user). Lastly, we’ve learned how to rewrite fields and build more complex ones with values taken from multiple fields. As you can see, this technique is very powerful for theming Views as it allows us to output complex markup.
Views is pretty much the most popular Drupal module and it is highly complex. Despite its complexity, building views as a site administrator is very easy. All you need to understand is a few basic concepts and you are good to go. Developing for Views to extend its functionality or expose data to it is also an enjoyable experience. If you’d like to know more about that, you can read my tutorial on exposing your own custom module table to Views right here on Sitepoint.com.
Frequently Asked Questions (FAQs) about Drupal 7 Views and Contextual Filters
How do I create a relationship in Drupal 7 Views?
Creating a relationship in Drupal 7 Views involves a few steps. First, navigate to the Views UI and select the view you want to add a relationship to. Under the “Advanced” section, you’ll find the “Relationships” option. Click on “Add” and a list of available relationships will appear. Choose the relationship that suits your needs, configure the settings if necessary, and apply the changes. The new relationship will now be available for use in your view.
What are contextual filters in Drupal 7 and how do they work?
Contextual filters in Drupal 7 are a powerful tool that allows you to filter content based on dynamic information. They work by using the URL to guide the displayed content. For example, if you have a view that lists blog posts, a contextual filter could be used to only display posts from a specific author or category, based on the URL. To add a contextual filter, go to the view you want to modify, find the “Advanced” section, and click on “Add” next to “Contextual filters”. Choose the filter you want to use, configure it, and apply the changes.
How can I rewrite fields in Views?
Field rewriting in Views allows you to customize how a field is displayed. To rewrite a field, first, ensure the field is added to your view. Then, in the “Fields” section of the view, click on the field you want to rewrite. In the field settings, you’ll find the “Rewrite results” checkbox. Check this box to enable rewriting. You can then enter the custom text or HTML you want to use. You can also use replacement patterns to include dynamic content.
What is the Filter module in Drupal and how does it work?
The Filter module in Drupal is a core module that provides an interface for managing text formats and applying them to content. It allows you to control how user input is displayed, including HTML tags, line breaks, links, and more. The Filter module works by applying a series of filters to the text, which can be configured per text format. For example, you could create a text format that removes all HTML tags, or one that automatically converts URLs into clickable links.
How do I use the Module Filter in Drupal?
The Module Filter is a Drupal module that provides a user-friendly interface for managing modules. It allows you to quickly find and enable or disable modules, with features like a search box and categorized module listing. To use the Module Filter, first, ensure the module is installed and enabled. Then, navigate to the “Extend” page, where you’ll find the new module filter interface. You can use the search box to find modules, and the checkboxes to enable or disable them.
How can I clone a view in Drupal 7?
Cloning a view in Drupal 7 is a simple process. Navigate to the Views UI and find the view you want to clone. Next to the view, you’ll find a “clone” link. Click this link and you’ll be taken to a page where you can configure the new view. The cloned view will have the same settings as the original, but you can modify them as needed.
How can I add a pager to a view in Drupal 7?
Adding a pager to a view in Drupal 7 allows you to limit the number of items displayed at once, with navigation links to view additional items. To add a pager, navigate to the view you want to modify and find the “Pager” section. Here, you can choose the type of pager you want to use, and configure settings like the number of items per page.
How can I use aggregation in Views?
Aggregation in Views allows you to group results by a certain field, and perform calculations like sum, count, average, minimum, and maximum. To use aggregation, navigate to the view you want to modify and find the “Advanced” section. Here, you’ll find the “Use aggregation” option. Enable this option to start using aggregation. You can then configure the aggregation settings for each field in the “Fields” section.
How can I add a contextual filter to a block view?
Adding a contextual filter to a block view is similar to adding one to a page view. Navigate to the view you want to modify, find the “Advanced” section, and click on “Add” next to “Contextual filters”. Choose the filter you want to use, configure it, and apply the changes. The block view will now use the contextual filter.
How can I use the Views PHP module to add custom code to a view?
The Views PHP module allows you to add custom PHP code to a view. To use it, first, ensure the module is installed and enabled. Then, in the view you want to modify, add a new field of the type “Global: PHP”. In the field settings, you can enter your custom PHP code. Be aware that using PHP in views can have security implications, so only use this feature if you’re confident in your PHP skills.
 Daniel Sipos
Daniel Sipos is a Drupal developer who lives in Brussels, Belgium. He works professionally with Drupal but likes to use other PHP frameworks and technologies as well. He runs webomelette.com, a Drupal blog where he writes articles and tutorials about Drupal development, theming and site building.