Quick Tip – What is Gradle and How do you use it?
This article was updated in April 2016 to include details on the Android wrapper
Released in 2007, Gradle is a popular open-source automated build system that makes working on large projects easier. It’s based on concepts from its predecessors Apache Maven and Apache Ant, but uses a Groovy-based domain specific language (DSL) and Java, instead of XML.
It speeds up the build process by skipping unnecessary re-execution of up-to-date projects part of larger project trees. It also makes adding different libraries to a project easier by using just one line of code.
Gradle is the official build system for Android Studio, and as Android Studio users, most configuration happens automatically. But I feel a basic understanding of how it works is useful to every Android Developer.
In this article I will give a quick overview of Gradle, how to use it and common problems.
Standalone Installation
Manual installation is not required to be able to build new Android applications, I am including this section for a deeper look. It comes bundled with Android Studio, so you can skip to Gradle Basics if you want.
Head to the download page to get the latest release of. Download the binary only distribution, extract the files in a directory of choice and add to your path.
GRADLE_HOME=DOWNLOAD_PATH/gradle;
export GRADLE_HOME
export PATH=$PATH:$GRADLE_HOME/bin
Mac
Gradle is also available via Homebrew.
Windows
Windows users will need to edit Environmental Variables by right-clicking on My Computer and selecting Properties. Choose Advanced System Settings on the left panel. This will open the System Properties window. On the right bottom, click Environmental Variables and the following window will open.
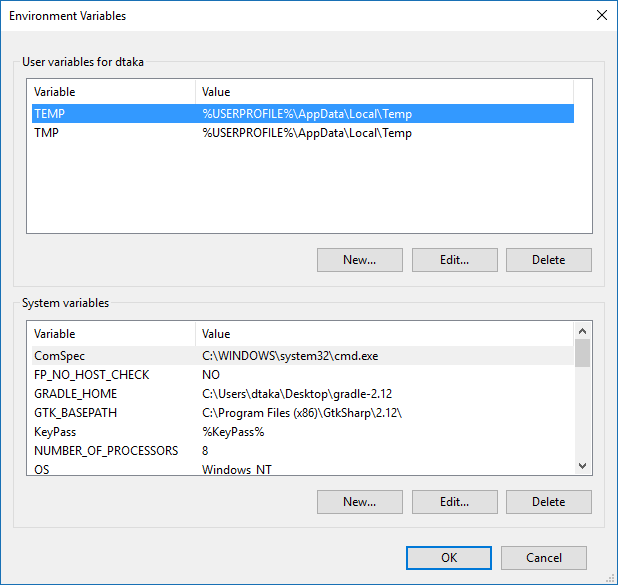
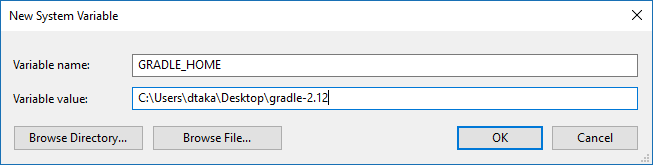
Under System Variables click New and enter GRADLE_HOME as the name, and the path to the extracted gradle zip and hit OK.
Return to System variables, find PATH in the list and click Edit.
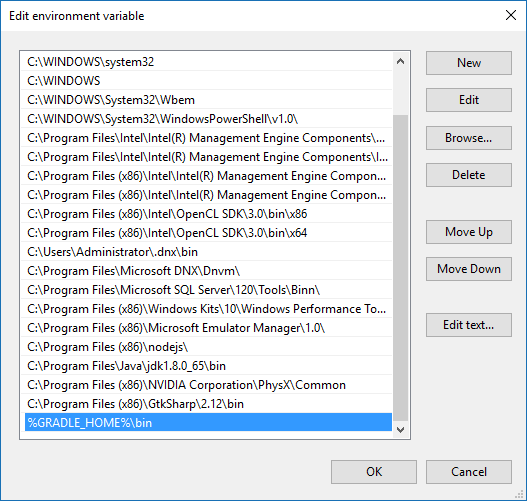
If the window is different, be careful not to delete what is already in there, instead go to the end of the line and add a semi-column ( ; ). In both cases add GRADLE_HOME%\bin and save changes.
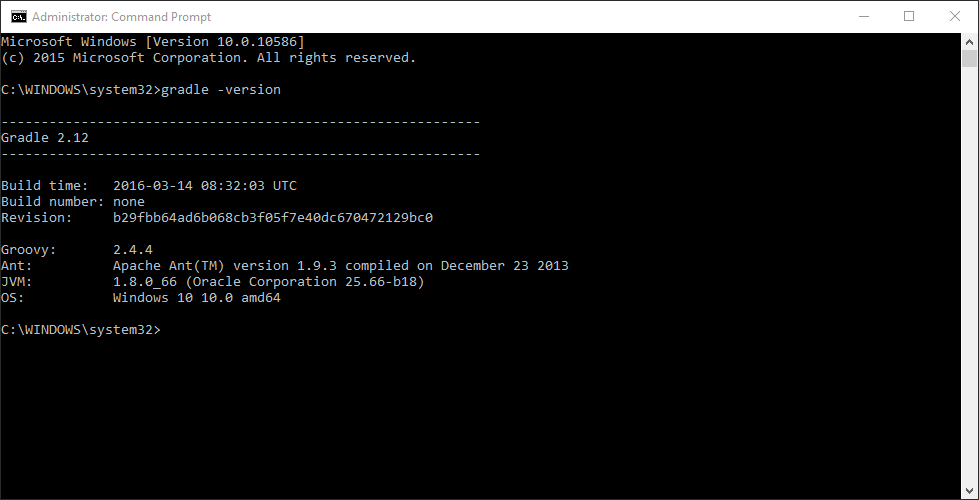
To check that everything is correct, open Command Prompt (or Terminal) and write gradle -version. It prints the version number on the console, and other details as below.
Gradle Basics
Open a text editor and create a new file that contains the following code:
task myFirstTask << {
    System.out.println "First task running..."
}
Save it as GradleTest/build.gradle(remember to choose All types as file type). Open a terminal, navigate to this folder and type gradle -q tasks to show the list of available tasks to run. There will be an Other tasks section at the bottom with one element underneath, myFirstTask.
Running gradle -q myFirstTask will execute the task, printing the line inside the task body. -q executes the command in silent mode, printing the information required, not the process.
All the tasks that you want Gradle to run are written in Groovy and saved into a file named build.gradle.
You can add more tasks, set dependencies on each other, and set default tasks.
For example:
task anotherTask (dependsOn: myFirstTask) << {
    System.out.println "Another task running..."
}
To make this task the default, add the following line at the beginning of the build file.
defaultTasks 'anotherTask'
Showing the list of tasks again, you will notice that myFirstTask is missing. Type gradle -q to execute the default task and on the screen will be printed:
First task running...
Another task running...
When you have a large project, with different projects depending on each other, the best approach is to have a different build file for each of them with specific tasks, and one for the whole project. The name of the files remains the same, but they are in different places. Gradle will need a configuration file to specify the projects to include. This is the settings.gradle file and contains the following.
include ":projectA", ":projectB", ":projectC"
This is a small selection of what’s possible with, I recommend reading the user guide and DSL reference for more detail.
Android Studio
There are several plugins available for Gradle, including the Android plugin, which I will cover next.
Open Android Studio and create a new project. By default it will have the Gradle wrapper included. The wrapper install the right tools for you, and the right version of these tools, relieving an unnecessary burden. Each wrapper is tied to a specific version of Gradle. For more information you can read the Wrapper documentation.
In the Project tab on the left, you will notice two main sections, app, and Gradle Scripts. The second section contains the files mentioned earlier. You will notice that an Android Studio project contains a build.gradle(Project:AppName) and a build.gradle(Module:app) file. The first contains configuration for all projects and modules in the application. The second contains specific configuration for the module it’s included with.
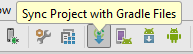
After any change you make to these files, you will need to sync Gradle from the bar that appears, or from the icon on the toolbar.
Syncing Gradle will evaluate the build files by comparing the current files to the project state that Gradle and Android Studio maintain. If it finds any changes it will execute just those specific tasks.

Thanks for reading. Enjoy coding and building!
Frequently Asked Questions about Gradle and Android Studio
What is the main purpose of Gradle in Android Studio?
Gradle is a powerful build system used in Android Studio. It automates and manages the build process, while allowing you to define flexible custom build configurations. Each build configuration can define its own set of code and resources, while reusing the parts common to all versions of your app. Gradle can also manage your project dependencies and allows you to implement advanced customization logic or actions with its Groovy-based DSL.
How does Gradle differ from other build systems?
Gradle is designed to be highly customizable and extensible. It uses a Groovy-based domain-specific language (DSL) instead of XML for its project configuration. This makes Gradle scripts more readable and easier to manage than those of other build systems like Apache Ant and Maven. Gradle also supports incremental builds, which can significantly reduce build time by recompiling only the portions of your code that have changed.
How can I upgrade Gradle in Android Studio?
Upgrading Gradle in Android Studio is a straightforward process. You can do this by updating the Gradle plugin for Android Studio. To do this, open your project in Android Studio, click on ‘File’, then ‘Project Structure’, then ‘Project’, and you will see the Gradle version. You can change this to the latest version and click ‘OK’. Android Studio will then download and use the specified version of Gradle.
How can I use Gradle to manage dependencies in my Android project?
Gradle makes it easy to manage dependencies in your Android project. In your build.gradle file, you can specify dependencies that your project requires and Gradle will ensure they are available for your project to use. You can specify dependencies from a variety of sources including Maven Central, JCenter, and other repositories.
What is a Gradle task and how can I create one?
A Gradle task represents a piece of work that a build performs. Tasks might be compiling classes, creating a JAR, generating Javadoc, or publishing some archives to a repository. You can define your own tasks in your build.gradle file using the task keyword followed by the task name and the action the task should perform.
How can I speed up my Gradle build?
There are several ways to speed up your Gradle build. One way is to enable incremental builds, which only recompiles code that has changed. You can also use the Gradle Daemon, which keeps the build process running in the background, reducing the startup time for subsequent builds. Additionally, you can configure your project to build only the necessary modules.
How can I troubleshoot Gradle build errors?
Gradle provides detailed error messages and allows you to run the build with the –stacktrace option for more detailed output. You can also use the –debug option to provide even more detailed debug output. If you’re still having trouble, the Gradle community and forums are a great resource for finding solutions to common problems.
Can I use Gradle outside of Android Studio?
Yes, Gradle is not exclusive to Android Studio and can be used with other IDEs and even from the command line. It’s a versatile tool that can be used for building, testing, running, and versioning your software regardless of what language you’re using or what platform you’re on.
How can I learn more about Gradle?
The official Gradle documentation is a great place to start. It provides a comprehensive overview of Gradle’s features and capabilities, along with detailed guides and tutorials. There are also many online resources, tutorials, and courses available that can help you get up to speed with Gradle.
What is the future of Gradle?
Gradle is constantly evolving and improving. The Gradle team is actively working on new features and improvements, such as improved performance, better dependency management, and enhanced IDE support. With its growing popularity and strong community support, Gradle is set to remain a key tool in the developer’s toolkit for the foreseeable future.
 Deivi Taka
Deivi has graduated in Computer Engineering. He started writing code at High School, and now he can program in Java, C, C#, and Swift. Currently a Mobile Application Developer at a local company, he tries to share his passion writing articles for SitePoint.