In my previous post I discussed the importance of the Start screen and Live Tiles on the Windows Phone 7 platform. Applications that have been ported across from other smartphone platforms Windows Phone 7 don’t normally go beyond creating a default start screen tile. A static start screen tile is little more than an application icon, which the user already has in the applications list. As such, when you’re thinking about your Windows Phone 7 application you should think about how to update the tile to reflect the status of the application. In this post we’ll cover how to define the default start screen tile, but more importantly how you can then update it.
The default start screen tile is the tile that will be displayed on the start screen when the user taps-and-holds on your application in the applications list, and selects “pin to start”. When you create a new Windows Phone 7 application the project template will automatically create an image called Background.png and configure your application to use it. As you can see in Figure 1, the default start screen tile is relatively boring so it’s recommended that you change it.

We’ll start by customising this image and saving it as DefaultTile.png (left image in Figure 2). One thing to be aware of is that any part of your image that is transparent will track on the accent colour that the user has selected on their Windows Phone 7 device. This is illustrated in the right image of Figure 2 where the background of the tile is set to transparent instead of black, and the user has selected the Green accent colour on the device.

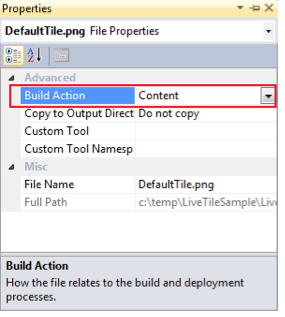
Place this newly created image into the project folder of your Windows Phone 7 application, alongside the existing Background.png. In Visual Studio, right-click on your Windows Phone 7 project in the Solution Explorer window and select ‘Add > Existing Item’; locate the newly created image and select ‘Add’. By default Visual Studio will add the image with the Build Action property set to Resource. You need to change this, as per Figure 3, to Content.
Now that you’ve added the image to your application you need to make sure it is selected as the default start tile. Right-click on the Windows Phone 7 project in the Solution Explorer window and select Properties. Selecting the Application tab should reveal a number of properties that relate to the deployment and installation of your application. Figure 4 illustrates two of the sections: Deployment options, which determine the title and icon to be displayed in the applications list; and Tile options, which defines the default text and the background image to be displayed on the start screen when the user pins the application to the Start.

When designing your start screen tile you should be aware that the Title text will be rendered by the Windows Phone 7 operating system over the top of the background image. In some cases you may want to remove the text altogether, as it conflicts with the image you’ve created. Unfortunately if you try to delete the value of the Title property, or set it to one or more spaces, Visual Studio will complain, insisting that you specify a Title value.
Luckily there is a way around this by modifying the WMAppManifest.xml file directly (the Properties page simply provides a nice visual representation of the key elements of this file). If you open the WMAppManifest.xml file by double-clicking on it in the Solution Explorer window, you’ll see a PrimaryToken element. The child elements of the PrimaryToken define the image to use as the default tile, the count, and the title text to be used. In the following snippet the value of the Title element has been set to a single space, which will present any text being written across our new background image.
<PrimaryToken TokenID="LiveTileSampleToken" TaskName="_default">
    <TemplateType5>
        <BackgroundImageURI IsRelative="true" IsResource="false">DefaultTile.png</BackgroundImageURI>
        <Count>0</Count>
        <Title> </Title>
    </TemplateType5>
</PrimaryToken>
Now that you’ve specified what the default start tile should be, the next thing you need to know is how to update the tile. This can be done by defining an update schedule, whereby the operating system will update the tile from an image on a remote server based on the specified schedule, or via a tile push notification.
The former is relatively simple and only requires the application to setup the schedule. However, it doesn’t allow the tile to be updated immediately or frequently by the application as there is a minimum threshold for the update schedule.
The other alternative is to use the notification services offered by Microsoft to send a tile notification to the device. This is more complex to configure but gives you both fine control on the timing of tile updates, as well as the ability to update not only the background image but also the title and count that appear on the tile.
In this post we’ll cover setting up a schedule for updating the background image of the start tile, leaving the discussion regarding push notifications for a later post. Configuring an update schedule is as simple as creating an instance of the ‘ShellTileSchedule’ class, setting the appropriate properties to define the schedule, and then invoking the ‘Start’ method.
var schedule = new ShellTileSchedule();
    schedule.RemoteImageUri = new Uri("http://www.builttoroam.com/applicationstarttile.png");
    schedule.Recurrence = UpdateRecurrence.Interval;
    schedule.Interval = UpdateInterval.EveryHour;
    schedule.MaxUpdateCount = 24;
    schedule.StartTime = DateTime.Now;
    schedule.Start();
When you setup a ‘ShellTileSchedule’ you can set it to update the background image of the tile from the RemoteImageUri either on an Interval recurrence or Onetime. The Interval can be set to EveryHour, EveryDay, EveryWeek or EveryMonth. You can also specify the maximum number of times the tile will be updated based on the recurrence interval. If you don’t specify the MaxUpdateCount the tile will continue to update indefinitely.
After configuring the update schedule you need to invoke the Start method to commence the update cycle. One of the limitations of the ‘ShellTileSchedule’ is that it doesn’t invoke an immediate update of the start tile. You may need to wait up for an hour or so for the first tile update to take place.
As you can only have a single update schedule defined for your application if you want to modify the schedule you simply need to create another instance of the ‘ShellTileSchedule’ and call ‘Start’. The new schedule will replace the existing schedule. To cancel an existing update schedule for the start tile you simply need to create a new instance of the ‘ShellTileSchedule’ and call the ‘Stop’ method.
var schedule = new ShellTileSchedule();
    schedule.Stop();
In this post you’ve seen how to create and configure a new image as the default start tile. You’ve also learnt how to define an update schedule for the tile that can be used to periodically update the start tile for your application. Next time we’ll cover how you can use push notifications to dynamically update the start tile.
 Nick Randolph
Nick is a software architect and developer with experience across a range of technologies, and has a particular interest in the future of rich client and mobile device applications. Nick is a speaker, author, a Microsoft MVP and owner of Built To Roam.