Earlier this year, Pebble announced the Pebble Time, their third generation smartwatch, funded via their hugely successful Kickstarter campaign. The Pebble Time ships with a new feature called Timeline for displaying information to the user (such as notifications, news, reminders and events) in chronological order on a timeline. Previously, Pebble required developers to write native apps for displaying information on the Pebble. Now, developers can push information onto the timeline directly using JSON from their own private server, via a public REST API.
If you’re unfamiliar with the Pebble Time, I encourage you to check out this article by Patrick Catanzariti by way of a refresher.
What Is the Timeline?
Smartphone notifications are instant and represent a transaction that occurs at that very moment in time. By definition they can’t arrive earlier or later.
The Pebble Time ships with a new OS feature called timeline. Timeline brings another dimension to your notifications; the dimension of time. The timeline shouldn’t be confused with a notification history. Timeline allows third parties to send past notifications and future notifications to you; notifications that you don’t need to know immediately, but may want to look up some time later. For example, you may want to look up what time you left your house in the morning, or what time sunrise was, or what percentage points the stock market opened at earlier, or when the next train out of Kennedy Town is.

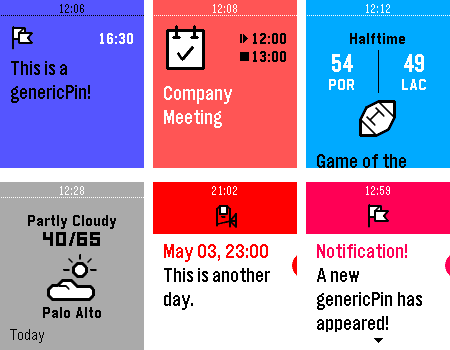
Credit: pebble
The beauty of the timeline is that you can dump virtually any information into it, no matter how insignificant, because the information doesn’t interrupt the user. For example, an egg timer app which buzzes the user when the timer goes off can also push the event onto the timeline. You can never tell when a user is going to ask him or herself, “when did I set that timer for that cake I baked this morning?”.
Of course, the timeline can also hold important timely information, such as a train schedule or movie times at your local cinema. Rather than being notified five minutes in advance of when a train departs, users can look ahead on their watch for the next train and the train after that. All this information is pushed silently to your watch and condensed into a single scrollable interface.
Other than being an outlet for random bits of information relevant to your life, Pebble automatically fills your timeline with past and future events from your smartphone’s calendar, so that you get a holistic view of your day.

Credit: pebble
How Does It Work?
Pebble calls timeline notifications “pins”. Pins are universally managed on Pebble’s server and Pebble devices are set to periodically connect and download a fresh list of pins to display on the timeline. Pebble’s server ensures that users are not spammed with too many pins and allow developers to push pins to multiple users with one command.
All pins must go through Pebble’s server. Even local apps which want to display a pin on the local device must first push the pin to the server and allow the device to receive it in its regular update schedule (15 minutes).
The issuer of the pin can update and delete the pin and Pebble’s server will push the changes to the Pebble device.
Anatomy of a Pin
All pins are written in JSON format and are pushed to Pebble’s server over HTTPS.
An example of a minimal pin looks like this:
{
  "id": "xxxxxxxxx",
  "time": "2015-05-25T08:42:00Z",
  "layout": {
    "type": "genericPin",
    "title": "You left your house",
    "tinyIcon": "system://images/NOTIFICATION_FLAG"
  }
}- The
idis a random unique string for each event and allows the issuer to update and delete the pin. - The
timedetermines where in the timeline it should appear. - The
layoutcontains the information that will be shown on the screen. - The
typedefines whether the pin should be formatted as a generic, calendar, sports, weather, etc. event. - The
titleis the text shown on the screen. - The
tinyIconis from a list of permitted icons.
Getting Your API Key
Pebble requires that you have an existing Pebble app uploaded to the Pebble App Store in order to push pins to Pebble’s server. The app doesn’t actually need to do anything.
An app is needed because users will need to intentionally download your app to signify that they want to subscribe to your pins. Likewise a user deleting your app automatically unsubscribes them from your pins.
If you intend to develop for the timeline only and don’t have the time to create a fancy app, head over to CloudPebble (Pebble’s official web-based app development environment) and create a simple app using their minimal templates, compile online and then download your finished app to your computer. After uploading your app to Pebble’s Developer Portal, follow the instructions on their website to get your app specific API key.
For additional help, see this article on how to submit a Pebble app to the App Store.
When communicating with Pebble’s server, you need to be aware of two different authentication tokens. The first is your app specific API key, which you use to push pins to all users. The second is a user token specific for each user and app combination. When pushing pins to Pebble, you can only use one of them depending on whether you want to push pins to all users or to specific users.
A user token can only be obtained by an app running on a Pebble device and is not otherwise exposed. This means if you are targeting specific users, you will need to develop a Pebble app that reads the user token and pushes the pins from within your app or communicates the user token back to your server.
Pushing a Pin to Pebble’s Server
Pins can be pushed from your own server to Pebble’s server, or from an app installed on the Pebble device to Pebble’s server. This is done over HTTPS which is a widely supported open protocol.
Here is an example of pushing pins from your server to all users (using XMLHttpRequest for purposes of illustration):
var xhr = new XMLHttpRequest();
xhr.open(
  "PUT",
  "https://timeline-api.getpebble.com/v1/user/pins/kennedytown-1395203",
  true
);
xhr.setRequestHeader("Content-Type", "application/json");
xhr.setRequestHeader("X-API-Key", "fbbd2e4c5a8e1dbef2b00b97bf83bdc9");
xhr.send(JSON.stringify(
{
  "id": "kennedytown-1395203",
  "time": "2015-05-25T08:42:00Z",
  "layout": {
    "type": "genericPin",
    "title": "Last train at 11:40 PM out of Kennedy Town",
    "tinyIcon": "system://images/SCHEDULED_EVENT"
  }
}
));
If this code is run inside a Pebble app, you should use the user token instead, since the pins are for the current user only and you don’t want to expose your app API key outside your server.
In this example we are pushing pins from within your app to the current user:
Pebble.getTimelineToken(
  function (userToken) {
    var xhr = new XMLHttpRequest();
    xhr.open(
      "PUT",
      "https://timeline-api.getpebble.com/v1/user/pins/kennedytown-1395203",
      true
    );
    xhr.setRequestHeader("Content-Type", "application/json");
    xhr.setRequestHeader("X-User-Token", userToken);
    xhr.send(JSON.stringify(
    {
      "id": "kennedytown-1395203",
      "time": "2015-05-25T08:42:00Z",
      "layout": {
        "type": "genericPin",
        "title": "Last train at 11:40 PM out of Kennedy Town",
        "tinyIcon": "system://images/SCHEDULED_EVENT"
      }
    }
    ));
  },
  function (error) {}
);
After the request has been made to the Pebble’s server, just sit back and relax and wait for the Pebble device to update itself and place the pin in the timeline.
Customizing Your Pins’ Appearance
Pins are much more customizable than just a text and icon. The previous JSON had a type property set to genericPin. By changing this, you can use any of the 6 pin layouts:
The pin layouts are:
genericPin— for generic informationcalendarPin— for a calendar eventsportsPin— for showing scores from different teamsweatherPin— for weathergenericReminder— for reminders due to occur soongenericNotification— to be used primary for immediate notifications
Each pin type has its own set of properties that further customize the appearance. For example, the sports layout allows you to specify who the home team and away team are and their respective scores.
You can also change the primaryColor, secondaryColor and backgroundColor of the pin by adding these properties to the layout JSON. The values are the color in HTML hex format (e.g. #0055FF).
Adding a Pin and Alerting the User
Although pins are designed to be quiet and require the user to actively seek out the information, pins can also provide disruptive notifications. By adding a property to the pin, you can control whether the pin alerts the user as soon as it is added or every time the data is updated. You can also specify up to three reminders that alert the user as an event approaches. For example, you can alert the user that a football game is about to begin, alert them when the score is out and alert them if the game was delayed, while still having all this information visible in the timeline.
To alert the user as soon as the pin is created, simply add a createNotification property to your JSON before pushing it to the Pebble server. When the Pebble device receives the pin, it will add it to the timeline and alert the user at the same time:
{
  "id": "uidxxxxxxxxx",
  "time": "2015-05-25T08:42:00Z",
  "layout": {
    "type": "genericPin",
    "title": "You left your house",
    "tinyIcon": "system://images/NOTIFICATION_FLAG"
  },
  createNotification: {
    "layout": {
      "type": "genericPin",
      "title": "You JUST left your house",
      "tinyIcon": "system://images/GENERIC_CONFIRMATION"
    }
  }
}
To alert the user after a pin has been updated, add a updateNotification property to your JSON and add a time property to indicate when it was updated, like so:
{
  "id": "uidxxxxxxxxx",
  "time": "2015-05-25T08:42:00Z",
  "layout": {
    "type": "genericPin",
    "title": "You left your house",
    "tinyIcon": "system://images/NOTIFICATION_FLAG"
  },
  updateNotification: {
    "time": "2015-05-25T08:59:00Z",
    "layout": {
      "type": "genericPin",
      "title": "The time you left your house has changed, how weird",
      "tinyIcon": "system://images/GENERIC_CONFIRMATION"
    }
  }
}
When updating a pin, you cannot just push the changed data, you need to push all of the info again.
Making the Pin Open Your App
You can make your pin open your Pebble app by adding an actions property to your pin. You can specify multiple actions where each action is assigned an integer parameter that gets passed to your app. When the user opens you pin, they will be presented with a menu that lists the actions that you specify. When they click on an item, your app will be launched.
{
  "id": "uidxxxxxxxxx",
  "time": "2015-05-25T08:42:00Z",
  "layout": {
    "type": "genericPin",
    "title": "You left your house",
    "tinyIcon": "system://images/NOTIFICATION_FLAG"
  },
  actions: [
    {
      "title": "Activate house alarm",
      "type": "openWatchApp",
      "launchCode": 15
    },
    {
      "title": "Deactivate house alarm",
      "type": "openWatchApp",
      "launchCode": 22
    }
  ]
}
Summary
In this article we’ve only touched on the basics of what the timeline can do. There are a number of topics I didn’t touch on that the reader can choose to explore on their own, such as deleting a pin, topic grouped pins and error handling.
The timeline is a simple technology (similar to RSS feeds) but much more personal and accessible, and with the right content, can become an indispensable feature.
Related Links
- Pebble Timeline — tutorial and examples.
- What Does Pebble Time Mean For Developers?
- How to Submit a Pebble App to the App Store
Frequently Asked Questions (FAQs) about Pebble Watch Timeline
How does the Pebble Watch Timeline work?
The Pebble Watch Timeline is a unique feature that organizes your day’s events, reminders, and notifications in a chronological order. It’s designed to give you a quick overview of your day at a glance. You can access the timeline by pressing the up or down buttons on the right side of your Pebble watch. The timeline will show past events when you press the up button and future events when you press the down button. It’s a simple and intuitive way to stay on top of your schedule.
How can I customize my Pebble Watch Timeline?
Customizing your Pebble Watch Timeline is easy. You can choose which apps send notifications to your timeline, and you can also pin items to your timeline manually. To do this, open the Pebble app on your smartphone, go to the ‘Apps/Timeline’ section, and select the apps you want to receive notifications from. To pin an item manually, simply select the ‘Pin’ option when viewing an event or reminder.
Can I use the Pebble Watch Timeline without a smartphone?
While the Pebble Watch Timeline is designed to work in conjunction with a smartphone, it can still function without one. However, without a smartphone, the timeline will only display the time and any alarms you’ve set. You won’t be able to receive notifications or updates from apps.
How do I set up the Pebble Watch Timeline?
Setting up the Pebble Watch Timeline is straightforward. First, make sure your Pebble watch is paired with your smartphone via Bluetooth. Then, open the Pebble app on your smartphone and go to the ‘Apps/Timeline’ section. Here, you can choose which apps you want to receive notifications from. Once you’ve made your selections, your timeline will automatically update with information from these apps.
Can I remove items from my Pebble Watch Timeline?
Yes, you can remove items from your Pebble Watch Timeline. To do this, navigate to the item you want to remove on your watch, press the select button, and then choose the ‘Remove’ option. Please note that this will only remove the item from your timeline, not from the app it originated from.
Why aren’t my notifications appearing on my Pebble Watch Timeline?
If your notifications aren’t appearing on your Pebble Watch Timeline, there could be a few reasons. First, make sure your watch is paired with your smartphone and that the Pebble app is running in the background. Also, check that you’ve selected the correct apps to send notifications to your timeline in the ‘Apps/Timeline’ section of the Pebble app.
Can I view past events on my Pebble Watch Timeline?
Yes, you can view past events on your Pebble Watch Timeline. To do this, press the up button on the right side of your watch. This will show you events and notifications from earlier in the day.
How do I update the software on my Pebble Watch to access the Timeline feature?
To update the software on your Pebble Watch, open the Pebble app on your smartphone and go to the ‘Support’ section. Here, you’ll find an option to update your watch’s software. Once the update is complete, you’ll be able to access the Timeline feature.
Can I use the Pebble Watch Timeline with iOS and Android devices?
Yes, the Pebble Watch Timeline is compatible with both iOS and Android devices. Simply download the Pebble app from the App Store or Google Play Store, pair your watch with your smartphone, and you’ll be able to use the Timeline feature.
What is the battery life of the Pebble Watch when using the Timeline feature?
The battery life of the Pebble Watch can vary depending on usage, but generally, you can expect up to 7 days of battery life. Using the Timeline feature shouldn’t significantly impact the battery life. However, if you’re receiving a large number of notifications, this could potentially drain the battery faster.
 Dmitri Lau
Dmitri Lau is a freelance Ajax developer with a penchant for statistical analysis. When not improving a meta template engine's relative response yield, yawning uninterruptedly every night has become a norm which he hopes will soon be over when his Hong Kong based startup picks up.