Welcome to the third and final part in this series introducing you to a great, alternative PHP e-commerce platform – OXID eSales. In case you missed them, part one of the series gave a broad introduction to OXID eSales. We looked at some of the features and requirements and finished up with installing a fully working shop. Part two dove deeper, looking at how themes are composed and we began creating a custom theme based off the default theme Azure.
This is part three, and we’re going to get some hands-on experience with OXID by writing a custom module to extend its core functionality. The functionality we’ll be implementing will enable us to display the latest tweets from our twitter account, based on a new custom field we’ll be adding to the administration backend.
Creating a Module
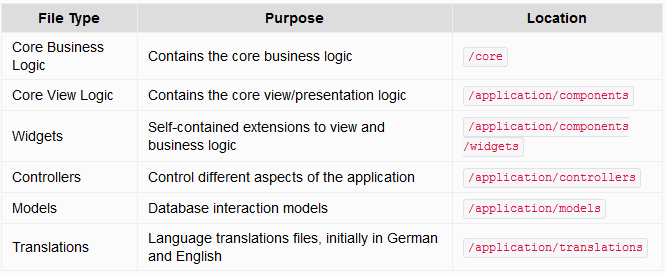
In OXID there are six types of what can be described as core files. They cover everything you can do in the shop, such as interacting with the database, language support (think internationalization), debugging, validation, PDF generation, images, themes, and more. Specifically, they are:
Unless you’re never going to upgrade, but especially if you are, it’s best to leave all these core files as they are. Otherwise you’re going to lose all of your hard work and changes when it’s time to upgrade.
If you’ve ever played around with Magento or platforms which implement a similar approach, OXID will be rather familiar to you. As with Magento, the user can extend core files with custom extensions which will survive an upgrade cycle. Whether you need extra currency support, more information displayed in a template which standard functions can’t provide, or need to store data which the standard structure doesn’t support, you can extend OXID to your heart’s content. Then, when it’s time to upgrade, your changes won’t be lost.
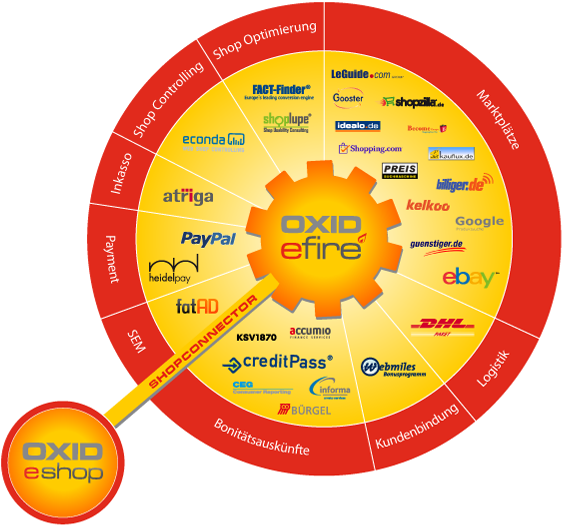
What’s also interesting is how OXID allows you to extend the core files in multiple locations. This affords the ability to use a variety of third party modules and extensions, such as from the OXID eFire market place. A sample of modules available can be seen in the graphic below.
Extending a Core File
So, how does one extend an Oxid class? In the image below you can see a simple illustration of the OXID class inheritance tree.
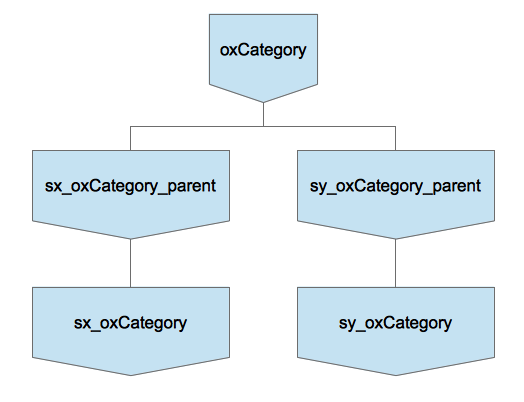
Let’s say we want to extend the functionality of oxCategory. At the top, you’ll see the core oxCategory class. Below it you’ll see two classes extending it, sx_oxCategory_parent and sy_oxCategory_parent. You’ll see these classes extended by sx_oxCategory and sy_oxCategory respectively. In a nutshell, that’s how you extend OXID core classes.
All custom classes you create have to extend from a *_parent class. These classes are pseudo classes; you don’t actually instanciate them. But for inheritance in OXID to work, you need to extend from the pseudo classes so the internal OXID processes can track multiple classes extending core ones.
Once you’ve done this, you then need to inform OXID which core classes your classes extend. This is done by adding extra information to the file metadata.php in our modules directory.
Let’s Create a Module
If you worked through creating a theme in part 2, then this process will be pretty familiar to you. We’re going to extend the core OXID functionality so we can retrieve and display the current tweets for a designated Twitter account. This involves the following steps:
- Customize the admin backend allowing us to specify the twitter account name
- Add a custom class to retrieve the twitter stream
- Extend the
oViewobjects so we can retrieve information in the templates - Customiz the templates to retrieve and display the information
Before we start, ensure that you’ve created your Twitter application; as you’ll need it for the four configuration values required in the class we write below. When you’ve created yours, make a note of these values:
- Consumer Key
- Consumer Secret
- Access Token
- Access Token Secret
We first need to create the basic structure of our module. Under modules, create a new directory called sitepointtwitter and in that directory create a file called metadata.php. In it add the following code:
<?php
/**
 * Metadata version
 */
$sMetadataVersion = '1.0';

/**
 * Module information
 */
$aModule = array(
    'id'           => 'sitepointtwitter',
    'title'        => 'SitePoint Twitter',
    'description'  => 'Module for retrieving and displaying a Twitter feed.',
    'thumbnail'    => 'picture.png',
    'version'      => '1.0',
    'author'       => 'Matthew Setter <matthew@maltblue.com>',
    'extend' => array(),
    'files' => array(
        'sitepointwTwitterFeed' =>
            'sitepointtwitter/widget/sitepointwtwitterfeed.php',
    )
);
These are the basic requirements for a module. At this point we’ve provided the basic registration information required, most of which is really only for display purposes which we’ll see shortly. However, the id value and the directory name have to match, so please make sure they do.
Create the Twitter Class
Now we’ll create a custom class which extends oxView, making available the Twitter information from our stream. Under modules/sitepointtwitter create a new file named sitepointview.php with the following code:
<?php
class sitepointwTwitterFeed extends oxWidget
{
    /**
     * Current class template name.
     * @var string
     */
    protected $_sThisTemplate = 'widget/sidebar/twitterfeed.tpl';

    /**
     * Simple class to retrieve a list of the latest
     * feeds from a users twitter feed.
     *
     * @return array An array containing the Twitter feed information
     *
     */
    public function getTwitterFeed()
    {
        $oConfig = $this->getConfig();

        try {
            $twitter = new Twitter(
                '<your/consumer/key>',
                '<your/consumer/secret>',
                '<your/access/token>',
                '<your/access/token/secret>'
            );
        } catch (TwitterException $e) {
            print $e->getMessage();
            return array();
        }

        try {
            if ($statuses = $twitter->load(Twitter::ME)) {
                return $statuses;
            }
        } catch (InvalidArgumentException $e) {
            print $e->getMessage();
            return array();
        } catch (TwitterException $e) {
            print $e->getMessage();
            return array();
        }
    }
}
Before we continue with the code overview, clone a copy of the repository to a new directory, vendor, under modules/sitepointtwitter. To do this, simply run the following command:
git clone git://github.com/dg/twitter-php.git
Then copy the two source files from the src to the vendor directory.
Now, back to the code. In the code above, we’ve created a class, sitepointView, which extends the pseudo-class oxWidget and uses the simplicity of David Grudl’s Twitter for PHP class to make one call and retrieve the latest tweets from our Twitter stream.
We attempt to instantiate a new Twitter object, using the configuration settings from our Twitter developer account we previously created. If a TwitterException is thrown, we return an empty array. Otherwise, we move to the next step of attempting to retrieve the latest statuses from our Twitter stream. If we encounter an exception, as before, we return an empty array.
My aim in writing this code was to keep it as simple as possible. We could have logged the fact something went wrong, or done something else so as to notify the user. But instead, it’s coded so either way, an array is returned which can be parsed, keeping it simple and effective so the purposes of the example is not lost.
With the class written we have to make the Twitter PHP classes available to our new OXID class. In the root of the modules directory, open the file functions.php and add the following lines:
// add in required classes for Twitter
require_once __DIR__ . "/sitepointtwitter/vendor/twitter.class.php";
require_once __DIR__ . "/sitepointtwitter/vendor/OAuth.php";
After this, clear the tmp directory and reload the shop. The module functionality will now be available.
Customize the Templates
So we’ve extended the backend configuration options, cloned the dependencies, extended oxView with our new class, and updated the metadata.php file making all the code available to our shop. Only one step remains – customising the view templates.
Copy application/views/azure/tpl/layout/sidebar.tpl to application/views/sitepoint/tpl/layout/sidebar.tpl. Then open it and find the following block:
[{block name="sidebar_tags"}]
    [{if $oView->showTags() && $oView->getClassName() ne "details" && $oView->getClassName() ne "alist" && $oView->getClassName() ne "suggest" && $oView->getClassName() ne "tags"}]
        [{oxid_include_widget nocookie=1 cl="oxwTagCloud" blShowBox="1" noscript=1 }]
    [{/if}]
[{/block}]
Above it, add in the following new block:
[{block name="sidebar_twitter_feed"}]
    [{oxid_include_widget cl="sitepointwTwitterFeed" nocookie=$blAnon force_sid=$force_sid}]
[{/block}]
What this does is use a custom Smarty plugin to render the contents of the widget inline, using the class sitepointwTwitterFeed as indicated by the cl argument. There are a range of other possible arguments, which you can read more about in the online documentation.
Following this, create a new directory application/views/sitepoint/tpl/widget/sidebar. In it, create new file called twitterfeed.tpl which will be the template that the widget will render. Add in it the following code:
[{assign var=aTwitterFeed value=$oView->getTwitterFeed()}]

<style type="text/css">
    div#twitterFeedBox ul {
        border: 0px;
    }

    div#twitterFeedBox ul li {
        margin-top: 5px;
        margin-bottom: 5px;
        color: #999;
    }
</style>
<div id="twitterFeedBox" class="box twitterFeed">
    <h3>[{ oxmultilang ident="WIDGET_TWITTER_FEED_HEADER" }]</h3>
    <div class="content">
        <ul>
            [{foreach from=$aTwitterFeed item=sTweet key=iCount}]
            <li>[{$sTweet->text}].<br />on: [{$sTweet->created_at|date_format:"%e/%m/%Y"}]</li>
            [{/foreach}]
        </ul>
    </div>
</div>
Finally, in application/views/sitepoint/en/cust_lang.php add the following line:
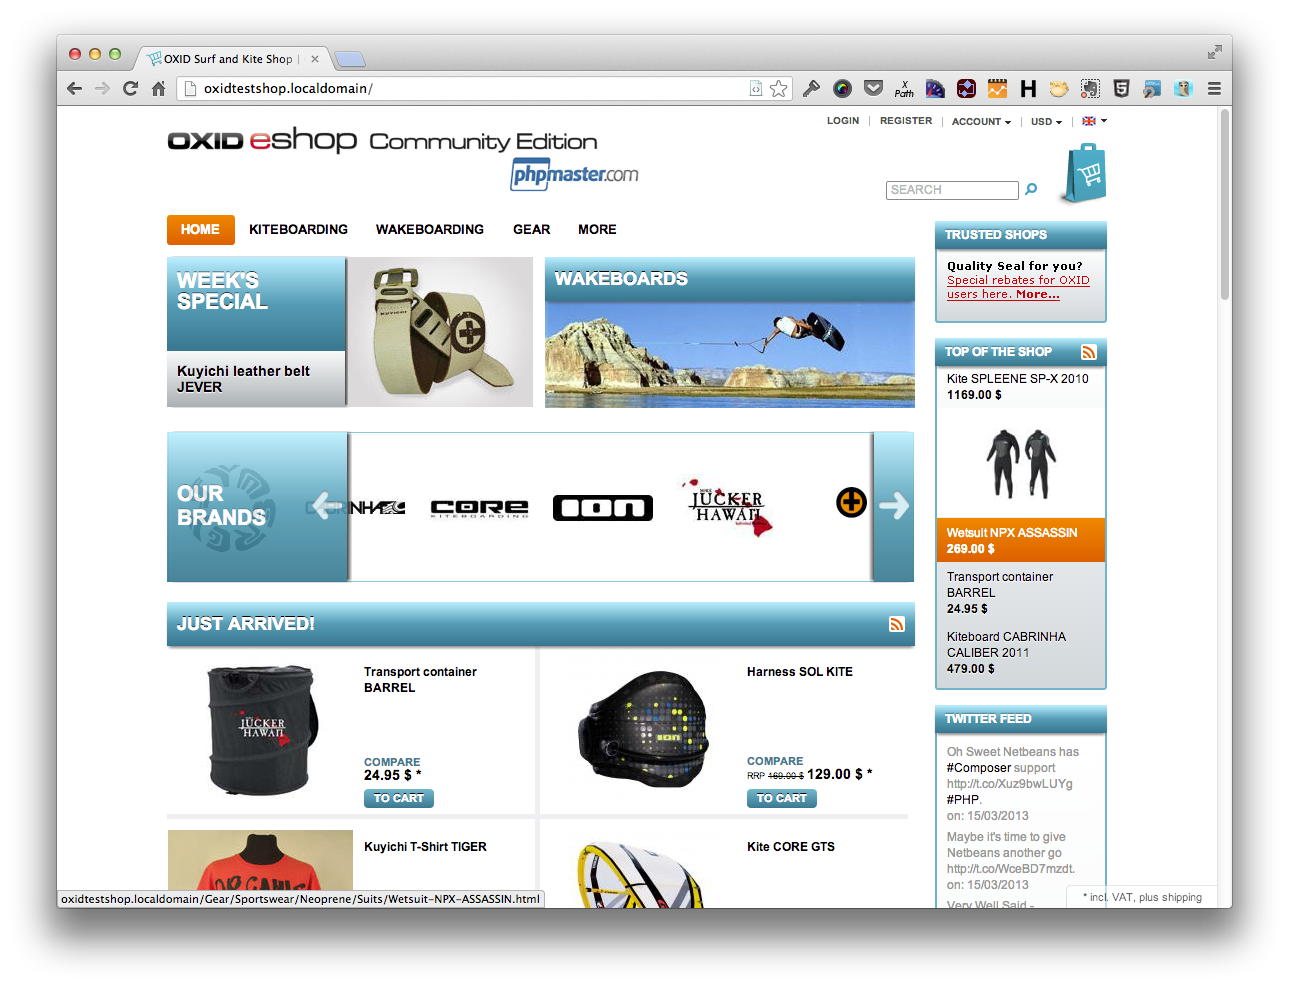
'WIDGET_TWITTER_FEED_HEADER' => 'Twitter Feed',This provides the translation required for the template’s H3 tag. Once you’ve done it, you then need to clear the tmp directory and reload OXID again so it becomes aware of the changes. After all is said and done, our shop will now look like the image below where you can see the twitter feed down on the bottom right hand side.
Conclusion
This concludes the 3-part series introducing OXID eSales. We’ve gone through what it is, installed a working version of the community edition, modified aspects of the theme and created a reusable widget which displays a Twitter feed via an external library.
So what do you think? OXID is very very easy to get started with and extend – wouldn’t you agree?
I hope you’ve enjoyed this introduction and will try OXID out. If you’ve already started since part 1, what has your experience been like? Is it working well? I hope it has.
If you have any questions or queries, you can always jump on the OXID eSales forums or chat in the IRC channel.
Until next time, all the best with OXID and don’t forget to share your feedback in the comments below.
Image via Fotolia
 Matthew Setter
Matthew Setter is a software developer, specialising in reliable, tested, and secure PHP code. He’s also the author of Mezzio Essentials (https://mezzioessentials.com) a comprehensive introduction to developing applications with PHP's Mezzio Framework.