Star Trek has long been a surprisingly accurate predictor of future technology. For example, the communicator was a precursor to the cell phone. Similarly, in Star Trek: The Next Generation, the crew aboard the Starship Enterprise wore badges that contained an intelligent location-aware system – the characters could ask the badge questions about their location, and discover information about what was around them.
Today, the ability to perform this kind of location sensing and mapping is bringing about a new wave of applications that answer useful questions, such as: “Where am I?”, “Who is nearby?”, and “What are they doing?”
In this article, I’ll show you how to combine Flex/Flash, Google Maps, Flickr, and OpenSocial to create some cool example applications that you could use as the basis for your own development. You can download the code archive for this article if you’d like to play along at home.
Pay attention – there will be a quiz at the end! The first 100 people to complete the quiz will win a copy of my book, Getting Started With Flex 3, delivered to their front door for FREE, thanks to Adobe. You can also download the book in PDF format for free for a limited time.
Getting Started
If you haven’t played with Flex before, it’s a platform for building Rich Internet Applications in Flash using MXML (an XML-based markup language) and ActionScript. The compiler and framework are open source, and you can download those directly from Adobe. You can also download the Flex Builder 3 IDE on a trial basis from Adobe. Flex Builder is definitely the easiest way to develop Flex applications because it supports syntax highlighting, code lookups, and all of the modern features one expects from a professional programming editor. I recommend reading this beginner Flex tutorial if you’re just getting started.
Google Maps is a site with which you’re probably already familiar, but you may not be aware that there’s also a Flash version of Google Maps which supports the same API as the JavaScript version. This is the version we’ll be using in these examples.
Before we begin, you’ll need to obtain API keys for both Flickr and Google Maps, if you don’t have them already. The Google Maps API application process requires that you enter the URL of the site from which you’ll be requesting the maps. We’ll be running this application on our local machine – at least initially, anyway – so I recommend using a URL of http://localhost/.
Displaying a Map
First, let’s create a small Flex application that simply embeds a Google Map. The code for this app looks like this:
Listing 1. Flickrmap.mxml

<?xml version="1.0" encoding="utf-8"?>

<mx:Application xmlns:mx="http://www.adobe.com/2006/mxml" layout="absolute"

  creationComplete="onStartup()">

<mx:Script>

<![CDATA[

import com.google.maps.services.GeocodingEvent;

import com.google.maps.services.ClientGeocoder;

import com.google.maps.controls.ZoomControl;

import com.google.maps.controls.MapTypeControl;

import com.google.maps.MapEvent;

import com.google.maps.LatLng;

import com.google.maps.Map;

import mx.core.UIComponent;


private var map:Map = new Map();


private function onStartup() : void {

  var uic:UIComponent = new UIComponent();

  uic.setStyle( 'top', 0 );

  uic.setStyle( 'left', 0 );

  uic.width = width;

  uic.height = height;

  addChildAt( uic, 0 );


  map.key = 'Your Google Maps Key';

  map.width = width;

  map.height = height;

  map.addEventListener( MapEvent.MAP_READY, onMapReady );

  uic.addChild( map );


  locPanel.setStyle( 'top', height - locPanel.height - 20 );

}

private function onMapReady( event:MapEvent ) : void {

  map.setCenter( new LatLng( 34.101509, -118.32691 ) );

  map.setZoom( 12 );


  map.addControl( new MapTypeControl() );

  map.addControl( new ZoomControl() );

}

private function onGeocodeSuccess( event:GeocodingEvent ) : void {

  map.setCenter( event.response.placemarks[0].point );

}

private function onKeyDown( event:KeyboardEvent ) : void {

  if ( event.keyCode == Keyboard.ENTER ) {

    var cg:ClientGeocoder = new ClientGeocoder( "USA" );

    cg.addEventListener( GeocodingEvent.GEOCODING_SUCCESS, onGeocodeSuccess );

    cg.geocode( loc.text );

  }

}

]]>

</mx:Script>

<mx:Panel id="locPanel" title="Location" top="500" left="20" borderAlpha="0.95">

  <mx:TextInput id="loc" keyDown="onKeyDown( event )" width="300" text="fremont, ca" />

</mx:Panel>

</mx:Application>
In the onStartup method, we create the map and register an event handler to listen for a MAP_READY message. As soon as that message is detected, we call the onMapReady method, which adds some controls to the map.
The user interface consists of a text input field, into which the user enters a street address. Our application monitors changes to this field via the keyDown attribute; when the user presses the Enter key (Return on a Mac) we perform a geocode lookup on the address that was entered. Performing a geocode lookup (commonly known simply as geocoding) takes an address and returns a latitude and longitude. The onGeocodeSuccess method is called when this process was successful, and Google has provided us with a valid latitude and longitude pair. We then center the map based on this geographical coordinate.
Let’s see if our application works. Launch the code from Flex Builder, and you should see something similar to the image in Figure 1.
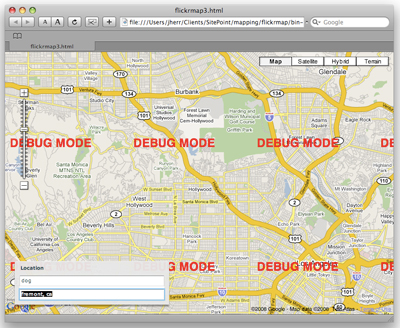
Hold up – why are the words “debug mode” plastered all over our map? Who said anything about debug mode?
Well, it turns out the Google Maps key is associated with a URL, and the URL we gave it was http://localhost/. However, the URL that our application is currently running from is a file URL pointing to somewhere on the disk.
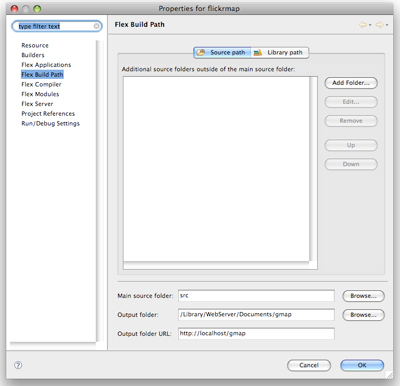
What we need to do is tweak our project settings so that Flex Builder places the compiled SWF files and such in the local web server directory. If you’re running on Windows, this probably means storing them somewhere in c:inetpubwwwroot (for the IIS web server) or c:apachehtdocs (for Apache). On a Mac, these files can be placed in either ~/Sites or in /Library/WebServer/Documents.
The two settings you need to change in the project settings are the Output Folder, which is where we want Flex Builder to copy our files, and Output Folder URL, which is the URL of that folder on the web server. These text fields are shown in Figure 2.
Once you’ve made these changes, re-launch the application. You should see something like the image shown in Figure 3.
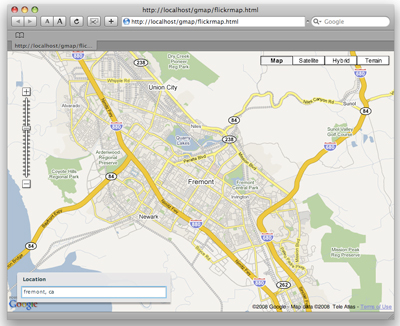
Now when the user presses Enter after typing a value into the Location input field, our application runs the geocode and sets the center of the map to the value that was typed – Fremont, California, in the case of the example above.
Adding Flickr Results
The next step is to add functionality for our application to communicate with the Flickr web server. Specifically, we’re after images that correspond to the current latitude and longitude of our map. The cool thing about Flickr is that many of its images are geotagged. This means that we can provide Flickr with a latitude, longitude, and radius, and it will return a selection of photos taken within the area specified by those parameters.
There is a Flickr library for Flex, but it doesn’t currently support the geotagging API. So in the code below, I’ve queried the Flickr REST API directly by using a Flex HTTP Service:
Listing 2. The Flickr Mapping application

<?xml version="1.0" encoding="utf-8"?>

<mx:Application xmlns:mx="http://www.adobe.com/2006/mxml" layout="absolute"

  creationComplete="onStartup()">

<mx:Script>

<![CDATA[

import com.google.maps.overlays.MarkerOptions;

import com.google.maps.overlays.Marker;

import mx.rpc.events.ResultEvent;

import com.google.maps.services.GeocodingEvent;

import com.google.maps.services.ClientGeocoder;

import com.google.maps.controls.ZoomControl;

import com.google.maps.controls.MapTypeControl;

import com.google.maps.MapEvent;

import com.google.maps.LatLng;

import com.google.maps.Map;

import mx.core.UIComponent;


private const FLICKR_KEY:String = 'Your Flickr Key';


private var map:Map = new Map();


private function createFlickrURL( search:String, lat:Number, lng:Number, radius:Number = 20 ) : String {

  var query:String = 'http://api.flickr.com/services/rest/?api_key='+FLICKR_KEY;

  query += '&method=flickr.photos.search&text=dog&extras=geo&lat='+lat+'&lon='+lng+'&radius='+radius;

  query += '&per_page=100&page=1&sort=date-posted-desc';

  return query;

}


private function onStartup() : void {

  var uic:UIComponent = new UIComponent();

  uic.setStyle( 'top', 0 );

  uic.setStyle( 'left', 0 );

  uic.width = width;

  uic.height = height;

  addChildAt( uic, 0 );


  map.key = 'Your Google Maps Key';

  map.width = width;

  map.height = height;

  map.addEventListener( MapEvent.MAP_READY, onMapReady );

  uic.addChild( map );


  locPanel.setStyle( 'top', height - locPanel.height - 20 );

}

private function onMapReady( event:MapEvent ) : void {

  map.setCenter( new LatLng( 34.101509, -118.32691 ) );

  map.setZoom( 12 );


  map.addControl( new MapTypeControl() );

  map.addControl( new ZoomControl() );

}

private function onSearch() : void {

  flickrSearch.url = createFlickrURL( searchText.text, map.getCenter().lat(), map.getCenter().lng() );

  flickrSearch.send();

}

private function onFlickrResult( event:ResultEvent ) : void {

  map.clearOverlays();

  for each( var photo:XML in event.result..photo ) {

    var pMarker:Marker = new Marker( new LatLng( photo.@latitude, photo.@longitude ),

      new MarkerOptions( {

        label:photo.@title,

        hasShadow:true } ) );

    map.addOverlay( pMarker );

  }

}

private function onGeocodeSuccess( event:GeocodingEvent ) : void {

  map.setCenter( event.response.placemarks[0].point );

  onSearch();

}

private function onKeyDown( event:KeyboardEvent ) : void {

  if ( event.keyCode == Keyboard.ENTER ) {

    var cg:ClientGeocoder = new ClientGeocoder( "USA" );

    cg.addEventListener( GeocodingEvent.GEOCODING_SUCCESS, onGeocodeSuccess );

    cg.geocode( loc.text );

  }

}

]]>

</mx:Script>

<mx:HTTPService id="flickrSearch" resultFormat="e4x" result="onFlickrResult(event)" />

<mx:Panel id="locPanel" title="Location" top="500" left="20" borderAlpha="0.95" layout="vertical">

  <mx:TextInput id="searchText" keyDown="onKeyDown( event )" width="300" text="dog" />

  <mx:TextInput id="loc" keyDown="onKeyDown( event )" width="300" text="fremont, ca" />

</mx:Panel>

</mx:Application>
You’ll notice at the bottom of the file that I’ve added a searchText field in addition to the location field. This field contains the search term that we’ll send to Flickr in addition to the current map location.
The bulk of the code that renders our map is unchanged from the simple example that we looked at a moment ago. The new stuff happens when the onGeocodeSuccess method calls the onSearch method to start a Flickr search. That Flickr search uses the flickrSearch HTTP service with a URL that we generate on the fly using the createFlickrURL method.
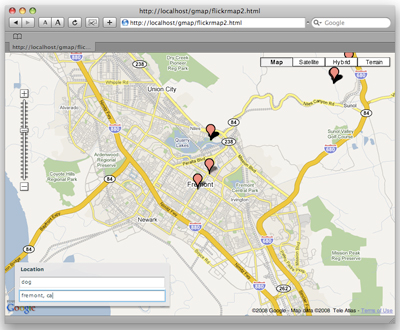
When our query to Flickr returns a selection of results (expressed as XML), the onFlickrResult method is called. This method takes that XML and looks for the photo elements in the XML tree. It then creates a Google Maps Marker object for each of the photos and adds this marker to the map.
Figure 4 shows the result of running this code.
Things are really starting to come together – our user can find photos of something given a location. But what if he or she actually wants to view the photo?
Let’s adjust our code to add this feature:
Listing 3. The updated code
private function createMarker( photo:XML ) : void {
var reqUrl:String = 'http://static.flickr.com/'+photo.@server+'/'+photo.@id+'_'+photo.@secret+'_s.jpg';
var pMarker:Marker = new Marker( new LatLng( photo.@latitude, photo.@longitude ),
new MarkerOptions( {
label:photo.@title,
tooltip:photo.@title,
name: reqUrl,
hasShadow:true } ) );
pMarker.addEventListener( MapMouseEvent.CLICK, function( event:MapMouseEvent ) : void {
pMarker.openInfoWindow( new InfoWindowOptions(
{ contentHTML: '<img width="75" height="75" src="'+reqUrl+'">' } ) );
} );
map.addOverlay( pMarker );
}
private function onFlickrResult( event:ResultEvent ) : void {
map.clearOverlays();
for each( var photo:XML in event.result..photo )
createMarker( photo );
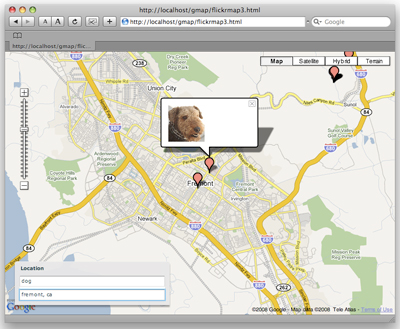
}In the code above, we’ve changed the onFlickrResult function so that it just calls createMarker. The createMarker method in turn creates a Marker, and we’ve added an event listener to detect when the user clicks on the Marker. When this happens, we display a small “info window” above our marker. This info window, which resembles a speech bubble, contains a thumbnail version of the Flickr image.
Figure 5 shows this thumbnail display code in action.
So, there we have it – we can produce Flickr pictures of big poodle-esque dogs in Fremont.
Now, what if we want to view images of people?
Mapping OpenSocial
Mapping people is a more complicated task than mapping geotagged images. Each of the major social networks (Facebook, MySpace, LinkedIn, and the like) make available their own APIs to use when searching for people. However, these networks are gradually unifying via a standard called OpenSocial.
OpenSocial was originally conceived as a common API for social networking applications. However, the release of version 0.8 offers a REST API that you can use to perform queries of a social network.
The only problem is that no major social networking sites have implemented 0.8 so far, so unfortunately we can’t take advantage of this feature just yet.
Don’t lose heart! This is an exciting space, and the goal posts are constantly changing. So what should you do when you hit a wall? Build your own door!
For this example, we’re going to create a dummy OpenSocial REST response in PHP. While this won’t allow us to actually perform any OpenSocial queries, it’ll be a proof of concept, showing that the REST API will certainly be ready to go once the social networks begin implementing version 0.8, which shouldn’t be too far away.
Here we go. Since REST is a URL-based API, we need to perform some URL rewriting to turn a URL like this …
http://localhost/~jherr/people/@me/self… into this:
http://localhost/~jherr/index.php?q=/people/@me/@selfThe best tool for the job is Apache mod_rewrite. If you’re new to mod_rewrite, check out this comprehensive tutorial. Ensure that you have the mod_rewrite module installed, and add the following code to your .htaccess file:
Options +FollowSymLinks


<IfModule mod_rewrite.c>

  RewriteEngine on

  RewriteBase /

  RewriteCond %{REQUEST_FILENAME} !-f

  RewriteCond %{REQUEST_FILENAME} !-d

  RewriteRule ^(.*)$ ~jherr/index.php?q=$1 [L,QSA]

</IfModule>
This rewrites the REST request URL into a URL that resembles an invocation of our index.php file.
The code for our index.php file looks like this:
Listing 4. The index.php file

<?php

header( 'Content-type: text/xml' );

?>

<entry xmlns="https://www.w3.org/2005/Atom">

 <content type="application/xml">

  <person xmlns="http://ns.opensocial.org/2008/opensocial">

   <name>

    <unstructured>Jane Doe</unstructured>

   </name>

   <about_me>Living in Fremont</about_me>

   <address>

    <longitude>-121.987259</longitude>

    <latitude>37.54987</latitude>

   </address>

  </person>

 </content>

...

<title/>

<updated>2003-12-13T18:30:02Z</updated>

<author/>

<id>urn:guid:example.org:34KJDCSKJN2HHF0DW20394</id>

</entry>
For this demo, we’ve manually created a person and structured their data in the XML OpenSocial 0.8 XML format. Until this version is supported by one or more of the social networking applications, you’ll need to resort to generating this XML data yourself.
The Flex code that maps the XML returned by our index.php file is shown below:
Listing 5. The OpenSocial Flex application

<?xml version="1.0" encoding="utf-8"?>

<mx:Application xmlns:mx="http://www.adobe.com/2006/mxml" layout="absolute"

  creationComplete="onStartup()">

<mx:Script>

<![CDATA[

import com.google.maps.InfoWindowOptions;

import com.google.maps.MapMouseEvent;

import com.google.maps.overlays.MarkerOptions;

import com.google.maps.overlays.Marker;

import mx.rpc.events.ResultEvent;

import com.google.maps.services.GeocodingEvent;

import com.google.maps.services.ClientGeocoder;

import com.google.maps.controls.ZoomControl;

import com.google.maps.controls.MapTypeControl;

import com.google.maps.MapEvent;

import com.google.maps.LatLng;

import com.google.maps.Map;

import mx.core.UIComponent;


private var map:Map = new Map();


private namespace OS='http://ns.opensocial.org/2008/opensocial';

private namespace Atom='https://www.w3.org/2005/Atom';


private function onStartup() : void {

  var uic:UIComponent = new UIComponent();

  uic.setStyle( 'top', 0 );

  uic.setStyle( 'left', 0 );

  uic.width = width;

  uic.height = height;

  addChildAt( uic, 0 );


  map.key = 'Your Google Maps Key';

  map.width = width;

  map.height = height;

  map.addEventListener( MapEvent.MAP_READY, onMapReady );

  uic.addChild( map );

}

private function onMapReady( event:MapEvent ) : void {

  map.setZoom( 10 );


  map.addControl( new MapTypeControl() );

  map.addControl( new ZoomControl() );


  osSearch.send();

}

private function createMarker( person:XML ) : void {

  use namespace OS;

  var pMarker:Marker = new Marker( new LatLng( person.address.latitude, person.address.longitude ),

    new MarkerOptions( {

    label:person.name.unstructured,

      tooltip:person.name.unstructured,

      hasShadow:true } ) );

  pMarker.addEventListener(MapMouseEvent.CLICK,function( event:MapMouseEvent ) : void {

    pMarker.openInfoWindow( new InfoWindowOptions( { content: person.name.unstructured.toString() } ) );

  } );

  map.addOverlay( pMarker );

}

private function onOpenSocialResult( event:ResultEvent ) : void {

  map.clearOverlays();

  var first:Boolean = true;

  use namespace OS;

  for each ( var person:XML in event.result..person ) {

    createMarker( person );

    if ( first ) {

      map.setCenter( new LatLng( person.address.latitude, person.address.longitude ) );

      first = false;

    }

  }

}

]]>

</mx:Script>

<mx:HTTPService id="osSearch" url="http://localhost/~jherr/people/@me/@self"

  resultFormat="e4x" result="onOpenSocialResult(event)" />

</mx:Application>
As you may have noticed, this code is very similar to the the code we used in our Flickr application. However, instead of requesting data from Flickr, this time we’re requesting data from our localhost URL.
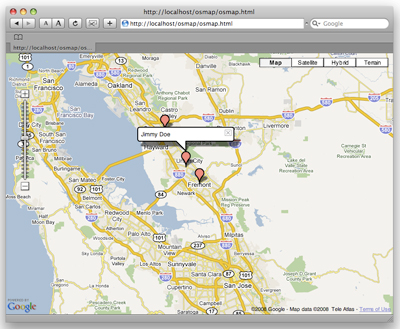
The onOpenSocialResult method in the code above takes XML data produced by our index.php file, calculates the latitude/longitude pairs for each of the person XML objects, and adds a Marker for this person to the map. Then when the user clicks the Marker, our application displays an info window containing the person’s name.
Figure 6 demonstrates what this looks like.
As I mentioned earlier, this article is slightly ahead of the curve – none of the services currently supporting OpenSocial support the 0.8 REST format. However, it’s clear that they soon will, and this code should serve as a useful foundation for you to make a start with querying data from social networks using the OpenSocial 0.8 standard.
Where to Go from Here
We covered a lot of ground in this article, no? First, we demonstrated how to use Flex to build Flash applications. We then learned how to embed a beautiful, dynamic Google Map into a Flex application. Then we looked at how to retrieve and process data from an XML data source (whether it be via the Flickr API or the OpenSocial API). Finally, I demonstrated how to plot that data as interactive markers on a map.
The techniques used in this example should provide you with some great starting points for your own geocoding/mapping applications (don’t forget to download the code archive for this article). I look forward to seeing what you create!
Quiz Yourself!
Test your understanding of this article with a short quiz, and receive a FREE PDF of my book, Getting Started With Flex 3. The first 100 people to complete the quiz will also receive a paper copy delivered to their doors for FREE, thanks to Adobe Systems.
 Jack Herrington
Jack Herrington is an engineer, author, and presenter who lives and works in the San Francisco Bay Area. He lives with his wife, daughter and two adopted dogs. When he's not writing software, books, or articles you can find him cycling, running, or in the pool training for triathlons. You can keep up with Jack's work and his writing at http://jackherrington.com.