Openbiz Cubi: A Robust PHP Application Framework, Part 1

Key Takeaways
- Openbiz Cubi is a robust PHP application framework designed for the fast development of business applications. It provides developers with an XML-based coding scheme, a modular platform with common components, a professional-looking UI, and flexible permission control options.
- To install Openbiz Cubi, developers need to prepare the LAMP stack, create a folder named cubi in the web server’s web directory, and unzip the Cubi ZIP file to the directory. After installation, developers can launch Cubi’s web installation wizard to set up the database and load modules.
- Openbiz Cubi offers several built-in modules, including System, Menu, User, and MyAccount modules. It supports several widely used access control models, including Role-based access control (RBAC) and Group-based access control. An administrator can manage users and their permissions to access certain resources through the Role Management page.
The web has been a standard platform for both consumer-facing and business-facing applications for more than 10 years. The enormous amount of open source projects, commercial tools, and frameworks make fast web development possible.
Openbiz Cubi is a robust PHP application framework giving developers the ability to create business applications with minimal effort. In this two-part series I’ll explain the concepts and steps necessary to create your own business web applications with Cubi. We’ll look first at the challenges web developers face and how Openbiz Cubi can help, and then how to install Cubi. In part 2 we’ll see how to create our own modules.
Openbiz Cubi Features
Even with many choices for a web development framework, application development is still a very challenging job.
A good framework can help developers code with good programming practices such MVC and ORM, although to build a real world application we sometimes have to spend time writing code beyond the capability of the framework.
- Learn the framework and code with it. After creating a “Hello World” app with the framework, developers still have a steep learning curve to build the first prototyped application.
- Implement common features like user registration, login, password reset, etc.
- Provide permission control for users. Because of the complexity of generalizing access control, permission logic is often hardcoded in the software.
- Make a professional UI. Fine-tuning HTML, CSS, and JavaScript is time-consuming, especially to please all major browsers.
All the above tasks are necessary but not the highlighted features of the application. Spending too much time on them brings frustration to both clients and the development team.
Openbiz Cubi is a mature platform, mainly for the fast development of business applications. It was designed to relieve the pain of such application development by providing:
- An XML-based coding scheme. Developers use intuitive XML to describe the data objects, pages and forms, as well as user interaction.
- A modular platform that has many common component built-in. Developers make their own modules and load them in the platform.
- A default professional-looking UI with multi-theme support.
- Flexible permission control options, from simple to sophisticated.
To learn more about Cubi, be sure to visit the project site code.google.com/openbiz-cubi and official website www.openbiz.me.
Installing Openbiz Cubi
To install Openbiz Cubi, you need to download either the source code or Windows installer from code.google.com/p/openbiz-cubi/downloads/list, or you can get the latest source code from the Openbiz Cubi SVN server.
When you choose to download the source ZIP archive or get the source from SVN, you can follow the steps below to install it:
- Prepare the LAMP stack. Openbiz Cubi can be run on Unix, Windows, and Mac servers. The runtime environment should include:
- Web server – Apache, IIS, etc.
- Database server – MySQL, MSSQL, Oracle, PgSQL, and databases supported by Zend_DB
- PHP 5.2 and above with mysql, PDO, and mcrypt extensions
cubi.If you use Windows as your development environment, you can install Cubi with its Windows Installer. The installer:
- Installs Apache 2.4, PHP 5.4 and MySQL 5.3. After installation is completed, you can find Apache and MySQL in the System Services list.
- Installs the Openbiz Cubi platform and business applications. You can choose to unselect the options of installing business applications which are not released under open source.
- Adds desktop icons and start menu items.
After the code is installed to the web server’s directory, you can launch Cubi’s web installation wizard in a browser to set up the database and load modules. Run the installation wizard by launching http://host/cubi/install in your browser.
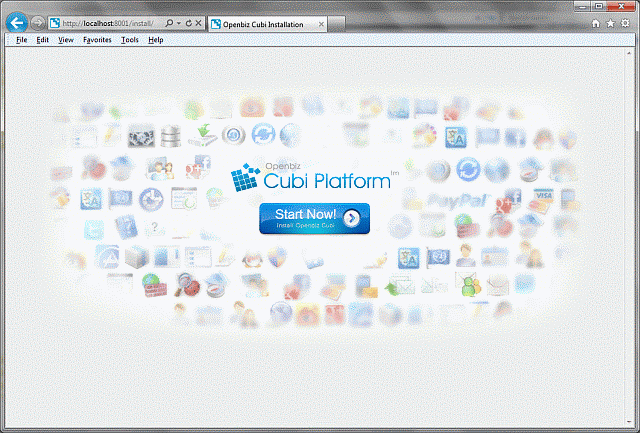
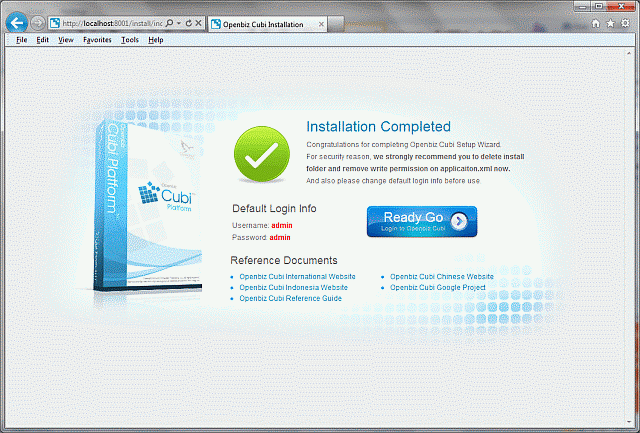
Click the Start Now button and follow the steps until you see Installation Completed page. Then you’ll be ready to test drive Cubi.
A Quick Tour of Openbiz Cubi
After you log in to Cubi as admin, you’ll see the Administration dashboard. You may see other tabs as well, like “Contacts” and “Calendar”.
Cubi is made of modules. All modules are under the cubi/modules directory. Of the many built-in modules, the following are the most important; they are core modules that are often used by other modules:
- System module – provides the ability for system administrators to manage users, roles, modules, groups and permissions.
- Menu module – provides support for page navigation by menus, tabs, and breadcumbs.
- User module – provides functions for users to register, sign in, and reset passwords.
- MyAccount module – provides My Account pages where a user can manage his own profile, preferences, activities, and password.
Cubi comes with other modules such as Contact, Email, Event Log, Security, Theme, Translation, Attachment, Picture, Chart, Payment, OAuth, Web Service, and more.
A typical Cubi page on the front-end is composed of four sections:
- Header – this section contains the logo, My Account link, application tabs, and breadcrumb navigation.
- Left Menu – this section contains navigation menus and other widgets.
- Content – this is the main area users will work in with their data and business logic.
- Footer – the footer may have links about the application provider, copyright, etc.

Manage Users and Roles
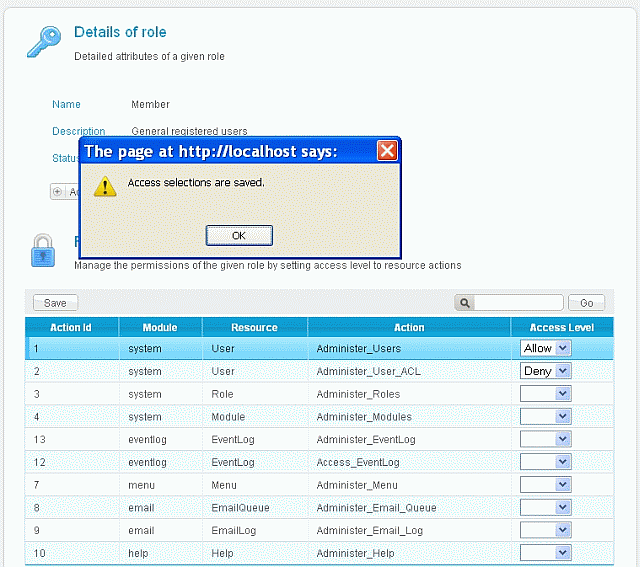
For the application administrator, one of the most important tasks is to manage users and their permissions to access certain resources. Cubi supports several widely used access control models including Role-based access control (RBAC) and Group-based access control (similar to Unix file permissions). I’ll briefly discuss how to use RBAC.
A Cubi user account is simply called “user”. A role usually means a type of user. Different roles are permitted to do different things. Cubi comes with three roles: administrator, member, and visitor. A user can be assigned to one or many roles.
An administrator needs to use the Role Management page to allow or deny resources for a given role. When he wants to grant a user certain permissions, he associates the user to a new role that has those permissions.
Conclusion
This is where I’ll end the first part of the series. So far we’ve talked about the challenges web developers face and how Openbiz Cubi can help, how to install Cubi, and undertook a brief overview of how Cubi is organized. In the next part I’ll dig deeper and show you how to create your own module. Stay tuned!
Image via Fotolia
Frequently Asked Questions about Openbiz Cubi PHP Application Framework
How does Openbiz Cubi compare to other PHP application frameworks like UserFrosting, Openbiz.io, and UserSpice?
Openbiz Cubi is a robust PHP application framework that offers a wide range of features and functionalities. Unlike UserFrosting, Openbiz.io, and UserSpice, Openbiz Cubi provides a more comprehensive solution for building business applications. It offers a unique data object model and metadata-driven design methodology that allows developers to focus more on business logic rather than coding. It also provides a robust security system, making it a more secure choice for businesses.
What are the key features of Openbiz Cubi that make it stand out from other PHP frameworks?
Openbiz Cubi offers several key features that set it apart from other PHP frameworks. These include a metadata-driven design methodology, a unique data object model, a robust security system, and a comprehensive solution for building business applications. These features allow developers to focus more on business logic rather than coding, making Openbiz Cubi a more efficient and effective choice for businesses.
How does Openbiz Cubi’s security system compare to other PHP frameworks?
Openbiz Cubi’s security system is robust and comprehensive, offering a higher level of security compared to other PHP frameworks. It includes features such as role-based access control, data encryption, and secure authentication, ensuring that your business data is protected at all times.
Can I use Openbiz Cubi for user login/registration?
Yes, Openbiz Cubi can be used for user login and registration. It provides a secure and efficient system for managing user accounts, including features such as secure authentication, role-based access control, and data encryption.
How does Openbiz Cubi’s data object model work?
Openbiz Cubi’s data object model is a unique feature that allows developers to focus more on business logic rather than coding. It provides a simple and efficient way to manage data, making it easier to build and maintain business applications.
What is metadata-driven design methodology in Openbiz Cubi?
Metadata-driven design methodology in Openbiz Cubi is a unique feature that allows developers to focus more on business logic rather than coding. It provides a simple and efficient way to manage data, making it easier to build and maintain business applications.
How does Openbiz Cubi compare to PHP frameworks listed on SourceForge?
Openbiz Cubi offers a more comprehensive solution for building business applications compared to many PHP frameworks listed on SourceForge. It provides a unique data object model and metadata-driven design methodology, allowing developers to focus more on business logic rather than coding.
Is Openbiz Cubi recommended for beginners?
Openbiz Cubi is a robust PHP application framework that offers a wide range of features and functionalities. While it may have a steeper learning curve compared to some other PHP frameworks, its comprehensive features and efficient design methodology make it a worthwhile choice for both beginners and experienced developers.
How does Openbiz Cubi handle data management?
Openbiz Cubi provides a unique data object model for efficient data management. This model allows developers to focus more on business logic rather than coding, making it easier to build and maintain business applications.
What kind of support is available for Openbiz Cubi users?
Openbiz Cubi offers a range of support options for users, including a comprehensive documentation, a community forum, and a dedicated support team. This ensures that users can get the help they need when they need it.
Rocky Swen is the founder of the Openbiz Cubi open source project. He spent his career on cloud, mobile, video encoding and streaming, business intelligence and enterprise technologies. During weekends he enjoys hiking with his family and playing tennis with friends.

Published in
·CMS & Frameworks·Development Environment·Meta·Miscellaneous·Patterns & Practices·PHP·October 3, 2014