In this tutorial, we’ll look at the Mootor Framework, an HTML 5 framework for developing mobile applications. It’s reasonably new (March 2014) and lacks the flurry of development some similar frameworks have, but it’s always worth taking a look.
Source code from this tutorial is available on GitHub.
Getting started
We’ll be using the angular seed project to set up a local server for the Mootor project. So first clone the angular seed project and install the required dependencies:
git clone https://github.com/angular/angular-seed.git
cd angular-seed
npm install
Once complete, clone the Mootor framework and copy the dist, source and examples folder into the angular-seed directory.
git clone https://github.com/emi420/Mootor.git
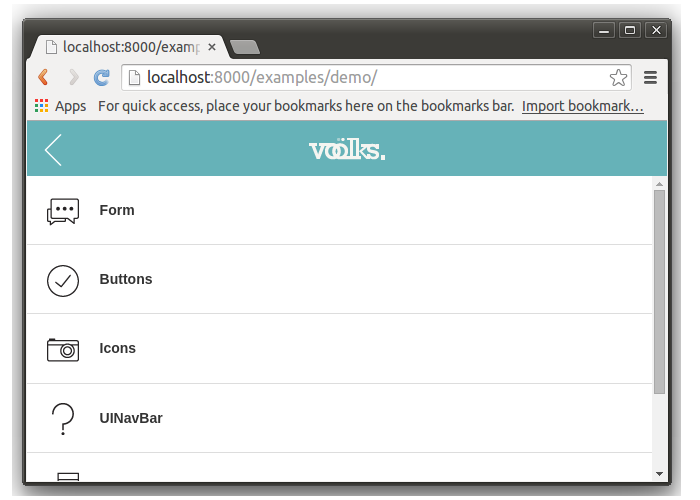
// copy dist, source and examples to angular-seedFrom the angular-seed directory, start the server using npm start and point your browser to http://localhost:8000/examples/demo/. You should see the demo app:
What we’ll be creating
Using the Mootor framework, we’ll be creating a simple Bucket list app where users can sign in and create their bucket list. We’ll hook up the app to the Firebase backend to save our data.
Creating sign in screen
Create a directory called BucketApp inside angular-seed/examples. Create an HTML file called index.html which will serve as the root file. Include all the required libraries inside this file.
Next create index.js where we’ll define the routing for our BucketApp.
Here is how examples/BucketApp/index.html should look:
<!DOCTYPE HTML>
<html>

<head>

    <meta http-equiv="Content-Type" content="text/html; charset=UTF-8">

    <meta name="viewport" content="initial-scale = 1.0, user-scalable = no">
    <meta name="apple-mobile-web-app-capable" content="yes" />

    <link rel="stylesheet" href="../../source/css/mootor.css">
    <link rel="stylesheet" href="../../source/css/color.css">
    <link rel="stylesheet" href="../../source/css/icons.css">

    <script defer type="text/javascript" src="../../dist/js/zepto-bundle.js"></script>
    <script defer type="text/javascript" src="../../dist/js/mootor.js"></script>
    <script defer type="text/javascript" src="index.js"></script>


</head>

<body>
    <header>
        <h1><img src="img/logo.png" /></h1>
    </header>
</body>

</html>
Inside BucketApp create a directory called views. Inside views create a folder called index and inside it create index.html,index.js and index.css.
index.html will be the default view of our app,index.js will be the supporting script and index.css will be css related to the index view.
Here is how views/index/index.html should look:
<form id="myForm" class="m-form m-padding">
    <fieldset class="m-form-top-labels">

        <div class="m-field">
            <input id="txtEmail" type="text" class="m-text" placeholder="Username" />
        </div>

        <div class="m-field">
            <input id="txtPass" type="password" class="m-text" placeholder="Password" />
        </div>

    </fieldset>

    <button type="submit" class="m-button m-button-success m-button-block">Sign In</button>

</form>
Next we’ll define the routes in examples/BucketApp/index.js as shown below:
(function() {
"use strict";
// Created the Mootor app
var app = m.app({
views: [
"index"
]
});
//default route
app.route("^$", app.view("index"));
// initialize the app
app.init();
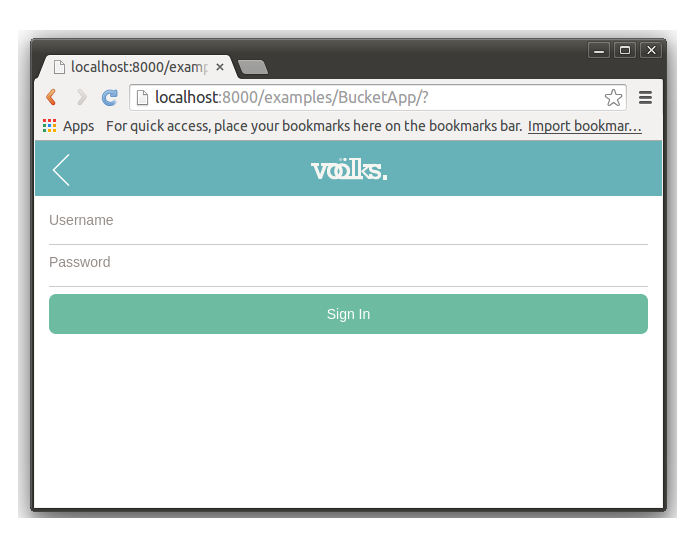
}());Restart the server, point your browser to http://localhost:8000/examples/BucketApp and you should be able to see the sign in screen.
Implementing sign in
Open up examples/BucketApp/views/index.js. This is where we’ll define the sign in logic. We’ll be using Firebase as a backend.
Let’s start by attaching a submit event to the sign in form.
(function($) {

    "use strict";

    m.app.view("index").on("ready", function() {
        $("#myForm").on("submit", function() {
            // logic will be here
        });
    });

}(window.$));
Getting started with firebase is quite simple. Start by registering for a free account on Firebase. Once you log into firebase, from the left side menu click on Login & Auth and check Enable Email & Password Authentication.
When a user has successfully logged in, the app will redirect to the users home with a welcome message. Let’s create a view for the user home.
Create a folder userhome inside examples/BucketApp/views/. Inside it create userhome.html, userhome.js and userhome.css.
Here is how userhome.html should look:
<h2>Welcome to User Home!!</h2>

<button id="btnLogout" type="button" class="m-button m-button-success m-button-block">Logout</button>
Open userhome.js and define the onclick event for btnLogout as shown below:
(function($) {

    "use strict";

    m.app.view("userhome").on("ready", function() {

        // create the firebase object
        var firebaseRef = new Firebase('https://burning-fire-1723.firebaseio.com');

        // create auth object
        var auth = new FirebaseSimpleLogin(firebaseRef, function(error, user) {
            if (!error) {
                if (user) {

                }
            }
        });

        // Logout click event
        $("#btnLogout").click(function() {
            auth.logout();
            window.location.href = "";
        });
    });

}(window.$));
Next add the route for userhome into examples/BucketApp/index.js as shown below:
app.route("^#userhome", app.view("userhome"));Let’s implement the user login. Once a user submits the sign in form, we’ll validate the username and password for empty values and call the firebase auth.login function.
Modify examples/BucketApp/views/index/index.js as shown below:
(function($) {

    "use strict";

    m.app.view("index").on("ready", function() {

        // create the firebase object
        var firebaseRef = new Firebase('https://burning-fire-1723.firebaseio.com');

        // create auth object
        var auth = new FirebaseSimpleLogin(firebaseRef, function(error, user) {
            if (!error) {
                if (user) {
                    window.location.href = "#userhome";
                }
            }
        });
        // form on submit event
        $("#myForm").on("submit", function() {
            var email = $('#txtEmail').val();
            var password = $('#txtPass').val();
            auth.login('password', {
                email: email,
                password: password
            });
            return false;
        });
    });

}(window.$));
Open examples/BucketApp/index.html and include the script reference to Firebase as shown:
<script type='text/javascript' src='https://cdn.firebase.com/js/client/1.0.17/firebase.js'></script>
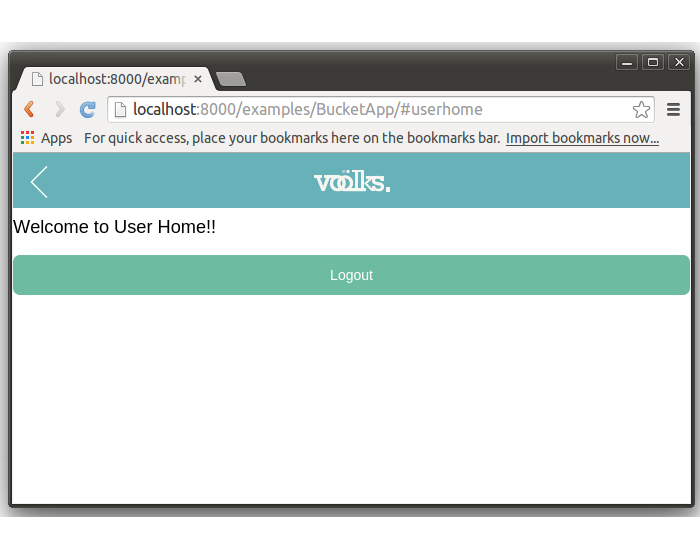
<script type='text/javascript' src='https://cdn.firebase.com/js/simple-login/1.6.1/firebase-simple-login.js'></script>Restart the server and point your browser to http://localhost:8000/examples/BucketApp/. Try to sign in using username sam@sam.com and password sam and on success you should see the below screen:
Conclusion
In this tutorial, we saw how to get started creating a mobile app using the Mootor framework. We implemented user sign in functionality using the Mootor framework and Firebase. In the next tutorial, we’ll try to use some other features offered by this framework and also implement the sign up functionality.
Detailed info about the framework can be found in the official docs. What are your thoughts? Does it offer anything new over other existing frameworks?
 Jay Raj
Jay is a Software Engineer and Writer. He blogs occasionally at Code Handbook and Tech Illumination.