
The goal behind minitest can be summed up in one word: simple. Minitest gets out of your way and allows you to write expressive and readable tests. These ideals are great, but sometimes we want a sprinkling of magic atop our tests; that’s what maxitest delivers. Maxitest adds features like context blocks and running by line number which make your test suite a little bit nicer. But there’s more to it than that. Let’s dive in!
While I will mention maxitest as our “test suite”, it’s important to keep in mind that minitest is the real power behind our testing. Maxitest is simply a series of add-ons to minitest that make it easier on the eyes.
The Application
Rails is perfect for showing off maxitest in all its glory as we can encounter all forms of testing. For our purposes, we are going to make a news app with user-generated content. Throughout this article, we will use test-driven development to utilize maxitest’s major features and design our application.
Let’s get some rails new action going:
$ rails new news_feed # such a creative title, I know
# ...
$ cd news_feed
Now add maxitest and minitest-spec-rails to your Gemfile.
group :development, :test do
  # ...
  gem 'maxitest'
  gem 'minitest-spec-rails'
end
The minitest-spec-rails gem takes the pain out of integrating Minitest::Spec with Rails by extending Minitest::Spec into Rails’ own test case classes. You can read more on the readme.
First, let’s take a look at our test_helper.rb and add a require for maxitest. If you’re adding this to an existing code base, you just have to change the mini to maxi:
ENV['RAILS_ENV'] ||= 'test'
require File.expand_path('../../config/environment', __FILE__)
require 'maxitest/autorun' # requires maxitest for test running
require 'rails/test_help'

class ActiveSupport::TestCase
  # Setup all fixtures in test/fixtures/*.yml for all tests in alphabetical order.
  fixtures :all

  # Add more helper methods to be used by all tests here...
end
Now let’s make something to test. For the basics, just create a user model with two attributes: first_name and last_name:
$ rails g model user first_name:string last_name:string
Using TDD, we’re going to concatenate these two attributes into a full name. So, being the dogmatic test-first people that we are (or at least wish we were), let’s write a test!
A test file should already be generated in test/models/user_test.rb.
# test/models/user_test.rb

class UserTest < ActiveSupport::TestCase
  describe '#name' do # our method
    it 'should concatenate first and last names' do
      user = User.new(first_name: 'Johnny', last_name: 'Appleseed')
      assert_equal user.name, "#{user.first_name} #{user.last_name}"
    end
  end
end
The class UserTest inherits from ActiveSupport::TestCase, which already has Minitest::Spec::DSL extended into it by the minitest-spec-rails gem. We then use a describe to describe what we’re testing. We use an it block to describe one of this method’s behaviors. Inside, the test creates an instance of User and then ensures that #name indeed returns the concatenation of first_name and last_name.
Let’s run the test suite:
$ rake test
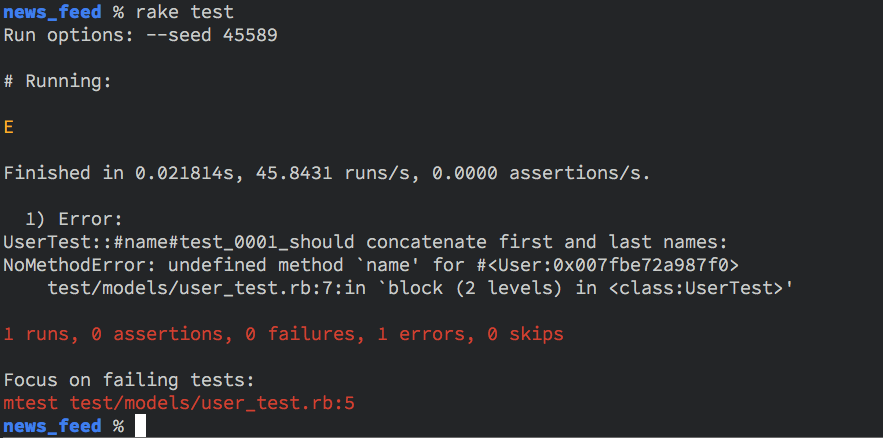
Yay! Red. Now let’s actually create the method to get green.
# app/models/user.rb

class User < ActiveRecord::Base
  def name
    "#{first_name} #{last_name}"
  end
end
To run the test this time, we’re going to copy and paste the code snippet maxitest gave to us to run this test again (on a line-by-line basis).
# the -I option tells mtest to include the 'test' directory
mtest test/models/user_test.rb:5 -I test
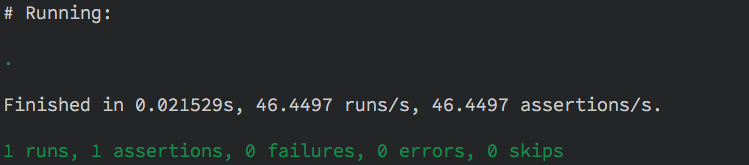
Great! As you can see, maxitest adds a satisfying green color to successful tests. This feature allows for a true red – green – refactor process. Speaking of which, let’s refactor our code a bit. I’ve decided that string interpolation might not be the best way to write our code (this is hypothetical; I have no preference), so I’m going to use #join on the two strings:
# app/models/user.rb

class User < ActiveRecord::Base
  def name
    [first_name, last_name].join(' ')
  end
end
Let’s run our tests to make sure we didn’t break anything… ($ rake test) We didn’t.
let_all
Now we’re going to refactor our tests a bit and show off maxitest’s let_all method. In order to understand let_all, it’s important to understand what let itself does. Create an accessor method that is assigned to the block you pass it. It’s no different than defining a method inside of a describe block. let_all is an extension of let‘s functionality, caching the response of the passed block. This essentially creates a cached global variable for your block.
Notice in user_test.rb that we setup the it block using a variable assignment. We can refactor this into a let_all block inside of the describe #name block. This is practical because all it blocks inside of the describe #name block can rely on the same setup data and thus run faster.
Our new, refactored user_test.rb:
require 'test_helper'

class UserTest < ActiveSupport::TestCase
  describe '#name' do # our method
    let_all(:user) { User.new(first_name: 'Johnny', last_name: 'Appleseed') }

    it 'should concatenate first and last names' do
      assert_equal user.name, "#{user.first_name} #{user.last_name}"
    end
  end
end
let!
On the other side of the spectrum, maxitest adds the let! method. let! ensures that the block passed to it is always evaluated on each usage of the method.
Implicit Subjects: Never, ever use them.
As an aside from the current code, let’s look at one of maxitest’s more eccentric features: implicit subjects. I highly suggest against using this. Ever. “Implicit subject” is a synonym for a Mystery Guest, which makes code far less maintainable and useful. While an implicit subject might be useful to you right now by saving a few seconds, when you or another developer adds a test-breaking feature into the code base five months from now and you can’t figure out what the test is verifying, you’ll be sorry.
Due to this, I cannot in good conscience demonstrate maxitest’s implicit subject feature. The author himself did not include implicit subjects by default. They are in their very nature extremely hacky.
Context Blocks
One thing I really wish minitest had is context blocks. Functionally, they are no different than describe blocks, but semantically they are. Sometimes it just makes more sense to write part of a test (especially acceptance tests) using context.
Maxitest made my wish come true in one line:
# https://github.com/grosser/maxitest/blob/master/lib/maxitest/autorun.rb#L23

# ...

Minitest::Spec::DSL.send(:alias_method, :context, :describe)

# ...
Context has no more functionality than describe, but it allows for more expressive and simple tests. To demonstrate the use of context blocks, we’re going to write an acceptance test for the listing of posts:
$ mkdir test/acceptance
$ touch test/acceptance/main_feed_test.rb
A great thing about the test-driven development methodology is its design aspect. While TDD is great for preventing regression, it also allows you to design your software before writing it. Acceptance tests are a higher-level test that allow you to design the features of your website before making it. With this in mind, let’s write a test for the main feature of our app: the news feed.
In our application we have users who have the ability to post text. In the body of our app we have a thread of these posts. We’re not going to add in anything complex, just a simple feed feature.
To build this right, we’re going to need a Post model that belongs to a user. Let’s generate that:
$ rails g model Post user_id:integer title:string body:text
While we’re at it, let’s add some validations and associations to our posts and users:
# app/models/post.rb
class Post < ActiveRecord::Base
  validates :title, :body, presence: true

  belongs_to :user
end

# app/models/user.rb
class User < ActiveRecord::Base
  validates :first_name, :last_name, presence: true

  has_many :posts

  # ...
end
Now we need to make some fixture data for our users and posts. Rails automatically generates samples fixtures in test/fixture, but we need to customize them a bit. Here’s some fixture data I made up, feel free to change it to whatever you would like:
# test/fixtures/users.yml
john:
  first_name: John
  last_name: Appleseed

jane:
  first_name: Jane
  last_name: Doe

# test/fixtures/posts.yml

one:
  user: john
  title: A Taste of Latin Filler Text
  body: Aenean pretium consectetur ex, at facilisis nisl tempor a. Vivamus feugiat sagittis felis. Quisque interdum, risus vel interdum mattis, ante neque vestibulum turpis, iaculis imperdiet neque mi at nisl. Vivamus mollis sit amet ligula eget faucibus. Vestibulum luctus risus nisi, et congue ante consectetur a. Quisque mattis accumsan efficitur. Curabitur porta dolor in nisi consectetur rhoncus. In quis libero scelerisque, sagittis neque at, porta tellus. Aenean metus est, tincidunt sed pellentesque id, aliquet a libero. Sed eget sodales nunc. Fusce lacinia congue felis at placerat.

two:
  user: jane
  title: Something Catchy
  body: I have nothing to say!

three:
  user: jane
  title: A Very Short Post
  body: This is witty and short.
These YAML files will generate fixtures for our tests accessible through model_plural_name(:fixture_name). Now that we have fixtures, let’s setup our acceptance testing environment. Rails does not come with a test case class for acceptance testing, so we’ll have to make one ourselves:
# test/test_helper.rb

ENV['RAILS_ENV'] ||= 'test'
require File.expand_path('../../config/environment', __FILE__)
require 'maxitest/autorun'
require 'rails/test_help'
require 'capybara/rails'

class ActiveSupport::TestCase
  fixtures :all
end

class AcceptanceCase < ActiveSupport::TestCase
  include Rails.application.routes.url_helpers
  include Rack::Test::Methods
  include Capybara::DSL

  def app
    Rails.application
  end
end
We add Capybara to the suite here, so make sure to add gem 'capybara' to your Gemfile.
The class we created (AcceptanceCase) gives us fixtures, route helpers, Rack-Test helpers, and Capybara.
Now let’s write a test to begin designing our feed feature.
require 'test_helper'

class FeedTest < AcceptanceCase
  it 'should exist' do
    get root_path

    assert last_response.ok?, 'GET "/" does not respond OK'
  end
end
Let’s run the suite now and see what happens:
1) Error:
FeedTest#test_0001_should exist:
ActionController::RoutingError: No route matches [GET] "/"
    test/acceptance/feed_test.rb:5:in `block in <class:FeedTest>'
It looks like we don’t have a route. Let’s make one. In order to have a route, we need a controller, so let’s generate a posts controller with an #index action:
$ rails g controller posts index
This generator also makes a posts controller test. Let’s add a test for the route there as well:
# test/controllers/posts_controller_test.rb

require 'test_helper'

class PostsControllerTest < ActionController::TestCase
  describe '#index' do
    it 'GET /' do
      response = get :index
      assert response.ok?
    end
  end
end
Let’s run the suite again to see the new errors:
  1) Error:
FeedTest#test_0001_should exist:
ActionController::RoutingError: No route matches [GET] "/"
    test/acceptance/feed_test.rb:5:in `block in <class:FeedTest>'


  2) Error:
PostsControllerTest::#index#test_0001_GET /:
ActionController::UrlGenerationError: No route matches {:action=>"index", :controller=>"posts"}
    test/controllers/posts_controller_test.rb:6:in `block (2 levels) in <class:PostsControllerTest>'
We have seen the first error before, but the second one is new; it’s from our posts controller test.
Now that we have test coverage and thus a goal of what needs to be implemented, we can write a few lines of code to make them pass.
# config/routes.rb
Rails.application.routes.draw do
  root to: 'posts#index'
end

# app/controllers/posts_controller.rb
class PostsController < ApplicationController
  def index
  end
end

<!-- app/views/posts/index.html.erb -->

<h1>A Listing of Posts!</h1>
4 lines of code later and we have 2 new passing tests! Obviously, we don’t have anything right now other than a working route and a static page, but it gives us a stable framework to build off of. Now we can build real functionality. Let’s head back to feed_test.rb.
Here use a context block to better describe a new feature in different contexts. For our purposes, there are two contexts: with posts and without.
require 'test_helper'

class FeedTest < AcceptanceCase
  it 'should exist' do
    get '/'
    assert last_response.ok?, 'GET "/" does not respond OK'
  end

  context 'with posts' do
    # posts are created before the test runs and can be found in the fixtures
    #
    # post #1 -> posts(:one)
    # post #2 -> posts(:two)
    # post #3 -> posts(:three)
    before do
      visit '/'
    end

    let_all(:posts) { page.all('.post') }

    it 'should list all posts' do
      assert_equal Post.count, posts.count
    end

    it 'should list all post titles' do
      assert_each_post_has 'title'
    end

    it 'should list all post bodies' do
      assert_each_post_has 'body'
    end

    it 'should list all post authors' do
      assert_each_post_has 'user.name'
    end
  end

  context 'without posts' do
    before do
      Post.delete_all

      visit '/'
    end

    it 'should say "There are no posts to be found"' do
      assert page.has_content? 'There are no posts to be found'
    end
  end

  private

  def assert_each_post_has(attribute)
    Post.all.each do |post|
      # The second argument is a message to display if the assertion fails.
      # When looping in a test, it's a best practice to ensure that identifying
      # loop information is returned on failure.
      assert page.has_content?(post.instance_eval(attribute)),
             "Post ##{post.id}'s #{attribute} is not displayed"
    end
  end
end
That’s a lot of code, but it’s fairly easy to understand; it reads like English. Let’s just run the tests and see if they’re descriptive enough on their own without explanation:
Run options: --seed 44175

# Running:

.F..FFFF

Finished in 0.257127s, 31.1131 runs/s, 31.1131 assertions/s.

  1) Failure:
FeedTest::post feed::without posts#test_0001_should say "There are no posts to be found" [/Users/jesse/code/examples/news_feed/test/acceptance/feed_test.rb:47]:
Failed assertion, no message given.


  2) Failure:
FeedTest::post feed::with posts#test_0004_should list all post authors [/Users/jesse/code/examples/news_feed/test/acceptance/feed_test.rb:35]:
Post #113629430's user.name is not displayed


  3) Failure:
FeedTest::post feed::with posts#test_0003_should list all post bodies [/Users/jesse/code/examples/news_feed/test/acceptance/feed_test.rb:31]:
Post #113629430's body is not displayed


  4) Failure:
FeedTest::post feed::with posts#test_0001_should list all posts [/Users/jesse/code/examples/news_feed/test/acceptance/feed_test.rb:23]:
Expected: 3
  Actual: 0


  5) Failure:
FeedTest::post feed::with posts#test_0002_should list all post titles [/Users/jesse/code/examples/news_feed/test/acceptance/feed_test.rb:27]:
Post #113629430's title is not displayed

8 runs, 8 assertions, 5 failures, 0 errors, 0 skips

Focus on failing tests:
mtest test/acceptance/feed_test.rb:46
mtest test/acceptance/feed_test.rb:34
mtest test/acceptance/feed_test.rb:30
mtest test/acceptance/feed_test.rb:22
mtest test/acceptance/feed_test.rb:26
Let’s look at the first failure: Immediately I know that a post’s (#113629430 to be specific) body is not being displayed within the post feed. Let’s fix this then! I see this list as a feature guide. It gives me incremental steps to completing a feature; which is great! We’re only going to fix the first test first, then we’ll fix the rest.
# app/controllers/posts_controller.rb

class PostsController < ApplicationController
  def index
    @posts = Post.all
  end
end

<% # app/views/posts/index.html.erb %>

<h1>A Listing of Posts!</h1>

<ul>
<% @posts.each do |post| %>
  <li><%= post.title %></li>
<% end %>
</ul>
That’s it! Now let’s try the test… (mtest test/acceptance/feed_test.rb:26 -I test) Success! That was pretty easy, let’s fix the rest. Testing is great for allowing incremental feature building. To fix the next tests, all we have to do is look at one error, fix it, then fix the next one.
Here’s the final product!
<% # app/views/posts/index.html.erb %>

<h1>A Listing of Posts!</h1>

<% if @posts.empty? %>
<p>There are no posts to be found!</p>
<% else %>
<ul>
  <% @posts.each do |post| %>
    <li class="post">
      <%= post.title %>
      <ul>
        <li><strong>Author: </strong> <%= post.user.name %></li>
        <li><em><%= post.body %></em></li>
      </ul>
    </li>
  <% end %>
</ul>
<% end %>
Obviously, this is a nowhere near complete feature, but we get the core of TDD with great additions from maxitest.
Conclusion
I merely skimmed the surface of a vast philosophy and a great tool. Minitest with maxitest make a potent, yet lightweight combination for implementing test driven development into your Ruby applications. Next time you’re starting a new project, think twice about RSpec and consider giving minitest and maxitest a try.
Interested in more testing topics? I’d love to hear them! Feel free to leave a comment below.
Frequently Asked Questions (FAQs) about Maxitest and Minitest
What is the difference between Maxitest and Minitest?
Maxitest is an extension of Minitest, a testing framework in Ruby. While Minitest provides a simple and clean syntax for writing tests, Maxitest adds several features to make testing more convenient and powerful. These include timeouts for tests, universal test IDs, and better integration with other tools like Guard and Zeus. Maxitest also provides a more descriptive and user-friendly output format.
How do I install Maxitest?
Maxitest is a Ruby gem, so you can install it using the gem install command in your terminal. Here’s the command you need to run: gem install maxitest. After running this command, you can require Maxitest in your test files with require 'maxitest/autorun'.
How do I use Maxitest in my Rails application?
To use Maxitest in a Rails application, you need to add it to your Gemfile. Here’s how you can do it: gem 'maxitest'. After adding this line, run bundle install to install the gem. Then, in your test files, you can require Maxitest with require 'maxitest/rails'.
What are the benefits of using Maxitest over Minitest?
Maxitest provides several additional features that are not available in Minitest. These include timeouts for tests, universal test IDs, and better integration with other tools like Guard and Zeus. Maxitest also provides a more descriptive and user-friendly output format, which can make your tests easier to understand and debug.
How do I write tests with Maxitest?
Writing tests with Maxitest is similar to writing tests with Minitest. You define a class that inherits from Minitest::Test, and then define methods in that class for each test you want to run. Here’s an example:require 'maxitest/autorun'class MyTest < Minitest::Test
def test_something
assert_equal 4, 2 + 2
endend
How do I run tests with Maxitest?
You can run Maxitest tests in the same way as Minitest tests. If you’re using Rails, you can run rake test in your terminal. If you’re not using Rails, you can run the Ruby file that contains your tests directly with the ruby command.
Can I use Maxitest with other testing libraries?
Yes, Maxitest is compatible with other testing libraries like RSpec and Cucumber. You can require Maxitest in your test files alongside these other libraries to take advantage of its features.
How do I debug tests with Maxitest?
Maxitest provides a more descriptive and user-friendly output format than Minitest, which can make your tests easier to understand and debug. If a test fails, Maxitest will provide a detailed error message and stack trace to help you identify the problem.
Can I use Maxitest for integration testing?
Yes, Maxitest can be used for both unit testing and integration testing. It provides features like universal test IDs and better integration with other tools that can be particularly useful for integration testing.
How do I contribute to Maxitest?
Maxitest is an open-source project, so you can contribute to it by submitting pull requests on GitHub. If you find a bug or have a feature request, you can also open an issue on the project’s GitHub page.
 Jesse Herrick
Jesse Herrick is an avid Ruby developer who specializes in web development. He is a back-end developer at Littlelines and loves programming. You can read his personal blog at: https://jesse.codes.