Android provides solid support for the development of UI-based applications. Android provides a variety of widgets that the application programmer can use to create a desired layout and interface. These layout elements can be created via the programming language directly, or through XML layout files. In this article, we are going to show you both methods and highlight their differences.
XML-Based Layouts in Android
In Android, an XML-based layout is a file that defines the different widgets to be used in the UI and the relations between those widgets and their containers. Android treats the layout files as resources. Hence the layouts are kept in the folder reslayout. If you are using eclipse, it creates a default XML layout file (main.xml) in the reslayout folder, which looks like the following XML code. The layout files act as an input to the Android Asset Packaging Tool (AAPT) tool, which creates an R.java file for all of the resources.<?xml version="1.0" encoding="utf-8"?>
<LinearLayout xmlns:android="http://schemas.android.com/apk/res/android"
android:orientation="vertical"
android:layout_width="fill_parent"
android:layout_height="fill_parent"
>
<TextView
android:layout_width="fill_parent"
android:layout_height="wrap_content"
android:text="@string/hello"
/>
</LinearLayout>The Benefits of XML-Based Layouts
XML-based layouts are very helpful if you know the UI components at the time of compiling. If run-time UI components are needed, then those can be added using the XML code. XML-based layout have the following advantages:- XML is a very popular and widely-used format. Hence, a lot of developers are quite comfortable with it.
- It helps to provide separation of the UI from the code logic. This provided flexibility to change one without affecting much the other.
- Generating XML output is easier than writing direct code, making it easier to have drag-and-drop UI tools to generate interfaces for android apps.
Standard Layouts in Android
The UI in Android is a hierarchy of viewgroups and views. The viewgroups will be intermediate nodes in the hierarchy, and the views will be terminal nodes. For example, in the above main.xml file, the LinearLayout is a viewgroup and the TextView is a view. Android provides the following standard layouts (viewgroups) that can be used in you Android application.- AbsoluteLayout
- FrameLayout
- LinearLayout
- RelativeLayout
- TableLayout
Absolute Layout
In absolute layout, we can specify the exact coordinates of each control that we want to place. In absolute layout, we will give the exact X and Y coordinates of each control. The following is an example of an absolute layout:<?xml version="1.0" encoding="utf-8"?>
<AbsoluteLayout xmlns:android="http://schemas.android.com/apk/res/android"
android:layout_width="fill_parent"
android:layout_height="fill_parent">
<TextView
android:layout_x="10px"
android:layout_y="110px"
android:text="@string/username"
android:layout_width="wrap_content"
android:layout_height="wrap_content" />
<EditText
android:layout_x="150px"
android:layout_y="100px"
android:width="150px"
android:layout_width="wrap_content"
android:layout_height="wrap_content" />
<TextView
android:layout_x="10px"
android:layout_y="160px"
android:text="@string/password"
android:layout_width="wrap_content"
android:layout_height="wrap_content" />
<EditText
android:layout_x="150px"
android:layout_y="150px"
android:width="150px"
android:layout_width="wrap_content"
android:layout_height="wrap_content" />
<Button
android:id="@+id/login"
android:text="@string/login"
android:layout_x="75px"
android:layout_y="200px"
android:width="200px"
android:layout_width="wrap_content"
android:layout_height="wrap_content" />
</AbsoluteLayout>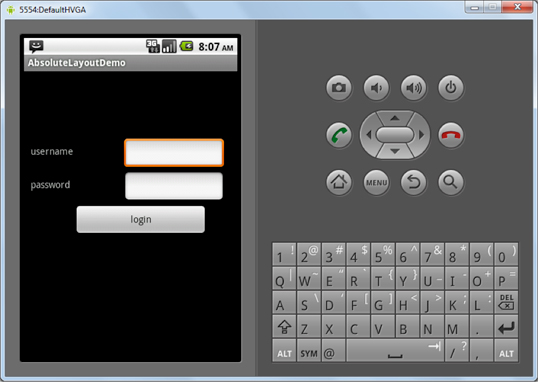 While using absolute layout, we can specify the exact position of the elements. You can move theml around by changing the android:layout_x and android:layout_y properties within the control.
Absolute layout is actually deprecated now, as it is not flexible for the wide variety of new Android devices. Hence, it should be used only if no other type of layout will suit your purposes.
Frame Layout
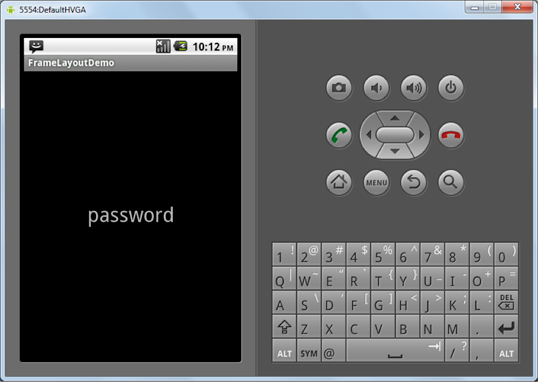
Frame layout is used when you want to show one item on each screen. Using frame layout, we can have multiple items, but they will be overlapping and only only displaying themselves one at a time. FrameLayout is particularly useful when you want to create animation or movement on screen. Now, we are going to create a small app using frame layout that has one button and one TextView. First, the button is displayed. Once you click on the button, the TextView is shown. The following is the code for the layout:<FrameLayout
android:layout_width="fill_parent"
android:layout_height="fill_parent"
xmlns:android="http://schemas.android.com/apk/res/android">
<Button
android:id="@+id/username"
android:text="@string/username"
android:layout_height="fill_parent"
android:layout_width="fill_parent"
android:textSize="30sp"
android:onClick="onClick"
android:gravity="center" />
<TextView
android:id="@+id/password"
android:text="@string/password"
android:layout_height="fill_parent"
android:layout_width="fill_parent"
android:textSize="30sp"
android:visibility="gone"
android:gravity="center" />
</FrameLayout>package com.FrameLayoutDemo;
import android.app.Activity;
import android.os.Bundle;
import android.view.View;
public class FrameLayoutDemo extends Activity {
/** Called when the activity is first created. */
@Override
public void onCreate(Bundle savedInstanceState) {
super.onCreate(savedInstanceState);
setContentView(R.layout.main);
}
public void onClick(View v) {
View vUsername = findViewById(R.id.username);
vUsername.setVisibility(View.GONE);
View vPassword = findViewById(R.id.password);
vPassword.setVisibility(View.VISIBLE);
}
}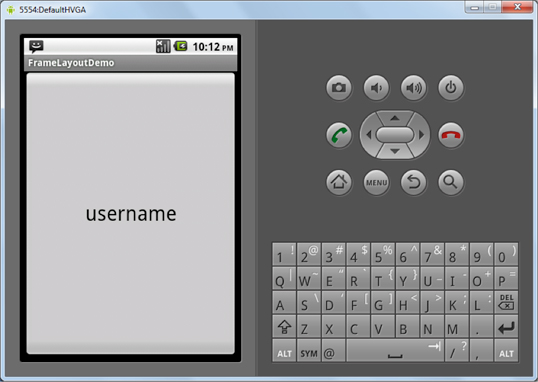 When we click on the button, the onClick function is called. In the onClick function we get username and password control, and we set the visibility for the username as “Gone” and for password as “Visible” using the function setVisibility.
Linear Layout
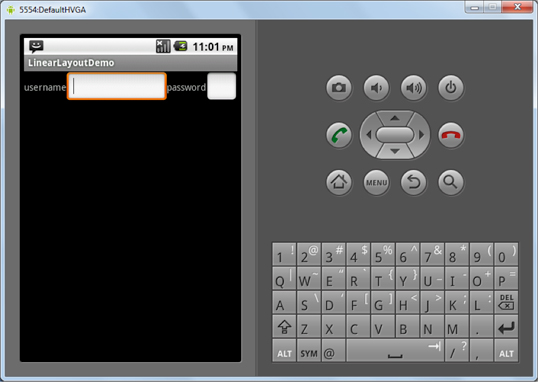
Linear layout is used to place one element on each line. So, all the elements will be place in an orderly top-to-bottom fashion. This is a very widely-used layout for creating forms on Android. We are now going to create a small app to display a basic form using the linear layout. The layout.xml file is as follows:<LinearLayout xmlns:android="http://schemas.android.com/apk/res/android"
android:orientation="vertical"
android:layout_width="fill_parent"
android:layout_height="fill_parent">
<TextView
android:text="@string/username"
android:layout_width="wrap_content"
android:layout_height="wrap_content" />
<EditText
android:width="150px"
android:layout_width="wrap_content"
android:layout_height="wrap_content" />
<TextView
android:text="@string/password"
android:layout_width="wrap_content"
android:layout_height="wrap_content" />
<EditText
android:width="150px"
android:layout_width="wrap_content"
android:layout_height="wrap_content" />
</LinearLayout>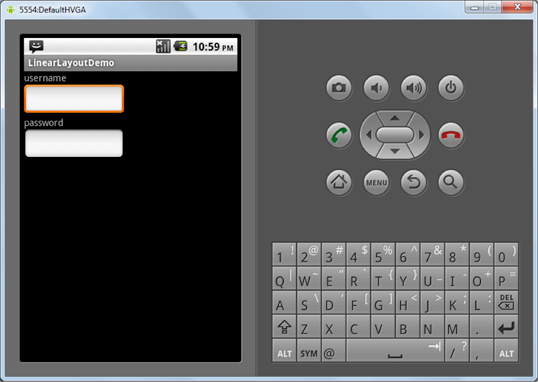 We can even change the orientation of our linear layout by making android:orientation=”horizontal”. This would display all the controls in one horizontal line, as shown below:
Relative Layout
Using relative layout, we can specify the position of the elements in relation to other elements, or in relation to the parent container. In order to specify the position with relation to its parent container, we use android:layout_alignParentTop=“true” and android:layout_alignParentLeft=“true” to align elements to the top-left of the parent container. Then, to align with respect to another element we can use the properties android:layout_alignLeft=“@+id/otherelement” and android:layout_below=“@+id/otherelement”. The following is an app employing relative layout for a basic form with a username field, password field, and a login button:<?xml version="1.0" encoding="utf-8"?>
<RelativeLayout
android:layout_width="fill_parent"
android:layout_height="fill_parent"
xmlns:android="http://schemas.android.com/apk/res/android"
>
<TextView
android:id="@+id/username"
android:layout_width="wrap_content"
android:layout_height="wrap_content"
android:text="@string/username"
android:layout_alignParentTop="true"
android:layout_alignParentLeft="true"
/>
<EditText
android:id="@+id/txtusername"
android:layout_width="fill_parent"
android:layout_height="50px"
android:layout_alignLeft="@+id/username"
android:layout_below="@+id/username"
android:layout_centerHorizontal="true"
/>
<TextView
android:id="@+id/password"
android:layout_width="wrap_content"
android:layout_height="wrap_content"
android:text="@string/password"
android:layout_alignLeft="@+id/txtusername"
android:layout_below="@+id/txtusername"
android:layout_centerHorizontal="true"
/>
<EditText
android:id="@+id/txtpassword"
android:layout_width="fill_parent"
android:layout_alignLeft="@+id/password"
android:layout_height="50px"
android:layout_below="@+id/password"
android:layout_centerHorizontal="true"
/>
<Button
android:id="@+id/login"
android:text="@string/login"
android:width="200px"
android:layout_width="wrap_content"
android:layout_height="wrap_content"
android:layout_alignLeft="@+id/txtpassword"
android:layout_below="@+id/txtpassword"
android:layout_centerHorizontal="true"
/>
</RelativeLayout>- android:layout_alignParentTop=“true”
- android:layout_alignParentLeft=“true”
- android:layout_alignLeft=“@+id/txtpassword”
- android:layout_below=“@+id/txtpassword”
- android:layout_centerHorizontal=“true”
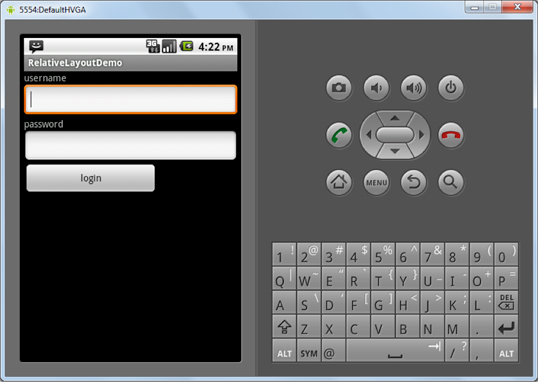
Table Layout
Using table layout, we create a table with rows and columns and place elements within them. In each row, you cam specify one or more elements. The table row is created using the tag <TableRow> inside the TableLayout. The following is an example of an app with table layout:<TableLayout
android:layout_width="fill_parent"
android:layout_height="fill_parent"
xmlns:android="http://schemas.android.com/apk/res/android">
<TableRow>
<TextView
android:id="@+id/username"
android:layout_width="wrap_content"
android:layout_height="wrap_content"
android:text="@string/username"
/>
<EditText
android:id="@+id/txtusername"
android:layout_width="fill_parent"
android:layout_height="50px"
android:width="100px"
/>
</TableRow>
<TableRow>
<TextView
android:id="@+id/password"
android:layout_width="wrap_content"
android:layout_height="wrap_content"
android:text="@string/password"
/>
<EditText
android:id="@+id/txtpassword"
android:layout_width="fill_parent"
android:layout_height="50px"
android:width="100px"
/>
</TableRow>
<TableRow>
<Button
android:id="@+id/login"
android:text="@string/login"
android:width="200px"
android:layout_width="wrap_content"
android:layout_height="wrap_content"
/>
</TableRow>
</TableLayout>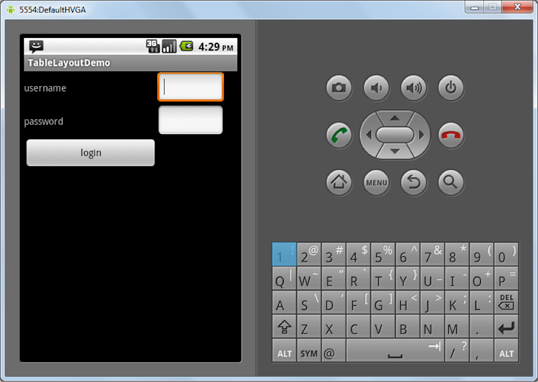
Conclusion
Android provides a very flexible way to display layouts using XML-based layouts. This helps us create apps while keeping the layout and logic completely separate. This makes it very easy for us to change the layout even after the application is written, without having any changes in the programming logic. Android also has a variety of layouts that can be used to create more complex UIs to suit the needs of a wide variety of applications. So, have fun creating beautiful UI for your apps using the different Android layouts.Frequently Asked Questions (FAQs) about Android Layouts
What are the different types of layouts available in Android?
Android provides several types of layouts to design the user interface. These include LinearLayout, RelativeLayout, FrameLayout, TableLayout, GridLayout, and ConstraintLayout. Each layout has its own unique properties and use cases. For instance, LinearLayout arranges its children in a single direction, either horizontally or vertically. RelativeLayout, on the other hand, positions its children relative to each other or to the parent. Understanding these layouts and their properties is crucial for designing effective and user-friendly interfaces in Android.
How can I choose the right layout for my Android application?
Choosing the right layout for your Android application depends on the complexity of the user interface and the specific requirements of your application. For simple interfaces, LinearLayout or RelativeLayout may suffice. For more complex interfaces, you might need to use GridLayout or ConstraintLayout. It’s important to understand the properties and use cases of each layout to make an informed decision.
What is the performance impact of using different layouts in Android?
The performance impact of using different layouts in Android can vary. Some layouts, like LinearLayout and RelativeLayout, are relatively lightweight and have minimal impact on performance. However, more complex layouts like GridLayout and ConstraintLayout can have a greater impact on performance, especially if they are nested within other layouts. It’s important to optimize your layouts to ensure smooth performance of your application.
How can I optimize my layouts for better performance in Android?
There are several ways to optimize your layouts for better performance in Android. One way is to avoid deep nesting of layouts, as this can lead to increased complexity and reduced performance. Another way is to use the hierarchy viewer tool in Android Studio to analyze your layouts and identify potential performance issues. You can also use the lint tool to check for common layout performance problems.
What are the advantages of using ConstraintLayout in Android?
ConstraintLayout is a flexible layout manager for Android that allows you to create complex layouts without nesting multiple layouts. It provides a high level of control over the positioning and sizing of UI elements, making it easier to create responsive layouts that adapt to different screen sizes and orientations. Additionally, ConstraintLayout can improve performance by reducing the depth of your layout hierarchy.
How can I declare a layout in Android?
Layouts in Android can be declared in two ways: programmatically in the Java or Kotlin code, or declaratively in an XML file. The XML approach is more common and recommended, as it separates the UI design from the code that controls the app’s behavior. In the XML file, you define the layout and its components, such as buttons, text views, and images, along with their properties.
Can I use multiple layouts in a single Android activity?
Yes, you can use multiple layouts in a single Android activity. This can be done by including one layout within another, also known as layout nesting. However, it’s important to note that excessive layout nesting can lead to performance issues, so it should be done judiciously.
What is the role of layout_weight in LinearLayout?
The layout_weight attribute in LinearLayout is used to distribute the remaining empty space among the child views. It specifies the relative proportion of the available space that a view should occupy. For instance, if you have two views with layout_weights of 1 and 2, the second view will occupy twice as much space as the first.
How can I handle different screen sizes and orientations in Android layouts?
Android provides several mechanisms to handle different screen sizes and orientations. One way is to create separate layout files for different screen sizes and orientations, and the system will automatically select the appropriate layout based on the current screen configuration. Another way is to use ConstraintLayout, which allows you to create responsive layouts that adapt to different screen sizes and orientations.
What are the best practices for designing Android layouts?
Some best practices for designing Android layouts include avoiding deep nesting of layouts, using the right layout for the job, optimizing layouts for performance, handling different screen sizes and orientations, and separating the UI design from the app’s behavior by declaring layouts in XML. Following these practices can help you create effective and user-friendly interfaces for your Android applications.
Abbas is a software engineer by profession and a passionate coder who lives every moment to the fullest. He loves open source projects and WordPress. When not chilling around with friends he's occupied with one of the following open source projects he's built: Choomantar, The Browser Counter WordPress plugin, and Google Buzz From Admin.

