
We can all appreciate the power that Ruby on Rails gives us to rapidly build great web applications. We can also appreciate Jekyll’s amazing ability to turn Markdown and templating into a beautiful static site.
What if we could combine these two? In this article, I’m going to do just that.
Why?
The most practical scenario to combine Jekyll and Rails is when you don’t want to separate your main app from your blog. You shouldn’t do this if you just want to add some dynamic-ness to your site (Middleman is better suited for this). But whatever the reason may be, let’s get started!
Step 1: The App
In the most likely scenario, you probably already have an app and you’d like to add a blog. However, for the sake of uniformity, let’s generate one for our purposes:
$ rails new jekyll-on-rails
$ cd jekyll-on-rails
Now that we’re in the app, we need to set it up for our Jekyll blog. First, we should add Jekyll to the app:
# 'Gemfile'
gem 'jekyll', '2.5.3'

# Terminal
$ bundle install
Once this command is complete, we can begin adding our blog to Jekyll.
Step 2: The Blog
Hypothetically, all Jekyll needs to run is a template file and a Markdown file. But we have blogs that are more complicated than that. Every blog is (and should be) different, but we need a uniform blog to demonstrate with, so let’s use the default.
First, let’s have Jekyll generate our blog.
$ bundle exec jekyll new blogThis creates a simple blog example with this file structure:
.
├── _config.yml
├── _includes
│   ├── footer.html
│   ├── head.html
│   └── header.html
├── _layouts
│   ├── default.html
│   ├── page.html
│   └── post.html
├── _posts
│   └── 2015-03-27-welcome-to-jekyll.markdown
├── _sass
│   ├── _base.scss
│   ├── _layout.scss
│   └── _syntax-highlighting.scss
├── about.md
├── css
│   └── main.scss
├── feed.xml
└── index.html
We’ll leave most of these where they are, but we’re going to move _config.yml into the Rails config directory and rename it something more specific:
$ cd blog
$ mv _config.yml ../config/jekyll.yml
$ cd ..
This is where the fun really begins, configuring the blog!
Step 3: Configuring the Blog
If you try going into the blog right now and running jekyll serve, it will still work, but you’ll get an error that there is no configuration file. This is obviously because we just moved it, so we’ll have to use special configuration when generating our blog.
We want the Jekyll site to be built every time that our Rails app is regenerated, so we need to add an initializer to our app:
#config/initializers/blog.rb

Rails.application.config.after_initialize do
  Rails.logger = Logger.new(STDOUT)
  begin
    # make a spot for the site
    dest = Rails.root.join('public/blog')

    # generate the site
    Jekyll::Site.new(
      Jekyll.configuration({
        "config" => Rails.root.join('config', 'jekyll.yml').to_s,
        "source" => Rails.root.join('blog').to_s,
        "destination" => dest.to_s
      })
    ).process

                # the strange codes give the output color
    Rails.logger.info "\e[0;32;49mJekyll site built!\e[0m]]"
  rescue => e
    Rails.logger.error "\e[0;31;49mJekyll site build failed.\e[0m\n\e[0;33;49mError:\e[0m #{e}"
  end
end
This code does a few things for us:
* It generates the Jekyll site when the Rails application starts
* It defines a path for the site to be at (http://localhost:3000/blog/) – to change this path, modify the dest variable
* It uses smart error handling to ensure that we know when the site build succeeds and when it fails. This also ensures that, even if the site build fails, the application will not fail, allowing for a separation of code bugs between Jekyll and Rails
This file tells Jekyll to take our site (in blog/) and move it to (public/blog/). This only works because Rails hosts static files in its public/ directory.
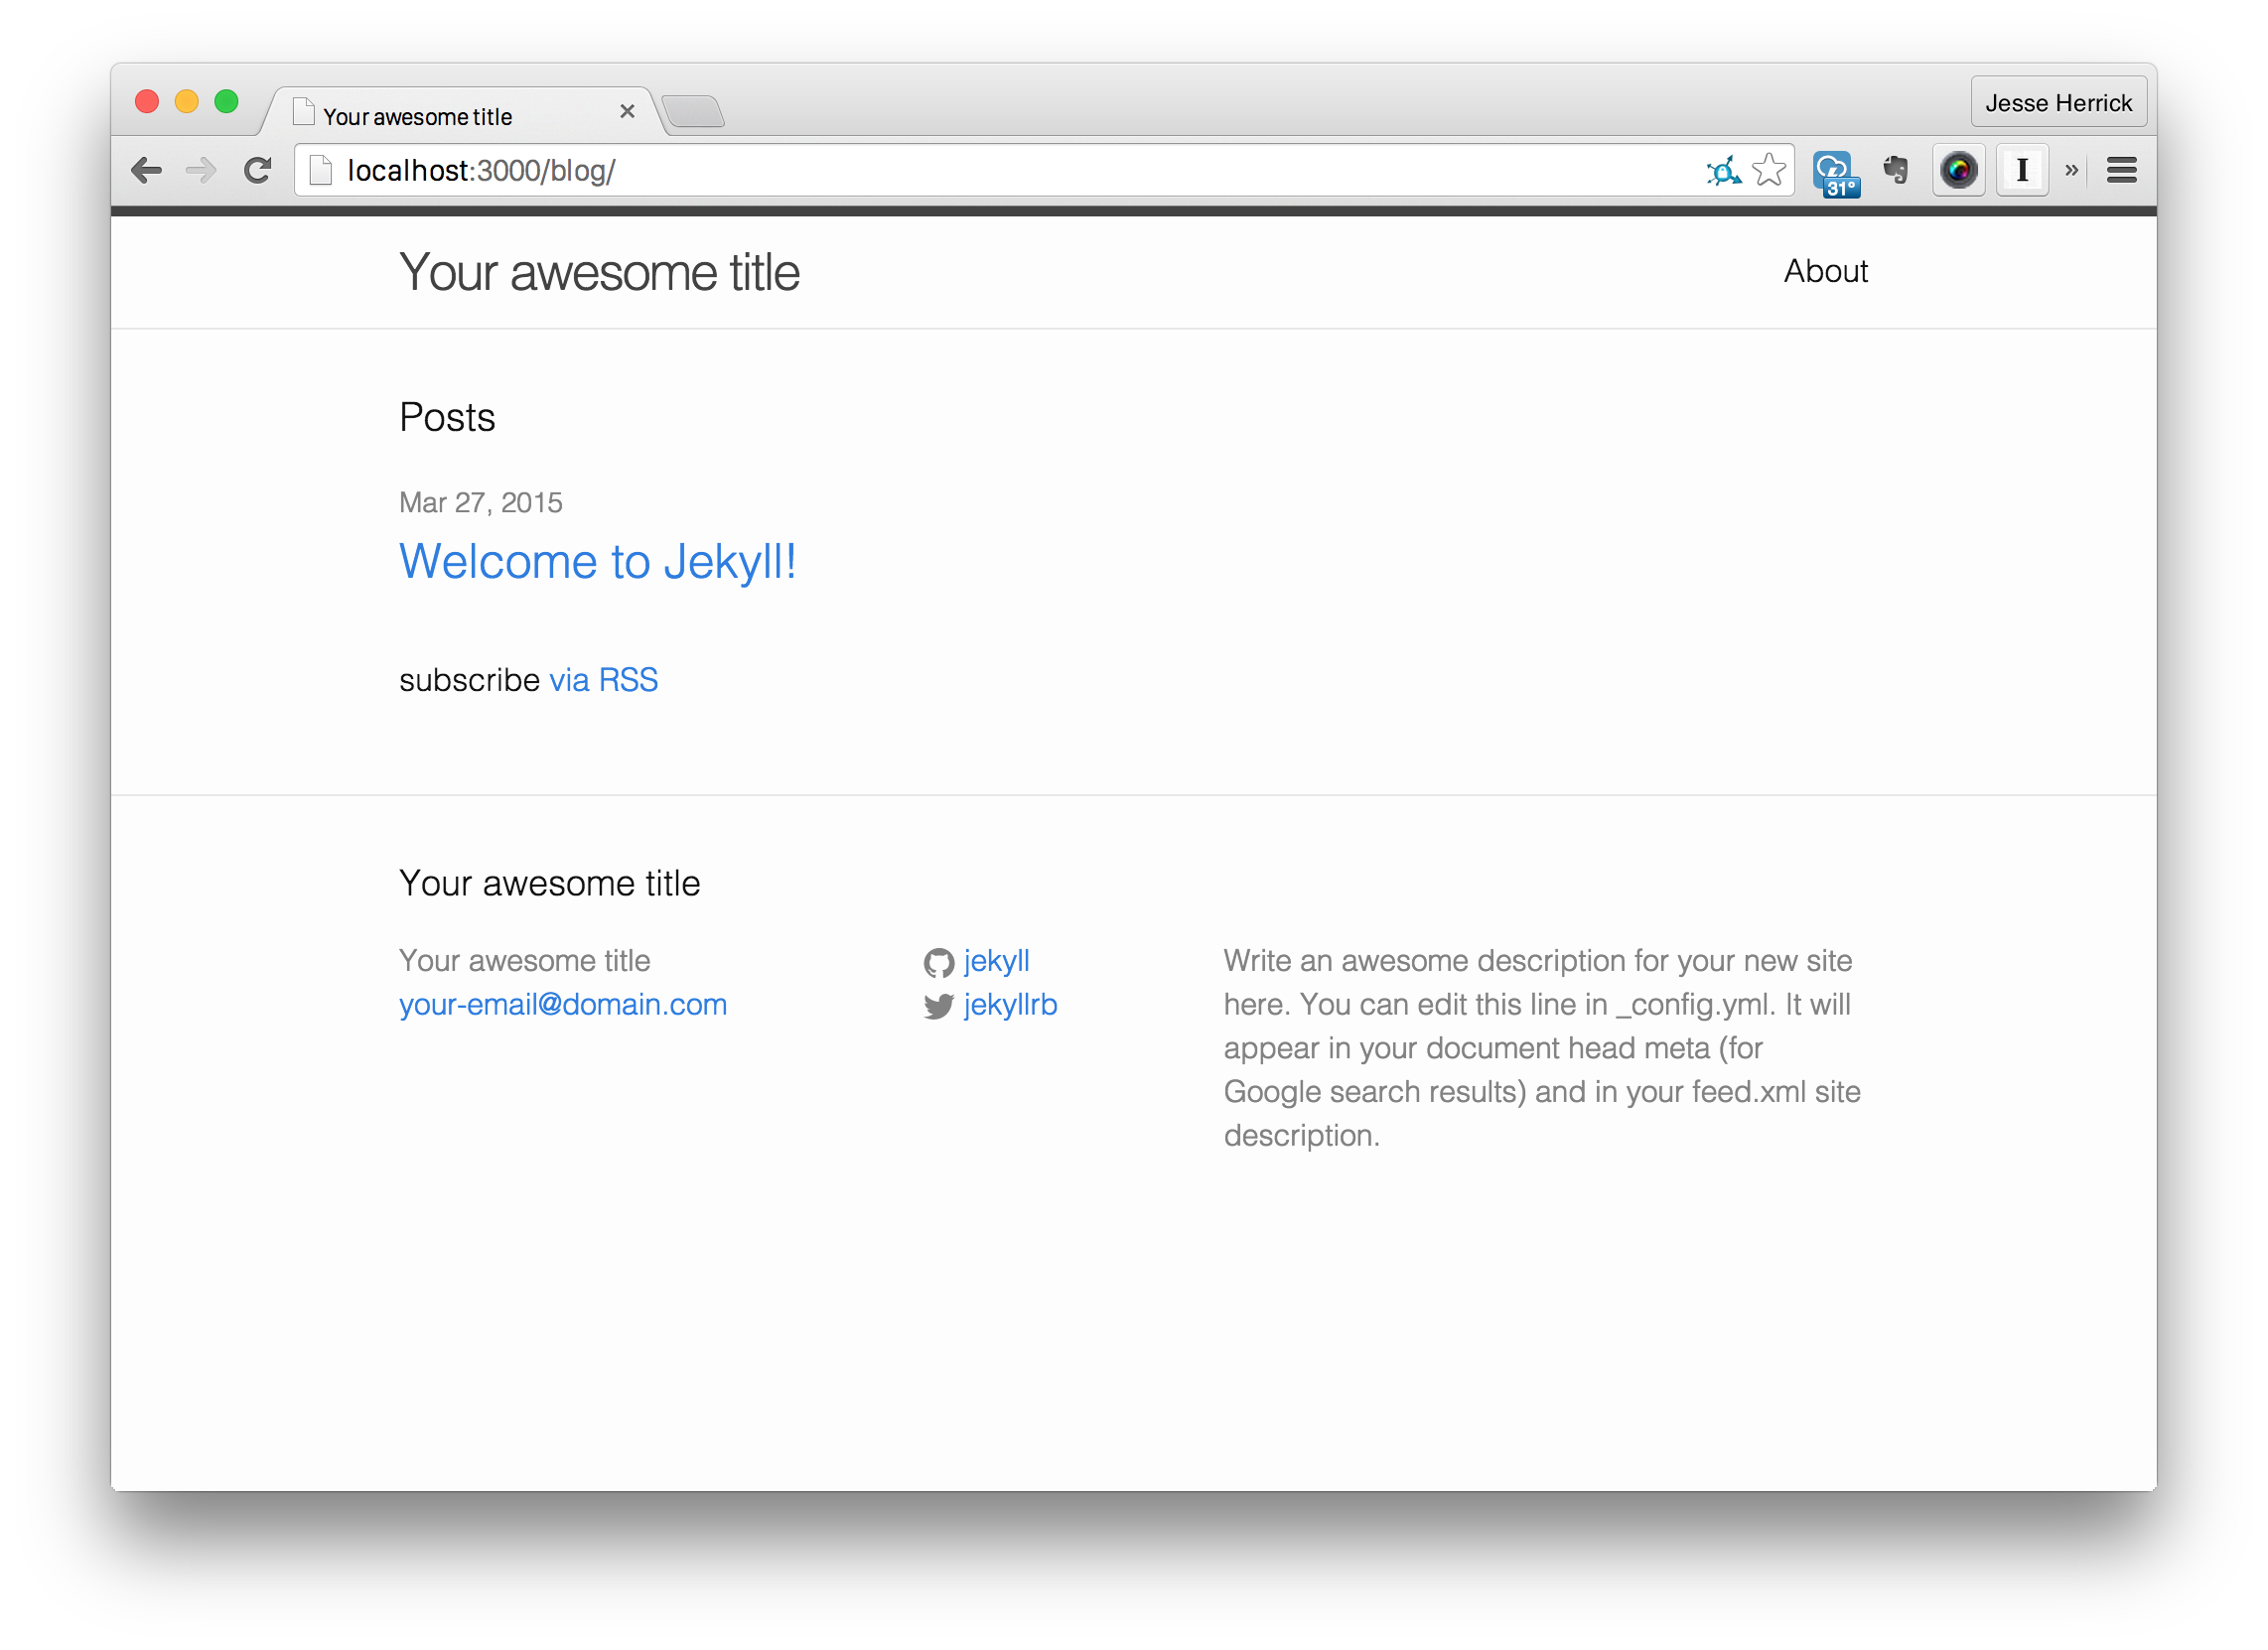
Now we can finally start our Rails app and see how this worked!
$ bundle exec rails server
=> Booting WEBrick
=> Rails 4.2.0 application starting in development on http://localhost:3000
=> Run `rails server -h` for more startup options
=> Ctrl-C to shutdown server
Configuration file: /Users/jesseherrick/Dropbox/Drafts/jekyll-on-rails/config/jekyll.yml
I, [2015-03-27T16:08:02.591221 #56341]  INFO -- : Jekyll site built!
[2015-03-27 16:08:02] INFO  WEBrick 1.3.1
[2015-03-27 16:08:02] INFO  ruby 2.2.0 (2014-12-25) [x86_64-darwin14]
[2015-03-27 16:08:02] INFO  WEBrick::HTTPServer#start: pid=56341 port=3000
But there’s a problem, the CSS wasn’t loaded properly!

With a little investigation, you’ll notice that the HTML uses absolute paths (i.e. /css/main.css). This means that any assets being requested will return a 404 because our blog is in a subdirectory. Luckily, the Jekyll site template is smart enough to have a baseurl option in the config, which allows for the definition of a subdirectory for asset loading. To quickly fix this problem, we can change our config like so:
# ... other config not shown ...
baseurl: "/blog"
# ... other config not shown ...
We use /blog because it is the directory where our site is generated. Once we restart the server, everything seems to be working fine.

And there you have it, a Rails app and Jekyll site working seamlessly together. You can stop reading now if you’d like, but there’s more cool stuff coming up.
Extra: Using Rails-like Assets
Unfortunately, there isn’t a way at the moment to link Rails assets into Jekyll easily. But if you still like the Rails asset pipeline (come on, who doesn’t?), there’s a plugin for that!
Jekyll-Assets is a fantastic Jekyll plugin that can do a lot of things for you, like:
* Compile CoffeeScript, SCSS/Sass, Less, and ERB
* Require dependencies from inside assets (using Sprockets)
* Hard and soft cache busting (main-bbd8a1c8b716f90cfaf9493cbb3868dc.css vs main.css?cb=bbd8a1c8b716f90cfaf9493cbb3868dc)
* Compress your assets
* And a few other things
That’s pretty awesome, right? Let’s add it to our Jekyll site.
First, we add gem 'jekyll-assets' to our Gemfile and bundle install. Next, we need to make sure that Jekyll includes this plugin when generating the site. To do this we just add jekyll-assets to our list of plugins in config/jekyll.yml, like so:
# 'config/jekyll.yml`
plugins:
  - jekyll-assets

# ... other config ...
Now that the plugin is added into Jekyll, we can start using it. But first, we should configure it for the features that we want. So open up config/jekyll.yml again and put:
# 'config/jekyll.yml'

# assets
 assets:
    dirname: assets # _assets
    baseurl: /blog/assets/
    sources: # asset subdirectories
        - _assets/stylesheets
        - _assets/javascripts
        - _assets/images
    cachebust: hard
    js_compressor: uglifier # included by rails
    css_compressor: sass # included by rails

# ... other config ...
Awesome, but now we have to actually utilize this plugin. To do that we need to move around our assets:
# make a place for the assets
$ cd blog
$ mkdir _assets
$ mkdir _assets/stylesheets
$ mkdir _assets/javascripts
$ mkdir _assets/images

# move around assets
$ mv _sass/* _assets/stylesheets/ && rmdir _sass
$ mv css/* _assets/stylesheets/ && rmdir css
If we happened to have any JavaScript/CoffeeScript files and/or images, we would move them into their respective folders as well.
Just like in Rails, Jekyll-Assets uses double (and sometimes triple) file extensions to convert files. For our purposes, we should rename main.scss to main.css.scss because we want our files to be parsed as SCSS, then converted into CSS. You should do this with any files that you want Jekyll-Assets to convert (e.g. main.js.coffee).
If we take a look at our blog again, you’ll notice an issue. The stylesheets are 404ing again. To fix this we just need to implement Jekyll-Assets’ way of linking stylesheets (and scripts) into HTML.
Jekyll-Assets provides several liquid tags and generators to properly implement cache busting and asset path handling. We won’t cover them all here, so take a look at this page if you’re curious.
To link our stylesheet, we just need to add this to our HTML :
<!-- 'blog/_includes/head.html' -->
{% stylesheet main %}
Now we can delete any old tags as they will just throw 404s. And if we restart the app, you’ll see that the stylesheets are once again being loaded.
Why did we just go through all that trouble to get the same result?
Although that seemed redundant, we actually setup a very nice system for ourselves. Let’s add some CoffeeScript to demonstrate this.
Let’s say that I want to add FitText.js to my Jekyll site so that the title is awesomely responsive using JavaScript. The problem is that this script relies on jQuery for its functionality and I don’t want to make a lot of script calls in my HTML for performance reasons. Jekyll-Assets makes this really easy to do.
First we need to open up the Jekyll config and add a new subdirectory into the JavaScript assets folder:
# 'config/jekyll.yml'

assets:
  # ... other config not shown ...
        sources:
          - _assets/stylesheets
          - _assets/javascripts
          - _assets/javascripts/vendor # added
          - _assets/images
        # ... other config not shown ...
Now we need to make that vendor directory and download jQuery and FitText.js into it:
# create the directory
$ cd blog/_assets/javascripts
$ mkdir vendor
$ cd vendor

# download the assets
$ wget https://raw.githubusercontent.com/davatron5000/FitText.js/master/jquery.fittext.js -O fittext.js
$ wget https://code.jquery.com/jquery-2.1.3.min.js -O jquery.js
Combine the files so there won’t be multiple requests for the javascript:
# 'blog/_assets/javascripts/main.js.coffee
#= require vendor/jquery
#= require vendor/fittext

# and then actually use the plugin
$('h1.page-heading').fitText()
Finally, request that one script in the HTML:
<!-- bottom of '_layout/default.html' -->
{% javascript main %}
Now, if we reload the page, we get a nice big responsive heading:
This is just the beginning of what you can do with Jekyll-Assets.
Jekyll has a fantastic community that makes great plugins, but if you’d like to create your own Jekyll has docs for that too.
Extra: Automation
You probably noticed that we have to keep restarting Rails every time we want to preview the site. That’s fine if we’re just making a few changes to the Jekyll site, but if we’re doing web design, it can get pretty annoying. Luckily we can automate this!
First, generate a new Rake task for Rails.
$ rails generate task jekyllThis command creates a file called lib/tasks/jekyll.rake. Using Jekyll’s API, we can programmatically build the site and serve it at the same time (using threads).
namespace :jekyll do
  dest = Rails.root.join('public/blog')

  options = {
    'baseurl' => '/blog',
    'config' => Rails.root.join('config', 'jekyll.yml').to_s,
    'watch' => true,
    'port' => 3000,
    'source' => Rails.root.join('blog').to_s,
    'destination' => dest.to_s
  }

  build = Thread.new { Jekyll::Commands::Build.process(options) }
  serve = Thread.new { Jekyll::Commands::Serve.process(options) }

  commands = [build, serve]
  commands.each { |c| c.join }
end
Now, rake jekyll, will start the server at http://localhost:3000/blog/ and reload itself whenever file changes are detected.
Conclusion
The possibilities with Jekyll and Rails are endless. This seemingly opposite pair can work together in perfect unison for a great, well-rounded website. You can find the source of this project on GitHub. I’d love to hear your input below if you have any questions or a suggestion on how this method could be improved.
Frequently Asked Questions (FAQs) about Jekyll and Rails
What are the key differences between Jekyll and Rails?
Jekyll and Rails are both popular web development tools, but they serve different purposes. Jekyll is a static site generator, which means it takes your text files and converts them into a ready-to-publish static website. This makes it ideal for blogs or personal websites where the content doesn’t change frequently. On the other hand, Rails is a full-fledged web application framework that allows you to build dynamic, database-driven websites. It’s more suitable for complex web applications that require user interaction and real-time updates.
How can I integrate Jekyll with a Rails application?
Integrating Jekyll with a Rails application can be a bit tricky, but it’s definitely possible. One common approach is to use Jekyll to generate the static pages of your website, and then use Rails for the dynamic parts. You can set up a build process that runs Jekyll to generate the static files, and then copies them into your Rails public directory. This way, you can take advantage of the speed and simplicity of Jekyll for your static content, while still leveraging the power of Rails for your dynamic features.
Can I use Jekyll plugins with a Rails application?
Yes, you can use Jekyll plugins with a Rails application. Jekyll plugins allow you to extend the functionality of Jekyll and customize your site to your needs. However, keep in mind that not all plugins may work perfectly when integrated with Rails. It’s always a good idea to test the plugin thoroughly before deploying it to your live site.
What are the benefits of using Jekyll over Rails for a blog or personal website?
Jekyll is a great choice for a blog or personal website for several reasons. First, it’s very easy to use. You can write your content in Markdown, and Jekyll will automatically convert it into HTML. Second, Jekyll generates static files, which means your site will load very quickly and can be easily hosted on any web server. Finally, Jekyll has a large community and a lot of plugins, so you can easily extend its functionality.
How can I migrate my existing Rails blog to Jekyll?
Migrating a Rails blog to Jekyll involves exporting your existing content, converting it into a format that Jekyll can understand, and then importing it into Jekyll. There are several tools and scripts available that can help with this process. However, keep in mind that this can be a complex task, especially if your blog has a lot of content or custom features. It’s always a good idea to back up your data before starting the migration.
Can I use Rails and Jekyll together for a hybrid site?
Yes, it’s possible to use Rails and Jekyll together to create a hybrid site. This can be a good solution if you want to take advantage of the benefits of both tools. For example, you could use Jekyll to generate the static pages of your site, and then use Rails for the dynamic parts. This way, you can have a fast, secure, and easy-to-maintain site that also has interactive features.
How does Jekyll handle data compared to Rails?
Jekyll and Rails handle data in very different ways. Jekyll is a static site generator, which means it doesn’t have a database. Instead, all the data is stored in files, and Jekyll generates the site by processing these files. On the other hand, Rails is a web application framework that uses a database to store data. This allows Rails to handle complex data relationships and perform advanced queries, which is not possible with Jekyll.
What are the performance differences between Jekyll and Rails?
Jekyll and Rails have different performance characteristics due to their different architectures. Jekyll generates static files, which can be served very quickly by any web server. This makes Jekyll sites very fast and scalable. On the other hand, Rails is a dynamic web application framework, which means it has to process each request in real-time. This can make Rails sites slower and less scalable than Jekyll sites, especially for high-traffic sites.
Can I use Jekyll themes with a Rails application?
Jekyll themes are a way to customize the look and feel of your Jekyll site. However, they are not directly compatible with Rails. If you want to use a Jekyll theme with a Rails application, you would need to convert the theme into a Rails-compatible format. This can be a complex task, depending on the complexity of the theme.
How can I deploy a Jekyll site on a Rails server?
Deploying a Jekyll site on a Rails server is similar to deploying any other static site. You can generate the site using Jekyll, and then copy the generated files to your Rails public directory. From there, you can serve the files using your Rails server. Keep in mind that you will need to regenerate and redeploy the site every time you make changes.
 Jesse Herrick
Jesse Herrick is an avid Ruby developer who specializes in web development. He is a back-end developer at Littlelines and loves programming. You can read his personal blog at: https://jesse.codes.


