In this tutorial series, I’ll walk you through Ebay’s Trading API. The Trading API allows you to build applications that can be used for selling in Ebay. Here are some examples of things you can do with the API:
- retrieve store information
- update store preferences
- add products to a specific eBay store
- end product listings
- update product price
- retrieve product information
In this tutorial, we’ll be creating an app that allows users to create a product on eBay through the use of the API.
Register an App
The first thing that you’ll need to do is register a developer account over at the eBay developer website.
Do that, and once you have verified your email, you will be greeted with a screen similar to the following:
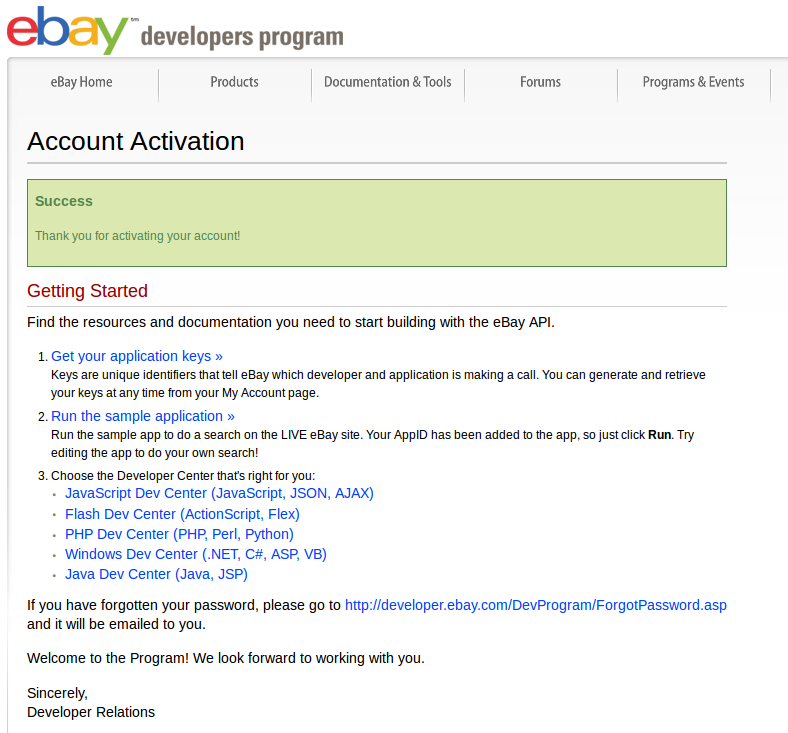
On that page, click on the ‘Get your application keys’ link, which will lead you to the page where you can generate sandbox and production keys. Then, click the ‘Generate Sandbox Keys’ button to generate the keys that you can use for testing the app that we will be building. Also click on the ‘Generate Production Keys’ button to generate the keys that you can use when you deploy the app. Note that these keys can be used with any of the APIs that eBay provides so you’ll only have to do this once.
Once the keys are generated, click on the ‘configure settings’ link on any of the keys (sandbox or production).
Under the ‘Customize the eBay User Consent Form’ section click on the ‘Customize the eBay User Consent Form’ link. This will allow you to configure the URL used by your app. This is basically the URL to the home page of the app. Once in there, under the ‘Manage Your RuNames’ section, click on the ‘Generate a RuName for Your Application’ link. A RuName is an equivalent to an app. If you are creating different apps that will interact with different eBay APIs, you can create one RuName for each app. Once a RuName is generated, the following information will be asked of you:
- display title – the title of the app that you want to display when the user gives authority to your app later on. (e.g product creator)
- display description: The display description is the text that describes what your app does. (e.g this app allows users to easily add products to their eBay store)
- token return method – the token return method is the method that will be used by the app after the user gives authority to your app. For this, the value supplied should be ‘FetchToken’.
- authorization type – the type of action that your app does after the user gives authority to your app. This can be either authorization or ID.verification. Supply a value of ‘authorization’ for this field because we need the user to give authority to our app to perform different actions for them.
- application type – the type of the app. This should be ‘web based’.
- accept redirect URL – the URL to which the user is redirected when they give authority to the app. Note that eBay only allows https URLs. If you want to follow along later on, I recommend you sign up for an account at openshift.com. The apps that you host there will have https by default, and it’s free.
- reject redirect URL the URL to which the user is redirected when they reject the app.
- privacy policy URL – the privacy policy URL. This URL is going to be included in the app description when the user is in the page for giving authority to the app.
Tools
EBay’s developer dashboard offers a variety of tools for us to play around with.
Sandbox Account
Lets take a look at the Sandbox User Registration tool. After registering a sandbox account, go to sandbox.ebay.com to test out logging in. Once you have verified that it’s working, go back to your eBay developer account page.
API Test Tool
Next is the API Test Tool. Once on that page you can see that there’s a bunch of options, but they are already pre-filled by default so you’ll have an idea of what each field does. Before we proceed with playing with this tool, here’s a brief description for each field:
- Select an Environment – this allows you to switch between sandbox and production environments. Often times when you’re just testing from the API Test Tool you would want to use ‘sandbox’ for this. The main difference between the two is that sandbox can only be used with sandbox/testing eBay accounts, and production can only be used with actual eBay accounts.
- Select a key set – this allows you to change the keys that will be used for making the API calls. Most of the time you wouldn’t really have to touch this because as you select the type of environment the keys already change.
- Select an API – this allows you to select the API to which you want to make the call. As you might already know, eBay has different sets of APIs: the trading, finding, shopping, feedback and open API’s. We’re mainly going to be using the trading API for this tutorial so go ahead and select that. Notice that after selecting the trading API, another set of fields shows up. It prompts you to either generate a user token or manually input an existing one. As we have already created a sandbox account earlier, we can just click on the ‘generate a user token’ button. That will redirect you to a page which looks like this:
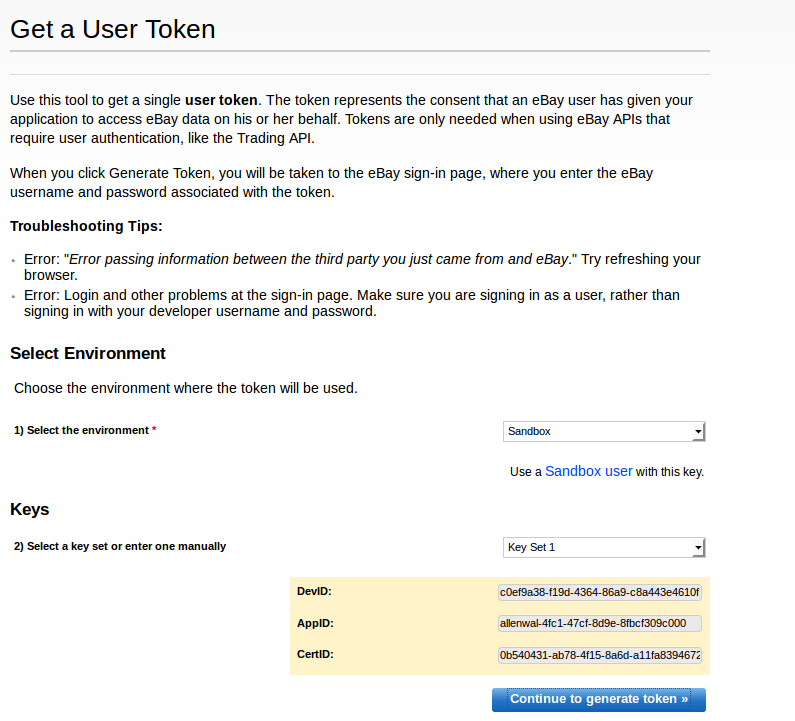
Confirm that sandbox is selected for the environment, then click on the ‘continue to generate token’ button. That will redirect you to the sandbox eBay website login page. Fill it out with your sandbox login credentials. If the login is successful, it will redirect you to the authorization page:
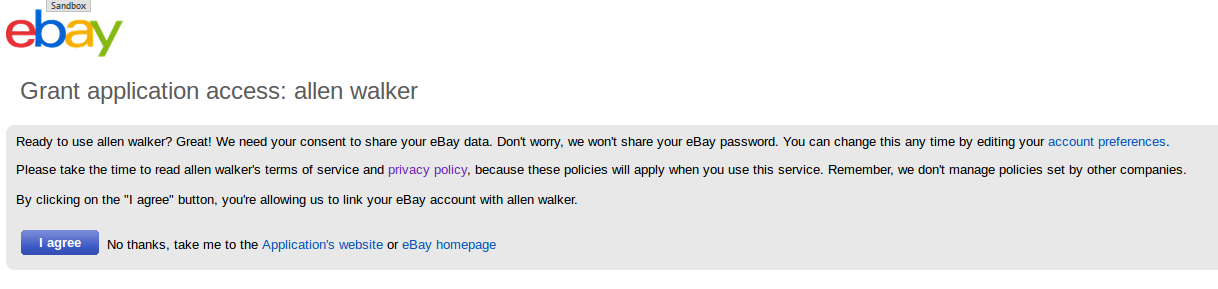
Agree to authorize the app. Note that this is a generic app used by eBay primarily for testing. This is not the app that we created earlier. After that, you will be redirected to the following page:

All you have to do on this page is copy the generated token then click on the ‘save token’ button. Once that’s done, you can go back to the API Test Tool page and paste in the user token that you have just copied into the user token field.
Select an API Call – the actual resource in the API that you want to request. There’s a bunch of calls that you can make. You can select anything that piques your interest.
Select a Template – this can either have a value of ‘full, generic’ or ‘partial, pre-filled’. Selecting ‘full, generic’ will give you blank fields in your XML Request box while selecting ‘partial, pre-filled’ will give you some basic example fields that have already been populated. Since we’re just getting started, using ‘partial, pre-filled’ is the best choice, because that would already supply for us some of the fields required by the resource that we have selected. For example, if we select ‘GetItem’ for the API Call field, this would already supply a sample ItemID and WarningLevel for us, and all we have to do is to click on the ‘submit’ button below the XML request textarea in order to initiate the request. Once you feel comfortable with using the API you can just directly add the values to the XML request textarea to modify the actual data that’s being submitted to the API.
Select a Call Variation – each resource in the API can have different variations, but most of the time you would only want to make a Basic Call so you don’t really have to modify the default value for this field.
Select Call Request Version – the eBay API has gone through a lot of changes, and that means there’s different versions of the API still floating around in order to support older systems. Since we’re just starting to make use of the API, we can just choose the latest version, which as of this time is version 885.
Select Site ID – as you might already know there are different eBay websites. This field represents the actual eBay website where you want to make the call. Since we’re just testing using the API test tool we can just supply United States for this.
Web Service URI – the URL to which all requests are made. You don’t have to modify this field.
HTTP Headers – the information supplied in the header for each request that you make to the API. The following headers are used by default:
X-EBAY-API-COMPATIBILITY-LEVEL:your-request-version
X-EBAY-API-DEV-NAME:your-dev-id
X-EBAY-API-APP-NAME:your-app-id
X-EBAY-API-CERT-NAME:your-cert-id
X-EBAY-API-SITEID:your-site-id
X-EBAY-API-CALL-NAME:YourAPICallMethod
Explaining the unclear ones:
- X-EBAY-API-SITEID – the id of the eBay website to which you want to make the request. Here’s a list of Site ID’s which you can use. You would want to find the Site Name and then note that corresponding eBay Site ID.
- X-EBAY-API-CALL-NAME – the resource or method in the API that you would want to call. Here’s a reference to the calls that you can make with the trading API.
- XML Request – the body of your request. The trading API only supports XML and SOAP formats. But XML looks more concise so we’re going to use XML for this one. It’s also the default format used in the API Test Tool so it’s really the way to go. Here’s a sample XML Request:
<?xml version="1.0" encoding="utf-8"?>
<GetItemRequest xmlns="urn:ebay:apis:eBLBaseComponents">
<ItemID>110072510158</ItemID>
<RequesterCredentials>
<eBayAuthToken>your-user-token</eBayAuthToken>
</RequesterCredentials>
<WarningLevel>High</WarningLevel>
</GetItemRequest>
Breaking it down, this specifies the xml version and encoding that we’re using:
<?xml version="1.0" encoding="utf-8"?>This is the wrapper for our request. It uses the GetItem request method. Note that GetItem is the name of the method in the API but we have to append Request to it. The xmlns is used to specify the namespace which the call belongs to. Most of the time the value for this would be urn:ebay:apis:eBLBaseComponents. And when I say most of the time it means most of the methods in the Trading API use this specific namespace.
<GetItemRequest xmlns="urn:ebay:apis:eBLBaseComponents">
</GetItemRequest>
Next is the ID of item in ebay.
<ItemID>110072510158</ItemID>To find this information, search for an item in eBay and then click on any of the results that are returned. The URL will look something like this:
http://www.ebay.co.uk/itm/Apple-MacBook-Pro-15-4-2-66Ghz-Dual-Core-8GB-RAM-250GB-Latest-OS-X-10-9-/301305989202?pt=UK_Computing_Apple_Laptops_ET&hash=item46273c8852The item id is the set of numbers which comes right after the title of the item.
Next is the wrapper for the requester’s credentials:
<RequesterCredentials>
</RequesterCredentials>
The requester credentials wrapper should contain the user token. We’ve already seen how to acquire a user token earlier for a sandbox account. Acquiring a user token for the app would basically be the same but we would have to handle saving the token in a database so that we could make use of it at a later time.
<eBayAuthToken>your-user-token</eBayAuthToken>Next is the Warning Level. This can have a value of either High or Low. This should always be set to High to tell eBay to return warnings for unrecognized, deprecated elements or invalid values. This would allow you to check the response if something has gone wrong with the request.
<WarningLevel>High</WarningLevel>Call Response – the actual response returned by the API. There’s no need to modify this as it is simply used for displaying the response.
API Call Use Report
The last tool we’re going to walk through is the API Call Use Report. This allows you to generate reports of your API usage for a specific time range. This is a nice tool to have if you’re deploying an app later on, as this would allow you to determine if you are exceeding the API call limits for the specific API that you’re using for your app. In that case, you can just submit an application to eBay to increase your API limit.
Database
We will be using MySQL for this app. The following tables will be used:
- settings – stores the general app settings like the user token and app id.
- store_settings – stores the eBay store settings to be used when creating products.
- products – stores product details.
- condition_types – stores the item condition IDs and their corresponding name.
- listing_types – stores the listing codes.
- listing_durations – store the listing duration codes.
Create a new database using something like phpmyadmin and then execute the following SQL statements to create the individual tables:
settings
CREATE TABLE IF NOT EXISTS `settings` (
  `id` int(11) NOT NULL AUTO_INCREMENT,
  `user_token` text NOT NULL,
  `dev_id` varchar(300) NOT NULL,
  `app_id` varchar(300) NOT NULL,
  `cert_id` varchar(300) NOT NULL,
  `run_name` varchar(300) NOT NULL,
  `site_id` varchar(60) NOT NULL,
  PRIMARY KEY (`id`)
)
store_settings
CREATE TABLE IF NOT EXISTS `store_settings` (
  `id` int(11) NOT NULL AUTO_INCREMENT,
  `store_name` varchar(160) NOT NULL,
  `county` varchar(160) NOT NULL,
  `street` varchar(160) NOT NULL,
  `country_code_type` varchar(60) NOT NULL,
  `ebay_website` varchar(160) NOT NULL,
  `postal_code` varchar(60) NOT NULL,
  `category_mapping` tinyint(1) NOT NULL,
  `category_prefill` tinyint(1) NOT NULL,
  `currency_code` varchar(60) NOT NULL,
  `item_location` varchar(300) NOT NULL,
  `dispatch_time` int(11) NOT NULL,
  `listing_duration` varchar(60) NOT NULL,
  `listing_type` varchar(60) NOT NULL,
  `condition_type` varchar(60) NOT NULL,
  `optimal_picturesize` tinyint(1) NOT NULL,
  `out_of_stock_control` tinyint(1) NOT NULL,
  `get_it_fast` tinyint(1) NOT NULL,
  `include_prefilled` tinyint(1) NOT NULL,
  `shipping_profile` varchar(160) NOT NULL,
  `return_profile` varchar(160) NOT NULL,
  `payment_profile` varchar(160) NOT NULL,
  `shipping_service` varchar(160) NOT NULL,
  `shippingservice_priority` int(11) NOT NULL,
  `shippingservice_cost` double NOT NULL,
  `shippingservice_additionalcost` double NOT NULL,
  PRIMARY KEY (`id`)
)
products
CREATE TABLE IF NOT EXISTS `products` (
  `id` int(11) NOT NULL AUTO_INCREMENT,
  `title` varchar(80) NOT NULL,
  `category_id` varchar(90) NOT NULL,
  `price` double NOT NULL,
  `qty` int(11) NOT NULL,
  `brand` varchar(160) NOT NULL,
  `description` text NOT NULL,
  PRIMARY KEY (`id`)
)
condition_types
CREATE TABLE IF NOT EXISTS `condition_types` (
  `id` int(11) NOT NULL,
  `name` varchar(160) NOT NULL,
  PRIMARY KEY (`id`)
)
listing_types
CREATE TABLE IF NOT EXISTS `listing_types` (
  `name` varchar(160) NOT NULL
)
listing_durations
CREATE TABLE IF NOT EXISTS `listing_durations` (
  `name` varchar(60) NOT NULL
)
For the condition types, listing types, and listing durations, we can just insert the default data directly. Also execute the following queries to do so.
INSERT INTO `listing_durations` (`name`) VALUES
('Days_1'),
('Days_10'),
('Days_120'),
('Days_14'),
('Days_21'),
('Days_3'),
('Days_30'),
('Days_5'),
('Days_60'),
('Days_7'),
('Days_90'),
('GTC');
INSERT INTO `listing_types` (`name`) VALUES
('AdType'),
('Auction'),
('Chinese'),
('FixedPriceItem'),
('Half'),
('LeadGeneration'),
('PersonalOffer'),
('Shopping'),
('Unknown');INSERT INTO `condition_types` (`id`, `name`) VALUES
(1000, 'New'),
(1500, 'New Other'),
(1750, 'New with defects'),
(2000, 'Manufacturer refurbished'),
(2500, 'Seller refurbished'),
(3000, 'Used'),
(4000, 'Very Good'),
(5000, 'Good'),
(6000, 'Acceptable'),
(7000, 'For parts or not working');Conclusion
In this part, we prepared our environment and set everything up for a smooth development workflow in parts 2 and 3. Stay tuned for the followup in which we’ll start building our application’s logic!
Frequently Asked Questions about eBay’s Trading API
What is eBay’s Trading API and how does it work?
eBay’s Trading API is a powerful tool that allows developers to create applications that can perform various operations related to eBay trading. It works by providing a set of protocols for communication between your application and eBay’s servers. These protocols allow your application to perform tasks such as listing items for sale, managing active listings, retrieving user information, and completing sales transactions. The Trading API uses XML-based messages to communicate, and it requires an authentication token for secure access.
How can I get started with eBay’s Trading API?
To get started with eBay’s Trading API, you first need to register as a developer on eBay’s Developer Program website. Once registered, you can create an application keyset which includes an AppID, CertID, and DevID. These keys are used to authenticate your application when making API calls. You also need to generate a user token, which represents the eBay user your application is acting on behalf of.
What operations can I perform with eBay’s Trading API?
eBay’s Trading API provides a wide range of operations that you can perform. These include listing items for sale, managing active listings, retrieving user information, completing sales transactions, and more. Each operation is represented by a specific API call, and the details of each call are documented in eBay’s API documentation.
How do I make an API call with eBay’s Trading API?
To make an API call with eBay’s Trading API, you need to send an HTTP POST request to the API endpoint. The body of the request should contain an XML message that specifies the API call you want to make and any required parameters. The headers of the request should include your AppID, CertID, and DevID for authentication.
How do I handle the response from an API call?
The response from an API call is an XML message that contains the results of the call. You can parse this XML message to extract the information you need. The structure of the response message depends on the API call you made.
What are some common errors I might encounter when using eBay’s Trading API?
Some common errors you might encounter when using eBay’s Trading API include authentication errors, invalid request errors, and server errors. Each error is represented by a specific error code and message, which are included in the response message when an error occurs.
How can I troubleshoot issues with eBay’s Trading API?
If you encounter issues with eBay’s Trading API, you can use the error code and message in the response message to identify the problem. You can also refer to eBay’s API documentation and developer forums for additional help.
Can I use eBay’s Trading API with other programming languages?
Yes, you can use eBay’s Trading API with any programming language that supports HTTP and XML. This includes languages like Python, Java, C#, and more.
How can I ensure my application is secure when using eBay’s Trading API?
To ensure your application is secure when using eBay’s Trading API, you should always use HTTPS when making API calls, and you should never share your AppID, CertID, DevID, or user token.
Where can I find more information about eBay’s Trading API?
You can find more information about eBay’s Trading API in eBay’s API documentation, which provides detailed information about each API call, including its parameters, response structure, and error codes. You can also find helpful resources on eBay’s Developer Program website and developer forums.
 Wern Ancheta
Wern is a web developer from the Philippines. He loves building things for the web and sharing the things he has learned by writing in his blog. When he's not coding or learning something new, he enjoys watching anime and playing video games.


