As a coder of many years, I am a keen believer in writing everything once and being able to use it in multiple places. In the coding world, thanks to open data formats and widely supported APIs we can generally have one central set of content and use it for different applications and use cases, all nicely in sync.
In the desktop design world, this has traditionally been harder, with sources of content in Word documents, InDesign files and maybe some content management systems or spreadsheets.
Imagine my delight when I by chance came across Porky, an open source InDesign extension (well, actually a script) that lets you connect your InDesign files to a variety of data sources.
Installation
Download the current version of the script, unarchive it and add the folder into the InDesign Scripts/Scripts Panel folder (On my Mac this is inside the InDesign application package), Porky should now show in the InDesign scripts panel.

Porky needs node.js installed on your local computer, full instructions can be found here. When you have that installed, we can install some of the additions to node.js needed by Porky that handle connecting to the various services it supports. Install these by opening up your command line and issuing these two commands (This is for a Mac with InDesign CC installed, paths will vary depending on your platform and version):
cd /Applications/Adobe\ InDesign\ CC\ 2015/Scripts/Scripts\ Panel/porky
npm install
Start Porky
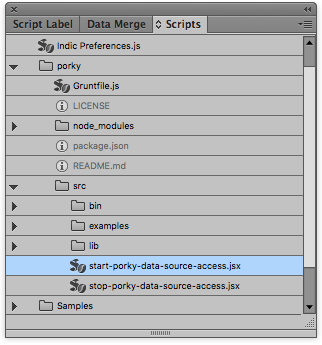
Double click start-porky-data-source-access.jsx in the Scripts panel, this may open up some terminal windows, just leave them for now.
Using Porky
Porky uses Adobe’s ExtendScript to create the scripts that connect InDesign to the data sources it supports. There are some examples in the Porky/src/examples folder and I recommend you download the ExtendScript Toolkit to edit and create your own.
I will step through examples of how to connect to and use the data sources that Porky supports, if you want to dig further, read Porky’s documentation.
SQL
I created a basic SQL table containing some SitePoint articles, you can find the file here.
//@include ../bin/porky.jsx;

settings.dataSource.type = "MySQL";
settings.dataSource.server = "127.0.0.1";
settings.dataSource.name ="SitePoint";
settings.dataSource.username = "root";
settings.dataSource.password = "";

var mySQLResult = "";

try{
    mySQLResult = connectToDataSource("SELECT * FROM articles");
    mySQLResult = JSON.parse(mySQLResult);
    alert(mySQLResult);
}catch(e){
    alert("Error\nCheck console window for details!");
}
JSON
As with all of my tutorials, I will use the Marvel API to show Porky’s JSON features.
//@include ../bin/porky.jsx;

settings.dataSource.type = "JSON";
settings.dataSource.name = "http://gateway.marvel.com/v1/public/characters?ts=1448030805540&apikey=dfa06d77bc9c4f9f0ed01337848247e3&hash=0e54a94548adeb07b97e3e3428c6956f&limit=10";

// specify path in dot notation here or leave "" to request the entire object
var myJSONResult = connectToDataSource("data.results");

alert( JSON.parse(myJSONResult) );
alert( JSON.stringify(myJSONResult) );
CSV
Using a CSV version of the SQL table from earlier:
//@include ../bin/porky.jsx;

// read an existing text file from a specific folder
var myCSVFileContent = readFile('articles.csv'); // Absolute file path

if(myCSVFileContent){
  alert('File read with content\n' + myCSVFileContent);
} else {
  alert('File does not exist');
}
Displaying Data
Create a Text Frame
//@include ../bin/porky.jsx;
...
var myTextframe = addFrame(50, 50, 500, 250, "");
...
This creates a new text frame and the parameters (in respective order) are equal to the x and y coordinates and the width and height of the frame. The final parameter is the string or file for content, which we will leave empty for now.
Filling frame with data
This process depends on the structure of the data returned and is easier with some data return formats than others. We use the following function:
//@include ../bin/porky.jsx;
...
var myTable = appendToFrame(myTextframe, myArray);
...
The myArray variable expects a string or two-dimensional array, i.e. an array of rows, with each row containing sets of content values. Getting this array is what can end up being complicated.
JSON
JSON can be hard depending on the formatting of the return data and whether it’s a JSON object or array. In the case of the Marvel API, this code partially worked for me:
...
var myArray = new Array(items.length);
myArray[0] = ["id", "Name", "Description"];

for(var i = 1; i < items.length; i++) {
  var obj = items[i - 1];
  myArray[i] = new Array(2);
  myArray[i][0] = obj.id;
  myArray[i][1] = obj.name;
  myArray[i][2] = obj.description;
}

var myTextframe = addFrame(50, 50, 250, 250, "");

var myTable = appendToFrame(myTextframe, myArray);
Not the tidiest solution and you may experience some issues with escaping characters, but as I say, this all very much depends on your JSON result.
MySQL
Outputting results from a MySQL table is similar to JSON as the MySQL data set is returned as JSON:
var myArray = new Array(mySQLResult.length);
myArray[0] = ["id", "title", "channel", "url"];

for(var i = 1; i < mySQLResult.length; i++) {
  var obj = mySQLResult[i - 1];
  myArray[i] = new Array(3);
  myArray[i][0] = obj.id;
  myArray[i][1] = obj.title;
  myArray[i][2] = obj.channel;
  myArray[i][3] = obj.url;
}

var myTextframe = addFrame(50, 50, 250, 250, "");

var myTable = appendToFrame(myTextframe, myArray);
CSV
CSV is the easiest:
//@include ../bin/porky.jsx;
...
var myArray = csvToTwoDArray(myCSVFileContent, { rSep:'\n' , fSep:',' , quot:"'" , trim:true });
var myTextframe = addFrame(50, 50, 250, 250, "");
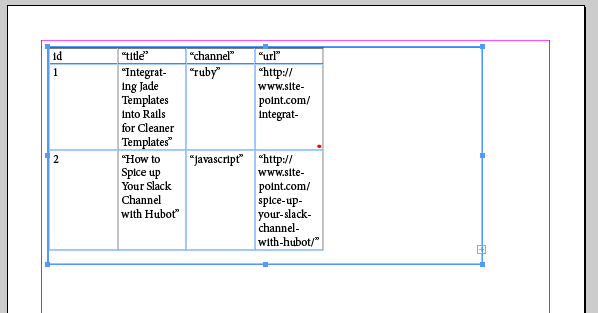
var myTable = appendToFrame(myTextframe, myArray);Depending on the connection and dataset, you should see something like this.
Conclusion
The main issue with Porky is that the people behind it are rather hoping that you will pay them consulting fees if you run into any issues. This isn’t necessarily an issue, especially in the Adobe ecosystem, but it does mean that documentation often feels lacking.
It took me some time to get the simple examples above working due mainly to a lack of definition around the differences between JavaScript and ExtendScript and the lacking documentation.
There are several other features I haven’t covered here such as creating placeholder images and other text box features, so if you’re willing to dig around and experiment, Porky has the potential to save you a lot of repeated tasks when working with large data sets in InDesign.
However, it’s not for the faint hearted.
Frequently Asked Questions (FAQs) about InDesign with Porky
How do I install scripts in InDesign with Porky?
Installing scripts in InDesign with Porky is a straightforward process. First, you need to download the script you want to install. Once downloaded, open InDesign and go to the ‘Window’ menu. From there, select ‘Utilities’ and then ‘Scripts’. In the ‘Scripts’ panel that opens, right-click on ‘User’ and select ‘Reveal in Finder’ (for Mac) or ‘Reveal in Explorer’ (for Windows). This will open the folder where you need to place your downloaded script. Simply drag and drop the script into this folder, and it will be available for use in InDesign.
What is the ExtendScript API in InDesign with Porky?
The ExtendScript API is a scripting language developed by Adobe that is similar to JavaScript. It allows you to automate tasks in Adobe applications, including InDesign. With the ExtendScript API, you can create scripts that perform complex tasks, saving you time and effort. For example, you can create a script that automatically formats text, applies styles, or exports files in a specific format.
How can I use the User Experience Platform (UXP) in InDesign with Porky?
The User Experience Platform (UXP) is a new technology from Adobe that allows developers to create plugins and scripts for Adobe applications, including InDesign. With UXP, you can create more powerful and interactive plugins compared to traditional scripts. To use UXP in InDesign, you need to have a basic understanding of JavaScript and HTML. You can then use the UXP Developer Tool to create and test your plugins.
How can I learn scripting in InDesign with Porky?
There are several resources available to learn scripting in InDesign. Adobe provides a comprehensive guide on their website, which covers the basics of scripting and provides examples of scripts you can use. There are also online tutorials and courses available on websites like Udemy and Lynda. Additionally, you can learn from the scripts provided in the InDesign application itself.
What are the benefits of using scripts in InDesign with Porky?
Scripts in InDesign can automate repetitive tasks, saving you time and effort. They can also perform complex tasks that would be difficult or impossible to do manually. For example, you can use a script to automatically format text, apply styles, or export files in a specific format. Scripts can also help you maintain consistency in your designs by ensuring that the same settings are applied every time.
Can I create my own scripts in InDesign with Porky?
Yes, you can create your own scripts in InDesign. To do this, you need to have a basic understanding of JavaScript or another scripting language supported by InDesign. You can then use the ‘Scripts’ panel in InDesign to create and manage your scripts.
How can I troubleshoot scripts in InDesign with Porky?
If a script is not working as expected, there are several steps you can take to troubleshoot the issue. First, check the script for any syntax errors. These are mistakes in the code that prevent the script from running correctly. You can also use the ‘ExtendScript Toolkit’ provided by Adobe to debug your scripts. This tool allows you to step through your script line by line to identify where the issue is occurring.
Can I share my scripts with other InDesign users?
Yes, you can share your scripts with other InDesign users. To do this, you simply need to provide them with the script file. They can then install the script in their own copy of InDesign by placing the file in the ‘Scripts’ folder.
Are there any limitations to what I can do with scripts in InDesign?
While scripts can automate many tasks in InDesign, there are some limitations. For example, scripts cannot perform tasks that require user interaction, such as selecting objects on the page. They also cannot access certain features of the InDesign application, such as the ‘Preferences’ dialog.
Can I use scripts to automate the creation of PDFs in InDesign?
Yes, you can use scripts to automate the creation of PDFs in InDesign. This can be particularly useful if you need to create a large number of PDFs with the same settings. You can create a script that sets the PDF options, exports the document as a PDF, and then saves the PDF to a specified location.
 Chris Ward
Developer Relations, Technical Writing and Editing, (Board) Game Design, Education, Explanation and always more to come. English/Australian living in Berlin, Herzlich Willkommen!


