Photoshop is a dynamic tool. It contains all of the necessary gadgets that designers need to create outstanding artworks. Most of us are aware of how useful Photoshop is for creating photo effects and photo manipulating tasks, but few realize that it’s equally good for creating vectors. Photoshop not only helps us create great vector illustrations, it also has powerful features that enhance vector quality.
So, let’s explore its vector creating capabilities today. I’ll walk you through the process of creating a delicious birthday cupcake in Photoshop. We’ll use many techniques that can help you to create any vector you’d like in Photoshop. We’ll use the pen tool, different shape tools, various blending options, and filters for the creation of the cupcake. So, let’s get started!
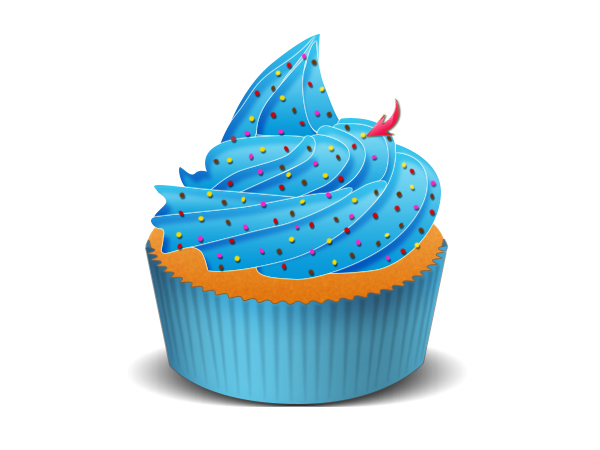
Final Result:

Step 1
Create a new document in Photoshop with a 600px width and a 700px height.
Step 2
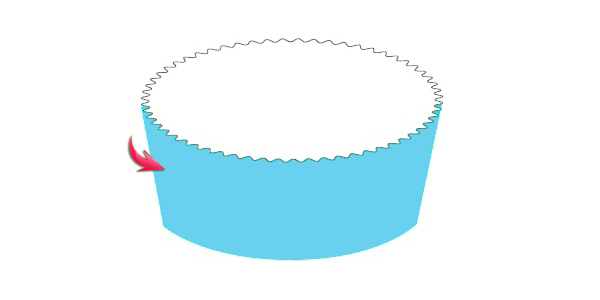
First of all, we’ll create the cup. Set #64c7ea as your foreground color, and select the polygon tool with the following settings in the properties bar located at the top to draw the shape as below.
Step 3
Select the pen tool (tool mode: shape) and draw the cup shape shown below in the same color. Now, select both the layers (the polygon shape and the pen tool shape layers) and go to “Layer” > “Combine shapes” > “Subtract Front Shape” to get a nice cup shape. Label this layer as “Cup.”
Step 4
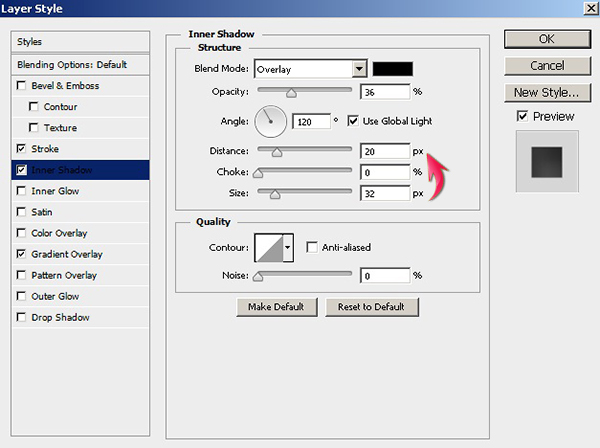
Double-click on the cup layer to open the “Layer Style” window, and apply the following settings to give it some character.


Step 5
Now, to finish cup’s top edges, draw the shape shown below at one corner, duplicate it, and flip horizontally by going to “Edit” > “Transform” > “Flip Horizontal,” and position it at the opposite corner.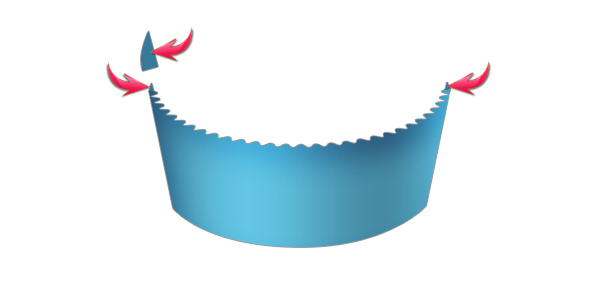 Draw the following thin cone shape using the pen tool in pure white.
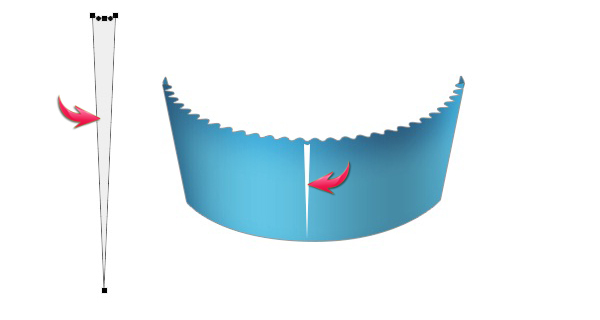 After that, right-click on the cone shape layer and select the option of “Rasterize Layer.” Then, go to “Filter” > “Blur” > “Gaussian Blur.” Use a 1px Gaussian blur here.

Step 6
We have formed the central cone shape. Now, keep on duplicating the cone shape to cover the entire cup. You’ll need to narrow the cones that are near the edges and also tilt them a bit around 1-2 degrees. To save time, cover one half of the cup with cones and collect these layers in a group. Then, simply duplicate that layer and flip it horizontally to cover the other half of the cup. Collect all of the stripes layers into a single group. Change the blending mode of this group to “Subtract” and reduce its opacity to 15%.

Step 7
Create a new layer just above the background layer, and select an elliptical area below the cup to form its shadow using the elliptical marquee tool.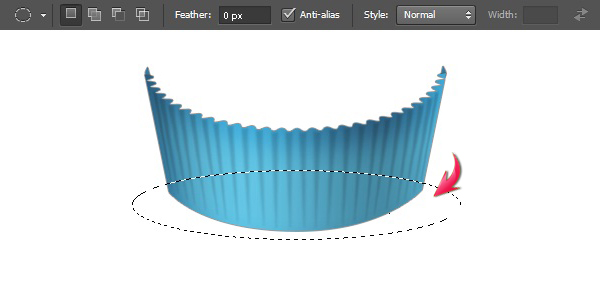 Fill this selection with pure black using the paint bucket tool, and go to “Filter” >“Blur” > “Motion Blur.” Use the following settings for the motion blur. After that, reduce the size of shadow horizontally using the free transform tool (Ctrl+ “T”).

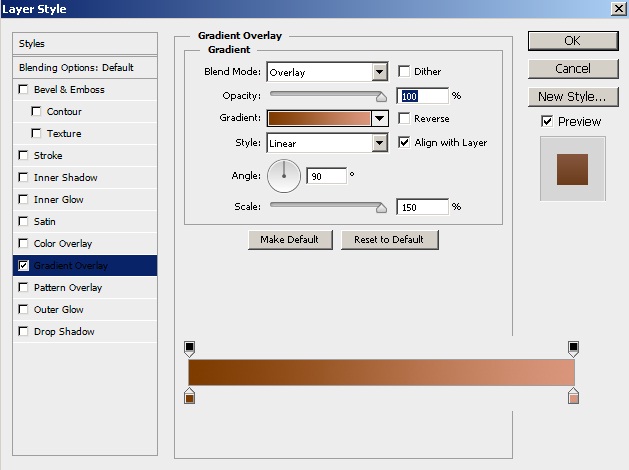
Step 8
Now, to form the cake, select the ellipse tool to draw an ellipse in color #e3aa6b on a layer below the cup layer. Apply a gradient overlay using the following settings.
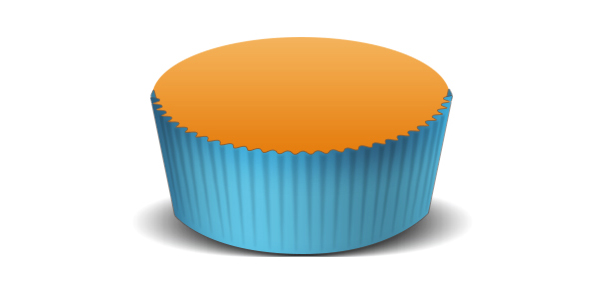
Step 9
Next, right-click on the cake layer and select “Convert to smart object.” Now we can apply smart filters to it, which means we can edit and update these filters at any time. Now, go to “Filter” > “Noise” > “Add Noise,” and apply the following settings for noise. After that, go to “Filter” > “Filter Gallery” > “Pallete knife,” and use the following values to achieve the effect shown below.
Step 10
We’ll move ahead to make the icing on the top. We’ll do it in three layers. For the bottom part, you’ll need to create few shapes using the pen tool (tool mode: shape) as shown below. I’ve drawn these shapes using different colors, so you can differentiate these shapes easily. You can use any color for now, as we’ll apply gradient on all of these shapes.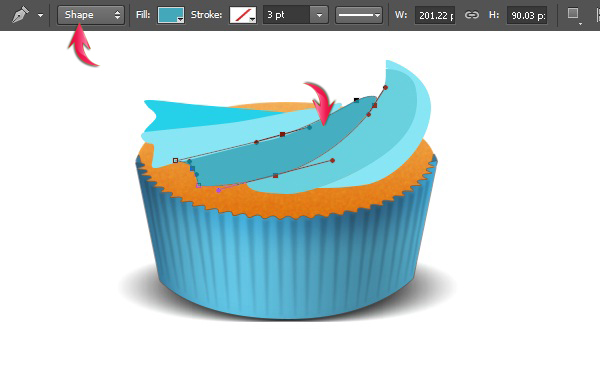
Step 11
Now, double-click on one of the shapes layers and apply the following layer style settings.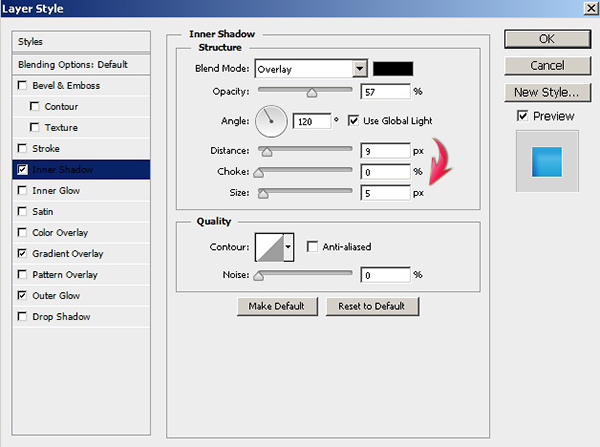

 Once you are done, right-click on this layer and select the option of “Copy Layer Style.” Then, right-click on the rest of the icing layers one by one, and select the option of “Paste Layer Style” to apply the same effects on them. After that, collect these bottom icing layers into a single group.
Step 12
Next, we’ll form middle icing segment in the same way that we did for the bottom part in steps 10 and 11. Make sure to create these layers below the bottom icing layer.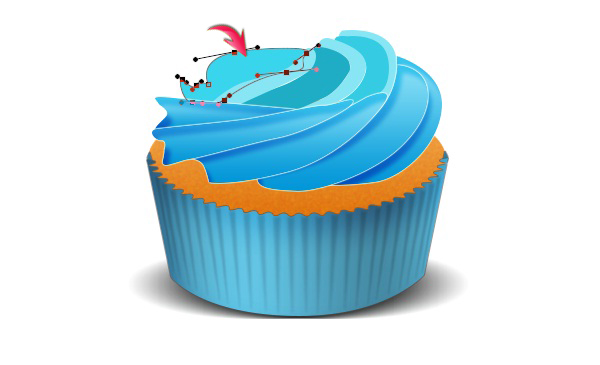
 Finally, make the top icing segment using the same technique.

Step 13
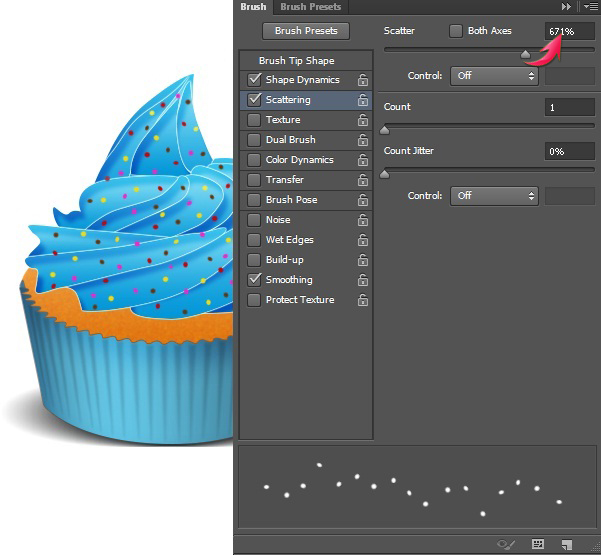
Now we’ll add sprinkles on the cupcake. Select the brush tool and click on brush panel from the top options bar. Apply the following settings in the brush panel. Create a new layer at top of rest of the layers and apply this brush over all three layers of icing. You can use whatever colors you like for this.

Step 14
Use the following values to apply a drop shadow on the sprinkles layer.
Step 15
Collect all the cupcake layers in a group, then duplicate and merge this group. Press Ctrl + <click on the merged layer> to make a selection around it. Now, go to “Edit” > “Fill.” Fill the merged layer with 50% gray. After that, change the blending mode of this layer to “Overlay.” Now, select the burn tool with a size of around 10px – 15px and a soft round brush “Range: Shadows, Exposure: 50%” and dodge tool in “Range: Highlights, Exposure: 50%.”
Step 16
Create a new layer above the cake layer and below the icing layers. Select the soft round brush tool and apply it on this new layer to form the shadow of the icing on the cake in pure black. Reduce its opacity to 30%.
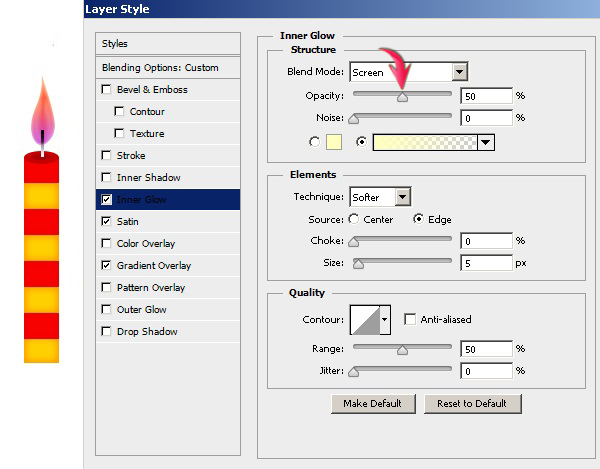
Step 17
Our cupcake is all done. Next, I’ll show you how to create a cute candle for this. Form alternate red (#f50101) and yellow (#ffc601) rectangles over each other using the rectangle tool and apply the following inner glow settings on them.

Step 18
Create an ellipse in color #c20000 over the top rectangle, and build a second, smaller ellipse inside it in with a darker shade. After that, draw a thin rectangle to form candle thread and apply a black and white gradient on it.
Step 19
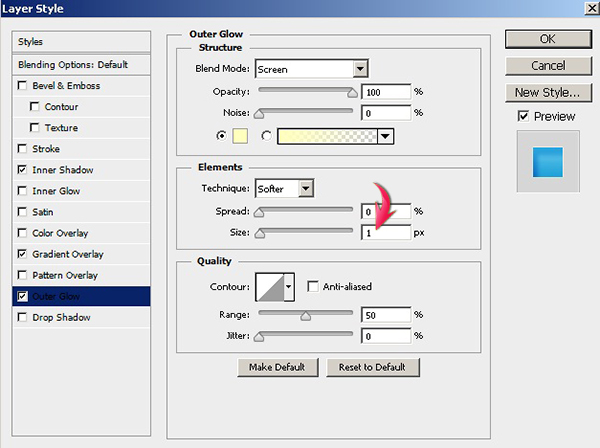
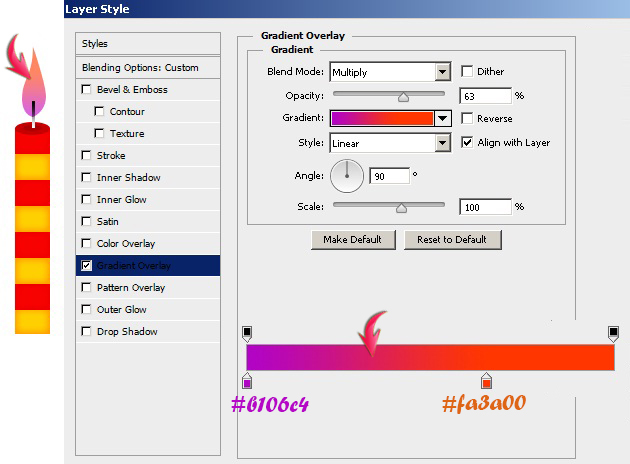
To form flame draw the following shape using the pen tool.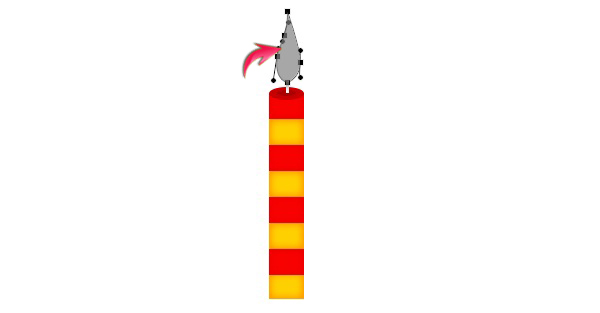 Set its fill color to 0% and apply the following layer style settings to it.

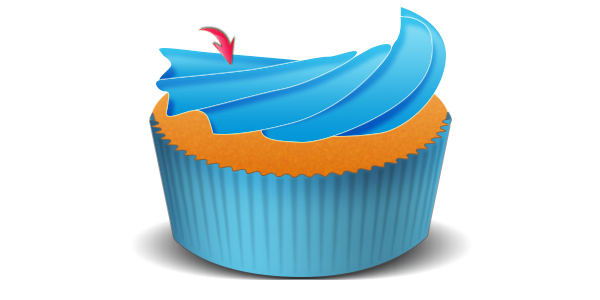
 Collect all the layers forming the candle into a single group and place this group below the cupcake layers. Position it as shown below.

Step 20
To make the background, make fill of background layer to 0% and apply the following gradient overlay settings.
 Create a layer just above the background layer, fill it with color #54fee2 and reduce its opacity to 35%.

Step 21
Next, we’ll make the surface on which cupcake is placed. Select a rectangular area within the lower third of the canvas using the rectangular marquee tool, and fill it with any color. After that, set the fill color to 0%, reduce the opacity to 30%, and apply the following gradient overlay settings on this layer.
Step 22
I’ve added few strokes to form borders, a ribbon around the cupcake, and some text. It’s up to you how you want enhance it further.
Step 23
Lastly, create a “Brightness/Contrast” adjustment layer at the top of the rest of the layers. Use the following values for it. That’s it guys, we are all done. Hope you enjoyed the creation of this cupcake and learned something useful. Enjoy your tasty treat!
Frequently Asked Questions about Illustrating a Birthday Cupcake in Photoshop
How can I add more realistic textures to my cupcake illustration in Photoshop?
To add more realistic textures to your cupcake illustration, you can use Photoshop’s various brush settings. For instance, you can use the “Noise” brush to give your cupcake a grainy texture, similar to a real cupcake. You can also use the “Texture” brush to add a pattern to your cupcake, such as a crumbly texture. Remember to adjust the opacity and flow of your brush to achieve the desired effect.
How can I create a more vibrant color scheme for my cupcake illustration?
Photoshop offers a wide range of color adjustment tools that can help you create a more vibrant color scheme. You can use the “Hue/Saturation” adjustment to increase the saturation of your colors, making them more vibrant. You can also use the “Color Balance” adjustment to tweak the colors in your illustration, making them more harmonious.
How can I add depth and dimension to my cupcake illustration?
Adding depth and dimension to your cupcake illustration can be achieved by using Photoshop’s layer styles. For instance, you can use the “Drop Shadow” style to add a shadow to your cupcake, giving it a 3D effect. You can also use the “Bevel and Emboss” style to add depth to your cupcake, making it look more realistic.
How can I create a more detailed icing effect for my cupcake illustration?
To create a more detailed icing effect, you can use Photoshop’s “Smudge” tool. This tool allows you to smudge the colors in your illustration, creating a creamy, swirled effect that resembles icing. You can also use the “Liquify” filter to distort the icing, making it look more fluid and realistic.
How can I add a background to my cupcake illustration?
Adding a background to your cupcake illustration can be done by creating a new layer in Photoshop and filling it with a color or pattern of your choice. You can also use the “Gradient” tool to create a gradient background, or the “Pattern” tool to create a patterned background.
How can I create a more dynamic composition for my cupcake illustration?
To create a more dynamic composition, you can use Photoshop’s “Transform” tools. These tools allow you to scale, rotate, and skew your cupcake, making it more dynamic and interesting. You can also use the “Perspective” tool to change the perspective of your cupcake, making it look more three-dimensional.
How can I add more details to my cupcake illustration?
Adding more details to your cupcake illustration can be done by using Photoshop’s “Brush” tools. You can use the “Pencil” brush to draw fine details, such as crumbs or sprinkles. You can also use the “Texture” brush to add texture to your cupcake, making it look more realistic.
How can I create a more professional-looking cupcake illustration?
To create a more professional-looking cupcake illustration, you can use Photoshop’s “Adjustment Layers” feature. This feature allows you to adjust the colors, brightness, contrast, and other aspects of your illustration without permanently altering the original image. This way, you can experiment with different adjustments until you achieve the desired effect.
How can I make my cupcake illustration look more appetizing?
Making your cupcake illustration look more appetizing can be achieved by using warm, inviting colors. You can use the “Color Balance” adjustment to tweak the colors in your illustration, making them warmer and more appetizing. You can also use the “Hue/Saturation” adjustment to increase the saturation of your colors, making them more vibrant and appealing.
How can I save my cupcake illustration for web use?
Saving your cupcake illustration for web use can be done by using Photoshop’s “Save for Web” feature. This feature allows you to optimize your image for web use, reducing its file size without compromising its quality. You can choose from various file formats, such as JPEG, PNG, or GIF, depending on your needs.
 Anum Khan
Anum is Web and Graphic designer. Addicted to Photoshop and crazy for pixel perfection. She is also an active blogger, sharing her passions, skills and creative details on her blog Websoulz. She loves to connect with the community, sharing the latest design gossips and rolling her eyes on boring trends.