If you use WordPress to manage your website, you likely started with a theme that needs to be modified. It’s easy enough to use the built-in tools in WordPress to modify CSS and sidebars, but arguably the most important identifier for your site is the header. So how do you find this, create your own, and get it in place? In this article we will discuss how to do all three of these tasks.
Bear in mind that not all WordPress themes work the same.
Find Your Theme’s Header
First thing’s first — you need to find where your WordPress theme has your header stored. There are lots of ways to find this quickly, but the easiest way is to right-click on the header in your web browser. From there it gets browser-specific, but here’s how to find the info you need quickly in Chrome, Firefox, and IE.
Chrome
Using Chrome, right-click the header image and click “Inspect element”.
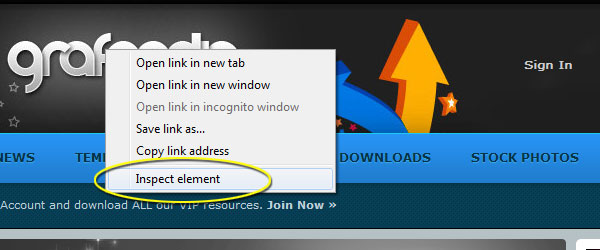
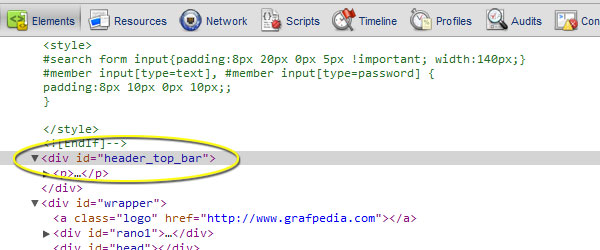
This gets you really close to where you need to be in the HTML source code. Select the location of the header image. In this case, it was in the “header_top_bar” DIV:
On the right side of the Inspect element tool, you will see where the CSS points to for the header image.

Hover your mouse over the link in the Matched CSS Rules window to get the file location:
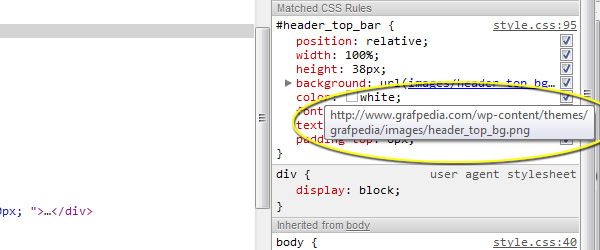
To make sure you have the right image file, click the link in the Matched CSS Rules box. If it’s not the right image, keep looking through the CSS rules until you find the image or images you’re looking to update. In our example, the image isn’t the right one, so we jumped up to the body tag and found the right one:

Firefox
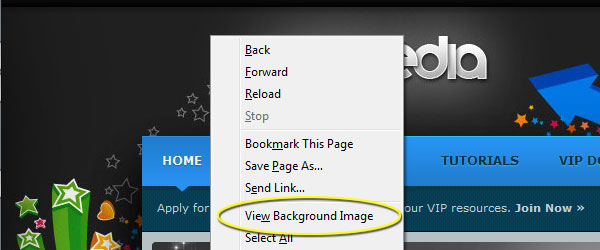
Firefox makes it pretty straightforward to find your header image. Just right click in the header section and select View Background Image:
In the address bar you now have your background image.

Note that this is different than the image we found with Chrome. That’s because this particular header image comes in parts, so you may have to click around to find what you’re looking for.
Internet Explorer
Good luck using IE. Without special plug-ins, you’re stuck sifting through the source HTML and CSS. But there are a few tricks to find the image(s) quickly. First, we need the HTML so we can find the CSS. Right-click and select View source:

In the new window, usually really close to the top of the document you will find the stylesheet(s) references. It’s usually smart to start with “Styles.css”:

Copy and paste this link into your browser. You may be prompted to open the CSS document in another program. Worst case, a text editor will get the job done. Most of the time the background for your header is found either in the Body or Header section of the CSS document. In this case, we can see immediately in the body section of the CSS document the location of the background image.
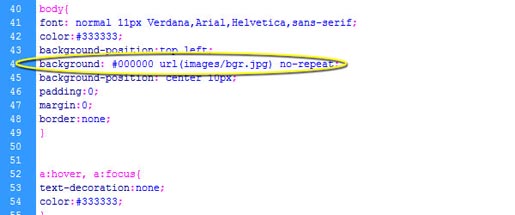
The location is relative to the CSS document, so you will have to paste your CSS url and use the reference from the CSS. In our example:
http://www.grafpedia.com/wp-content/themes/grafpedia/images/bgr.jpg
Image Size
Now that you have your image file, you need to find out the dimensions. This allows you to design your own and save it to the server so that it will fit exactly as the old background image did. On a windows machine, just right-click the saved image file, select Properties, and click on the Details tab:
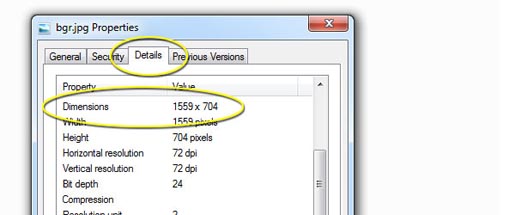
On a Mac, save the image and drag it into a Safari window. The dimensions will be along the top of the window.

Replacing the Default Header Image
Once you have your new design completed, you need to replace the current version. There are countless ways to replace the image, but the easiest is simply to rename the current background image and load your new one into the same folder.
Using your favorite FTP software, navigate to the location of your background image. In our example, it would look something like:
ftp://ftp.grafpedia.com/wp-content/themes/grafpedia/images/
From there you simply use your FTP software to rename the current background image to something like bgr.old.jpg and then name your new design EXACTLY the same as the original and upload to the folder where the original is stored.
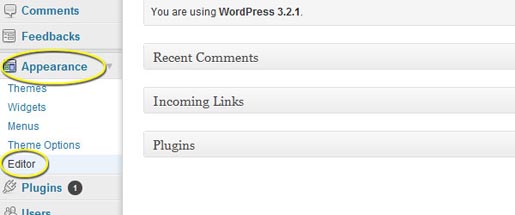
An alternative approach is to edit the CSS. You can use the built-in editor in WordPress to do this or use an HTML editor to edit. Using WordPress is just as fast as long as you know where to look. In the WordPress dashboard, open the Appearance tab and select Editor.
Towards the bottom right side of the page is the option to edit the stylesheets for your site. Click the sheet you need:
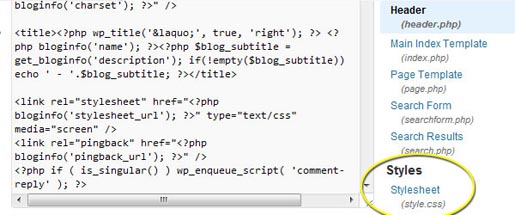
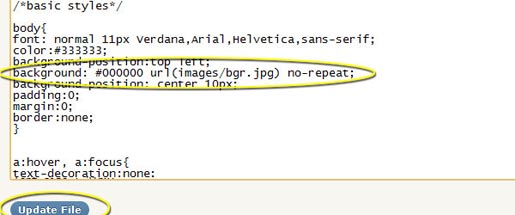
Edit the location of the background image and point to the location of the file you want and click the Update File button.
Run into any problems? Let us know and we can walk you through where to find your background file if you get stuck.
 Tara Hornor
Tara Hornor has a degree in English and has found her niche writing about marketing, advertising, branding, graphic design, and desktop publishing. She is a Senior Editor for Creative Content Experts, a company that specializes in guest blogging and building backlinks. In addition to her writing career, Tara also enjoys spending time with her husband and two children.