Thanks to Michaela Lehr for kindly helping to peer review this article.

In this tutorial, I’ll demonstrate how to create a simple 2D tapping game in Unity. The idea is similar to the famous games of Tapping Bugs: you tap on a moving insect, it disappears, and another one comes in.
I won’t give too much attention to the design, because I’d like to show how it works using some simple code. This game can be converted in an Android, iOS or WebGL game.
First, make sure you have the latest version of Unity. I’m using version 5.3.
Here is the Assets folder for this Tapit project, or you can view/download the entire project files here.
Creating Game Scene, Canvas and GUI Elements
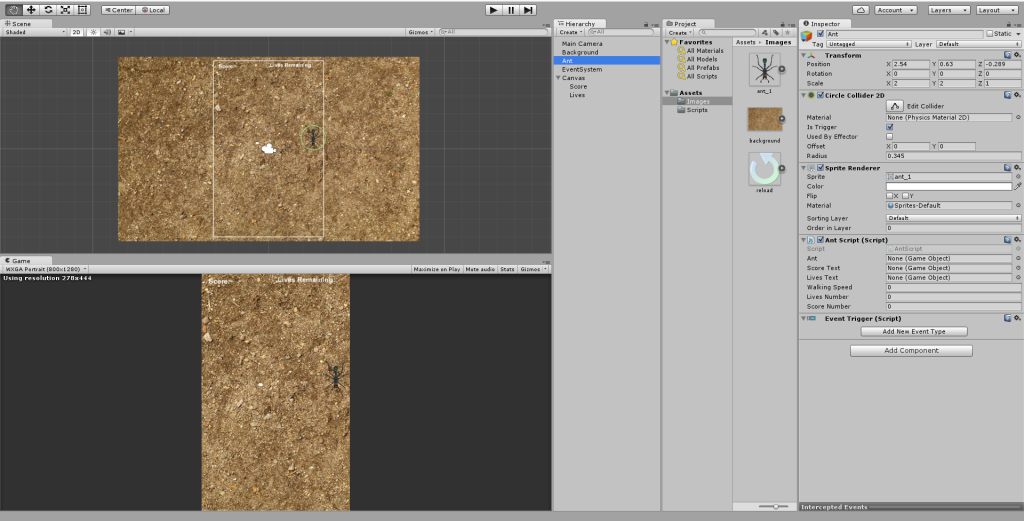
Create a new 2D project and name it as you wish. Once the new project is ready, inside the Assets folder create a new folder called Images. Open this folder, right-click, choose Import new Asset and import the background.jpg image. Drag this image inside the Scene window and stretch it depending on the screen size you’re using. I’m using a portrait screen similar to mobile screens, 800 x 1280px.
Now import the ant_1.png image the same way. I scaled width and height by a factor of 2 to make it more visible and easier to tap. Click on Ant in the Hierarchy view and add a Circle Collider 2D.
Right-click on an empty space inside the Hierarchy view and go UI > Canvas.
In the Canvas menu, select Render Mode to be Screen Space – Camera. Render Camera should be your default camera, Main Camera. Plane Distance should be any value between the distance of the background and Main Camera. Most of the times this is a number between 0 and 10. I set it to 3.
In the Canvas Scaler (Script) menu, set the UI Scale Mode to Scale With Screen Size and Screen Match Mode to Expand.
Now right-click on the Canvas in Hierarchy view and choose UI > Text. Let this new game object be called Score
. Set a readable font size and place it at any corner you want.
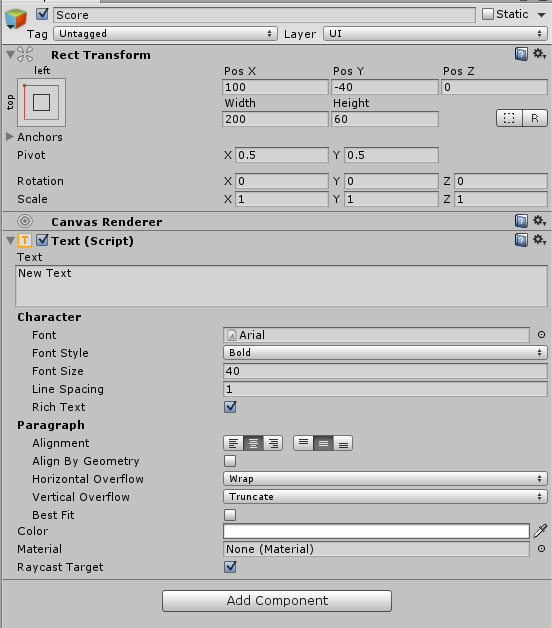
Create another Text game object and call it Lives
. This text will show us the number of our remaining lives. Make this object similar to the Score object and place in another corner.
All the GUI now is done.
Scripts
The latest versions of Unity support only two scripting languages: UnityScript (which is similar to JavaScript) and C#. This project will be written in UnityScript.
Inside the Assets folder, create a new one called Scripts. This will contain all the necessary functions to make game run. In the first part, we’ll create the variables, giving them a name and type.
Inside the Scripts folder, create a new JavaScript file and call it AntScript.js. It will start with these variables:
var ant : GameObject;
var scoreNumber : int;
var livesNumber : int;
var scoreText : GameObject;
var livesText : GameObject;
var walkingSpeed : double;
So the only player in our game will be called ant and it will be a GameObject. Indeed, it’s a 2D Sprite that will move and change behavior according to the code we’ll look at shortly.
In this case, we will use two integer variables called scoreNumber (for saving the player’s scores) and livesNumber (for storing the player’s remaining lives).
The scoreText and livesText GameObjects will display information about the scores and the remaining lives to play.
To move the player on the 2D Space, its coordinates have to change, depending on which axis it will move along. Since the 2D space is a little bit small, we’re going to use small numbers along the axis.
Its speed will be determined by a variable called walkingSpeed. This variable will be incremented by small numbers, like 0.01. So its type will be double.
Function Start()
Everyone who has some knowledge about UnityScript knows that it has two important functions: function Start() and function Update(). The first one is called only once during all the scene play, and the second is called on each game frame (if MonoBehaviour is enabled). Here’s what function Start() contains:
function Start () {
    ant = GameObject.Find("Ant");
    scoreText = GameObject.Find("Score");
    livesText = GameObject.Find("Lives");

    //Initialize the values of walking speed
    walkingSpeed = 0.0;
    livesNumber = 3;
    scoreNumber = 0;

    //Initialize the GUI components
    livesText.GetComponent(UI.Text).text = "Lives Remaining: " + livesNumber;
    scoreText.GetComponent(UI.Text).text = "Score: " + scoreNumber;

    //Place the ant in a random position on start of the game
    ant.transform.position.x = generateX();
    ant.transform.position.y = generateY();
}
In the first block of code, the variables are now initialized. Unity Scripting has a very good method for referencing the GameObjects: you just have to write GameObject.Find("[Name_of_gameobject]");.
The initial walkingSpeed will be 0.0, livesNumber will be 3, and scoreNumber will normally be 0.
The second block sets text to the UI elements we initialized before.
In the third block we are accessing the x and y coordinates of the ant object. generateX() and generateY() are two functions that return random numbers.
generateX() and generateY() Functions
Their code is this:
//Generates random x
function generateX(){
    var x = Random.Range(-2.54,2.54);
    return x;
}

//Generates random y
function generateY(){
    var y = Random.Range(-4.0,3.8);
    return y;
}
These two functions have similar code, except what’s contained in the Range(). In each, we’re putting the left and right limit.
Depending on your screen size, choose left and right limit as the extreme horizontal positions of the ant in order to be inside of the screen.
The value it returns depends on the parameter types you put inside the brackets. In this case, we’re putting doubles so it returns a double value. At the same time, these values represent the visible 2D playground of our game.
Function Update()
This function does the most important job during the game run.
function Update () {
    if(ant.transform.position.y < -4.35 && livesNumber > 0){
        livesNumber -= 1;
        livesText.GetComponent(UI.Text).text = "Lives Remaining: " + livesNumber;
        generateCoordinates();
    }
    else if(ant.transform.position.y < -4.35 && livesNumber == 0){
        Destroy(GameObject.Find("Ant"));
        gameOver();
    }
    else{
        ant.transform.position.y -= walkingSpeed;
    }
}

function Update () {
  if(ant.transform.position.y < -4.35 && livesNumber > 0) {
        livesNumber -= 1;
        livesText.GetComponent(UI.Text).text = "Lives Remaining: " + livesNumber;
        generateCoordinates();

  } else if(ant.transform.position.y < -4.35 && livesNumber == 0) {
        Destroy(GameObject.Find("Ant"));
        gameOver();
  } else {
        ant.transform.position.y -= walkingSpeed;
  }
}
From this function, we can get information about our game objects on each game frame. Since the ant will be moving most of the time, we should set the player miss condition. In this case, the player misses when the ant goes to the bottom of the screen, or when its y position is smaller than -4.35. If the player misses and the number of lives is more than 0, it has other chances to play, so the number of lives decreases by 1 and the screen text shows the decreased number of lives. Then, generateCoordinaes() is called.
If the ant goes to the bottom while the number of lives is 0, this object is destroyed and the gameOver() function is called. This function loads the GameOver scene.
And if the ant isn’t at the bottom of the screen, it goes down along the Y axis with a speed of walkingSpeed/frame.
Function OnMouseDown()
This function is an internal function of the engine. It’s called each time its parent game object is clicked with mouse button or tapped on a touch device:
function OnMouseDown(){
    //Place the ant at another point
    generateCoordinates();

    //Increase the walking speed by 0.01
    walkingSpeed += 0.01;
}
Here it means that the player has tapped the ant and he/she just won a +1 score. The score text gets updated and two new coordinates are randomly generated. The ant shows up at the new coordinates and it goes down with an increased walkingSpeed.
The whole AntScript.js code can be seen on GitHub.
Drag this script and drop on the Ant game object shown in Hierarchy view.
Inside the Scripts folder create a new script called Functions.js. The code is:
function loadGame(){
    Application.LoadLevel("Game");
}

function loadMenu(){
    Application.LoadLevel("Menu");
}

function quit(){
    Application.Quit();
}
Now the game scene is almost done. Save this scene by clicking File* > Save Scene and call it Game
.
Game Over Scene
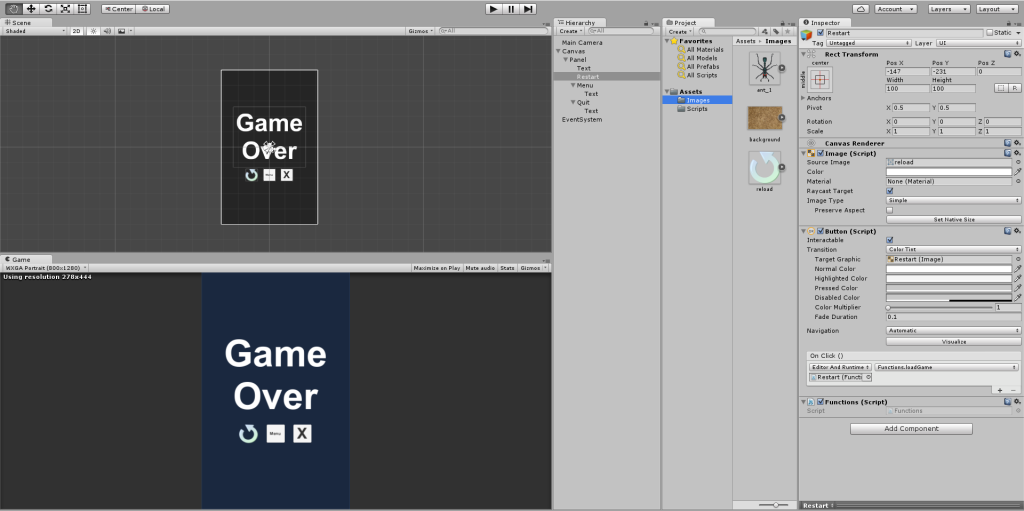
Go to File > New Scene. Create a new Canvas the same way we did in the last scene. Create a new Panel inside and give it the color you want.
Inside the Panel, place a new Text element that will show that game is over.
Create a new Button and call it Restart
. Place it below the Game Over
text and choose its Source Image to be the reload.png from the Assets folder.
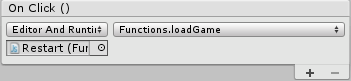
Click Add Component and choose Scripts > Functions. Make sure to call Functions.loadGame on clicking this button.
You can also add another button to load the Menu scene.
Under this button, create a new Button and call it Quit
. Call Functions.quit when this is clicked.
We are done with this scene, so save it and set its name GameOver
.
Menu Scene
Lastly, we need to create a new Scene and call it Menu
. This will be the first scene the user will see once the app is loaded.
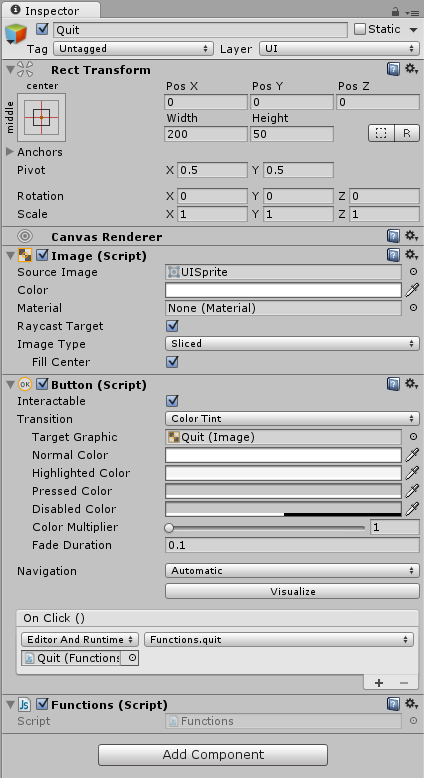
Add a new Canvas the same way as above and add two Buttons inside it. The first should be called New Game
and the second Quit
.
Call the functions from the Functions.js script on each button as below.
The New Game button:
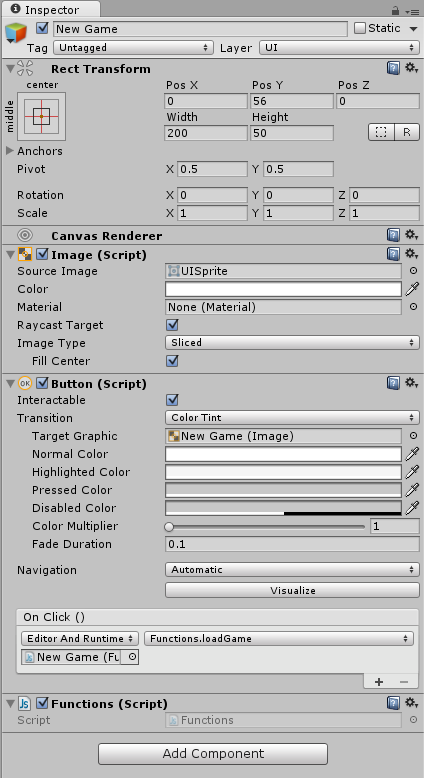
The Quit button:
The Menu:
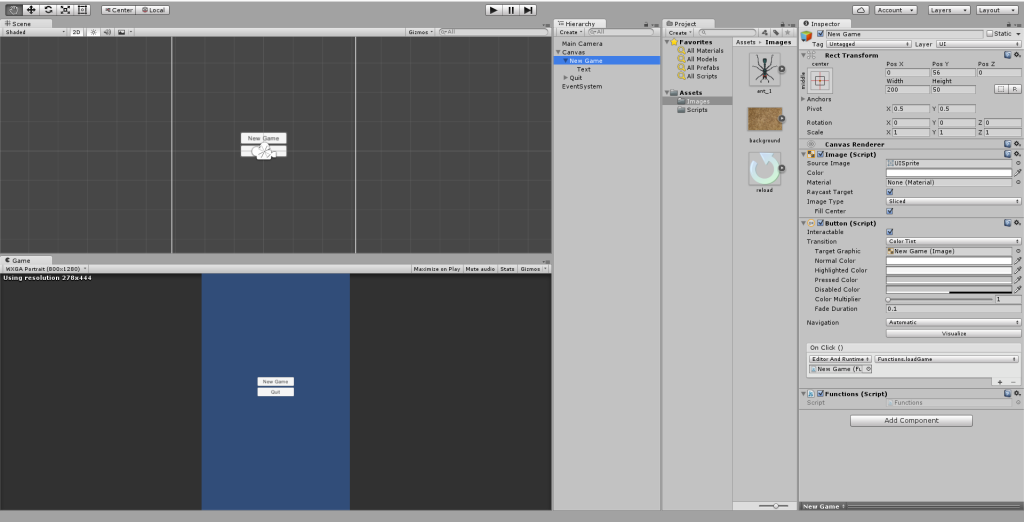
Conclusion
This tutorial has demonstrated elements that can be used for a range of other games. As I said at the beginning, the focus hasn’t been on design, but you can easily replace the assets with others of your own design. You can also get as creative as you like with the menu scenes.
Now the game is done. Have a try at building it yourself, and don’t hesitate to comment below if you have any difficulties or questions.
And once again, you can download the full codebase on GitHub.
Frequently Asked Questions (FAQs) about Building a 2D Tapping Game in Unity
What are the basic requirements for building a 2D tapping game in Unity?
To build a 2D tapping game in Unity, you need to have Unity installed on your computer. Unity is a powerful game development engine that supports both 2D and 3D game development. You also need to have a basic understanding of C# programming language as Unity uses C# for scripting. Additionally, you should be familiar with the Unity interface and its various components like the Scene view, Game view, Hierarchy window, Inspector window, and Project window.
How can I add a scoring system to my 2D tapping game in Unity?
Adding a scoring system to your 2D tapping game in Unity involves creating a UI Text element to display the score and a script to update the score. The score is usually updated whenever the player taps on the screen. You can use the OnClick() function in your script to increment the score whenever the player taps on the screen.
How can I add sound effects to my 2D tapping game in Unity?
Sound effects can be added to your 2D tapping game in Unity by using the AudioSource and AudioClip components. You can attach an AudioSource component to your game object and then assign an AudioClip to the AudioSource. You can then use the Play() function in your script to play the sound effect whenever the player taps on the screen.
How can I add animations to my 2D tapping game in Unity?
Animations can be added to your 2D tapping game in Unity by using the Animation window and the Animator component. You can create animation clips in the Animation window and then use the Animator component to control the playback of these animation clips. You can also use the Animator class in your script to control the animations programmatically.
How can I add power-ups to my 2D tapping game in Unity?
Power-ups can be added to your 2D tapping game in Unity by creating special game objects that give the player certain advantages when they are tapped. These power-ups can be implemented using scripts that modify the game’s variables when the power-up is activated. For example, a score multiplier power-up could double the player’s score for a short period of time.
How can I add a pause feature to my 2D tapping game in Unity?
A pause feature can be added to your 2D tapping game in Unity by using the Time.timeScale property. You can set Time.timeScale to 0 to pause the game and set it back to 1 to resume the game. You can also create a pause menu using UI elements that is displayed when the game is paused.
How can I add a leaderboard to my 2D tapping game in Unity?
A leaderboard can be added to your 2D tapping game in Unity by using a backend service like Firebase or PlayFab. These services provide APIs that you can use to store and retrieve player scores. You can then display these scores in a UI element in your game.
How can I optimize my 2D tapping game in Unity for mobile devices?
Optimizing your 2D tapping game in Unity for mobile devices involves reducing the game’s resource usage to ensure it runs smoothly on mobile devices. This can be achieved by using efficient scripts, optimizing graphics and animations, and using Unity’s built-in optimization tools like the Profiler.
How can I monetize my 2D tapping game in Unity?
Monetizing your 2D tapping game in Unity can be done through various methods like in-app purchases, ads, and premium versions of the game. Unity provides support for these monetization methods through its Unity IAP and Unity Ads services.
How can I publish my 2D tapping game in Unity to the App Store and Google Play Store?
Publishing your 2D tapping game in Unity to the App Store and Google Play Store involves building your game for the respective platforms and then submitting it to the stores. Unity provides support for building your game for different platforms through its Build Settings. After building your game, you can submit it to the App Store and Google Play Store through their respective developer consoles.
 Theodhor Pandeli
Theodhor has just finished his Computer Engineering bachelor. He loves Android development and that is the field he is the most focused. He also has good knowledge in web development and Unity 3D.