While we can use vector graphics like lines and shapes in Pebble watchfaces, sometimes images are needed to provide a greater level of detail. Images can provide a nice backdrop that doesn’t take hours of precise coding and are pretty easy to update. In this article, we’ll look at a few simple ways to prepare images and include them into Pebble apps that work across all platforms – the classic Pebble, the Pebble Time and Pebble Time Round watches. In particular, we’ll make a background image that spans the width and height of the watchface.
What You’ll Need
In order to step through this guide, you’ll need the following:
- CloudPebble – You’ll need to log in here and test your changes on Pebble Time Round if you are building for all three platforms.
- A general knowledge in Pebble app development – If you are new to Pebble development, have a read of my beginner tutorial on Pebble Watch Development with JavaScript to get started.
- An image of at least 180×180 – you’ll need to crop it nicely to 180×180 and 144×168.
- Photoshop – This will be needed to set up the images in the right palette for the Pebble Time Round. However, if you aren’t too concerned about the Pebble Time Round, you can get away with using a few other techniques to prepare your images that I’ll cover here. (You can also use GIMP or ImageMagick, however I won’t cover those in this article.)
The Code
All the code for this is available on GitHub. This is code which I’ve cleaned up from a watchface I’d built for geek musician, Meri Amber (available to install on your watch here). I’ve removed all the time keeping and other components to focus in on how the image switching works.
Preparing Our Images
In this age of multiple Pebble device types, there are a variety of platforms we are looking to support. When it comes to our images, we care about three potential device types:
- Classic Pebble and Pebble Steel watches with rectangular black and white displays – this image size should be
144 x 168. - Pebble Time watches with rectangular color displays – this image size should be
144 x 168. - Pebble Time Round watches with circular color displays – this image size should be
180 x 180.
Preparing Images For Aplite
Aplite images are black and white only, so in order to display them we need to convert images in a way which still keeps them looking recognisable from their original, despite a serious lack of color.
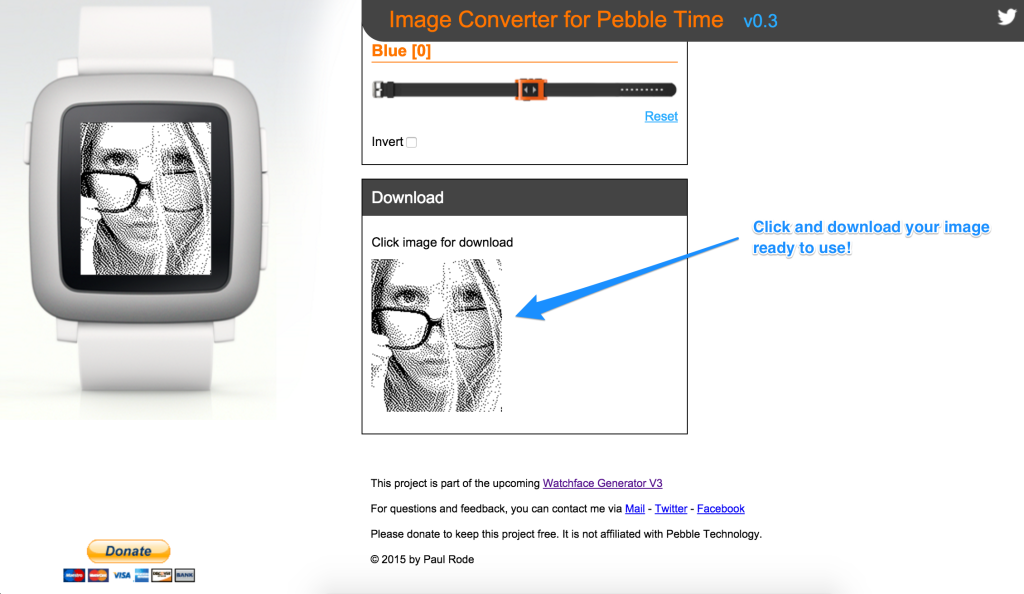
Online Image Converter
One method which is quite quick and simple is to use this online image converter. It works for both Aplite and Basalt images.
To start with, upload your file. Then for Aplite, choose the color mode of “black and white” to remove all color from the image. This may be all you need to get a good result, however some images work better with different dithering options. Try changing the dithering option to see what works best for your image – this may be different for each style of image you use!
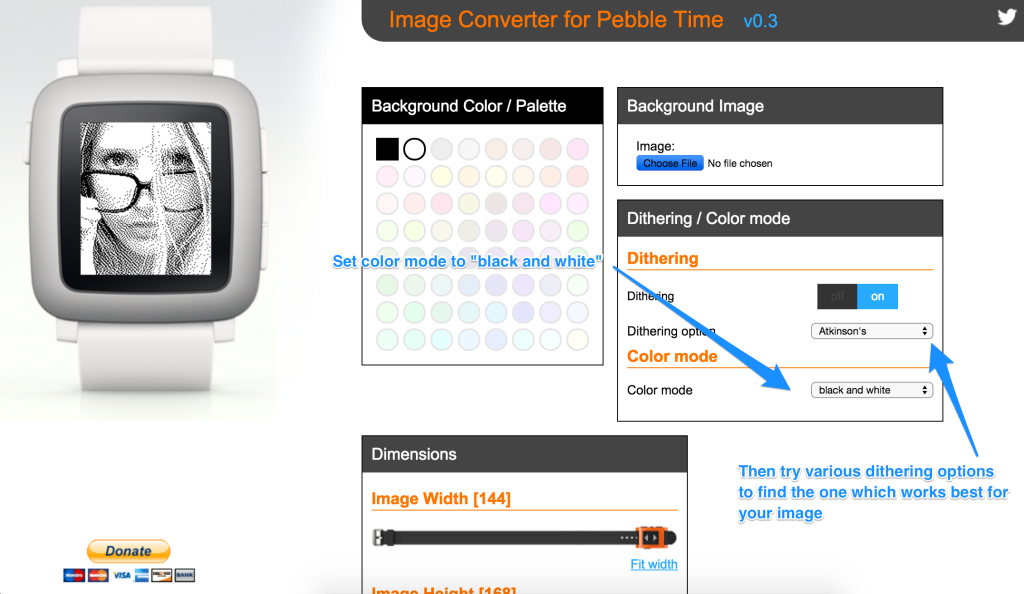
You can scroll down and change brightness, contrast and more. Once you are happy with how your image looks, click the image at the bottom of the page to download it to your computer ready to use.
HyperDither
Another option for Mac OSX users is a free application called HyperDither. It can turn color images into monochrome ones quite effectively. Upon opening it up, it will await an image from you:
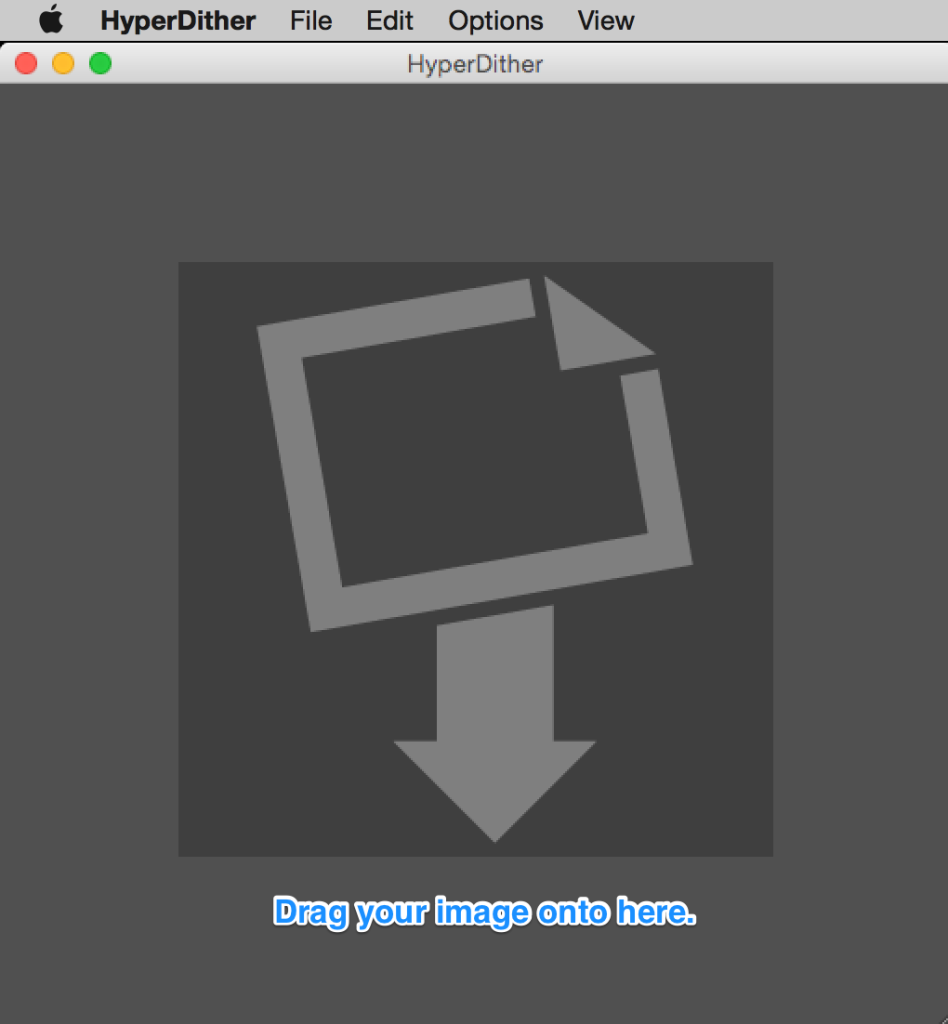
Drag an image into the app:
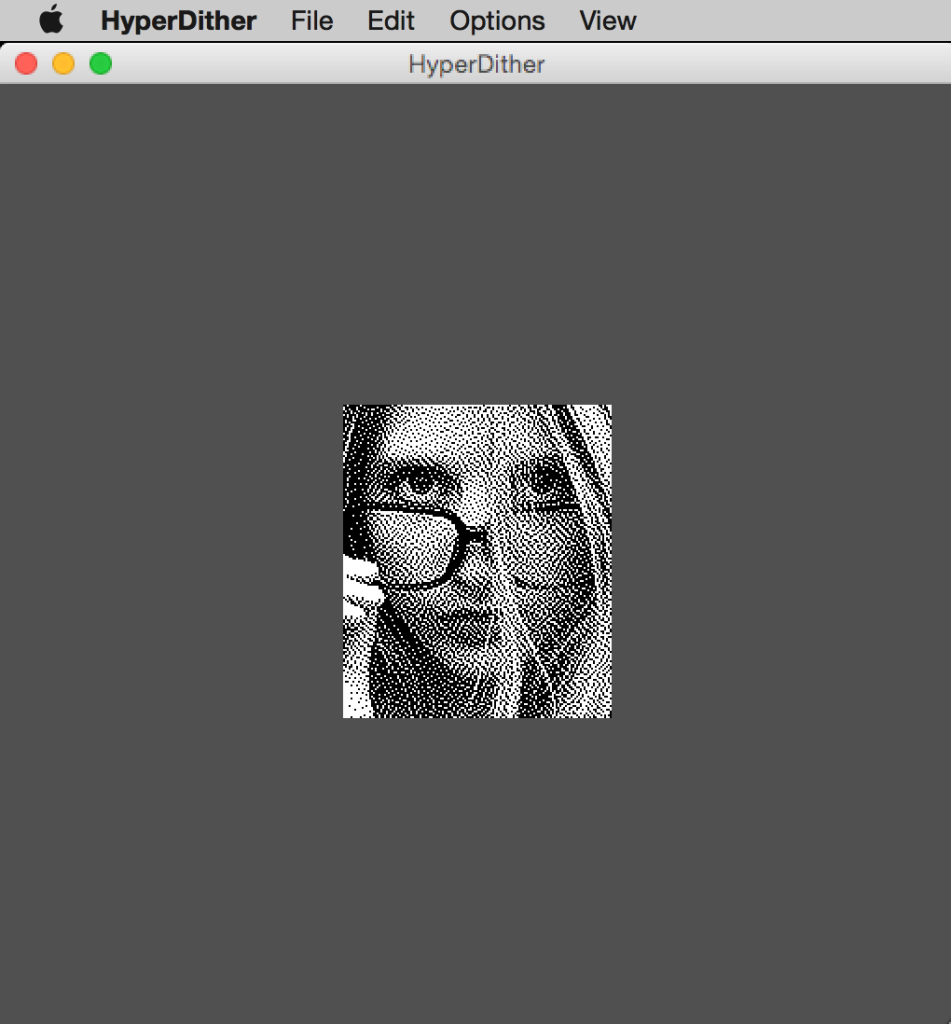
Then you can adjust settings, such as “contrast” that looks like so:
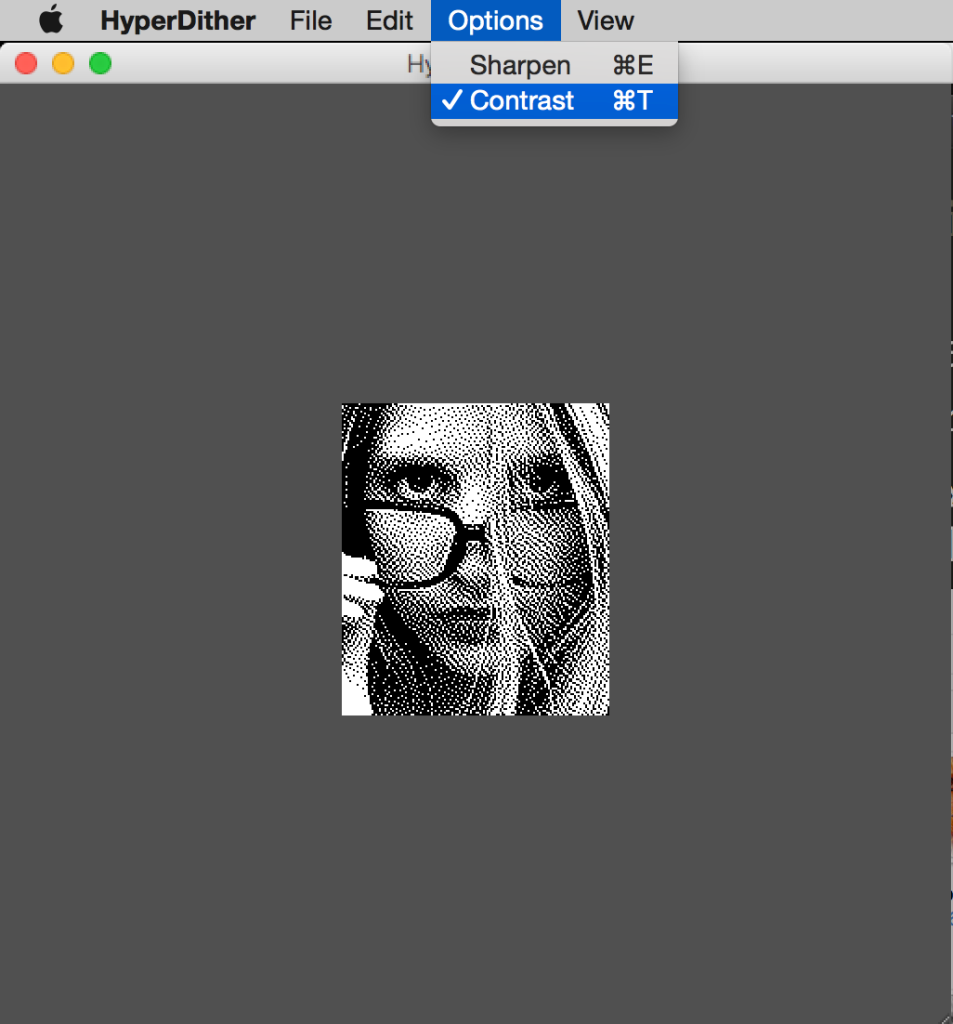
Or sharpening it too:

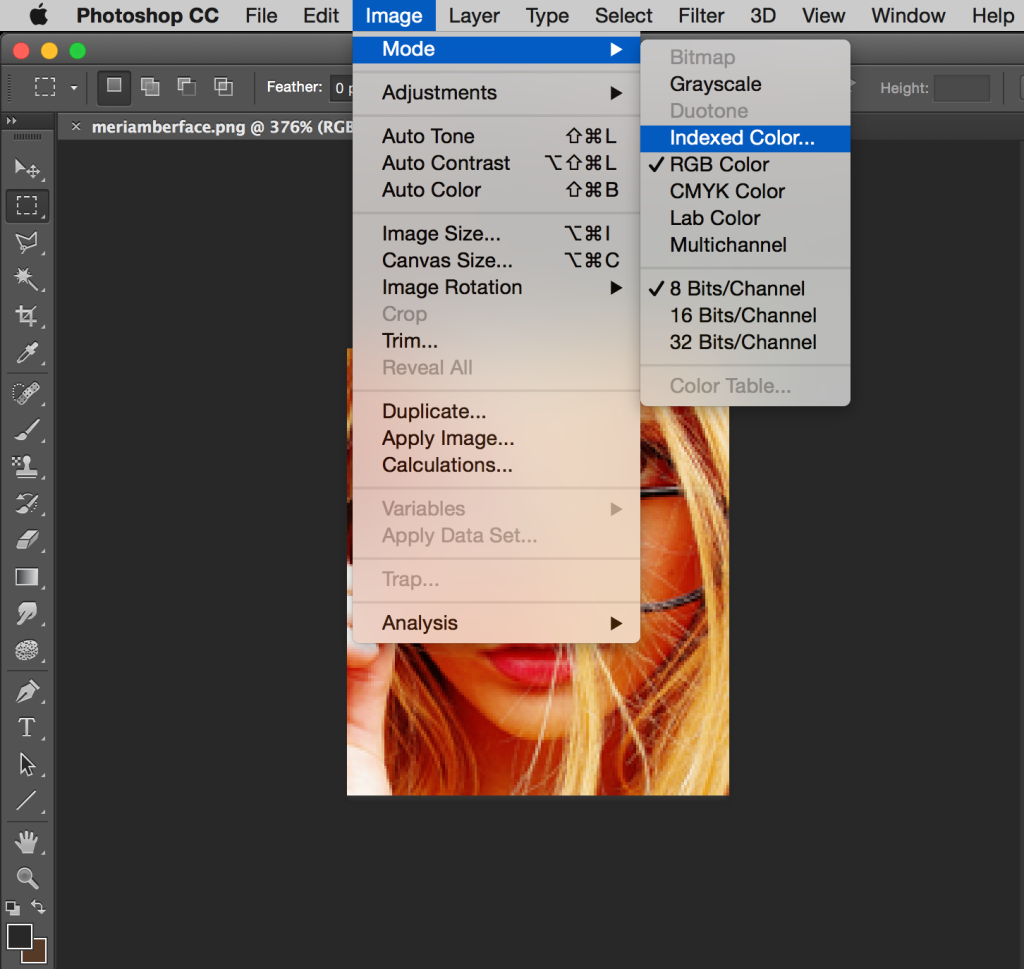
Photoshop
If you are a Photoshop owner, you can also do this in Photoshop. It’s likely there are plenty of techniques out there for this, but the basics of it are:
Go to Image > Mode > Indexed Color….
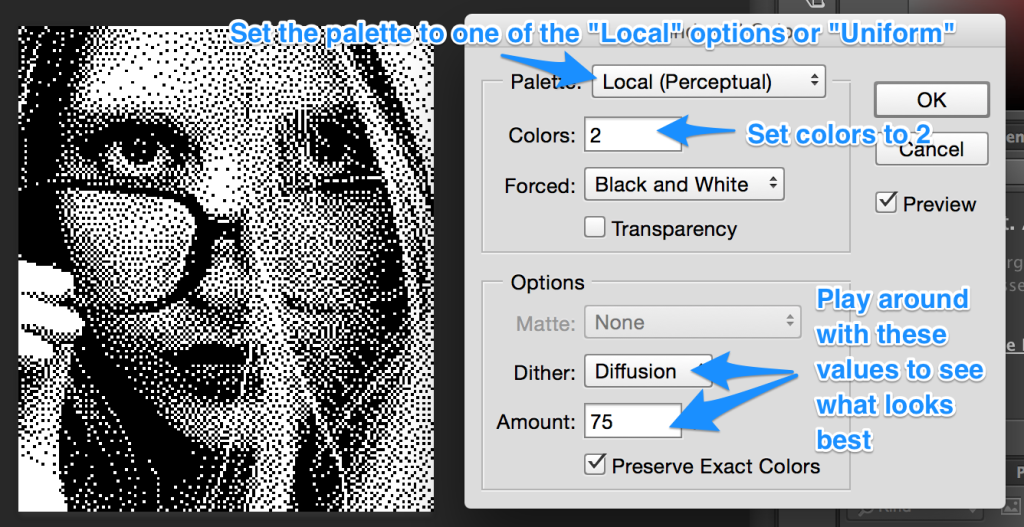
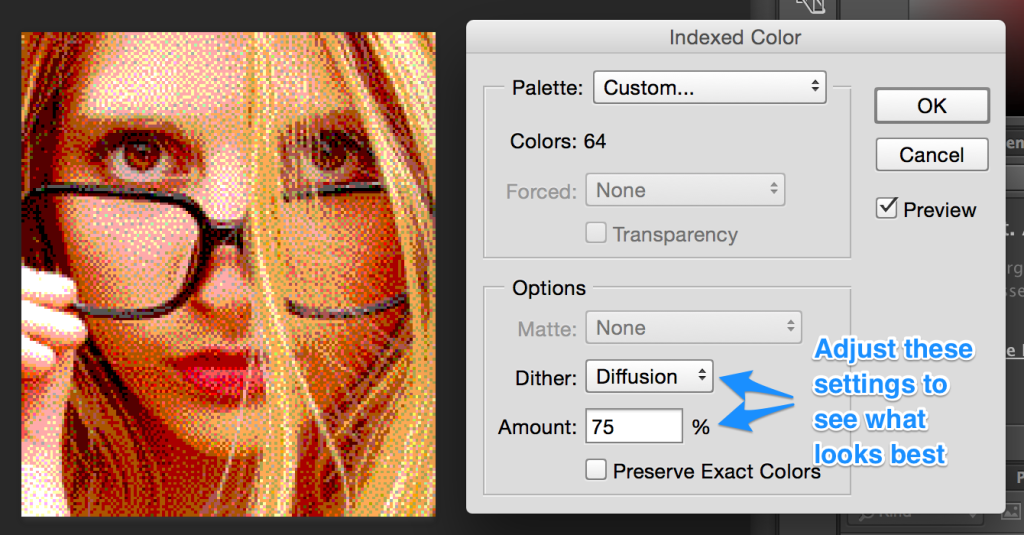
Choose either one of the “Local” options or the “Uniform” option for your palette, set the number of colors to 2 and play around with the diffusion options to see what works the best for your image:
Preparing Images For Basalt and Chalk
Basalt and Chalk allow for 64 specific colors. HyperDither won’t work as it only does black and white dithering. So we are left with the other two options.
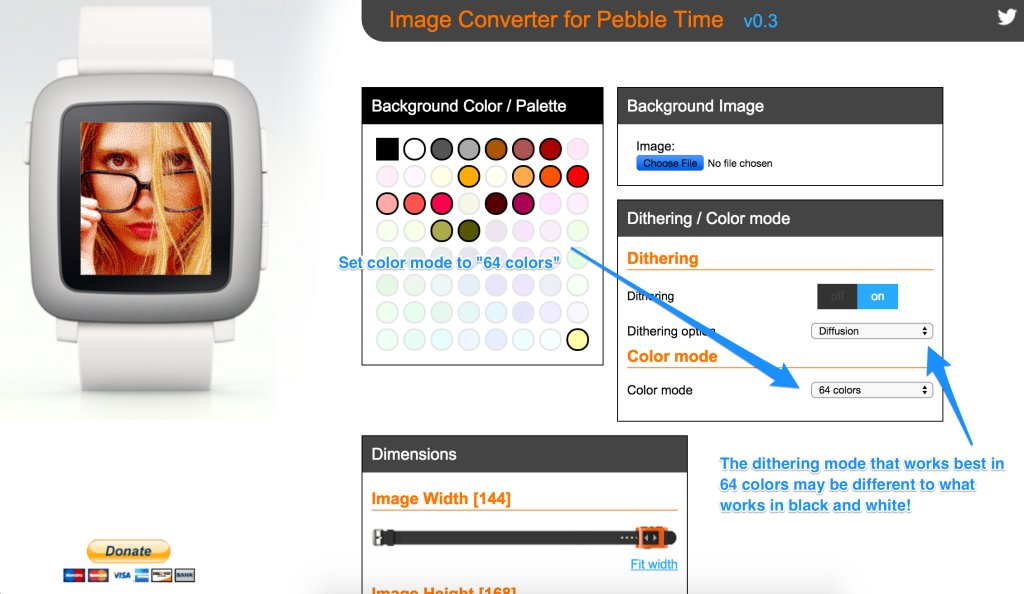
Online Image Converter
This one only works for Basalt at the moment as it doesn’t appear to be able to export square images yet.
Head back over to online image converter and put in your image. This time, choose “64 colors” for your color mode and then play around with the dithering options and so on again.
Photoshop
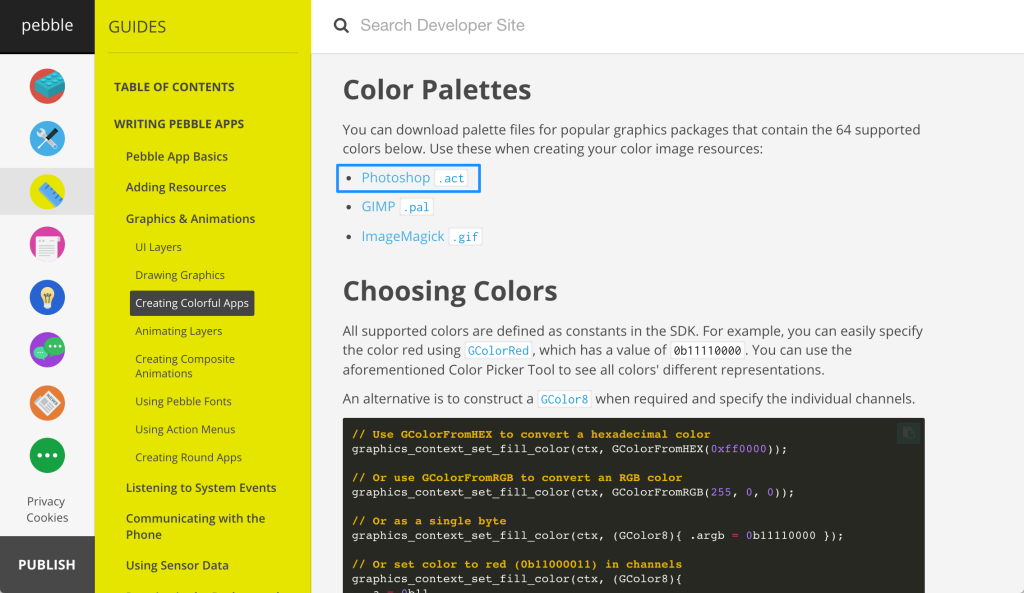
Photoshop will need to know the specific 64 colors that you’d like to use in your image. To download these, go to the Color Palettes section of Pebble’s “Creating Colorful Apps” page and download the Photoshop .act file:
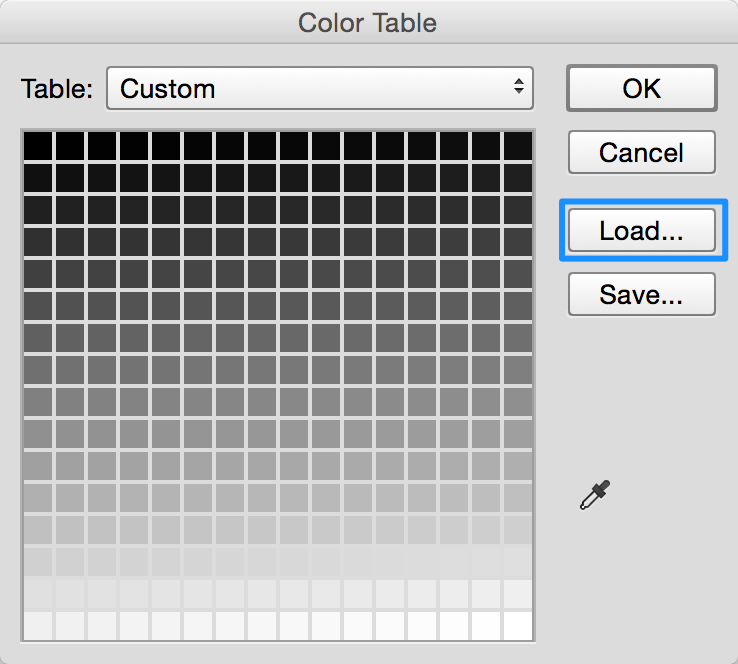
Then, go back to Image > Mode > Indexed Color… but choose “Custom” from the palette. It will appear asking for a “color table”, click “Load” on this screen and find your .act file:
The 64 color palette should look like so:
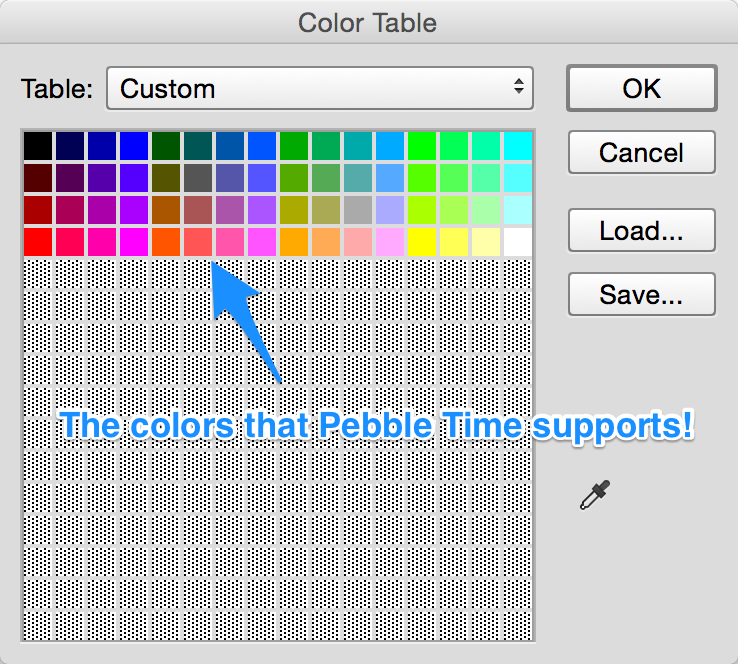
Click “OK” and then you’ll be back to the screen where you can adjust settings:
You should now have the abiity to set all three types of images for our platforms. It is time to work out how to put these into our app.
Detecting Platforms
Every version of our background image will be positioned dynamically in the center of the watchface and will fit the size of the watchface, so we don’t need to do any platform detection for those purposes. We won’t even need to mention in the code that the image will change on different devices, that will be taken care of in our image resource. Overall, we keep as much of the image switching functionality out of our code – this ensures our app is maintainable and easily compatible with future Pebble platforms too.
You may be tempted, as I was initially, to switch images via #if defined(PBL_BW) and #elif defined(PBL_COLOR) style statements. Don’t do that! It is much better to use platform specific resources which you can set up when uploading your images in CloudPebble.
Uploading Your Images In CloudPebble
If you are new to using images in your Pebble apps, the “Resources” section of CloudPebble may have been a bit of a mystery until now. That is where we’ll go to add our image. To start, click the “Add New” button next to “Resources”:

In the screen that appears, enter a name for your image within the “Identifier” field. In our code, it is named “MERI” as our sample image is of Meri Amber. If you’ve got something else, name it accordingly and remember that name as you’ll use it to refer to the image in your code. Then, skip the “File Name” field as this will be filled in automatically once you’ve uploaded your image. Upload your file in the “Upload New File” section:
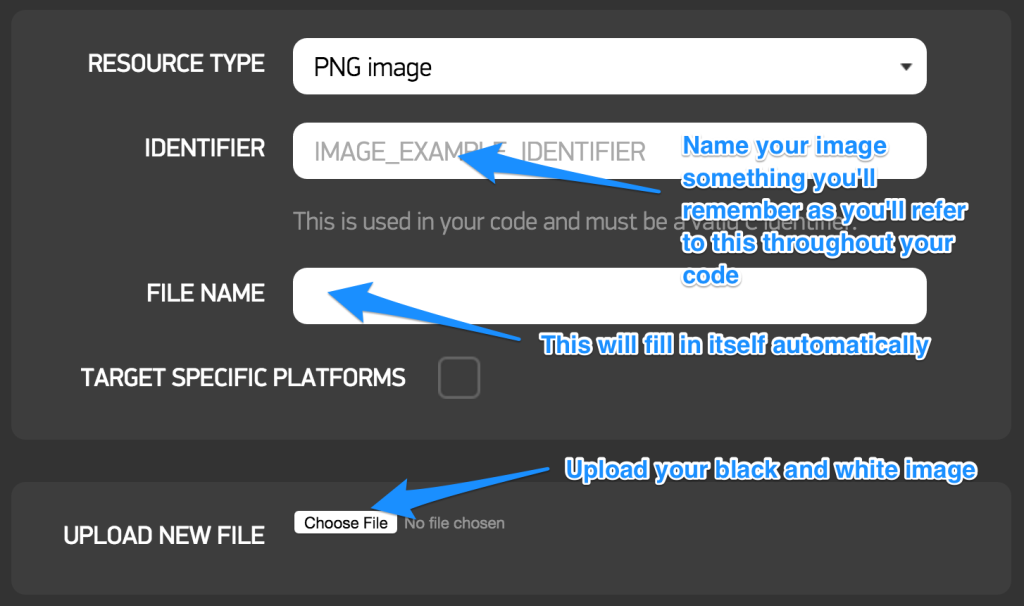
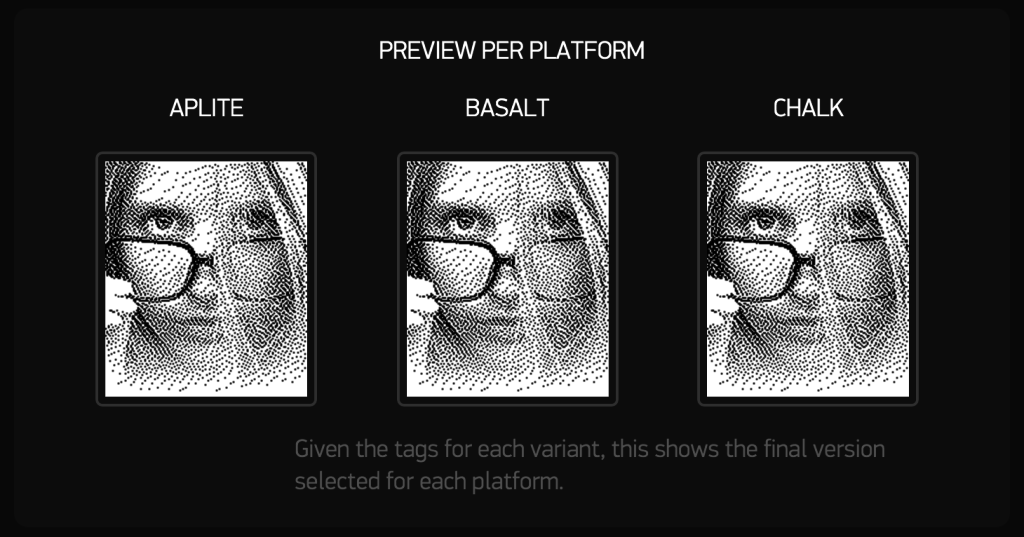
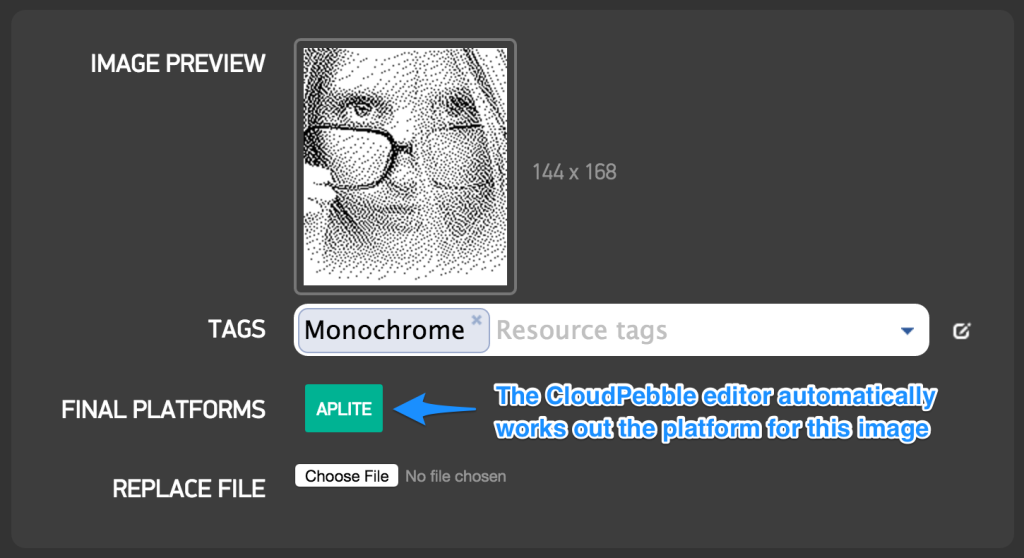
If you click “Save”, the image resource will be uploaded and you’ll see an updated interface which previews your image across each available platform. As you’ll see, we are currently displaying a black and white image on each platform. We’ll want to add in our other platform specific images next.
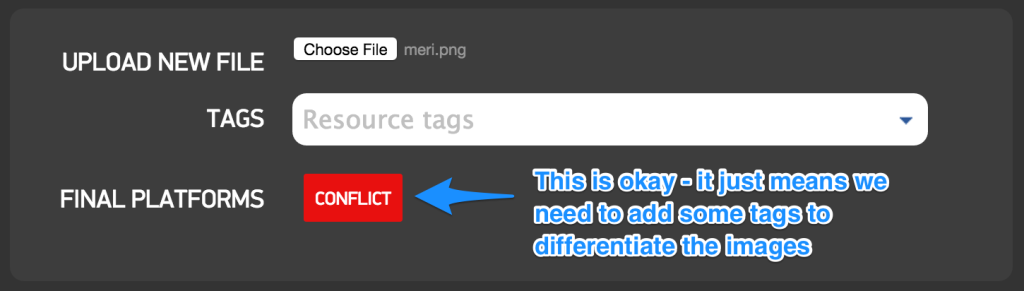
If you scroll to the bottom of that resource screen, you’ll find an “Upload New File” section. Upload your rectangular color image into that one. When it loads, you’ll see the interface go red with conflicts. Don’t freak out. This just means we need to add some tags so it knows each image is for a different platform.
Go back to our black and white image and add the tag “Monochrome” to it. This tells our Pebble app that this image is for black and white displays (e.g. our Classic Pebble and Pebble Steel).
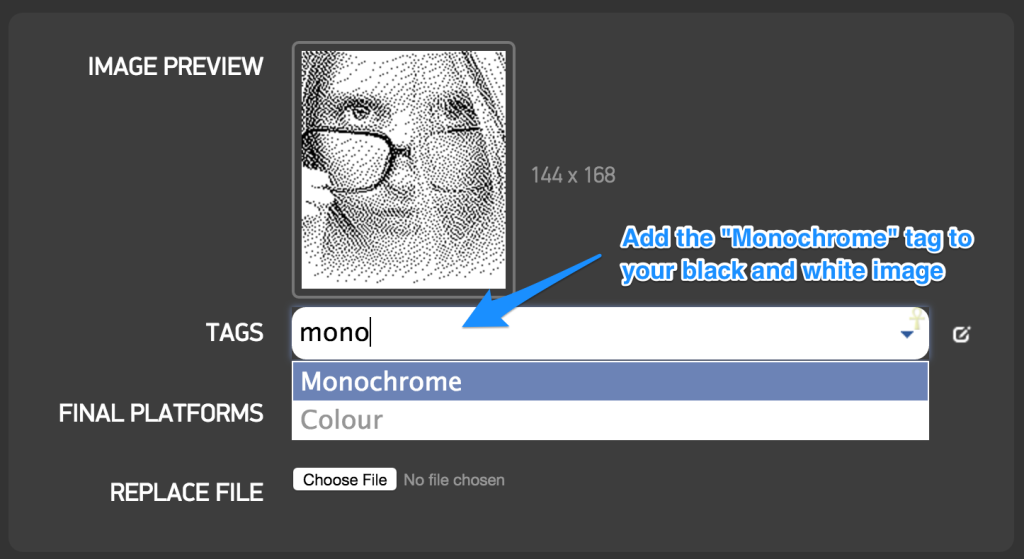
Once it has this tag, you should see the “Aplite” platform is automatically detected and the menacing red conflict messages have disappeared.
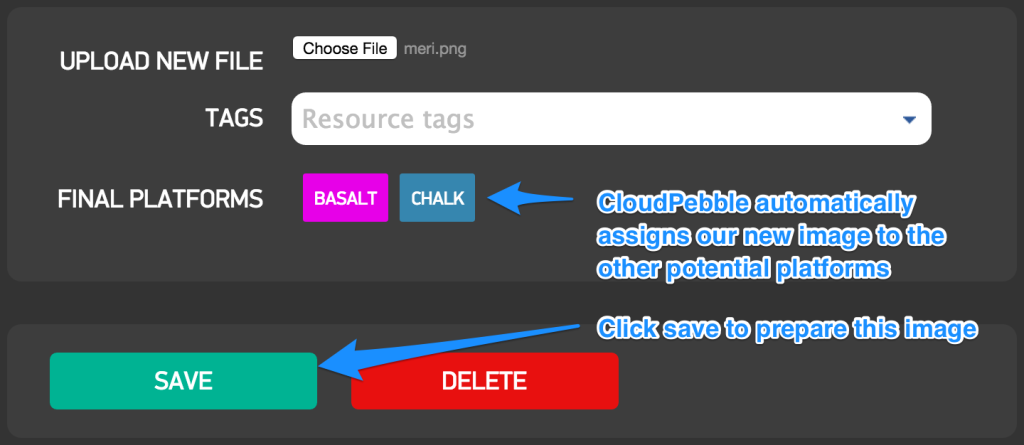
The image below that will also see its own platforms have been automatically assigned. CloudPebble has assigned the two remaining platforms to the color image we are uploading. Click “Save” to initially save our new color image. We don’t want to give this image a tag yet as CloudPebble will want each platform to have a defined image option each time you save. We will tag this image once we’ve got our final image in there as well – so all platforms are covered each time we save the resource.
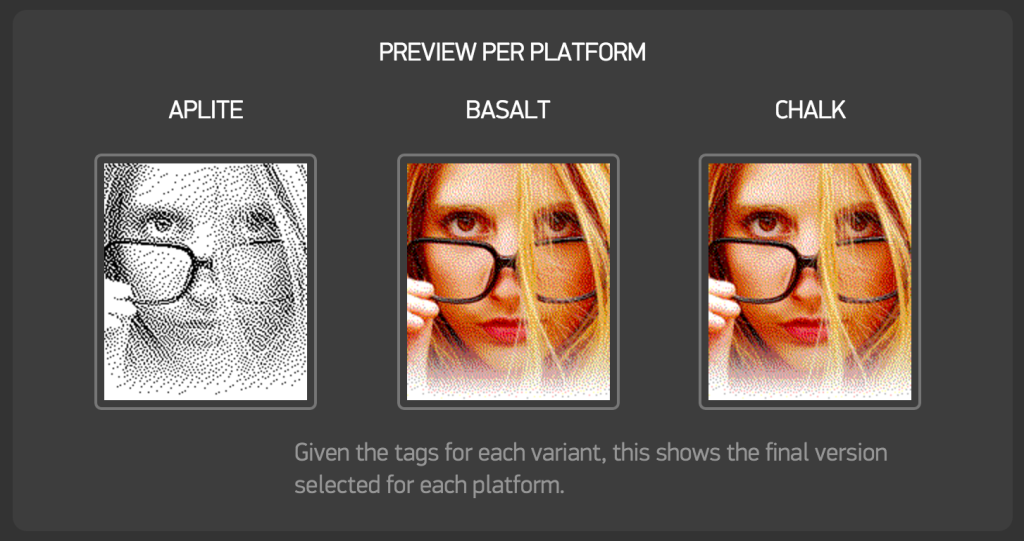
When saved, you should now see a black and white image for Aplite and our color image for Basalt and Chalk.
Scroll back down and click the “Upload new file” option one last time. Choose your square color image. It will appear with a conflict once again as we haven’t told it a platform to focus on. Type in “Round” as our tag for this image and it will automatically set the image’s platform to Chalk – the Pebble Time Round platform.
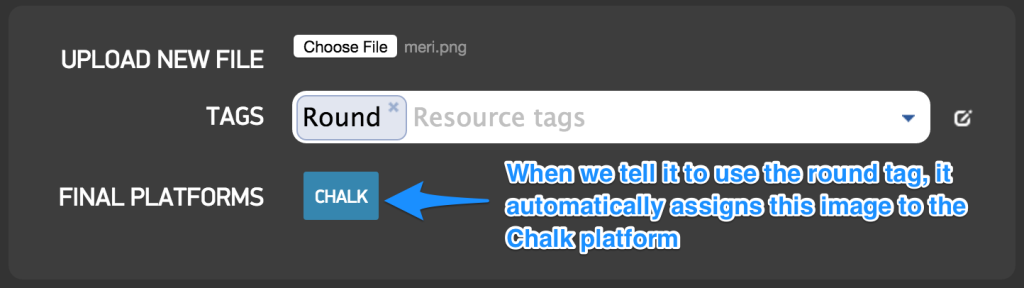
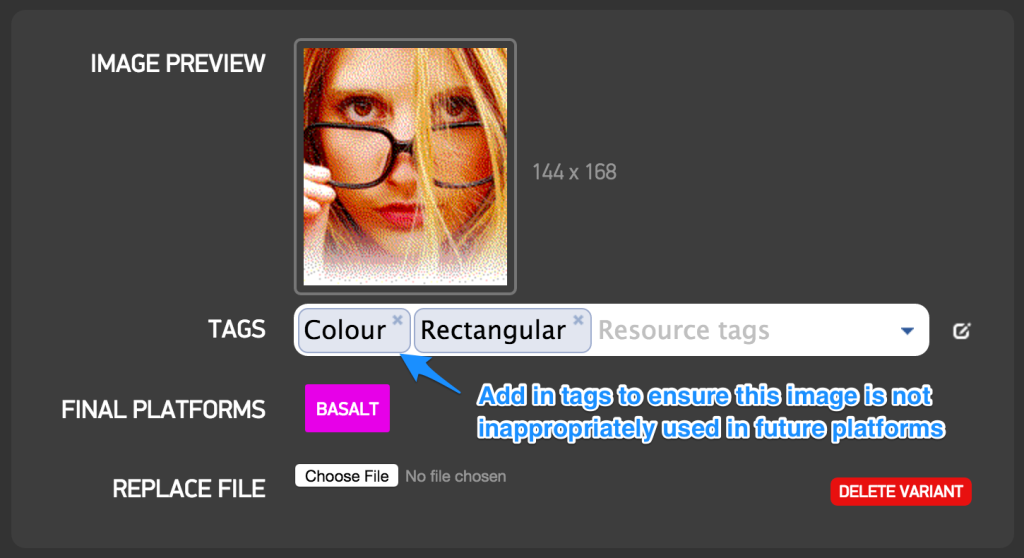
Our rectangular color image is automatically given the Basalt platform as it is the only remaining platform left.
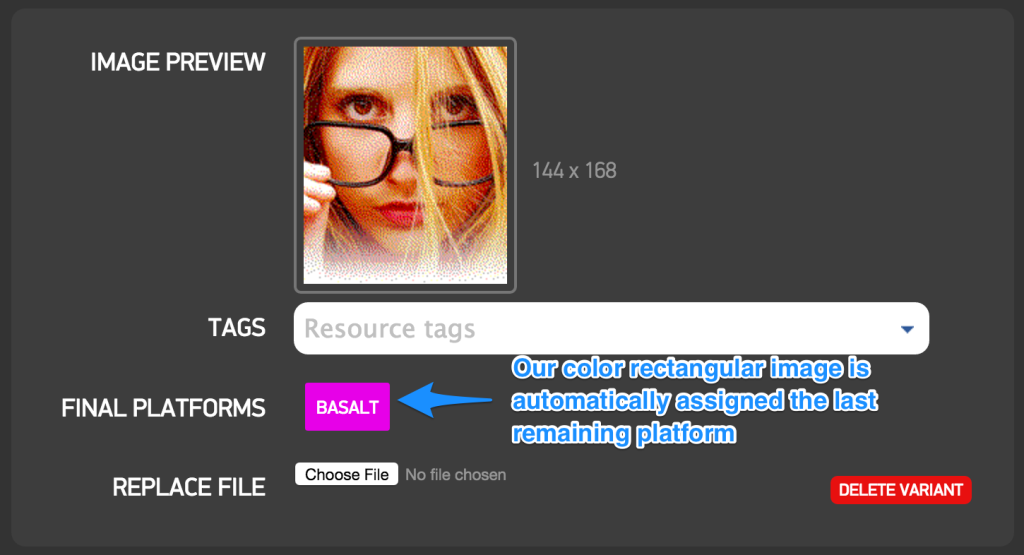
Add in tags of “color” and “rectangular” to this image. This ensures the image is used correctly in future platforms too. They’ll know that this image is for those purposes and ensures we’ve got control over when that image is being used.
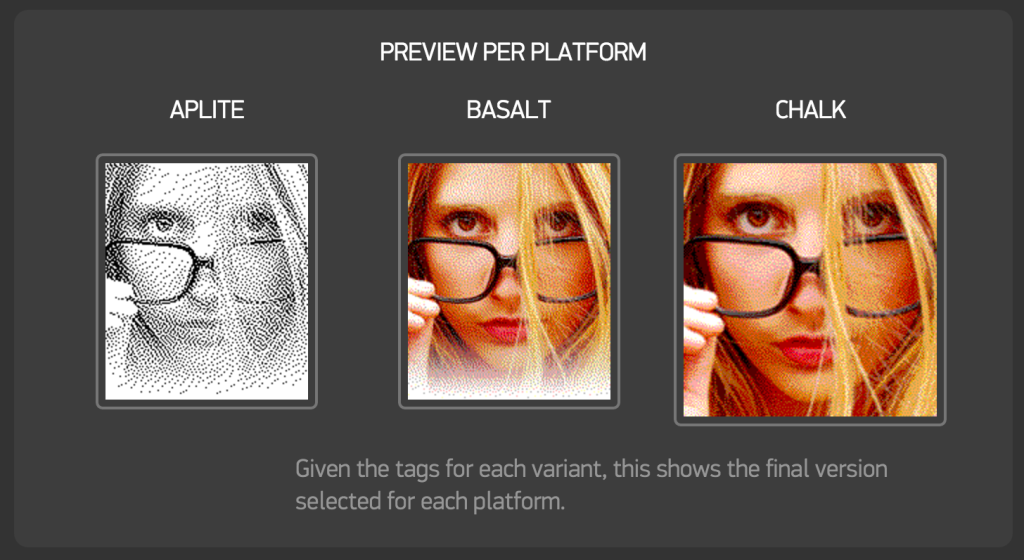
Click “Save” to save our new square color image and the new tags we’ve included. Once it is saved, we should see each version of our image is now displayed in its correct platform preview:
Our resource is now completely ready to be used within the app!
Our Code Explained
All of our code for this example will be in main.c. Remember, I’ve removed all the time keeping and other components to focus in on how the image switching works. That C code looks like so:
#include "pebble.h"

static BitmapLayer *meri_image_layer;
static GBitmap *meri_image;

Window *window;

static void window_load(Window *window) {
  Layer *window_layer = window_get_root_layer(window);
  GRect bounds = layer_get_bounds(window_layer);

  meri_image_layer = bitmap_layer_create(bounds);
  meri_image = gbitmap_create_with_resource(RESOURCE_ID_MERI);

  bitmap_layer_set_compositing_mode(meri_image_layer, GCompOpAssign);
  bitmap_layer_set_bitmap(meri_image_layer, meri_image);
  bitmap_layer_set_alignment(meri_image_layer, GAlignCenter);
  layer_add_child(window_layer, bitmap_layer_get_layer(meri_image_layer));
}

static void window_unload(Window *window) {
  gbitmap_destroy(meri_image);
  bitmap_layer_destroy(meri_image_layer);
}

static void init(void) {
  window = window_create();
  window_set_window_handlers(window, (WindowHandlers) {
    .load = window_load,
    .unload = window_unload,
  });

  const bool animated = true;
  window_stack_push(window, animated);
}

static void deinit(void) {
  window_destroy(window);
}

int main(void) {
  init();
  app_event_loop();
  deinit();
}
Including Our Image
Images in a Pebble app require two things, a BitmapLayer and a GBitmap. The BitMapLayer is the app layer which we place an image inside. The image itself is stored in a GBitmap.
static BitmapLayer *meri_image_layer;
static GBitmap *meri_image;
Within window_load(), we set the BitmapLayer‘s size. As we will be using this as a background in our app, we set the size to be bounds – the width and height of our Pebble device.
meri_image_layer = bitmap_layer_create(bounds);If you want to use your image for something that isn’t covering the whole screen, you would do bitmap_layer_create(GRect(0, 0, 64, 64)), where {0,0} are the coordinates and the image is 64×64 pixels large.
Next, we allocate our image resource that we uploaded earlier to the meri_image GBitmap. We called the image resource “MERI” on that screen. That translates to RESOURCE_ID_MERI. If you are using your own image with a different name, just make sure you prepend RESOURCE_ID_ to it:
meri_image = gbitmap_create_with_resource(RESOURCE_ID_MERI);We then set up our render settings on our meri_image_layer. The first one is the compositing mode:
bitmap_layer_set_compositing_mode(meri_image_layer, GCompOpAssign);We have used GCompOpAssign because it directly puts the image onto the layer without worrying about opacity or any adjustments. This is perfect for a background image. However there are various options we could have gone with for images:
GCompOpAssign– Assigns the pixels from the image onto the destination, ignoring opacity.GCompOpSet– On color platforms, this provides transparency as it assigns the pixels from the image onto the destination using our image as a mask. On monochrome, this mode is a bit strange. Any black pixels from the image are displayed as white on the destination.
There are other composition modes such as GCompOpAssignInverted, GCompOpOr, GCompOpAnd and GCompOpClear, however these only work on apps running on the Aplite monochrome platform. For newer apps, I’d recommend avoiding relying on these as they won’t work on your color images.
To assign meri_image to the meri_image_layer, we use the bitmap_layer_set_bitmap function:
bitmap_layer_set_bitmap(meri_image_layer, meri_image);To set our image into the center of that image layer, we do the following:
bitmap_layer_set_alignment(meri_image_layer, GAlignCenter);Finally, we place that layer into our app’s window like so:
layer_add_child(window_layer, bitmap_layer_get_layer(meri_image_layer));On our window’s unload, it is important to destroy both the image and its layer:
static void window_unload(Window *window) {
  gbitmap_destroy(meri_image);
  bitmap_layer_destroy(meri_image_layer);
}
In Action
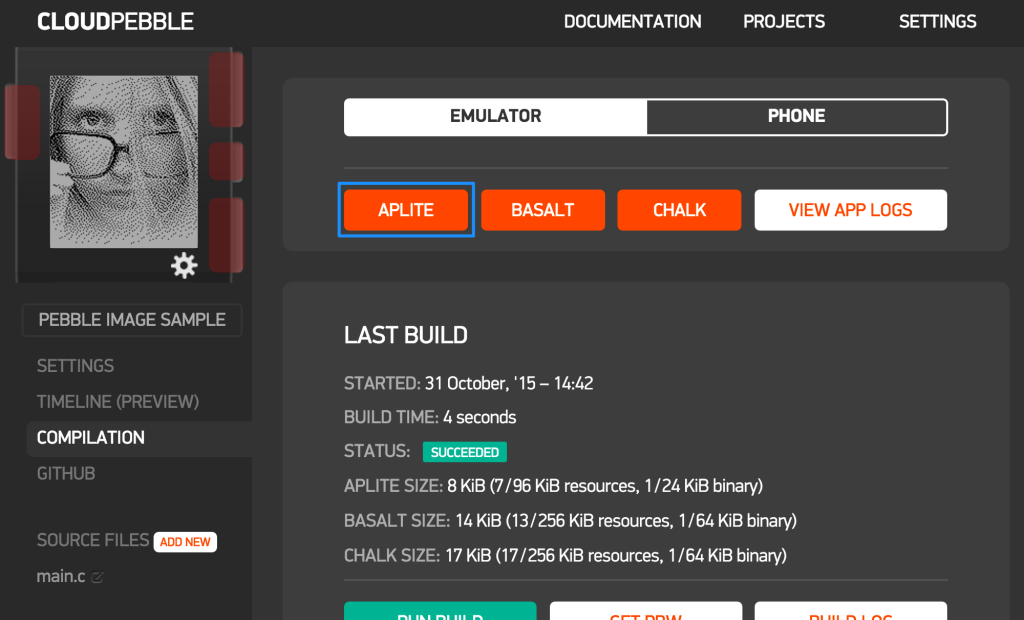
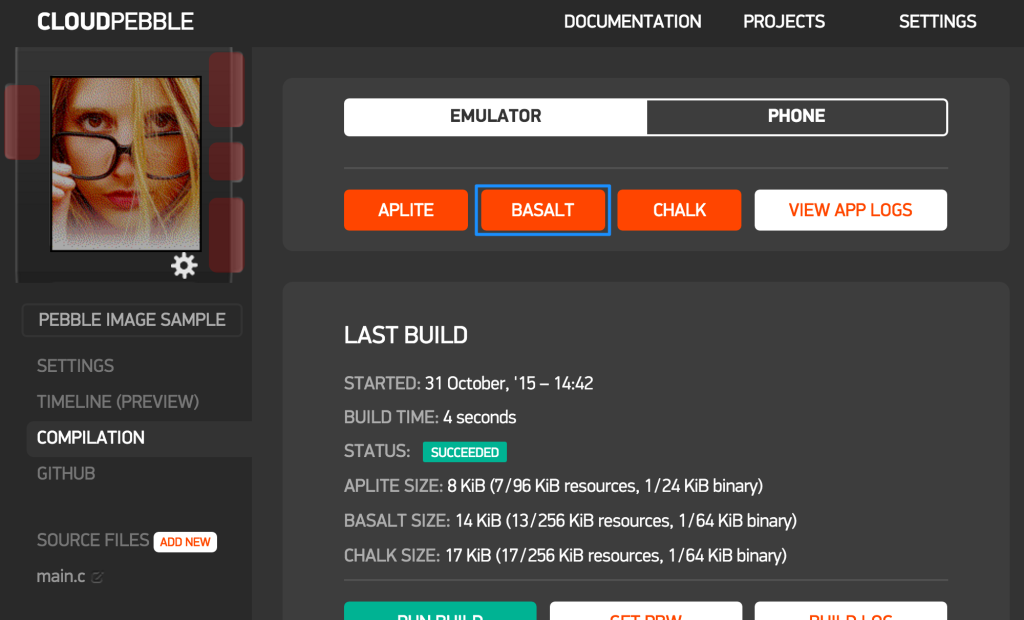
We can test each version in the CloudPebble emulator. Here is what my image displays like on the Aplite platform:
This is it on Basalt:
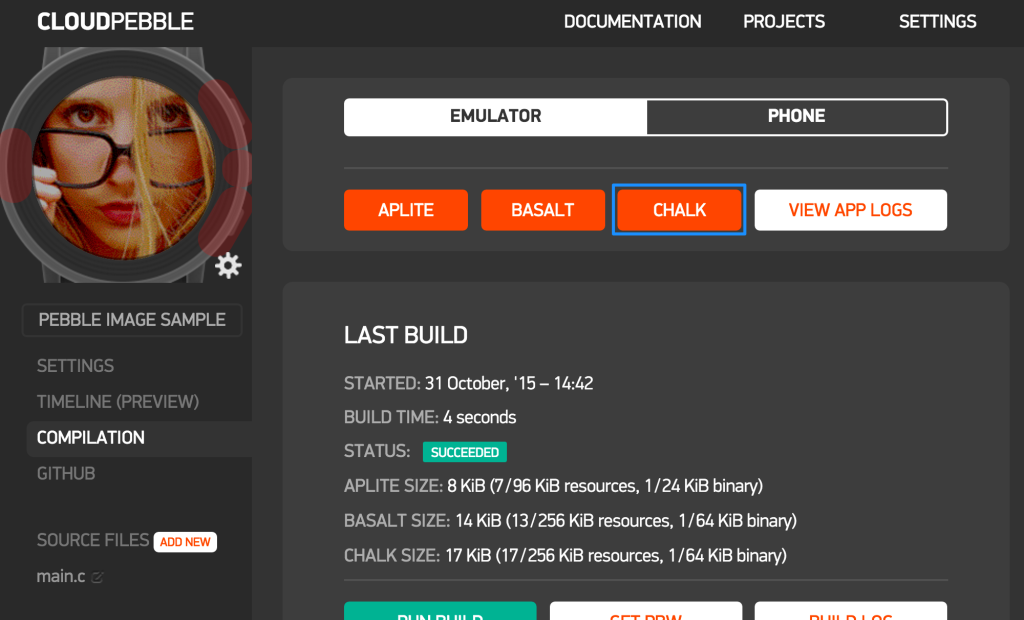
On the round Chalk platform, it looks like so:
Conclusion
Adding images can be a rather key part of putting together a great looking watchface. Hopefully this article has helped clarify the process for Pebble developers out there!
If you put together some great image powered Pebble watchfaces, please share it in the comments or get in touch with me on Twitter (@thatpatrickguy). I’d love to see them and try them out on my Pebble!
If you’re looking for further links on Pebble development, I’ve got a set of curated links over on my Dev Diner Pebble Development Guide. If you’ve got other great resources I don’t have listed – please let me know too!
Thank you to Meri Amber for letting me dissect part of her app!
Frequently Asked Questions (FAQs) about Adding Images to Your Pebble Watchfaces
How Can I Convert Images for My Pebble Watchface?
To convert images for your Pebble Watchface, you will need to use an image converter tool. This tool will help you convert your image into a format that is compatible with the Pebble Watchface. You can use online tools like ImageMagick or GIMP for this purpose. Simply upload your image, select the desired output format (usually PNG or JPEG), and click on ‘Convert’. Once the conversion is complete, download the converted image and use it for your Pebble Watchface.
What Size Should My Images Be for the Pebble Watchface?
The size of the images for the Pebble Watchface should ideally be 144 x 168 pixels. This is the standard resolution for Pebble watches. However, you can use images of different sizes, but they may not display correctly on the watchface. It’s recommended to resize your images to the correct dimensions using an image editing tool before uploading them to your Pebble Watchface.
Can I Use Animated Images on My Pebble Watchface?
Currently, Pebble Watchface does not support animated images or GIFs. You can only use static images in PNG or JPEG format. However, you can create a sequence of images that give the illusion of animation when displayed in quick succession on the watchface.
How Can I Customize the Position of My Image on the Pebble Watchface?
You can customize the position of your image on the Pebble Watchface using the Pebble SDK. This software development kit allows you to write code that determines where your image will be displayed on the watchface. You can specify the x and y coordinates of the image’s position in the code.
Why Isn’t My Image Displaying Correctly on the Pebble Watchface?
If your image isn’t displaying correctly on the Pebble Watchface, it could be due to several reasons. The image might be in an incompatible format, or its size might be too large or too small. Make sure your image is in PNG or JPEG format and its size is 144 x 168 pixels. If the problem persists, it could be a software issue. Try restarting your watch or reinstalling the watchface.
Can I Use Multiple Images on My Pebble Watchface?
Yes, you can use multiple images on your Pebble Watchface. However, you will need to write code to manage the display of these images. You can use the Pebble SDK to write this code. The SDK allows you to specify the position and order of the images on the watchface.
How Can I Add Text to My Image on the Pebble Watchface?
To add text to your image on the Pebble Watchface, you will need to use an image editing tool. Tools like Photoshop or GIMP allow you to add text to your images. Once you’ve added the text, save the image in a compatible format and upload it to your Pebble Watchface.
Can I Change the Image on My Pebble Watchface Regularly?
Yes, you can change the image on your Pebble Watchface as often as you like. However, each time you want to change the image, you will need to upload the new image and update the code on your watchface. This can be done using the Pebble SDK.
Can I Use Images from the Internet on My Pebble Watchface?
Yes, you can use images from the internet on your Pebble Watchface. However, make sure that the images are in a compatible format and of the correct size. Also, be aware of copyright issues. Always use images that are free to use or for which you have obtained permission.
How Can I Make My Own Images for My Pebble Watchface?
You can make your own images for your Pebble Watchface using any image editing tool. Tools like Photoshop or GIMP are great for this purpose. You can create images from scratch or modify existing images. Once you’ve created your image, save it in a compatible format and upload it to your Pebble Watchface.
 Patrick Catanzariti
PatCat is the founder of Dev Diner, a site that explores developing for emerging tech such as virtual and augmented reality, the Internet of Things, artificial intelligence and wearables. He is a SitePoint contributing editor for emerging tech, an instructor at SitePoint Premium and O'Reilly, a Meta Pioneer and freelance developer who loves every opportunity to tinker with something new in a tech demo.