
- Why Interactive Rebase Should be Part of Every Developer’s Toolkit
- What Interactive Rebase Can Do for You
- When to Use Interactive Rebase (and When Not To!)
- The Basic Mechanism of an Interactive Rebase Operation
- Editing an Old Commit Message
- Deleting an Unwanted Commit
- Combining Multiple Commits into One
- Harnessing the Power of Interactive Rebase
- Frequently Asked Questions (FAQs) about Git Interactive Rebase
Version control with Git has become a default in every modern developer’s tool belt. Commands like commit, push, and pull have made it into our fingers’ muscle memory. But relatively few developers know about the “more advanced” features in Git — and how incredibly valuable they can be! In this article, we’re going to explore “interactive rebase”, one of the most powerful tools in Git.
Why Interactive Rebase Should be Part of Every Developer’s Toolkit
In a nutshell, and without exaggeration, interactive rebase can help you become a better developer, by allowing you to create a clean and well-structured commit history in your projects.
Why is a well-structured commit history important? Just imagine the opposite: a hard-to-read commit history, where you have no idea what your colleagues actually did with their recent changes. More and more “dark corners” start to emerge in such as project, and you only understand the small parts that you worked on yourself.
Contrast this with a clean and well-structured commit history: it helps make a project’s codebase more readable and easier to understand. This is an essential ingredient for a healthy, long-lasting project!
What Interactive Rebase Can Do for You
Interactive Rebase helps you optimize and clean up your commit history. It covers many different use cases, some of which allow you to to the following:
- edit an old commit message
- delete a commit
- squash/combine multiple commits
- reorder commits
- fix old commits
- split/reopen old commits for editing
When to Use Interactive Rebase (and When Not To!)
Like a couple of other Git tools, interactive rebase “rewrites history”. This means that, when you manipulate a series of commits using interactive rebase, this part of your commit history will be rewritten: the commit’s SHA-1 hashes will have changed. They’re completely new commit objects, so to speak.
This fact calls for a simple but important rule to live by: don’t use interactive rebase (or other tools that rewrite history) on commits that you’ve already shared with your colleagues on a remote repository. Instead, use it to clean up your own, local commits — such as in one of your own feature branches — before merging them into a team branch.
The Basic Mechanism of an Interactive Rebase Operation
Although there are many different things that interactive rebase can be used for, the basic workflow is always the same. Once you’ve firmly understood this basic mechanism, interactive rebase will lose its air of “complex mystery” and become a valuable, accessible item in your tool belt.
Step 1: Where should you start the session?
The first question you need to answer is: “What part of my commit history do I want to manipulate?” This tells you where you should start your interactive rebase session. Let’s make a practical example and say we’d like to edit an old commit message (which is what we’ll actually do in practice in a moment).
Our starting situation is pictured below, where we’re editing an old commit message via interactive rebase.
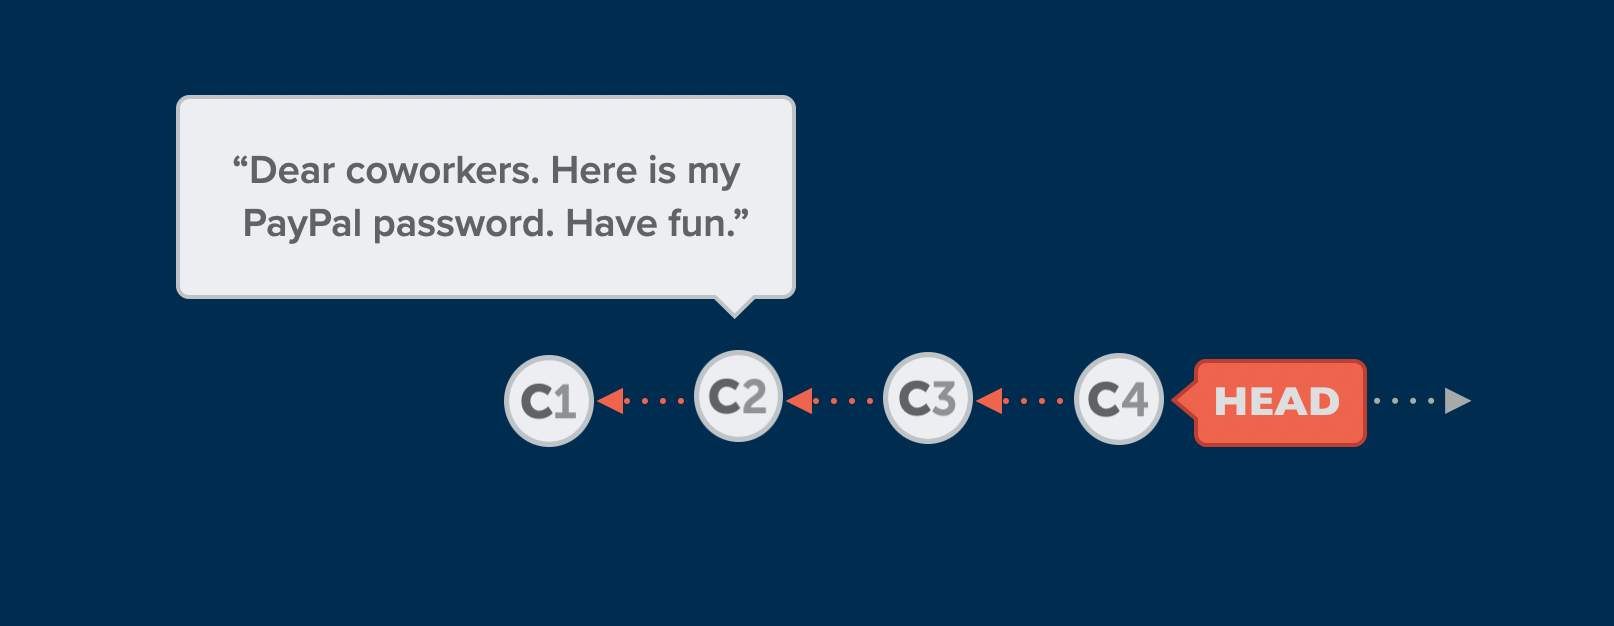
To be able to change the commit message in C2, we have to start our interactive rebase session at its parent commit (or even before that, if you want to). In this example case, we would use C1 as the starting point for our interactive rebase session.
Step 2: starting the actual session!
Starting the actual session is pretty simple:
$ git rebase -i HEAD~3
We’re using the git rebase command with the -i flag (to indicate we indeed want it to be “interactive”) and provide the base commit (that we came up with in our first step above). In this example, I’ve used HEAD~3 to specify the commit that’s “3 behind the HEAD commit”. Alternatively, I also could have provided a specific SHA-1 hash.
Step 3: telling Git what you want to do
After starting the interactive rebase session, you’ll be presented with an editor window where Git lists a series of commits — from the latest commit, all the way to (but not including) the one you picked as a base commit in Step 1.
There are two important things to keep in mind in this step:
- Commits are listed in reverse order! The newest commit, which we would expect to appear at the top, will appear at the bottom of the list. Don’t worry: your Git repository is fit as a fiddle! 🥳 Remember that we’re in the process of performing an interactive rebase operation, and this requires Git to reapply the commits from oldest to newest at the end of the operation.
- Don’t make your actual changes in this editor window! Although you might be itching to simply go ahead and change the commit message in this editor window (after all, that’s what we actually want to do …), you have to show some patience. Here, we are only going to tell Git what we want to do — but not make the actual change. I’ll demonstrate this point in practice shortly!
With this theoretical overview out of the way, let’s dive into some practical cases together!
Editing an Old Commit Message
One of the very popular use cases of interactive rebase is that you can edit an old commit message after the fact. You might be aware that git commit --amend also allows you to change a commit’s message — but only if it’s the very latest commit. For any commit older than that, we have to use interactive rebase!
Let’s take a look at a concrete scenario. Below is an image of a bad commit message that needs to be corrected.
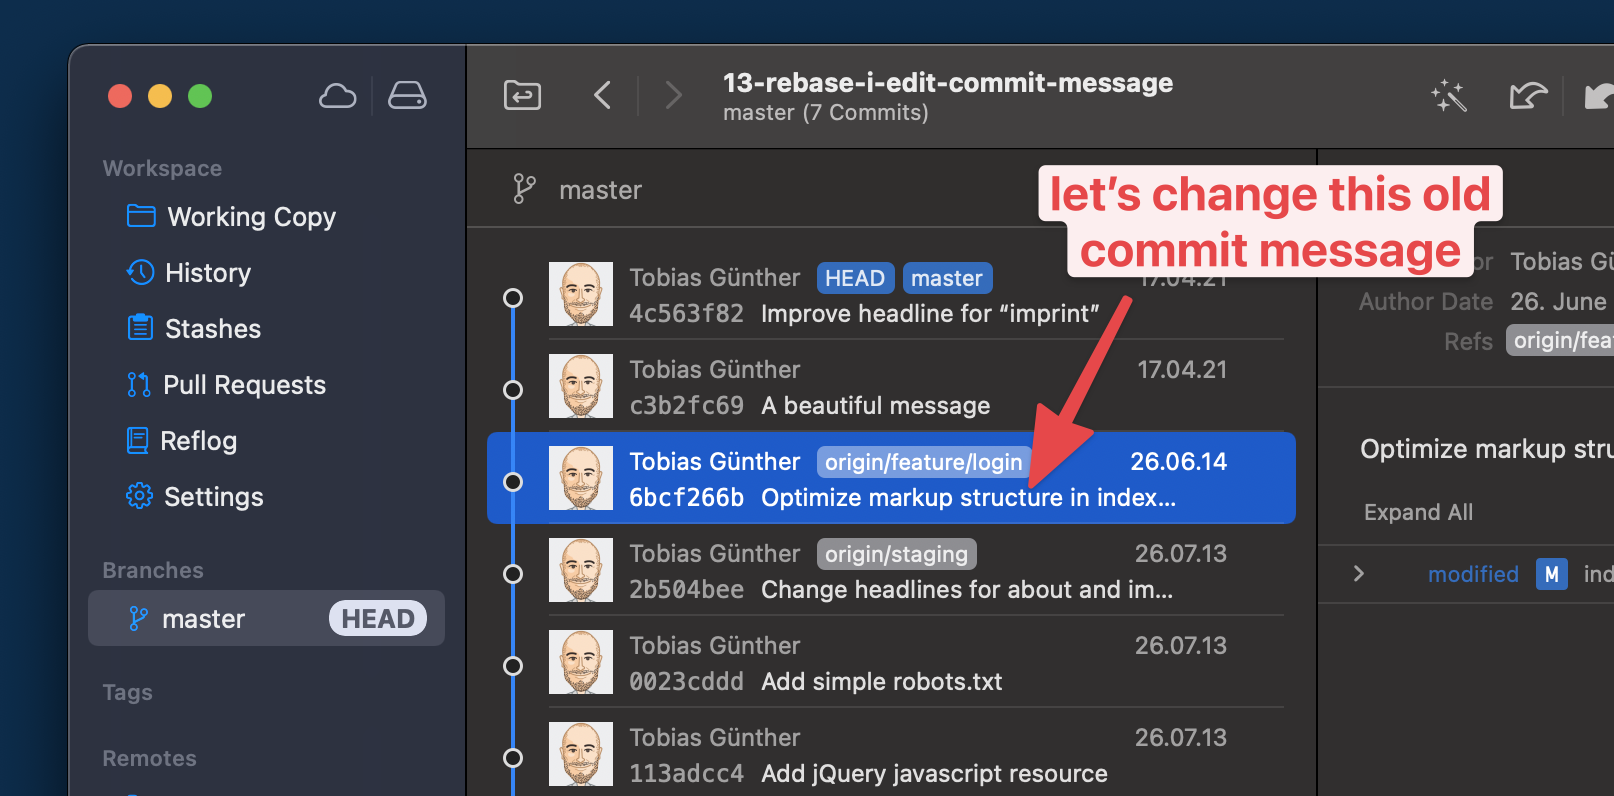
Note: For a better overview and clearer visualization, I’m using the Tower Git desktop client in some of my screenshots. You don’t need Tower to follow along in this tutorial.
For our example, let’s say that we’d like to edit the message of the commit currently titled “Optimize markup structure in index…”
Our first step is to determine the base commit for starting this interactive rebase session. Since we have to (at least) go back to the parent of our “bad apple” commit, we’re starting our session at HEAD~3 (three commits behind the HEAD commit, which is the one that’s titled “Change headlines …”):
$ git rebase -i HEAD~3
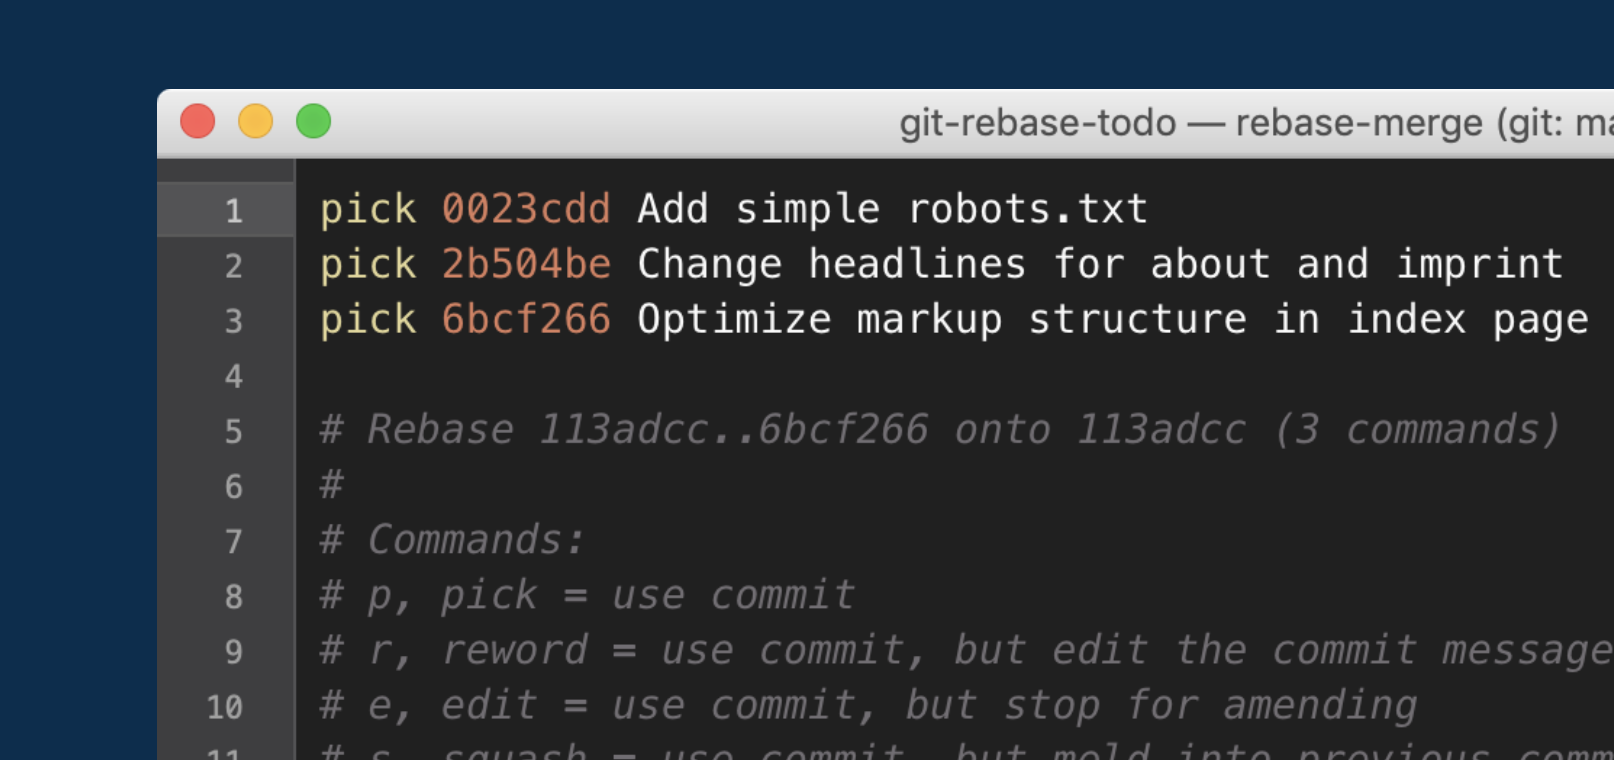
Right after executing this command, your favorite editor will open up and present the list of commits you just selected (by providing a base commit).
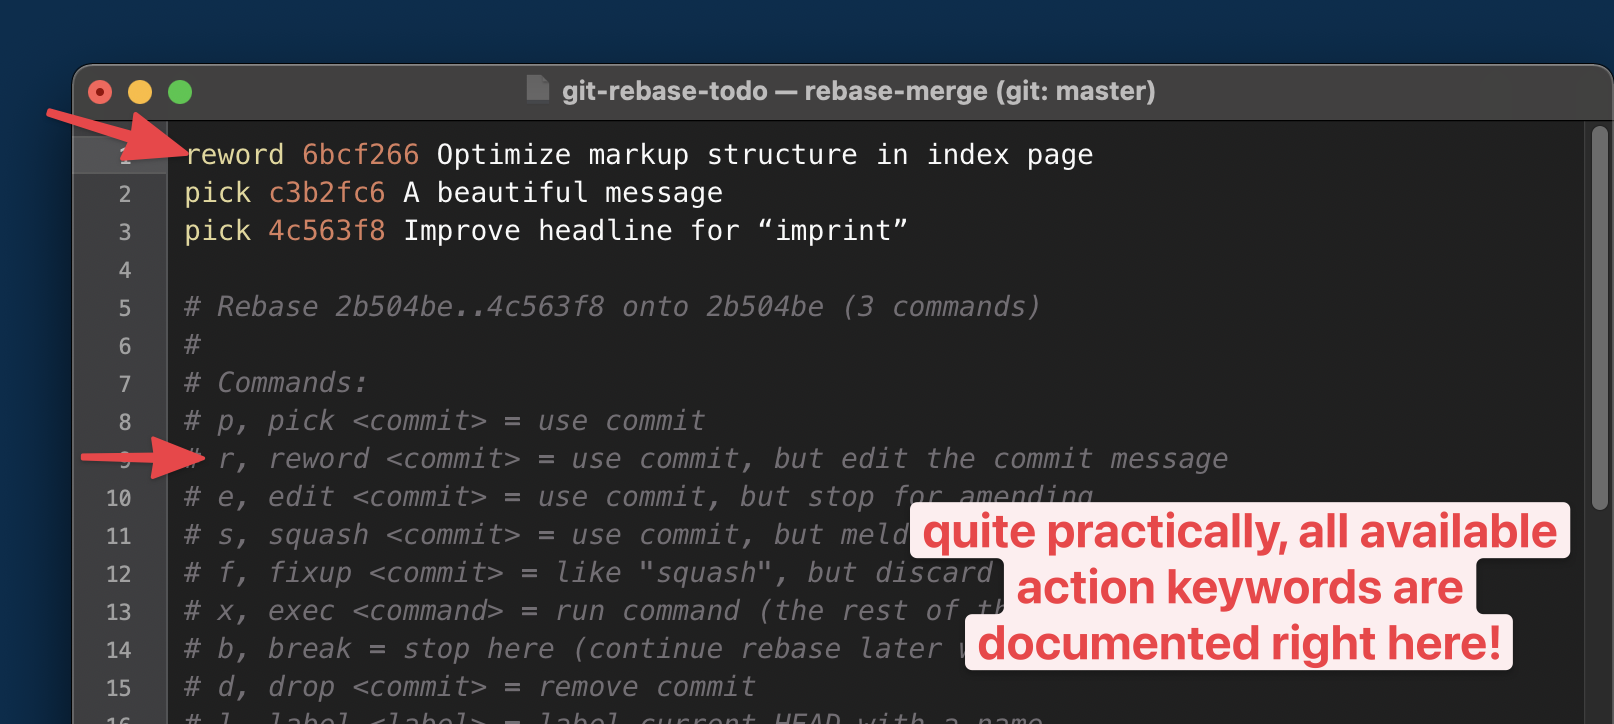
As a reminder: although you might be tempted to do so, we do not change the commit message here. We only mark up the respective line with an “action keyword”. In our case, we want to reword the commit (which means we’d like to change the commit message, but leave the rest of the commit as is).
Quite practically, all the available action keywords are documented at the bottom of this window — so there’s no need to remember anything by heart!
Once you’ve replaced the standard pick keyword (which means “take the commit as is”) with your preferred action keyword, you can simply save and close the window.
After doing so, a new editor window will open that contains the current commit message. Finally, we’re allowed to do what we set out to do in the first place: edit this old commit’s message!
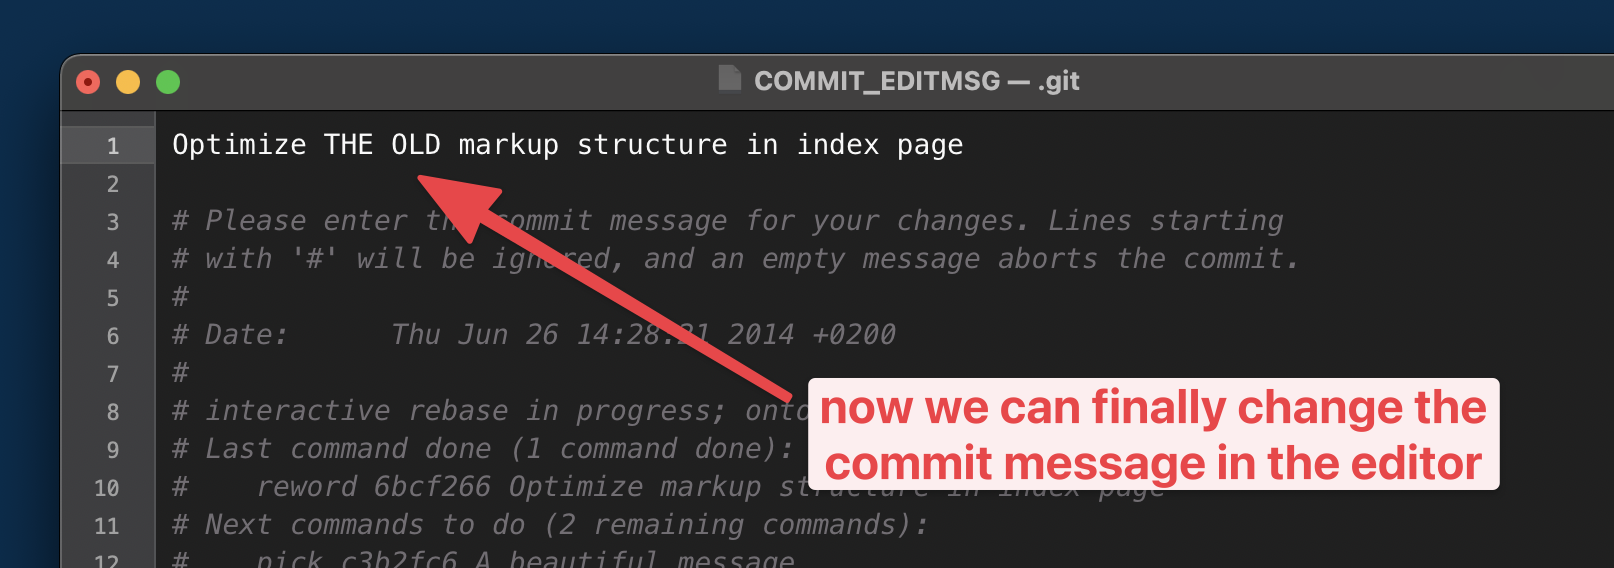
After making our change and then saving and closing the editor window, the interactive rebase session is complete — and our commit message is updated! 🎉
Deleting an Unwanted Commit
Interactive rebase also allows you to delete an old commit from your history that you don’t need (or want) anymore. Just imagine you have accidentally included a personal password in a recent commit: sensitive information like this should not, in most cases, be included in a codebase.
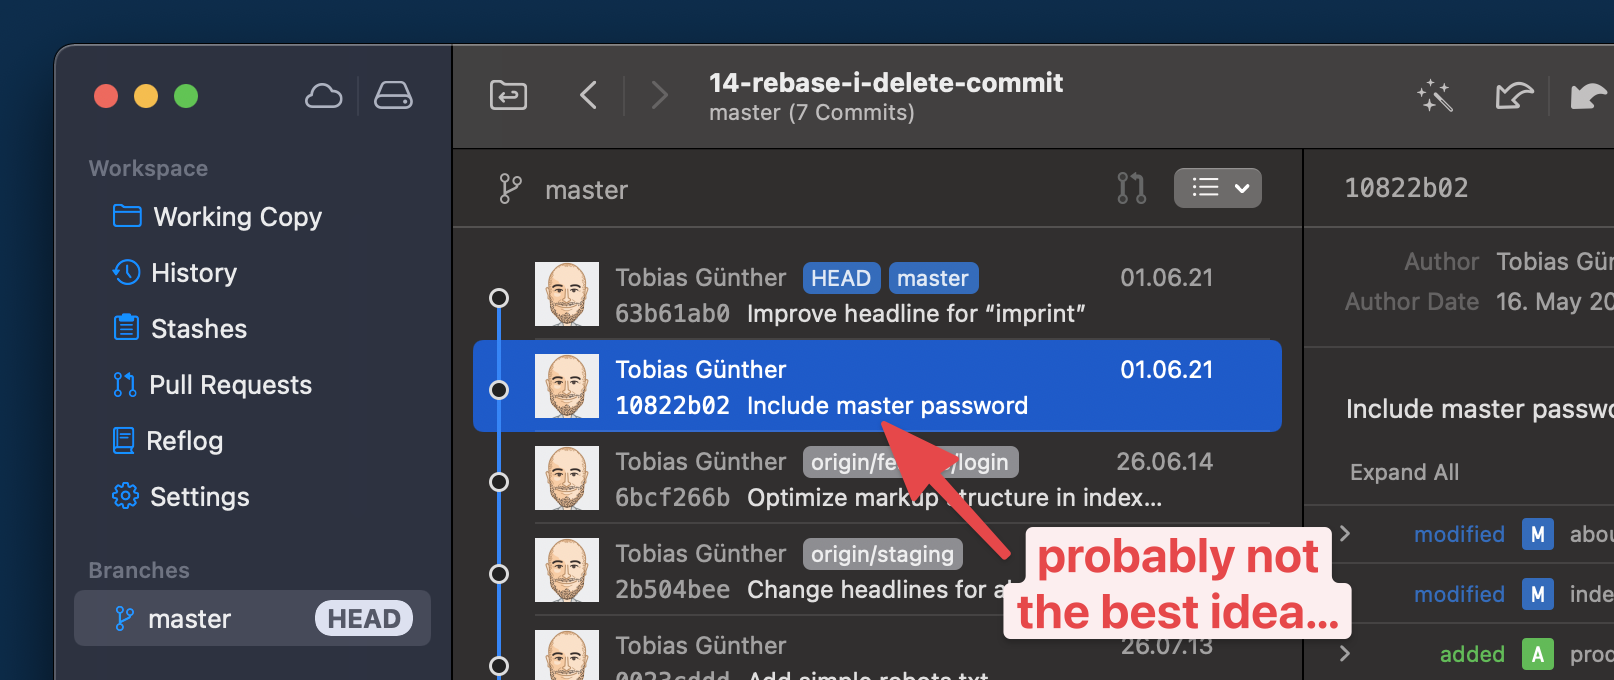
Also remember that simply deleting the information and committing again doesn’t really solve your problem: this would mean the password is still saved in the repository, in the form of your old commit. What you really want is to cleanly and completely delete this piece of data from the repository altogether!
Let’s start by determining the base commit for our interactive rebase session. Since we need to start at least at the bad commit’s parent, we’re using the “Optimize markup structure…” commit as our basis:
$ git rebase -i 6bcf266b
Notice that, this time, I’ve used a concrete SHA-1 hash in the git rebase -i command. Instead of the commit hash, of course, I could have used HEAD~2 to address that commit.
After executing this command, we’re again presented with a list of commits.
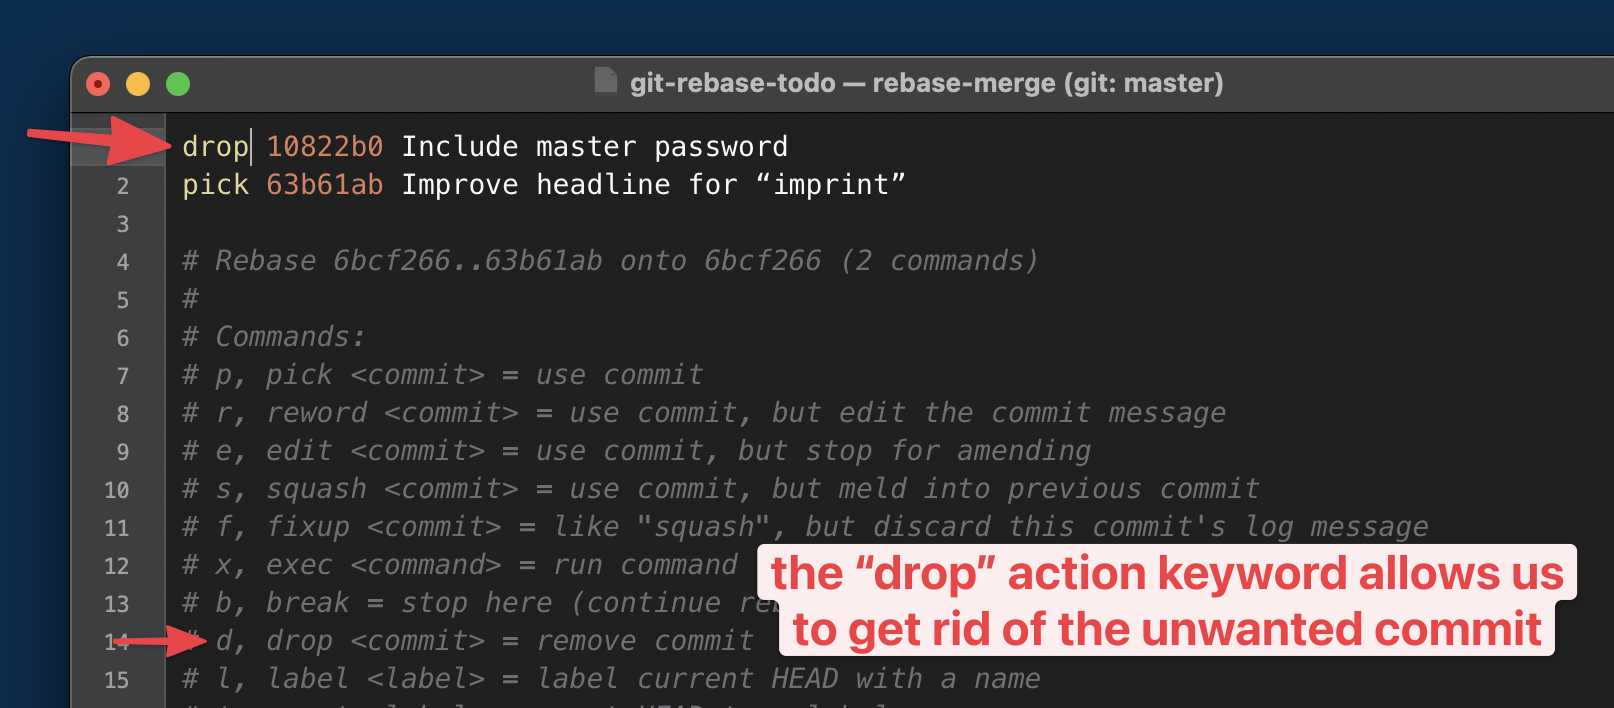
This time, we’re using the drop action keyword to get rid of the unwanted commit. Alternatively, in this special case, we could also simply delete the whole line from the editor. If a line (representing a commit) is not present anymore when saving and closing the window, Git will delete the respective commit.
However you choose to do it, after you’ve saved and closed the editor window, the commit will be deleted from your repository’s history!
Combining Multiple Commits into One
Another use case for interactive rebase is when you want to combine multiple separate commits into a single one. Before we dive into how this works, let’s spend a few moments talking about when or why this could be valuable.
Generally speaking, making commits “bigger” (by combining multiple into one) is not a good strategy in most cases. The general rule of thumb is to keep commits as small as possible, because “small” means “easier to read and understand”. But there are situations where this can make sense nonetheless. Here are two examples:
- Imagine that you noticed a problem with an older commit. You might then go ahead and produce a new commit that fixes the problem. In such a situation, being able to combine these commits into a single one makes a lot of sense: the newer commit, after all, was just a “Band-Aid” to fix a problem that shouldn’t have been there in the first place. By combining these commits, it looks like there never was a problem in the first place!
- Another example is when you notice that you made things a bit too granular. Making small commits is all good and well, but littering your commit history with lots of unnecessarily small commits would mean overshooting the mark.
The rationale is the same in both examples: by combining two (or multiple) commits that should have been a single one in the first place, you’re producing a cleaner and more readable commit history!
Let’s walk through a practical example together and take the situation pictured below as our starting situation.
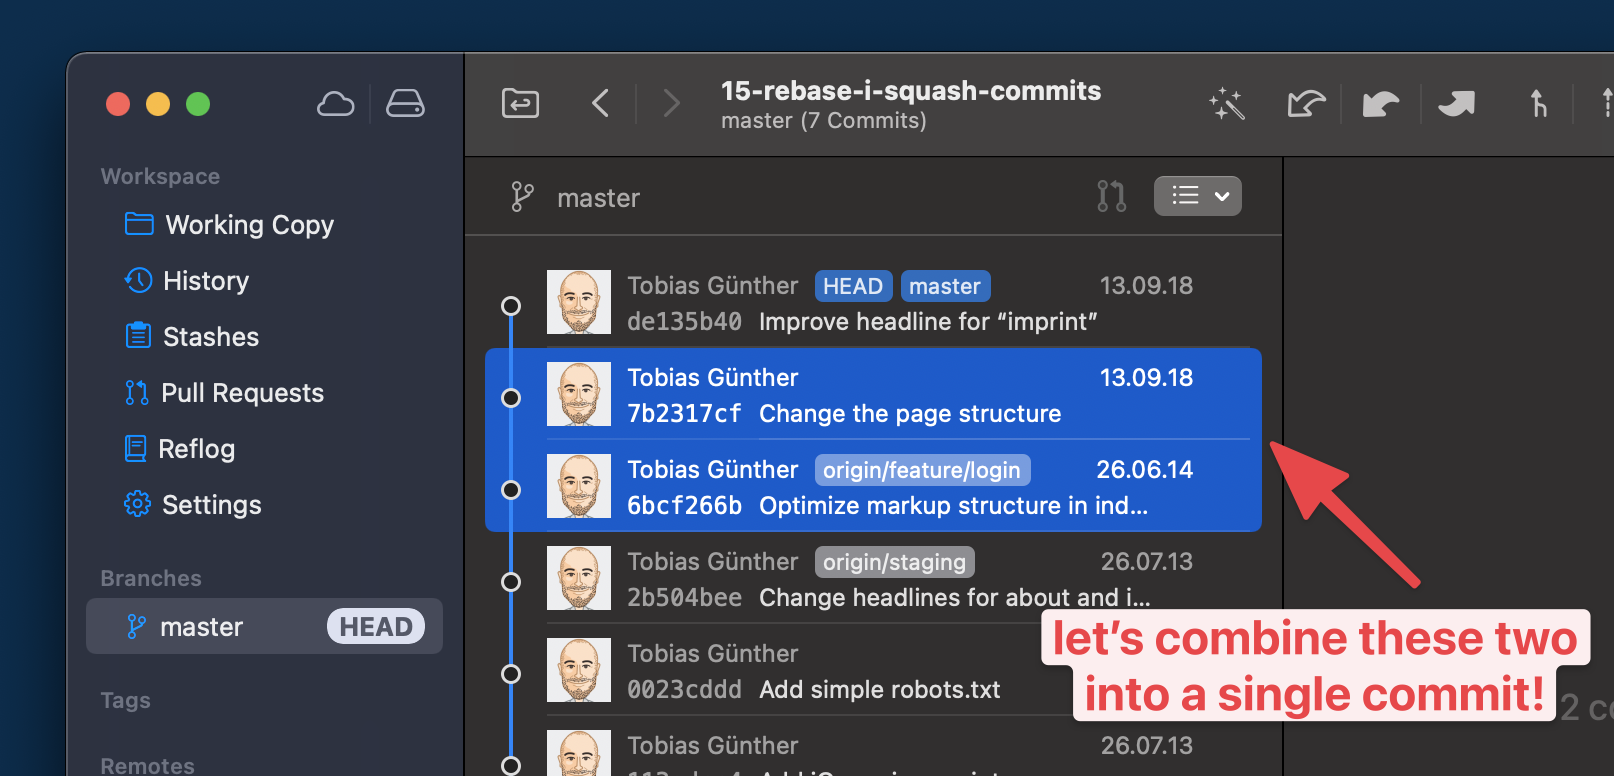
Let’s say that, semantically, it makes more sense for these two commits to be a single one. Using the squash tool of interactive rebase, we can indeed combine them:
$ git rebase -i HEAD~3
By now, you’re already used to what happens next: an editor window opens up with a list of commits.

I already mentioned that we’re going to use the squash action keyword in this case. There’s an important thing to know about how squash works: the line you mark up with the keyword will be combined with the line directly above! This explains why I marked line 2 with the squash keyword in our example.
After saving and closing this window, a new one will open up. This is because, by combining multiple commits, we are of course creating a new one. And this one needs a commit message, like any other commit, too!
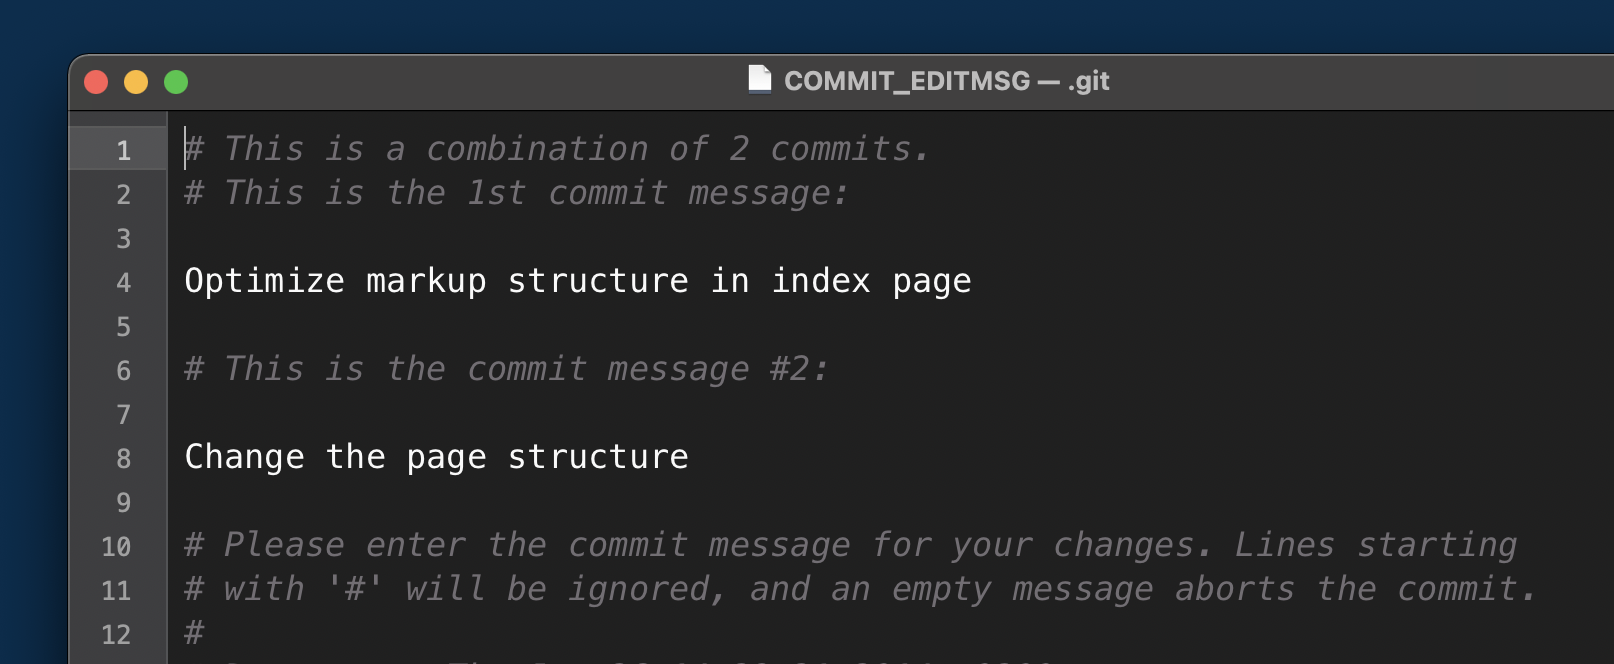
What you see in the above screenshot is what Git prepared for us: it combined the commit messages of the respective original commits along with some comments. You’re free to delete the old messages and start fresh — or keep them and add some more information.
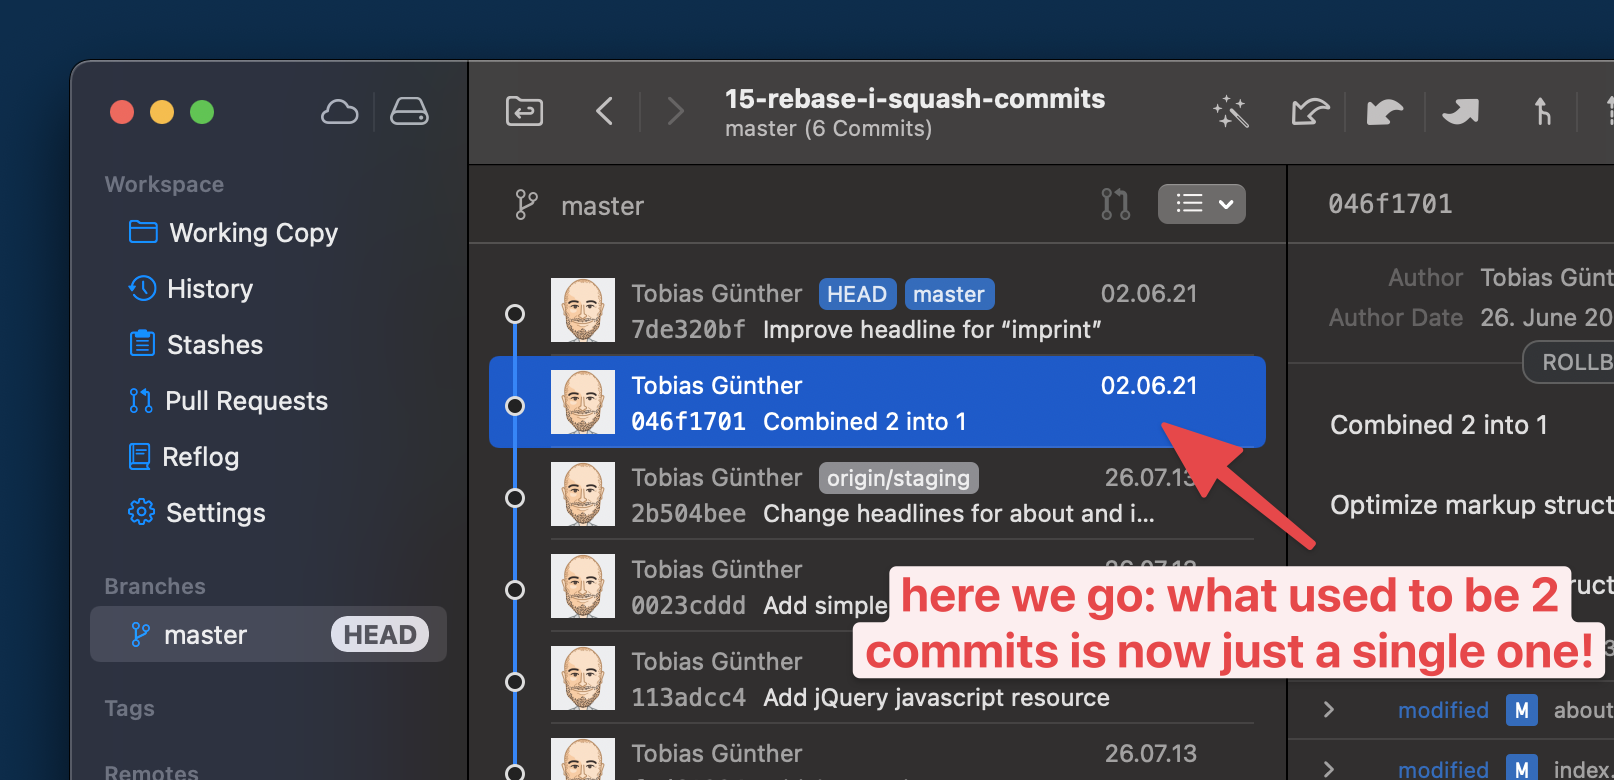
After saving and closing this editor window, we can proudly state: what used to be two separate commits is now a single one!
Harnessing the Power of Interactive Rebase
I hope you agree that Git’s interactive rebase tools can be very valuable! As developers, it’s important for us to strive for a clean and clear commit history. It’s a crucial ingredient in keeping a codebase healthy and easy to understand (both for your teammates, and yourself, after some time has passed).
If you want to learn more, I highly recommend the “First Aid Kit for Git”. It’s a (free) collection of short videos that show you how to clean up and undo mistakes in Git.
Have fun!
Frequently Asked Questions (FAQs) about Git Interactive Rebase
What is the difference between Git Rebase and Git Merge?
Git Rebase and Git Merge are two different ways to integrate changes from one branch into another. Git Merge is a straightforward way to combine code from two different branches. It creates a new commit in the history, preserving the chronological order of commits. On the other hand, Git Rebase is a way to move or combine a sequence of commits to a new base commit. It’s like saying “I want to base my changes on what everybody else has done.” In other words, it allows you to place the changes from the current branch on top of another branch.
How can I undo a Git Rebase?
If you want to undo a Git Rebase, you can use the command git reflog to find the commit you want to return to, and then use the command git reset --hard HEAD@{number}. The git reflog command shows a list of every change made to the HEAD, and the git reset command allows you to set the current HEAD to the specified state.
What is the purpose of Git Interactive Rebase?
Git Interactive Rebase allows you to alter commits in many ways such as editing, deleting, and squashing. Not only can you change the commit message, but you can also change the actual code if you made a mistake. It’s a powerful tool that gives you complete control over your project’s commit history.
How can I squash commits using Git Interactive Rebase?
Squashing is the act of combining several commits into one. In Git, you can squash commits using the git rebase -i command followed by the commit hash you want to squash. In the text editor that opens, you can mark the commits you want to squash by replacing pick with squash or s next to each commit.
What are the risks of using Git Interactive Rebase?
While Git Interactive Rebase is a powerful tool, it can be dangerous if not used correctly. It rewrites commit history, which can be problematic if you’re working on a public branch that others are also working on. It’s recommended to use it on local branches that haven’t been pushed yet.
How can I resolve conflicts during a Git Rebase?
During a rebase, conflicts may occur. Git will pause and allow you to resolve those conflicts before continuing. You can resolve conflicts by editing the files to fix the conflicting changes and then adding the resolved files with git add. After resolving all conflicts, you can continue the rebase with git rebase --continue.
Can I use Git Interactive Rebase to split a commit?
Yes, you can use Git Interactive Rebase to split a commit into smaller ones. This can be useful if you’ve made several changes in a single commit but later decide that they should have been separate commits.
How can I edit a commit message using Git Interactive Rebase?
You can edit a commit message during an interactive rebase. In the list of commits, replace pick with reword or r next to the commit you want to edit. When you continue, Git will open a text editor for each reword marked commit, allowing you to change the commit message.
What is the difference between Git Rebase and Git Pull?
Git Pull is a command that fetches changes from a remote repository and merges them into your current branch. On the other hand, Git Rebase is a command that moves or combines a sequence of commits to a new base commit. While both commands are used to integrate changes, they do it in different ways.
Can I use Git Interactive Rebase to change the order of commits?
Yes, you can change the order of commits using Git Interactive Rebase. In the list of commits, you can simply change the order of the lines to change the order of the commits. This can be useful if you want to make your commit history more logical or clear.
 Tobias Günther
Tobias Günther is a co-founder of “Tower”, the popular Git desktop client that helps more than 100,000 developers around the world to be more productive with Git.