
This introduction to content collections in Astro is excepted from Unleashing the Power of Astro, available now on SitePoint Premium.
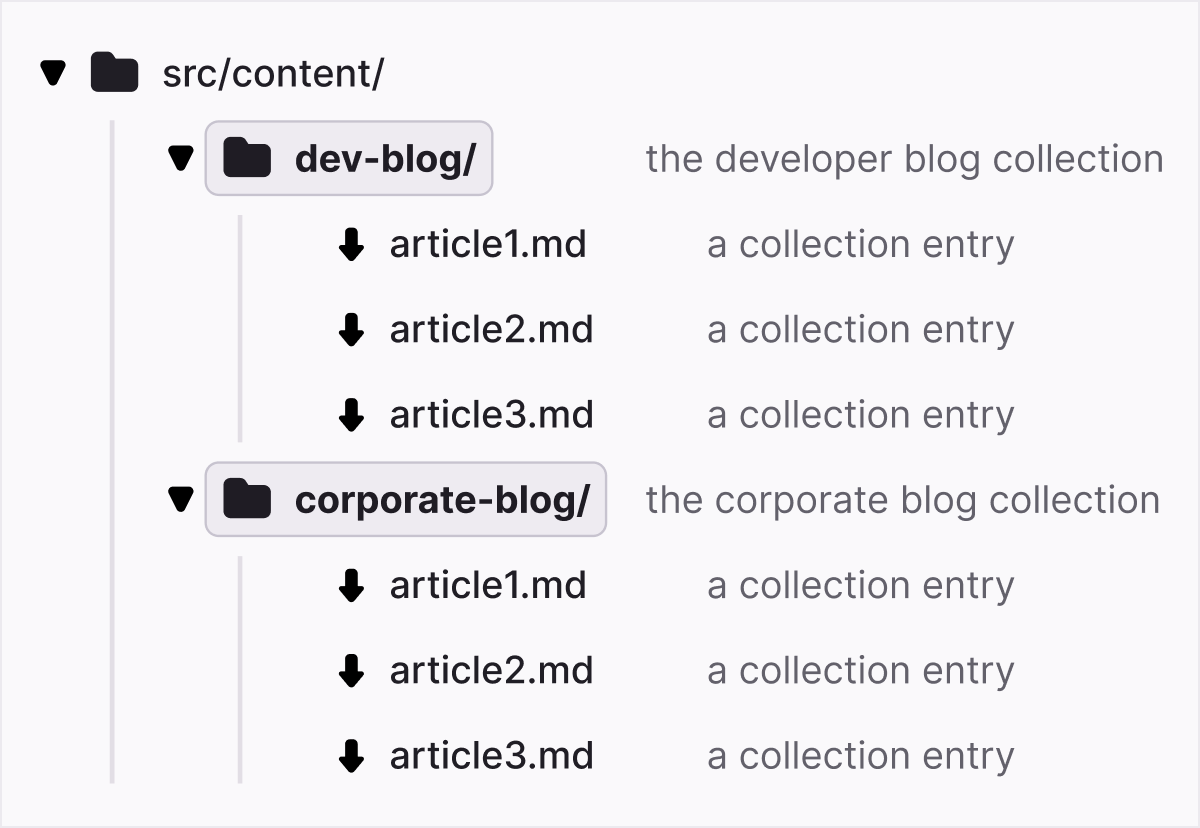
To make use of content collections, Astro designates a special folder: src/content. Subsequently, we can create subfolders within this location, each generating individual content collections. For instance, we could create collections such as src/content/dev-blog and src/content/corporate-blog.
Each content collection can be configured in a config file—/src/content/config.js (or .ts)—where we have the option to employ collection schemas using Zod.
Zod is a “TypeScript-first schema validation with static type inference” that’s integrated into Astro. Here’s an example of how this would take shape:
// src/content/config.js
import { z, defineCollection } from 'astro:content';

const devBlogCollection = defineCollection({
  schema: z.object({
    title: z.string(),
    author: z.string().default('The Dev Team'),
    tags: z.array(z.string()),
    date: z.date(),
    draft: z.boolean().default(true),
    description: z.string(),
  }),
});

const corporateBlogCollection = defineCollection({
  schema: z.object({
    title: z.string(),
    author: z.string(),
    date: z.date(),
    featured: z.boolean(),
    language: z.enum(['en', 'es']),
  }),
});

export const collections = {
  devblog: devBlogCollection,
  corporateblog: corporateBlogCollection,
};
In the code above, we’re defining two content collections—one for a “developer blog” and one for a “corporate blog”. The defineCollection method allows us to create a schema for any given collection. For the “developer blog”, we’re creating a schema where the articles for this blog category must have a title (string), author (string defaulting to “The Dev Team”), tags (array of strings), date (date type), draft (Boolean defaulting to true) and a description (string).
For the “corporate blog”, our schema is a little bit different: we have a string for both the title and the author. Date (data type) is also going to be required by the content, as well as the featured (Boolean) flag and a language (enum), which can either be set to en or es.
Lastly, we’re exporting a collections object with two properties, devblog and corporateblog. These will be used later on.
Markdown Files and Frontmatter
The examples in this tutorial about content collection assume that the .md files also include frontmatter matching the schema specified above in the configuration file. As an example, this is what a sample “corporate blog” post would look like:
---
title: 'Buy!!'
author: 'Jack from Marketing'
date: 2023-07-19
featured: true
language: 'en'
---

# Some Marketing Promo

This is the best product!
Slug Creation
Astro will automatically generate slugs for posts based on the file name. For example, the slug for first-post.md will be first-post. However, if we provide a slug entry in our frontmatter, Astro will respect that and use our custom slug.
Bear in mind that the properties specified in the export const collections object must match the folder names where the content is going to live. (Also note that they’re case sensitive!)
Querying Data
Once we have all the Markdown files in place (in our case, that would be under src/content/devblog and src/content/corporateblog) and our config.js file ready, we can start to query data from the collections, which is a straightforward process:
---
import { getCollection } from 'astro:content';
const allDevPosts = await getCollection('devblog');
const allCorporatePosts = await getCollection('corporateblog');
---
<pre>{JSON.stringify(allDevPosts)}</pre>
<pre>{JSON.stringify(allCorporatePosts)}</pre>
As seen above, the getCollection method can be used to retrieve all the entries from a given collection (again, referencing the exported collection names from earlier). In the example above, we retrieve all the posts from both the “developer blog” (devblog) and from the “corporate blog” (corporateblog). In the template, we simply return the raw data using JSON.stringify().
We should also examine the data that’s being displayed via JSON.stringify(), and we should take note that, other than the frontmatter data, we also get an id, a slug, and a body property returned to use where the latter contains the post’s content.
We can also filter for drafts or posts written in a particular language in the frontmatter section by iterating through all articles like this:
import { getCollection } from 'astro:content';

const spanishEntries = await getCollection('corporateblog', ({ data }) => {
  return data.language === 'es';
});
getCollection returns all the posts, but we can also use getEntry to return a single entry from within a collection:
import { getEntry } from 'astro:content';

const singleEntry = await getEntry('corporateblog', 'pr-article-1');
getCollection vs getEntries
While there are two ways to return multiple posts from collections, there’s a subtle difference between the two of them. getCollection() retrieves a list of content collection entries by collection name, while getEntries() retrieves multiple collection entries from the same collection.
The Astro documentation gives the example of getEntries() being used to retrieve content when using reference entities (for example, a list of related posts).
The concept of related posts is where we can reference an array of posts from a collection. This can be achieved by adding the following to the schema when using the defineCollection method:
import { defineCollection, reference, z } from 'astro:content';

const devblog = defineCollection({
  schema: z.object({
    title: z.string(),
    relatedPosts: z.array(reference('blog')),
  }),
});
In the code above, we’re also importing reference and using that when adding relatedPosts to our schema. (Note that we can call this whatever we want, such as recommendedPosts or followupPosts.)
To use these relatedPosts, the appropriate slug values should be added to the frontmatter part of the Markdown:
title: "This is a post"
relatedPosts:

- A related post # `src/content/devblog/a-related-post.md
Reference entities are defined in the config.js file for the content collection and use the reference method from Zod:
const blog = defineCollection({
  type: 'content',
  schema: z.object({
    title: z.string(),
    relatedPosts: z.array(reference('blog')).optional(),
    author: reference('author'),
  }),
});

const author = defineCollection({
  type: 'data',
  schema: z.object({
    name: z.string(),
  }),
});
Also, notice the usage of type: 'content' and type: 'data'. In this case, the collection encompasses both content authoring formats such as Markdown (type: 'content') and data formats like JSON or YAML (type: 'data').
Displaying the Content
Now that we know how to query data, let’s discuss how to actually display it in a formatted way. Astro provides a convenient method called render() to render the entire content of the Markdown into a built-in Astro component called <Content />. How we build and display the content is also going to be driven by whether we have static site generation or server-side rendering mode.
For pre-rendering, we can use the getStaticPaths() method:
// /src/pages/posts/[...slug].astro
---
import { getCollection } from 'astro:content';

export async function getStaticPaths() {
  const blogEntries = await getCollection('blog');
  return blogEntries.map(entry => ({
    params: { slug: entry.slug }, props: { entry },
  }));
}

const { entry } = Astro.props;
const { Content } = await entry.render();
---
<h1>{entry.data.title}</h1>
<Content />
In the code above, we’re using getStaticPaths(). (We covered this method in the second tutorial of this series as a way to cater for dynamic routes.) We then rely on Astro.props to capture the entry, which is going to be an object that contains the metadata about the entry, an id, a slug, and a render() method. This method is responsible for rendering the Markdown entry to HTML in the Astro template, and it does so by creating a <Content /> component. What’s amazing about this is that all we need to do now is add the <Content /> component to our template and we’ll be able to see the Markdown content rendered into HTML.
Want to learn more about Astro, the modern all-in-one framework to build faster, content-focused websites? Check out Unleashing the Power of Astro, available now on SitePoint Premium.
 Tamas Piros
Tamas is a Google Developer Expert in Web Technologies and a seasoned Developer Evangelist. He is a passionate advocate for modern web technologies, helping people understand and unlock the latest & greatest features of web development.