A web widget, or badge, is a small, embeddable element that you can add to your site that will display your content from another web service. But enabling web widgets to work properly can be a hassle. One of the easiest ways to build a widget is to build a Flex application that compiles a Flash object.
In this article, I’ll show you how to create a small Flex widget that we’ll call FlickrTag. The widget can be embedded on any web page and will show a set of Flickr photos matching a specified search term, centered on a particular location; for example, you could use the widget to show dog pictures near Fremont, California. You can use the code as a basis for your own widgets, as well – the principles are the same whether you use Flickr or some other service.
There’s a lot to do, so let’s dig right in. The first step is to install Flex Builder 3, which is a development environment for Flex. You can download the Flex SDK, which is free, and build this code from the command line. But trust me, it’s easier to just use Flex Builder 3, and there is a 60-day free trial of it from Adobe. You’ll also need a Flickr API key so that your widget can retrieve images.
Showing Some Photos
With Flex Builder installed, let’s create a new Flex Builder project and have a look at the first version of our FlickrTag widget. This first version will retrieve a list of photos from Flickr using a REST request and arrange them as a wide strip of images. In the versions that follow, we’ll have some pop-up functionality that shows more information about the photos.
Here is all the MXML code we need. You can view a complete listing in flickrmap1.mxml:
<?xml version="1.0" encoding="utf-8"?>

<mx:Application xmlns:mx="http://www.adobe.com/2006/mxml"

    layout="absolute" creationComplete="onStartup()"

    width="660" height="100"

    horizontalScrollPolicy="off" verticalScrollPolicy="off">


<mx:Script>

<![CDATA[


// ... We'll fill this in soon


]]>

</mx:Script>


<mx:HTTPService id="flickrSearch" resultFormat="e4x"

    result="onFlickrResult(event)" />


<mx:HBox id="hbPictures" cornerRadius="15" width="660" height="100"

    borderColor="#00FF00" borderThickness="3" borderStyle="solid"

    backgroundColor="#CCFFCC" paddingBottom="10" paddingTop="10"

    paddingLeft="10" paddingRight="10" horizontalGap="5"

    horizontalScrollPolicy="off" verticalScrollPolicy="off">

</mx:HBox>


</mx:Application>
At the top of the file we have the <mx:Application> tag that wraps the whole Flex application. This tag stipulates that when the application is loaded we should call the onStartup method. This method can be found within the <mx:Script> tags, where we also import some required classes and set some variables to store image data and a constant to store the Flickr API key:
<mx:Script>

<![CDATA[

import mx.core.UIComponent;

import mx.controls.Image;

import mx.rpc.events.ResultEvent;


private const FLICKR_KEY:String = 'Your Flickr API Key';


private var images:Array = [];

private var imageItems:Array = [];


private function onStartup() : void {

  flickrSearch.url = createFlickrURL();

  flickrSearch.send();

  for( var imgItem:int = 0; imgItem < ( hbPictures.width - 30 ) / 80; imgItem++ ) {

    var newImage:Image = new Image();

    newImage.data = null;

    newImage.width = 75;

    newImage.height = 75;

    imageItems.push( newImage );

    hbPictures.addChild( newImage );

  }

}
This onStartup method uses the createFlickrUrl method to set the URL for the Flickr search query:
private function createFlickrURL( ) : String {

  var query:String = 'http://api.flickr.com/services/rest/?api_key='+

      FLICKR_KEY;

  query += '&method=flickr.photos.search&extras=geo';

  query += '&text='+parameters.text;

  query += '&lat='+parameters.lat;

  query += '&lon='+parameters.lon;

  query += '&radius=30';

  query += '&per_page=100&page=1&sort=date-posted-desc';

  return query;

}
The createFlickrUrl function uses some parameters that are specified in the widget creation code. We’ll see how to specify those in a second.
To finish up with this code we look at the onFlickrResult method, which is called when Flickr sends back an XML response:
private function onFlickrResult( event:ResultEvent ) : void {

  for each( var photo:XML in event.result..photo ) {

    var smallPhotoUrl:String = 'http://static.flickr.com/'+photo.@server+

        '/'+photo.@id+'_'+photo.@secret+'_s.jpg';

    var bigPhotoUrl:String = 'http://static.flickr.com/'+photo.@server+

        '/'+photo.@id+'_'+photo.@secret+'.jpg';

    images.push( {

      source:smallPhotoUrl,

      bigSource:bigPhotoUrl,

      title:photo.@title,

        latitude:photo.@latitude,

        longitude:photo.@longitude

      } );

  }

  setPictures();

}
The onFlickrResult method looks for all of the photo tags and stores the picture location, the title, and the latitude and longitude in an object within the images array.
Once the onFlickResult method has chewed through all of the photos, the setPictures method compiles a random sampling of the Flickr images returned from the feed and puts them in a box, hbPictures:
private function setPictures() : void {

  for each( var ii:Image in imageItems ) {

    var imgIndex:int = int( Math.random() * images.length );

    ii.data = images[ imgIndex ];

    ii.source = images[ imgIndex ].source;

  }

}

]]>

</mx:Script>
So, where do the search term, the latitude, and the longitude come from? Well, they come from the source URL we specify to include the Flash file. Our HTML template uses JavaScript to embed the element, so we’ll need to tweak the JavaScript in the index.template.html file managed by Flex Builder 3, found in the html-template folder within your project folder. You can edit the index.html.template file by double-clicking the file or right clicking on the file in the Project panel and selecting Open.
You can see the updated code for the template below:
...

} else if (hasRequestedVersion) {

  AC_FL_RunContent(

    "src", "${swf}?text=dog&lat=37.57228&lon=-122.0747",

    "width", "${width}",

    "height", "${height}",

    "align", "middle",

    "id", "${application}",

    "quality", "high",

    "bgcolor", "${bgcolor}",

    "name", "${application}",

    "allowScriptAccess","sameDomain",

    "type", "application/x-shockwave-flash",

    "pluginspage", "http://www.adobe.com/go/getflashplayer"

  );

}

...
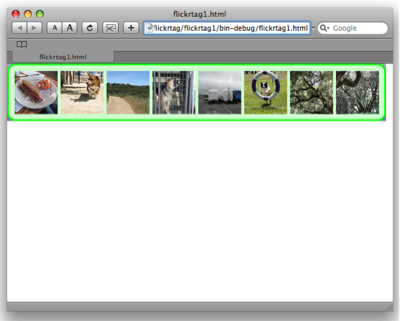
We’ve altered the value of the src parameter. In this case, I’m specifying that the text we should look for is dog, and that the latitude and longitude indicates the location of Fremont. When we launch this from Flex Builder 3, we should see a strip of images, as depicted below.
The biggest problem with this widget is the size of the download. Have a look for the FlickrTag.swf file that is sitting in the project output folder; this is a folder inside your project folder called bin-debug by default. Even with this limited functionality, the widget clocks in at around 400KB, which is more of a whoa-didget than a widget.
To trim it down to size, we’ll use a new feature of Flash 9 called a runtime shared library (RSL). This means that we’ll split our code, which is small, from the Flex Framework code, which is fairly fat. The first time our visitor visits, they will download both our code and the Flex Framework code; after that, they’ll just download our code and use the Framework version, which is cached in the player.
Thankfully, moving to RSLs is super easy. The first step is to go into the project’s Properties panel under the Project menu, and select Flex Build Path. You’ll see this dialog, shown below.

From here we select the Flex Build Path tab, and within that select the Library path tab. Once we’re there we expand the framework.swc file, which is the big Flex Framework library. Click on the Link Type item and then click on the Edit button.
That brings up the Library Path Item Options dialog, shown below.
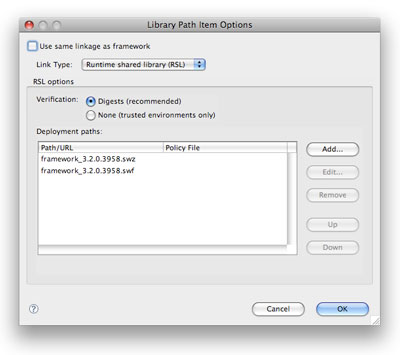
This is the dialog where we make the change from merging the framework.swc code into our Flash application, or linking it as an RSL. We want to uncheck the Use same linkage as framework checkbox, then select Runtime Shared Library, as shown above.
With that done we can launch the widget, and have another look at the size of the widget’s SWF file and see that it’s been significantly reduced. And it really should stay around that size as we add more functionality to it.
Flex, combined with the use of RSLs, is the way to build Flash widgets quickly.
Adding Mapping
The next step is to add a map into the widget so that it displays where the photo was taken when the user selects it. To do this I’m going to use the UMap component from Advanced Flash Components, which is free for non-commercial use. The advantage of the UMap component is that, unlike the Google and Yahoo map components, its license allows you to use the component on any domain.
Download and unzip the UMap component. Then, to add the component, copy the .swc files from the Flex Components folder in the downloaded archive into the libs folder in our FlickrTag project folder.
The complete code for the FlickrTag application with the map installed can be seen in flickrtag2.mxml.
First we increase the height of the widget by adjusting the mx:Application tag:
<mx:Application xmlns:mx="http://www.adobe.com/2006/mxml"

    layout="absolute" creationComplete="onStartup()" width="660"

    height="400" horizontalScrollPolicy="off"

    verticalScrollPolicy="off">
Inside the <mx:Script> tag we need to import some map classes and add a new variable:
import com.afcomponents.umap.overlays.Marker;

import com.afcomponents.umap.types.LatLng;

import com.afcomponents.umap.gui.*;

import com.afcomponents.umap.events.MapEvent;

import com.afcomponents.umap.core.UMap;


private var map:UMap = null;
We need to adjust the onStartup function to add a mouse click event listener to the images:
private function onStartup() : void {

  flickrSearch.url = createFlickrURL();

  flickrSearch.send();

  for( var imgItem:int = 0; imgItem < ( hbPictures.width - 30 ) / 80; imgItem++ ) {

    var newImage:Image = new Image();

    newImage.data = null;

    newImage.width = 75;

    newImage.height = 75;

    newImage.addEventListener(MouseEvent.CLICK,onImageClick);

    imageItems.push( newImage );

    hbPictures.addChild( newImage );

  }

}
We also need to add a bunch of new mapping functions:
private function createMap() : void {

  map = new UMap();


  var uic:UIComponent = new UIComponent();

  uic.setStyle( 'top', 0 );

  uic.setStyle( 'left', 0 );

  uic.width = mapArea.width;

  uic.height = mapArea.height;

  mapArea.addChild( uic );


  map.setSize( mapArea.width, mapArea.height );

  map.addEventListener(MapEvent.READY, onMapReady);

  uic.addChild( map );

}


private function onMapReady( event:MapEvent ) : void {

  map.setZoom( 12 );

  centerMap();

}


private function centerMap() : void {

  var lat:Number = Number( imgSelected.data.latitude );

  var lng:Number = Number( imgSelected.data.longitude );

  map.setCenter( new LatLng( lat, lng ) );

  var m:Marker = new Marker( { position:new LatLng( lat, lng ) } );

  map.addOverlay( m );

}


private function onImageClick( event:Event ) : void {

  var clkImg:Image = event.currentTarget as Image;

  imgSelected.data = clkImg.data;

  imgSelected.source = clkImg.data.bigSource;

  imgTitle.text = clkImg.data.title;

  if ( mapArea.getChildren().length == 0 ) {

    createMap();

  } else {

    centerMap();

  }

}
Finally, we add some new interface elements:
<mx:HBox id="hbDetail" top="110" cornerRadius="15" width="660"
height="290" borderColor="#00FF00" borderThickness="3"
borderStyle="solid" backgroundColor="#CCFFCC" paddingBottom="10"
paddingTop="10" paddingLeft="10" paddingRight="10"
horizontalGap="5" horizontalScrollPolicy="off"
verticalScrollPolicy="off">
<mx:Image id="imgSelected" width="270" height="270"
horizontalAlign="center" verticalAlign="middle" />
<mx:VBox width="100%" height="100%"
horizontalScrollPolicy="off" verticalScrollPolicy="off">
<mx:Label id="imgTitle" fontWeight="bold" fontSize="14" />
<mx:Canvas id="mapArea" height="230" width="360"
horizontalScrollPolicy="off" verticalScrollPolicy="off"
clipContent="true" />
</mx:VBox>
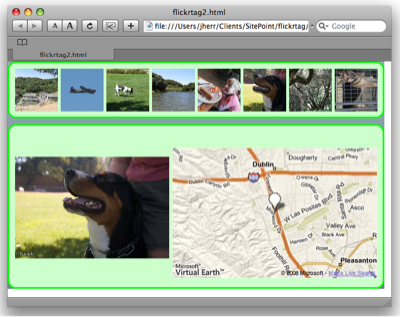
</mx:HBox>The user interface is now divided into two boxes. In the top box is the set of images, and in the bottom box is the map and an enlarged version of the selected image. The map, once initialized, is centered on the latitude and longitude coordinates of the selected image and a marker confirms the location. You can see the result below.
This looks really pretty, but it’s far too big to be included in a web page. Ideally, only the top portion of the widget would be visible. Then, when the user clicks on it the drop-down should appear over the text in the web page. That way the control can take up just a small amount of space until it’s used.
Building the Pop-up Version
Some small changes are required to implement the drop-down menu transition phase. We’ll do this by creating two states for the Flex application. The first is the bar state where just the horizontal list of images is shown. The second is the detail state where both the image list and the image detail windows are shown.
The two states are defined in <mx:State> tags, and the transition between the two states is defined in <mx:Transition> tags. An initial state is defined in the <mx:Application> tag. In this case I’m going to fade-in the detail window, but you can use any effect you like to bring the application to life.
You can see the completed code in flickrtag3.mxml.
Here’s the addition we’ll make to the mx:Application element:
<mx:Application xmlns:mx="http://www.adobe.com/2006/mxml"

    layout="absolute" creationComplete="onStartup()" width="660"

    height="400" backgroundAlpha="0" horizontalScrollPolicy="off"

    verticalScrollPolicy="off" currentState="bar">
And here’s how we change the onImageClick function within the <mx:Script> element:
private function onImageClick( event:Event ) : void {

  var clkImg:Image = event.currentTarget as Image;

  imgSelected.data = clkImg.data;

  imgSelected.source = clkImg.data.bigSource;

  imgTitle.text = clkImg.data.title;

  if ( mapArea.getChildren().length == 0 ) {

    createMap();

  } else {

    centerMap();

  }

  currentState = 'detail';

}
Our states and transitions are defined as follows:
<mx:states>

  <mx:State name="bar">

    <mx:SetProperty target="{hbDetail}" name="visible" value="false" />

  </mx:State>

  <mx:State name="detail">

    <mx:SetProperty target="{hbDetail}" name="visible" value="true" />

  </mx:State>

</mx:states>


<mx:transitions>

  <mx:Transition fromState="bar" toState="detail">

  <mx:Sequence>

    <mx:SetPropertyAction target="{hbDetail}" name="visible" />

    <mx:Fade target="{hbDetail}" alphaFrom="0" alphaTo="1"

        duration="200" />

  </mx:Sequence>

  </mx:Transition>

  <mx:Transition fromState="detail" toState="bar">

  <mx:Sequence>

    <mx:Fade target="{hbDetail}" alphaFrom="1" alphaTo="0"

        duration="200" />

    <mx:SetPropertyAction target="{hbDetail}" name="visible" />

  </mx:Sequence>

  </mx:Transition>

</mx:transitions>
To avoid a big gray rectangle we should adjust the index.template.html file to set the wmode parameter of the widget to transparent so that the widget background is transparent:
AC_FL_RunContent(

  "src", "${swf}?text=dog&lat=37.57228&lon=-122.0747",

  "width", "${width}",

  "height", "${height}",

  "align", "middle",

  "id", "${application}",

  "quality", "high",

  "bgcolor", "${bgcolor}",

  "wmode", "transparent",

  "name", "${application}",

  "allowScriptAccess","sameDomain",

  "type", "application/x-shockwave-flash",

  "pluginspage", "http://www.adobe.com/go/getflashplayer"

);
Other than the states and transitions, the code for the rest of the application remains exactly the same.
Now the tricky part starts: how can we place the control precisely on the HTML page in such a way as to let the rest of the content flow around the Flex application? The secret is to absolutely position a div element in the HTML with the width and height of the bar.
To demonstrate the technique we can make a few changes to the index.html.template file. Just after the opening <body> tag, add the following content:
<p>Add a paragraph of text here...</p>

<div id="widget"><div>
Then just before the closing <body> tag, add the following content:
</div></div>

<p>Add a paragraph of text here...</p>

<p>Add a paragraph of text here...</p>

<p>Add a paragraph of text here...</p>
That will surround our widget with content. Notice the widget is now inside a div element, which is nested within a parent div element with the ID of inner.
We then need to add some CSS:
#widget {

  height:100px;

  width:660px;

  position:relative;

}

#widget div {

  position:absolute;

  top:0;

  left:0;

}
We restrict the height of the outer div to 100px so it can contain the widget in bar mode, but not obscure the page content. Absolutely positioning the div that contains the widget will allow it to pop out over the page content when an image is clicked.
Launch this from Flex Builder 3 and you’ll see a similar screen to that shown below.

This shows the widget in its bar mode. From here, I can click on one of the images and the detail portion of the application fades in over the rest of the HTML page. You can see here:

The nice thing about this approach is that you can have a Flash application on your page that takes up minimal space until the user wants to click on it. From there you can expand the application to take up a bunch of space and really show its value.
Where to Go from Here
This article is really just a starting point. You can take what you learned here – about accessing web services, mapping, and creating an expanding Flash application – and use it in your own work. But beyond that, you should start to see the potential of using Flex as a way of building Flash widgets quicker, as well as offering better maintainability than you’d have using Flash alone.
 Jack Herrington
Jack Herrington is an engineer, author, and presenter who lives and works in the San Francisco Bay Area. He lives with his wife, daughter and two adopted dogs. When he's not writing software, books, or articles you can find him cycling, running, or in the pool training for triathlons. You can keep up with Jack's work and his writing at http://jackherrington.com.