Alfred is an OS X productivity tool that can turn user-specified commands into actions. These are known as workflows and they can be written in a variety of languages – including Ruby.
In a previous article, I showed how to make an Alfred workflow to generate a list of random numbers for the user to choose, storing the selected number in the clipboard. In this article, let’s look at some more practical use cases, such as:
- Showing what’s on a website using screen scraping
- Using a JSON API and a symbol keyword for quick currency conversion
- Generating OS X calendar events with natural language
If you are new to Alfred, be sure to read over the previous article to get up to speed.
Note: You will need to buy the Alfred Powerpack to use and create workflows.
Alfredo
Previously, we sent information to Alfred by converting a Ruby hash into XML (using the gyoku gem) and then printing it to stdout. In this tutorial we’ll use a gem that simplifies this a bit: Alfredo.
First, install the alfredo gem. As with any workflow gem, be sure to install it for whatever Ruby you are using inside the workflow bash script, usually /usr/bin/ruby:
$ gem install alfredo
Then use it by creating a workflow object, adding items to it, and printing the XML:
require 'alfredo'

workflow = Alfredo::Workflow.new
workflow << Alfredo::Item.new({
  title: "Example",
  arg: "example"
})
workflow.output!
One of the nice things about alfredo is that it will fill in missing workflow item attributes like uid (used to keep track of your behavior for prediction) and autocomplete with intelligent defaults. If you don’t want these attributes, be sure to specify them in the Alfredo::Item constructor.
Screen Scraping
“Screen Scraping” may be a bit of a misnomer. We’re not taking a screenshot and then giving the pixel values to a machine-learning algorithm to get the characters. Although, that probably has plenty of applications.
Fortunately, with websites the process usually works like this:
- Send GET request to HTML endpoint (URL)
- Parse the HTML response string into a traversable hash
- Use the hash
If there’s a lot of JavaScript, then step 1 may require a headless browser with a JS engine.
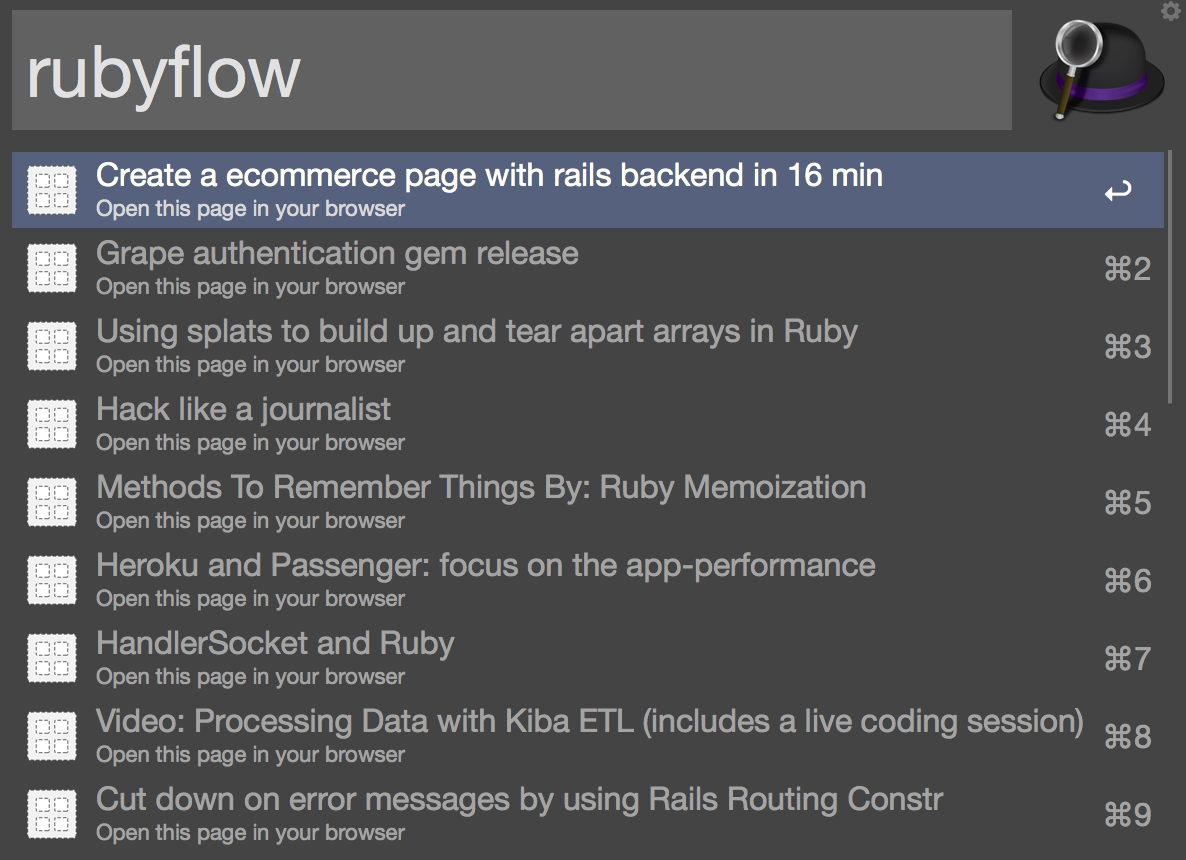
Let’s make an Alfred workflow that will display the titles on the front page of rubyflow and then open the page that is selected. All we need is a blank workflow with an Inputs->Script Filter node connected to an Actions->Open URL node.
Inside the script filter, set bash as the script type, add a Ruby script to the workflow folder, and then run it with /usr/bin/ruby:
require 'net/http'
require 'nokogiri'
require 'alfredo'

url = "http://www.rubyflow.com"
uri = URI.parse(url)

body = Net::HTTP.get(uri)
html = Nokogiri::HTML(body)

workflow = Alfredo::Workflow.new

html.css(".body h1 a").each do |el|
  if el.text != ""
    workflow << Alfredo::Item.new({
      title: el.text,
      subtitle: "Open this page in your browser",
      arg: url + el["href"]
    })
  end
end

workflow.output!
How easy was that?
Currency Conversion with a JSON API
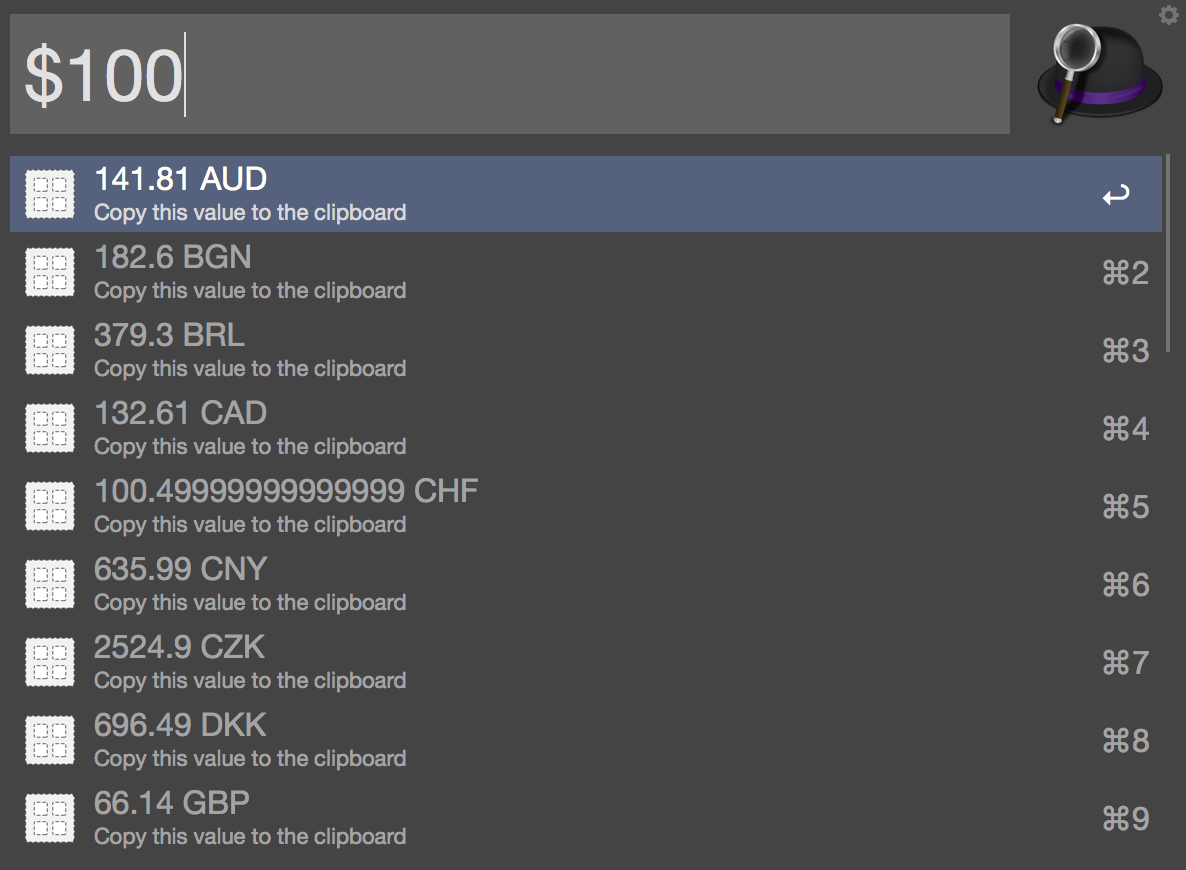
Workflow keywords don’t need to be words, necessarily. If you want a quick currency converter, create a script filter workflow with your currency symbol as the keyword and then the amount as the argument. Be sure to uncheck “with space” in the script filter node so that you can use amounts like “$100” instead of “$ 100”.
We can use the free currency conversion API provided by Fixer.io.
require "json"
require "net/http"
require "alfredo"

amount = ARGV[0] || 1.0
base = "USD"

amount = amount.to_f
amount = 1.0 if amount == 0.0
url = "http://api.fixer.io/latest?base=#{base}"
uri = URI.parse(url)
body = Net::HTTP.get(uri)
json = JSON.parse(body, symbolize_names: true)

workflow = Alfredo::Workflow.new

json[:rates].each do |rate|
  # rate is in the format [:CUR, float]
  total = rate[1].round(4) * amount
  workflow << Alfredo::Item.new({
    title: total.to_s + " " + rate[0].to_s,
    subtitle: "Copy this value to the clipboard",
    arg: total
  })
end

workflow.output!
Since we’re using the keyword argument here, we access it via ARGV[0] by passing it to the script like
$ /usr/bin/ruby your_script.rb {query}
For the selected value to be copied to the clipboard, be sure to add an Outputs->Copy to Clipboard node with {query} as the text, and connect it to the output of the script filter.
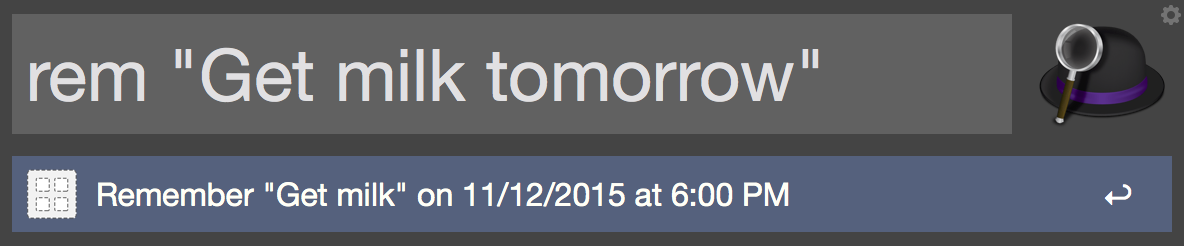
A Reminder Workflow
Let’s create a workflow that lets us set OS X calendar notifications based on natural language. For example, we could say rem "pay the light bill on tuesday". Here’s how it’s going to work:
- Get the reminder and the time from the keyword argument
- Give these to AppleScript in a single string (Alfred seems to only support one argument at this time)
- Split the string and create an event in
Calendar.
We’ll use the nickel gem (https://github.com/iainbeeston/nickel) for time parsing since it can parse messages and times together:
$ gem install nickel
Open up irb to see what kinds of times nickel will parse.
> require 'nickel'
> event = Nickel.parse "pay the light bill on tuesday"
=> message: "pay the light bill", occurrences: [#<Occurrence type: single, start_date: 20151103>]
> event.occurrences.first.start_date.day
=> 3
Note that nickel currently isn’t great at inferring things. You will need to specify AM/PM if you use that format – it works fine with 24 hour times:
> Nickel.parse "Go to the gym at 5:00 pm"
=> message: "Go to the gym", occurrences: []
> Nickel.parse "Go to the gym today at 5:00 pm"
=> message: "Go to the gym", occurrences: [#<Occurrence type: single, start_date: 20151101, start_time: 170000>]
OK, now let’s write the workflow:
require 'nickel'
require 'alfredo'

query = ARGV[0]
parsed = Nickel.parse(query)
workflow = Alfredo::Workflow.new

if parsed != nil && parsed.occurrences.size > 0
  event = parsed.occurrences.first
  reminder = parsed.message
  date = event.start_date || DateTime.new
  time = event.start_time || DateTime.new

  date_string = date.to_date.strftime "%m/%d/%Y"
  time_string = time.to_time.strftime "%I:%M %p"
  time_string[0] = '' if time_string[0] == '0'

  workflow << Alfredo::Item.new({
    title: "Remember \"#{reminder}\" on #{date_string} at #{time_string}",
    arg: "#{reminder};#{date_string} #{time_string}"
  })
end

workflow.output!
AppleScript
Next, we need some AppleScript that will create the Calendar event based on the time processed by nickel. AppleScript gives us the power to automate scriptable OS X application by sending them Apple Events.
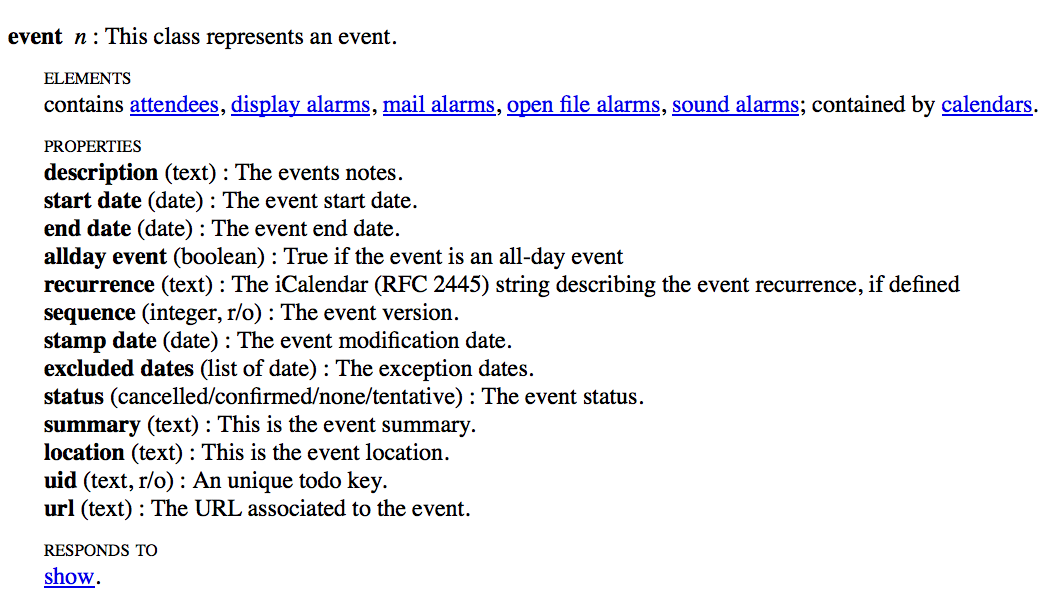
To know what scriptable behavior an application supports, we will need to examine its AppleScript dictionary. This can be displayed by opening the AppleScript Editor (found in the Utilities Folder and called Script Editor) and then going to File->Open Dictionary and selecting the desired application.
Looking at the dictionary for Calendar, we can see what kind of properties are needed to create a new event:
In the workflow node view, add an Actions->Run NSAppleScript node and connect it to the script filter node. Then add the following code:
-- Found at http://erikslab.com/2007/08/31/applescript-how-to-split-a-string/
on split(theString, theDelimiter)
  -- save delimiters to restore old settings
  set oldDelimiters to AppleScript's text item delimiters
  -- set delimiters to delimiter to be used
  set AppleScript's text item delimiters to theDelimiter
  -- create the array
  set theArray to every text item of theString
  -- restore the old setting
  set AppleScript's text item delimiters to oldDelimiters
  -- return the result
  return theArray
end split

on alfred_script(query)
  tell application "Calendar"
    tell calendar "Home"
      set inputString to query
      set inputArray to my split(inputString, ";")
      set reminder to item 1 of inputArray
      set dateString to item 2 of inputArray
      set newDate to my date (dateString)
      make new event at end with properties {description:reminder, summary:reminder, location:"Event Location", start date:newDate, end date:newDate}
    end tell
  end tell
end alfred_script
Note that we’re getting the argument passed from the script filter node with the on alfred_script argument instead of {query} as in the notification node.
Also, an AppleScript keyword that might not be obvious is my. This tells AppleScript that the context is the top-level script rather than the target of the tell block. We need this because AppleScript will not keep looking if something is not defined specifically in the current context.
Now, out the workflow and it will tell us the date and time that will be added once we’ve closed off the argument in quotes.
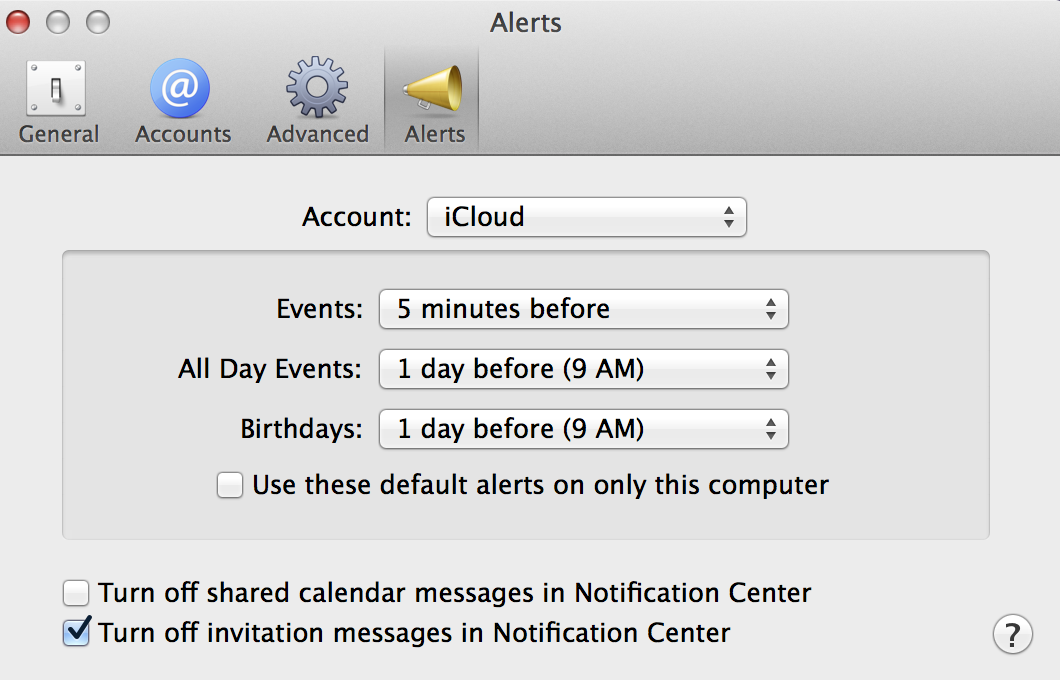
In order to receive notifications for calendar events, we need to turn them on in the preferences (CMD-,) for the Calendar application. You can set whether you want the alert to occur at the start of the event or some time before.
Nickel can parse whether events occur in an interval like a daily or monthly basis as well as a period between two times. So there’s a lot that can be added to the reminder workflow.
Conclusion
Tools like Alfred have only been around for a few years, so we’re probably just scratching the surface with what’s possible. It may especially be a boon for disabled users who need to associate spoken commands with complex behavior.
Oh, and if you want the workflow pictured at the top of the article, it can be found on GitHub.
Got any great ideas for workflows? Let us know in the comments.
Frequently Asked Questions (FAQs) about Alfred Workflows in Ruby
What are Alfred workflows and how do they work?
Alfred workflows are a powerful feature of the Alfred app that allows you to automate tasks on your Mac. They are essentially a series of actions that are triggered by a keyword or hotkey. These actions can include launching apps, running scripts, or even controlling your Mac’s system functions. The workflows are created using a visual interface, and you can use a variety of programming languages, including Ruby, to create them.
How can I create my own Alfred workflow in Ruby?
Creating your own Alfred workflow in Ruby involves a few steps. First, you need to open the Alfred preferences and click on the ‘Workflows’ tab. Then, click on the ‘+’ button to create a new workflow. You can then add a trigger, such as a keyword or hotkey, and an action, which is the script you want to run. You can write this script in Ruby, and it will be executed when the workflow is triggered.
Can I share my Alfred workflows with others?
Yes, you can share your Alfred workflows with others. To do this, you simply need to right-click on the workflow in the Alfred preferences and select ‘Export…’. This will create a .alfredworkflow file that others can import into their own Alfred app.
What are some examples of practical Alfred workflows in Ruby?
There are many practical Alfred workflows that you can create in Ruby. For example, you could create a workflow that launches a specific set of apps with a single keyword. Or, you could create a workflow that searches for a specific file type on your Mac. The possibilities are endless, and the best part is that you can customize these workflows to suit your own needs.
How can I troubleshoot my Alfred workflows in Ruby?
If you’re having trouble with your Alfred workflows in Ruby, there are a few things you can do. First, make sure that your script is correct and that there are no syntax errors. You can also use the ‘Debug’ feature in the Alfred preferences to see what’s happening when your workflow is triggered. This can help you identify any issues and fix them.
Can I use Alfred workflows to control system functions on my Mac?
Yes, you can use Alfred workflows to control system functions on your Mac. For example, you could create a workflow that adjusts the volume, brightness, or other system settings. You can also create workflows that interact with specific apps, such as opening a new tab in your browser or creating a new document in your word processor.
What are some fun Alfred workflows in Ruby?
There are many fun Alfred workflows that you can create in Ruby. For example, you could create a workflow that tells you a joke or a fun fact when you type a certain keyword. Or, you could create a workflow that plays a specific song or playlist when you type a certain keyword. The possibilities are endless, and the best part is that you can customize these workflows to suit your own interests.
Can I use Alfred workflows to automate tasks on my Mac?
Yes, you can use Alfred workflows to automate tasks on your Mac. This is one of the main benefits of using Alfred workflows. By creating a workflow, you can automate a series of actions that you would normally have to perform manually. This can save you time and make your Mac more efficient.
How can I learn more about creating Alfred workflows in Ruby?
There are many resources available online that can help you learn more about creating Alfred workflows in Ruby. For example, the Alfred app’s official website has a comprehensive guide on creating workflows. There are also many tutorials and examples available on websites like GitHub and YouTube.
Can I use other programming languages to create Alfred workflows?
Yes, you can use other programming languages to create Alfred workflows. While this article focuses on using Ruby, you can also use languages like Python, PHP, and JavaScript. The process for creating a workflow is the same, regardless of the language you use. You simply need to write a script in your chosen language and add it as an action in your workflow.
 Robert Qualls
Robert is a voracious reader, Ruby aficionado, and other big words. He is currently looking for interesting projects to work on and can be found at his website.