CRMs are a tricky business. What some devs consider to be “just log everything about the user” apps, others know to be incredibly advanced and convoluted business apps that not only monitor your interactions with the user, but improve both your communication with them and their experience with you – without either of you knowing that explicitly.
What’s a CRM?
Customer Relationship Management apps are often underrated and underused, and far too frequently “included” in the base of a company’s app. If you’ve ever worked in an office cubicle for a large company doing menial work day in day out, chances are you’ve had the company’s (ancient Java) app running in front of you on Windows XP, and if something important about a customer you were just talking to came up, it would be marked in a silly comment box next to their name in an obscure corner of the screen, if that.
CRM is much more than what you’re usually lead to believe – it’s not just semi-relevant and subjective information about a person you once did business with – it’s a collection and collation of all the knowledge about your interactions, and a presentation of all the parameters that statistically help you gain the favor of your correspondent.
OroCRM
Though the CRM field of the PHP world isn’t madly ripe, the recent flurry of developments from Oro had my interest piqued enough to make me take a look. OroCRM is a multi-language CRM built on PHP 5.4+ with the Symfony framework. It’s a behemoth in its own right, and is tuned nicely for cooperation with the Oro Platform, a business application skeleton you can use to build your own custuom business apps that take advantage of the data OroCRM provides. That’s a bit much for this piece, though, so we’ll just take a look at OroCRM this time. Note, however, that an OroCRM installation brings with itself an underlying instance of the Oro Platform, which it is based upon.
OroCRM was also announced on the Symfony2 blog, so give it a read if you’re interested in its youth – it was only four months ago.
Among other features, OroCRM boasts with their marketplace for third party plugins and extensions, their customer segmentation, and import of data from various established tools like Magento. Let’s see how it stacks up in a locally deployed demo app.
Installing
Installing OroCRM is relatively simple. The steps are covered well in their Github README, or you can follow our detailed guide on getting it up and running with Vagrant, so hop through those if you’d like to follow along with your own installation.
Demo
As soon as we install the app (the Demo app can also be tried out at demo.orocrm.com), we’re greeted by a modern looking dashboard with random information regarding sales.

As someone who’s built internal CRMs, I’ll focus on the technical side more than the actual business side when looking at this application, but a thorough business review and a comparison with the competition on some other channel of ours is not out of the question. For an actual user guide, see here.
The first thing I noticed is how smoothly responsive the theme is. Even on this chart-rich screen, resizing the browser window did little to cause horizontal scrollbars and immediately placed the dash elements one under the other, instead of distributing them into two columns as is the default in full screen mode (image above is single column, image below is double).

If you try clicking on “Sent” in the “Recent emails” frame, you can see an email there. The email can be previewed and clicking the recipient’s name will lead you to their exhaustive user screen:
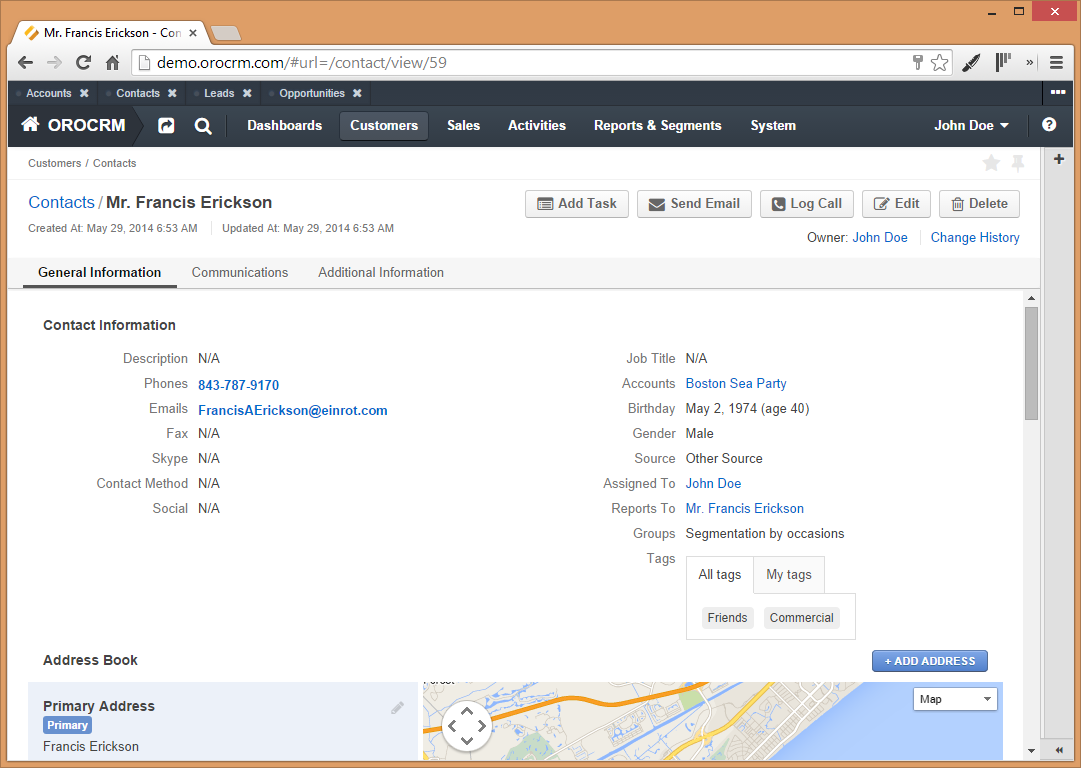
As someone who has had to tie an in-house CRM to regular IMAP inboxes with custom header support for a volume of ten million emails per month, I can appreciate this feature – I’m fully aware of how difficult it is to build it well without confusing your users (your company’s employees, primarily).
Note also that it’s all built with ajax – no page reloads are happening here, and this makes the entire experience that much smoother.
You can easily create dashboard, user groups and roles, and so much more – just explore the options above. But what if we want to extend this app? What if we need to tweak it a bit?
Extending
OroCRM, being a Symfony app, is also extended with bundles – tweaking existing ones or building new ones, everything goes.
It’s important to note that due to this heavy tie-in with Symfony, one should be more than familiar with Symfony and the way it works. This might be discouraging to some newcomers, seeing as Symfony is a very complex framework.
Creating a New Bundle
Bundles are created just like in regular Symfony apps. If you’d like to follow along, you can do this with the Symfony console:
php app/console generate:bundleThe console will ask for input on a variety of information. I gave it the namespace of SitePoint/Bundle/TestBundle. I used the default suggestions for all other inputs, and only said no to the last two items: automatically updating the kernel, and automatically updating the routing. Oro has a special way of enabling bundles, and it’s important to answer “no” to these questions.
To enable it, we create the file src/SitePoint/Bundle/TestBundle/Resources/config/oro/bundles.yml with the following content:
bundles:
    - SitePoint\Bundle\TestBundle\SitePointTestBundle
To look at your Oro installation in dev mode, access it via the app_dev.php url, like so:
http://test.app:8000/app_dev.phpTo be able to do this, you need to remove the blocking check from app_dev.php, removing this entire block, or tweaking it so it’s more permissive:
// This check prevents access to debug front controllers that are deployed by accident to production servers.
// Feel free to remove this, extend it, or make something more sophisticated.
if (isset($_SERVER['HTTP_CLIENT_IP'])
    || isset($_SERVER['HTTP_X_FORWARDED_FOR'])
    || !in_array(@$_SERVER['REMOTE_ADDR'], array('127.0.0.1', 'fe80::1', '::1'))
) {
    header('HTTP/1.0 403 Forbidden');
    exit('You are not allowed to access this file. Check '.basename(__FILE__).' for more information.');
}
After that, we clear the cache (php app/console cache:clear). This will take a while, but after it’s done, your bundle will be “installed”. You can see it’s there through the dev console, though it won’t be in actual use anywhere.
Adding a New Screen and Menu Option
Based on our newly created bundle, let’s give Oro a new menu option and a default view for said option.
The bundle created via the means specified above will add some default files – including a default view and a default controller. We’ll change those a little bit and explain why we’re doing what we’re doing.
Step 1
Change the default controller. Give the file src\SitePoint\Bundle\TestBundle\Controller\DefaultController.php this content, instead of what it currently contains:
<?php

namespace SitePoint\Bundle\TestBundle\Controller;

use Symfony\Bundle\FrameworkBundle\Controller\Controller;
use Sensio\Bundle\FrameworkExtraBundle\Configuration\Route;
use Sensio\Bundle\FrameworkExtraBundle\Configuration\Template;

class DefaultController extends Controller
{
    /**
     * @Route("/hello", name="sitepoint_link")
     * @Template()
     */
    public function indexAction()
    {
        return array('name' => "hello link");
    }
}
We need to add the “Route” and “Template” use statements because Symfony relies heavily on reading the annotation text to resolve dependencies. Notice how I’m telling it about a new @Route in the annotation? That’s the “Route” I’m “use”ing above. Same with Template. If you’re using an IDE like PhpStorm, don’t let the “alias never used” warnings throw you off – PhpStorm doesn’t know the annotations are the ones using them.
In the action, we just give a variable a random value and pass it to the template. With this, we’re done with a basic controller.
Step 2
Create the file src\SitePoint\Bundle\TestBundle\Resources\config\navigation.yml and give it the following content:
oro_menu_config:
    items:
        sitepoint_tab:
            label: SitePoint Test
            uri:   '#'
            extras:
                position: 300
        sitepoint_tab_link:
            label: SitePoint Link 1
            route: sitepoint_link
            extras:
                routes: ['/^sitepoint_link/']
                description: This is a SitePoint link
    tree:
        application_menu:
            children:
                sitepoint_tab:
                    children:
                        sitepoint_tab_link: ~

oro_titles:
    sitepoint_link: My link page title
This builds a new menu item. First it defines a new tab named “SitePoint Test” – this will be the main menu entry among the possible menu options already there. Then, it gives it a child link, as defined in the “tree” section near the bottom. The link (defined above) has a name “SitePoint Link 1”, and uses the route “sitepoint_link” (yet to be defined, but also used in the controller’s @Route declaration).
Step 3
Delete the default routing.yml file (src\SitePoint\Bundle\TestBundle\Resources\config\routing.yml) and create a new one at src\SitePoint\Bundle\TestBundle\Resources\config\oro\routing.yml with the following content:
sitepoint_link:
    resource:     "@SitePointTestBundle/Controller"
    type:         annotation
    prefix:       /user
This made sure Oro loads the new route configuration, reads its functionality from the annotation of the default controller, and adds a “user” prefix in front of it.
Step 4
Change the default template src\SitePoint\Bundle\TestBundle\Resources\views\Default\index.html.twig into the following:
{% extends "OroUIBundle:Default:index.html.twig" %}
{% block content %}
    {{ name }}!
{% endblock content %}
This is important due to the ajax nature of Oro. The application expects a certain format to be returned, and unless it gets back a specific type (extended from the default OroUI template), it wil become confused and break.
Step 5
Reload navigation generation, and clear the cache:
php app/console oro:navigation:init
php app/console cache:clear
You should now be able to visit the new menu option in the browser and see “Hello link”:
Other customizations are possible as well, but are outside the scope of this post and will likely be covered in followup articles if there’s enough interest for them.
Conclusion
As you can see, OroCRM is a fully-featured, highly robust, and extremely extensible CRM for the modern era. It uses a powerful framework, and sports a modern design.
However, it’s also extremely overbloated. It pulls in Zend and Symfony both? Why? Those frameworks alone weigh over a hundred megs each with dependencies. I feel like they’re far too desperately trying to cover both all the options they can think of and not reinvent the wheel, which is something that, in my experience, isn’t a healthy combination.
Will you be giving it a go? Are you using it in production? Let us know – and if you’ve built some elaborate open source Oro extensions, we’d love to publish your workflow! Get in touch!
 Bruno Skvorc
Bruno is a blockchain developer and technical educator at the Web3 Foundation, the foundation that's building the next generation of the free people's internet. He runs two newsletters you should subscribe to if you're interested in Web3.0: Dot Leap covers ecosystem and tech development of Web3, and NFT Review covers the evolution of the non-fungible token (digital collectibles) ecosystem inside this emerging new web. His current passion project is RMRK.app, the most advanced NFT system in the world, which allows NFTs to own other NFTs, NFTs to react to emotion, NFTs to be governed democratically, and NFTs to be multiple things at once.